Practical_Antenna_Handbook_0071639586
C h a p t e r 2 7 : T e s t i n g a n d T r o u b l e s h o o t i n g 607 mise value covering both impedances). The small-Âvalue trimmer capacitor (C 2 ) must be adjusted for a reactance ratio with C 1 of 1 ⁄50, 1 ⁄75, or 1 ⁄68, depending upon how the bridge is set up. The sensitivity control can be used to calibrate the meter. In one version of the micromatch, there are three power ranges (10, 100, and 1000 W). Each range has its own sensitivity control, and these are switched in and out of the circuit as needed. The monomatch bridge circuit in Fig. 27.14 is the instrument of choice for HF and low-Â VHF applications. In the monomatch design, first seen by the author in Collins accessories, the transmission line is segment B, while RF sampling elements are formed by segments A and C. Although the original designs were based on a coaxial-Âcable sensor, later versions used printed circuit foil transmission line segments or parallel brass rods for A, B, and C. The sensor unit is basically a directional coupler with a detector element for both forward and reverse directions. For best accuracy, diodes CR 1 and CR 2 should be matched, as should R 1 and R 2 . The resistance of R 1 and R 2 should match the transmission line surge impedance, although in many instruments a 68-ÂW compromise resistance is used. The particular circuit shown in Fig. 27.14 uses a single dc meter movement to monitor the output power. Many recent implementations employ two separate meters (for simultaneous viewing of forward and reverse power, as in the Kenwood wattmeters) or a single meter with crossed-Âneedle pointers (as in certain Daiwa units). R 1 100 k CR 2 IN60 C 2 0.01 F J 1 XMTR B C J 2 ant R 4 15 k A CR 1 IN60 R 2 100 R 3 15 k FWD REV S 1 M 1 C 1 0.01 F R 5 10 k 0-500 A C 3 0.05 F Figure 27.14 Monomatch wattmeter.
608 P a r t V I I : T u n i n g , T r o u b l e s h o o t i n g , a n d D e s i g n A i d One of the latest designs in VSWR meter sensors is the current transformer assembly shown in Fig. 27.15. In this instrument, a single-Âturn ferrite toroid transformer is used as the directional sensor. The transmission line passing through the hole in the toroid forms the primary winding of a broadband RF transformer. The secondary, which consists of 10 to 40 turns of small enamel wire, is connected to a measurement bridge circuit (C 1 + C 2 + load) with a rectified dc output. Figures 27.16 and 27.17 show instruments that can be left in the transmission line for all amateur power levels. The upper unit in Fig. 27.16, from Diamond Antennas, houses the transformer with the metering and control functions. The Kenwood wattmeter below it allows the user to Âfront-Âpanel select any of up to three separate companion transformer units, each capable of being located as much as 18 in from the meter enclosure. The Bird Model 43 Thruline RF wattmeter shown in Fig. 27.17 has for years been one of the industry standards in communications service work. Although it is slightly more expensive than other instruments, it is versatile and has a reputation for being accurate and rugged. The Thruline meter can be inserted into the transmission line of an antenna system with so little loss that it may be left permanently in the line during normal operations. The Model 43 Thruline is popular with land mobile and marine radio technicians. T 1 J 1 XMTR C 1 10 pF Conductor D 1 IN60 D 2 IN60 C 2 10 pF J 2 ant C 3 330 pF R 1 68 k R 2 68 k C 4 330 pF L 1 C 5 0.001 F 1 mH 10 k cal S 1 REV FWD 10 k cal L2 1 mH C 6 0.001 F S 2 VSWR PWR C 7 0.01 F M 1 0–100 A Figure 27.15 Current transformer wattmeter.
- Page 578 and 579: C h a p t e r 2 5 : A n t e n n a M
- Page 580 and 581: CHAPTER 26 The Smith Chart The math
- Page 582 and 583: Figure 26.2 Normalized impedance li
- Page 584 and 585: A Figure 26.3 Constant resistance c
- Page 586 and 587: A Figure 26.4A Constant inductive r
- Page 588 and 589: C h a p t e r 2 6 : T h e S m i t h
- Page 590 and 591: C h a p t e r 2 6 : T h e S m i t h
- Page 592 and 593: D C B A Figure 26.5 Radially scaled
- Page 594 and 595: C h a p t e r 2 6 : T h e S m i t h
- Page 596 and 597: C h a p t e r 2 6 : T h e S m i t h
- Page 598 and 599: C h a p t e r 2 6 : T h e S m i t h
- Page 600 and 601: C h a p t e r 2 6 : T h e S m i t h
- Page 602 and 603: 0.165 Y ' 1.0 j1.1 G' 1.0 Y ' 0.2
- Page 604 and 605: C h a p t e r 2 6 : T h e S m i t h
- Page 606 and 607: C h a p t e r 2 6 : T h e S m i t h
- Page 608 and 609: CHAPTER 27 Testing and Troubleshoot
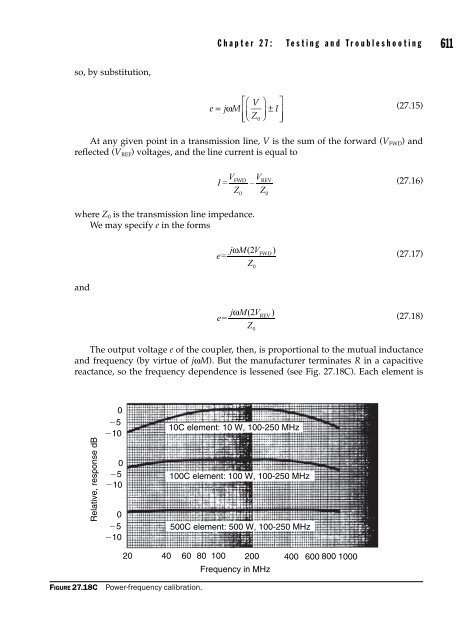
- Page 610 and 611: C h a p t e r 2 7 : T e s t i n g a
- Page 612 and 613: C h a p t e r 2 7 : T e s t i n g a
- Page 614 and 615: C h a p t e r 2 7 : T e s t i n g a
- Page 616 and 617: C h a p t e r 2 7 : T e s t i n g a
- Page 618 and 619: C h a p t e r 2 7 : T e s t i n g a
- Page 620 and 621: C h a p t e r 2 7 : T e s t i n g a
- Page 622 and 623: C h a p t e r 2 7 : T e s t i n g a
- Page 624 and 625: C h a p t e r 2 7 : T e s t i n g a
- Page 626 and 627: C h a p t e r 2 7 : T e s t i n g a
- Page 630 and 631: C h a p t e r 2 7 : T e s t i n g a
- Page 632 and 633: C h a p t e r 2 7 : T e s t i n g a
- Page 634 and 635: C h a p t e r 2 7 : T e s t i n g a
- Page 636 and 637: C h a p t e r 2 7 : T e s t i n g a
- Page 638 and 639: C h a p t e r 2 7 : T e s t i n g a
- Page 640 and 641: C h a p t e r 2 7 : T e s t i n g a
- Page 642 and 643: C h a p t e r 2 7 : T e s t i n g a
- Page 644 and 645: Mechanical Construction and Install
- Page 646 and 647: CHAPTER 28 Supports for Wires and V
- Page 648 and 649: C h a p t e r 2 8 : S u p p o r t s
- Page 650 and 651: C h a p t e r 2 8 : S u p p o r t s
- Page 652 and 653: C h a p t e r 2 8 : S u p p o r t s
- Page 654 and 655: C h a p t e r 2 8 : S u p p o r t s
- Page 656 and 657: C h a p t e r 2 8 : S u p p o r t s
- Page 658 and 659: C h a p t e r 2 8 : S u p p o r t s
- Page 660 and 661: C h a p t e r 2 8 : S u p p o r t s
- Page 662 and 663: C h a p t e r 2 8 : S u p p o r t s
- Page 664 and 665: C h a p t e r 2 8 : S u p p o r t s
- Page 666 and 667: C h a p t e r 2 8 : S u p p o r t s
- Page 668 and 669: C h a p t e r 2 8 : S u p p o r t s
- Page 670 and 671: C h a p t e r 2 8 : S u p p o r t s
- Page 672 and 673: C h a p t e r 2 8 : S u p p o r t s
- Page 674 and 675: CHAPTER 29 Towers At some point, th
- Page 676 and 677: C h a p t e r 2 9 : T o w e r s 655
C h a p t e r 2 7 : T e s t i n g a n d T r o u b l e s h o o t i n g 607<br />
mise value covering both impedances). The small-Âvalue trimmer capacitor (C 2 ) must be<br />
adjusted for a reactance ratio with C 1 of 1 ⁄50, 1 ⁄75, or 1 ⁄68, depending upon how the bridge<br />
is set up.<br />
The sensitivity control can be used to calibrate the meter. In one version of the micromatch,<br />
there are three power ranges (10, 100, and 1000 W). Each range has its own<br />
sensitivity control, and these are switched in and out of the circuit as needed.<br />
The monomatch bridge circuit in Fig. 27.14 is the instrument of choice for HF and low-Â<br />
VHF applications. In the monomatch design, first seen by the author in Collins accessories,<br />
the transmission line is segment B, while RF sampling elements are formed by<br />
segments A and C. Although the original designs were based on a coaxial-Âcable sensor,<br />
later versions used printed circuit foil transmission line segments or parallel brass rods<br />
for A, B, and C.<br />
The sensor unit is basically a directional coupler with a detector element for both<br />
forward and reverse directions. For best accuracy, diodes CR 1 and CR 2 should be matched,<br />
as should R 1 and R 2 . The resistance of R 1 and R 2 should match the transmission line surge<br />
impedance, although in many instruments a 68-ÂW compromise resistance is used.<br />
The particular circuit shown in Fig. 27.14 uses a single dc meter movement to monitor<br />
the output power. Many recent implementations employ two separate meters (for<br />
simultaneous viewing of forward and reverse power, as in the Kenwood wattmeters) or<br />
a single meter with crossed-Âneedle pointers (as in certain Daiwa units).<br />
R 1<br />
100 k<br />
CR 2<br />
IN60<br />
C 2<br />
0.01 F<br />
J 1<br />
XMTR<br />
B<br />
C<br />
J 2<br />
ant<br />
R 4<br />
15 k<br />
A<br />
CR 1<br />
IN60<br />
R 2<br />
100 <br />
R 3<br />
15 k<br />
FWD REV<br />
S 1<br />
M 1<br />
C 1<br />
0.01 F<br />
R 5<br />
10 k<br />
0-500 A<br />
C 3<br />
0.05 F<br />
Figure 27.14 Monomatch wattmeter.


