Instruction booklet - Hotpoint
Instruction booklet - Hotpoint
Instruction booklet - Hotpoint

Create successful ePaper yourself
Turn your PDF publications into a flip-book with our unique Google optimized e-Paper software.
<strong>Instruction</strong> <strong>booklet</strong><br />
TUMBLE DRYER<br />
GB<br />
English, 1<br />
TCL G31<br />
TCL G31X<br />
P<br />
Português, 15<br />
GR<br />
EÏÏËÓÈο, 29<br />
Contents<br />
Important Information, 2-3<br />
Installation, 4<br />
Where to put your dryer<br />
Ventilation<br />
Door reversal instructions<br />
Water drain<br />
Electrical connection<br />
Before you start using your dryer<br />
Dryer description, 5<br />
To open the door<br />
The features<br />
Control panel<br />
Start and programmes, 6-8<br />
Choosing a programme<br />
Table of programmes<br />
The controls<br />
Laundry, 9-10<br />
Sorting your laundry<br />
Wash care labels<br />
Special clothing items<br />
Drying times<br />
Warnings and Suggestions, 11<br />
General safety<br />
Disposal<br />
Saving energy and respecting the environment<br />
Maintenance and Care, 12<br />
Switching off the electricity<br />
Cleaning the filter after each cycle<br />
Empty the water container after each cycle<br />
Check the drum after each cycle<br />
Cleaning the condenser unit<br />
Cleaning the dryer<br />
Troubleshooting, 13<br />
Service, 14<br />
Spare parts<br />
! Keep this instruction <strong>booklet</strong> on hand in order to refer to it when necessary. Take it with you when you move, and<br />
should you sell this appliance or pass it on to another party, make sure that this <strong>booklet</strong> is supplied along with the<br />
dryer so that the new owner may be informed about warnings and suggestions on how the appliance works.<br />
! Read these instructions carefully; the following pages contain important information on installation and suggestions<br />
on how the appliance works.<br />
GB<br />
1
Important Information<br />
GB<br />
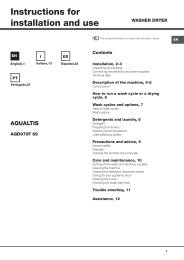
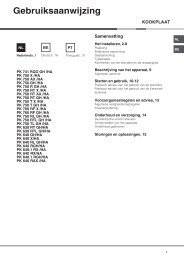
For your Condenser dryer to operate efficiently, you must follow the regular maintenance schedule shown below:<br />
Fluff Filter...<br />
! You MUST clean the fluff filter after EVERY drying<br />
cycle.<br />
STEP 1.<br />
Open the door of your<br />
dryer.<br />
STEP 2.<br />
Pull out the filter (using<br />
the two finger grips).<br />
STEP 3.<br />
Clean any fluff deposits<br />
from the filter mesh.<br />
STEP 4.<br />
Refit the filter - NEVER<br />
run the dryer without the<br />
filter in position.<br />
! Failure to clean the filter after EVERY drying cycle will affect the drying performance of your machine.<br />
- It will take longer to dry and as a result will use more electricity during drying.<br />
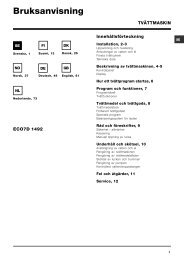
Water Container...<br />
! You MUST empty the water container after EVERY<br />
drying cycle.<br />
STEP 1.<br />
Pull the water container<br />
towards you and remove<br />
it fully from the dryer.<br />
STEP 2.<br />
Empty all the water<br />
collected in the water<br />
container.<br />
STEP 3.<br />
Refit the water container,<br />
ensuring that it is pushed<br />
fully back into position.<br />
! The ‘Empty Water’ light<br />
stays on - To remind you to<br />
empty the water container<br />
at the start and at the<br />
end of each programme.<br />
! Failure to empty the water container will result in:<br />
- The machine will stop heating (so the load may still be wet at the end of the drying cycle).<br />
- The ‘Empty Water’ light will flash to tell you that the water container is full.<br />
Priming the Water Collection System<br />
When your dryer is new, the water container will not collect water until the system is primed... this will take 1 or 2 drying<br />
cycles. Once primed it will collect water during every drying cycle.<br />
2
Important Information<br />
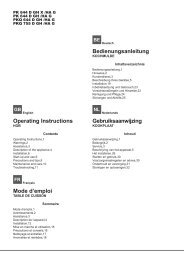
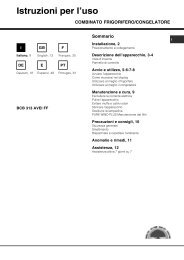
Condenser Unit...<br />
GB<br />
! You MUST clean the fluff from the condenser EVERY<br />
month.<br />
STEP 1.<br />
Open the condenser cover<br />
- hold the handle and<br />
pull towards you.<br />
STEP 2.<br />
Remove the condenser by<br />
rotating the 3 clips then<br />
pulling the condenser<br />
towards you.<br />
(There may be some water<br />
in the tubes, this is normal).<br />
STEP 3.<br />
Flush the condenser, from<br />
the rear with water, to<br />
remove any fluff deposits.<br />
STEP 4.<br />
Refit the condenser unit<br />
- ensure that the unit is<br />
pushed in fully, all 3 clips<br />
are re-secured and the<br />
positiong arrows on the<br />
front of the condenser are<br />
pointing upwards.<br />
●<br />
Check that:<br />
- The positioning arrows are pointing upwards.<br />
- The 3 clips are re-secured back into their ‘lock’ position.<br />
Rotate 3 clips<br />
! Failure to clean the condenser could cause premature<br />
failure of your dryer.<br />
3
Installation<br />
GB<br />
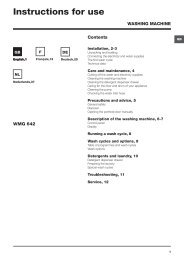
Where to put your dryer<br />
●<br />
Place your dryer at a distance from gas ranges,<br />
stoves, heaters, or cook tops because flames can<br />
damage the appliance.<br />
Minimum gap 10mm<br />
Minimum gaps<br />
15mm<br />
●<br />
If you are going to install<br />
the appliance under a work<br />
counter, be sure to leave a<br />
10mm space between the<br />
top and any other objects<br />
on or above the machine and<br />
a 15mm space between the<br />
sides and lateral furnishings<br />
or walls. This is to ensure<br />
proper air circulation. Make sure that the back vents<br />
are not obstructed.<br />
Ventilation<br />
When the dryer is in use, there has to be adequate<br />
ventilation. Make sure you put your dryer in an<br />
environment that is not damp and has proper air<br />
circulation throughout. Airflow around the dryer is<br />
essential to condense the water produced during the<br />
washing, the dryer will not operate efficiently in an<br />
enclosed space or cupboard.<br />
! We do not recommend that the dryer is installed in a<br />
cupboard but the dryer must never be installed<br />
behind a lockable door, a sliding door or a door with a<br />
hinge on the opposite side to that of the dryer door.<br />
! If using the dryer in a small or cold room some<br />
condensation could be experienced.<br />
Door Reversal <strong>Instruction</strong>s<br />
Door latch<br />
Hinge<br />
Hinge<br />
Door catch<br />
The door of your dryer is reversible and can easily be<br />
changed. Exchange diagonally hinge brackets and<br />
blanking screws. Exchange door latch and catch with<br />
their opposite blanking plates (see diagram above).<br />
Water drain<br />
If your dryer is installed next to a drain the water can be<br />
plumbed into this drain. This does away with the need to<br />
empty the water container. If the dryer is stacked onto or<br />
installed next to a washing machine it can share the same<br />
drain. The height of the drain must be less than 3' (1m)<br />
from the bottom of the dryer.<br />
Remove the existing clip and hose<br />
from position shown (see diagram).<br />
Remove clip and hose<br />
from here...<br />
Fit a suitable length of hose to the<br />
new location shown (see diagram)<br />
and refit clip.<br />
...fit new hose and refit<br />
clip here.<br />
! Make sure that the hose is not squashed or kinked when<br />
the dryer is in its final location.<br />
Electrical connections<br />
Make sure of the following before you insert the plug<br />
into the the electrical socket:<br />
● The socket must be grounded.<br />
● The socket must be able to sustain the machines<br />
maximum power, which is indicated on the rating<br />
label (see Dryer Description).<br />
● Power voltage must be within the values indicated<br />
on the rating label (see Dryer Description).<br />
● The socket must be compatible with the dryers plug.<br />
Should this not be the case, replace the plug or the<br />
socket.<br />
! The dryer must not be installed outdoors, even if the<br />
space is sheltered. It can be very dangerous if it is<br />
exposed to rain or storms.<br />
! Once installed, the dryers electrical wire and plug<br />
must be within easy reach.<br />
! Do not use extension cords.<br />
! The power cord must not be bent or squashed.<br />
! The power cord supplied should be checked<br />
periodically and replaced by a cord specially prepared<br />
for this dryer and fitted only by authorised technicians<br />
(see Service). New or longer power cords are supplied<br />
at an extra charge by authorised dealers.<br />
! The manufacturer denies any responsibility should any<br />
of these rules not be followed.<br />
! If in doubt about any of the above consult a qualified<br />
electrician.<br />
Before you start using your dryer<br />
Once you have installed your dryer and before you<br />
use it, clean the inside of the drum to remove any dust<br />
that could have accumulated during transport.<br />
4
Dryer Description<br />
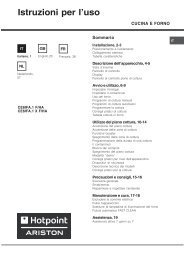
To open the door<br />
Press and release the front<br />
panel in position shown<br />
The features<br />
Water container<br />
Rating plate<br />
GB<br />
Model &<br />
Serial<br />
numbers<br />
Condenser unit<br />
(Cover open)<br />
Condenser cover<br />
Condenser cover handle<br />
(Pull to open)<br />
Filter<br />
Air intake<br />
grille<br />
Control panel<br />
PROGRAMMES<br />
Knob<br />
Indicator<br />
Progress or Delay<br />
Lights<br />
Clean Condenser<br />
Light<br />
Clean Filter<br />
Light<br />
Drying Guide<br />
ON/OFF<br />
Button<br />
OPTION<br />
Buttons & Lights<br />
START/PAUSE<br />
Button & Light<br />
Empty Water<br />
Light<br />
The ON/OFF button : If the dryer is running and<br />
this button is pressed, the dryer stops. Press again,<br />
the dryer restarts.<br />
The Drying Guide allows you to consult a user friendly<br />
table of fabric types and load capacities.<br />
The PROGRAMMES knob sets the programme: rotate<br />
it until the indicator is pointing to the programme you want<br />
to select (see Start and Programmes).<br />
The OPTION buttons/lights select available options for<br />
your selected programme. The lights indicate that the<br />
option has been selected (see Start and Programmes).<br />
The START/PAUSE button/light starts a selected<br />
programme. When you press this button there will be<br />
one beep and the progress lights will flash to confirm<br />
the action. When a programme is running, holding this<br />
button in pauses the programme and stops the dryer.<br />
The light is green when programme is running, flashing<br />
amber if the programme has been paused or flashing<br />
green if on standby waiting to start a programme (see<br />
Start and Programmes).<br />
The Progress or Delay lights show you the status of<br />
the programme, or the delay time when they flash.<br />
During a delayed start the lights flash to show the<br />
delay selected. When (not flashing) they show each<br />
stage of the programme by the corresponding light<br />
turning on (see Start and Programmes).<br />
The Empty Water indicator light signals that the<br />
water container should be emptied. The light will take<br />
a few seconds to go out after replacing the empty water<br />
container, the dryer must be running for this to happen<br />
(see The Controls).<br />
Note: If the water bottle fills the indicator light flashes, the<br />
heat is turned off and your clothes will not dry.<br />
The Clean Filter light gives you a reminder before<br />
every programme that it is essential to clean the filter<br />
every time the dryer is used (see Maintenance and Care).<br />
The Clean Condenser light gives you a reminder<br />
that it is essential to clean the condenser at regular<br />
intervals (see Maintenance and Care).<br />
5
Start and Programmes<br />
GB<br />
Choosing a programme<br />
1. Plug the dryer into the electrical socket.<br />
2. Sort your laundry according to fabric type (see<br />
Laundry).<br />
3. Open the door and make sure the filter is clean<br />
and in place and the water container is empty<br />
and in place (see Maintenance).<br />
4. Load the machine and make sure items are not in<br />
the way of the door seal. Close the door.<br />
5. If none of the lights are on: Press the ON/OFF<br />
button .<br />
6. Choose a programme by checking the Programmes<br />
Guide (see Programmes) as well as the indications<br />
for each type of fabric (see Laundry).<br />
- Select a programme by rotating the<br />
PROGRAMMES knob.<br />
7. Set a delay time and other options if necessary.<br />
8. The START/PAUSE light is flashing green:<br />
- press the START/PAUSE button to begin. The<br />
green light stops flashing.<br />
During the drying programme, you can check on<br />
your laundry and take out items that are dry<br />
while others continue drying. When you close<br />
the door again, press the START/PAUSE button in<br />
order to resume drying.<br />
(When the door is opened the START/PAUSE light<br />
will flash Amber, after the door is closed and the<br />
START/PAUSE button pressed, the START/PAUSE<br />
light will stop flashing and show green.)<br />
9. When the programme is complete. The buzzer<br />
will sound. Open the door, take the laundry out,<br />
clean the filter and replace it. Empty the water<br />
container and replace it (see Maintenance).<br />
If the Post Creasecare option has been selected<br />
and you do not remove the laundry immediately,<br />
the dryer will tumble occasionally for 10 hours or<br />
until you open the door.<br />
10. Unplug the dryer.<br />
Easy Iron Programme<br />
‘Easy Iron’ is a short 10 minute programme (8 minutes of heat followed by a 2 minute cool tumble period) which<br />
fluffs the fibres of clothing that have been left in the same position/location for an extended period of time. The<br />
cycle relaxes the fibres and makes them easier to iron and fold.<br />
! ‘Easy Iron’ is not a drying programme and should not be used for wet articles of clothing.<br />
For best results:<br />
1. Do not load more than the maximum capacity.<br />
These numbers refer to the dry weight:<br />
Fabric<br />
Maximum load<br />
Cotton and Cotton mixtures 2.5kg<br />
Synthetics<br />
2kg<br />
Denim<br />
2kg<br />
2. Unload the dryer immediately after the end of the programme, hang, fold or iron the articles and put<br />
them away in the closet. Should this not be possible repeat the programme.<br />
The ‘Easy Iron’ effect varies from one fabric to the next. It works well on traditional fabrics like Cotton or Cotton<br />
mix, and less well on acrylic fibres and on materials such as Tencel®.<br />
6
Start and Programmes<br />
Programmes<br />
GB<br />
! If none of the lights are lit; Press the ON/OFF button and then select programme.<br />
Programme What it does... How to set it... Note:<br />
Easy Iron<br />
Cottons<br />
Extra<br />
dry<br />
Brief programme (approximately<br />
10 minutes) that softens fibres of<br />
clothing that is ready for ironing.<br />
Dries your clothes on High Heat<br />
setting, ready for wearing.<br />
1. Position the PROGRAMMES knob<br />
on .<br />
2. Press the START/PAUSE button .<br />
1. Position the PROGRAMMES knob<br />
on .<br />
2. Select any options if required.<br />
3. Press the START/PAUSE button .<br />
! This is not a drying<br />
programme (see previous<br />
page).<br />
Options available:<br />
None<br />
Options available:<br />
Delayed Start<br />
Pre-Creasecare<br />
Post Creasecare<br />
Cottons<br />
Cupboard<br />
dry<br />
Dries your clothes on High Heat<br />
setting, ready for putting away.<br />
1. Position the PROGRAMMES knob<br />
on .<br />
2. Select any options if required.<br />
3. Press the START/PAUSE button .<br />
Options available:<br />
Delayed Start<br />
Pre-Creasecare<br />
Post Creasecare<br />
Synthetics<br />
Cupboard<br />
dry<br />
Timed Drying<br />
(150, 140, 120,<br />
100, 80, 70, 60,<br />
50, 40,30 or 20<br />
minutes)<br />
Dries your clothes on Low Heat<br />
setting, ready for putting away.<br />
Dries wet clothing that you wish<br />
to dry on Low Heat or small<br />
loads (less than 1kg).<br />
Can be used with High Heat<br />
option if you prefer to use a<br />
timed programme.<br />
1. Position the PROGRAMMES knob<br />
on .<br />
2. Select any options if required.<br />
3. Press the START/PAUSE button .<br />
1. Position the PROGRAMMES knob<br />
on the desired time: 150, 140, 120,<br />
100, 80, 70, 60, 50, 40, 30 or 20.<br />
2. Select any options if required.<br />
3. Press the START/PAUSE button .<br />
Options available:<br />
Delayed Start<br />
Pre-Creasecare<br />
Post Creasecare<br />
Options available:<br />
High Heat<br />
Delayed Start<br />
Pre-Creasecare<br />
Post Creasecare<br />
Consult ‘suggested drying<br />
times’ (see Laundry).<br />
The last 10 minutes of these<br />
programmes is the Cool<br />
Tumble phase, see below.<br />
Cool Tumble<br />
Brief programme (approximately<br />
10 minutes) that cools fibres of<br />
clothing.<br />
1. Position the PROGRAMMES knob<br />
on .<br />
2. Press the START/PAUSE button .<br />
Options available:<br />
None<br />
7
Start and Programmes<br />
GB<br />
The Controls<br />
●<br />
PROGRAMMES knob<br />
! Warning, if after pressing the START/PAUSE button<br />
, the programmes knob position has changed, the<br />
new position will NOT change the programme selected.<br />
To change a selected programme, press the<br />
START/PAUSE button ,the light flashes Amber to<br />
indicate the programme is paused. Select the new<br />
programme and any options required, the light will<br />
then flash green. Press the START/PAUSE button<br />
again and the new programme will start.<br />
●<br />
OPTION buttons / lights<br />
These buttons are used to customise the selected<br />
programme to your requirements. Not all options are<br />
available for all programmes (see Start and<br />
Programmes). If an option is not available and you<br />
press the button, the buzzer will beep three times. If<br />
the option is available there will be one beep and the<br />
option light next to the button lights to confirm the<br />
selection.<br />
Progress ( Drying, Cool Tumble, ) /<br />
Delay (3hr, 6hr, 9hr) Lights<br />
When the light next to the delay button is on, these lights<br />
flash to indicate the delay time selected. During other<br />
programmes they indicate the progress of the dryer,<br />
each one comes on as the corresponding phase starts.<br />
Time Delay<br />
The start of some programmes (see Start and<br />
Programmes) can be delayed for up to 9 hours in 3hr<br />
steps. Ensure the water bottle is emptied before setting<br />
a delayed start.<br />
When a delayed start is in progress the light next to the<br />
delay button will be on and the selected delay period<br />
light will flash (after the start button has been pressed).<br />
To set a delayed start, press the Time Delay button,<br />
and the light next to the button will come on together<br />
with the 3hr delay light. Pressing the button again will<br />
advance the delay setting to 6hr, the 3hr light goes<br />
out and the 6hr light is on. Each time you press the<br />
button the delay setting advances 3 hours, as indicated<br />
by the corresponding light. If the 9hr light is on,<br />
pressing the button again will cancel the delay.<br />
Holding in the On/Off button will also cancel.<br />
Pre Creasecare<br />
When a delayed start and this option have been<br />
selected the clothes are tumbled occasionally during<br />
the delayed period to help prevent creases developing.<br />
High Heat<br />
Available for Time Drying Programmes. Press this button<br />
and a high heat setting is selected and the light next to<br />
the button comes on. Timed programmes have a<br />
default of low heat, if the light alongside the button is<br />
on then pressing the button selects a low heat setting<br />
and the light goes out.<br />
Post Creasecare<br />
When selected, the clothes are occasionally tumbled<br />
after the end of the drying and cool tumble cycles, to<br />
help prevent creases developing should you not be<br />
available to remove the load immediately the programme<br />
is complete. The light is on during this phase.<br />
Empty Water Light / Container<br />
(If you have plumbed your dryer to a drain this light<br />
can be ignored, as there is no need to empty the water<br />
container).<br />
When this light is on (not flashing) it reminds you to<br />
empty the water container.<br />
If the water container fills during a programme, the<br />
heater turns off and the dryer does a period of Cool<br />
Tumble then the light flashes and the buzzer sounds.<br />
You must empty the water container and restart the<br />
dryer or the clothes will not dry. After re-starting the<br />
dryer, the light will take a few seconds to go out.<br />
To avoid this always empty the water container each<br />
time you use the dryer (see Maintenance).<br />
●<br />
Door Opening<br />
Opening the door (or pressing the START/PAUSE<br />
button ) during a programme will stop the dryer<br />
and have the following effects:<br />
● The START/PAUSE light flashes Amber.<br />
● During a delay phase the delay will continue to<br />
count down. The start/pause button must be<br />
pressed to resume the delay programme.<br />
One of the delay lights will flash to show the<br />
current delay setting.<br />
● The start/pause button must be pressed to<br />
resume the programme. The progress lights will<br />
change to show the current status and the<br />
START/PAUSE light will stop flashing and turn green.<br />
● During the post creasecare phase of a drying<br />
programme, the programme will finish. Pressing<br />
the start/pause button will re-start a new<br />
programme at the beginning.<br />
● Changing the programmes knob will select a new<br />
programme and the START/PAUSE light will flash<br />
green. You can use this to select the Cool Tumble<br />
programme to cool the clothes, if you find them<br />
dry enough. Press the START/PAUSE button to<br />
begin a new programme.<br />
● Note<br />
If you have a power cut, switch off the power or<br />
remove the plug. When power is restored, press the<br />
START/PAUSE button and the programme will<br />
resume.<br />
8
Laundry<br />
Sorting your laundry<br />
● Check symbols on clothing labels to make sure<br />
that the articles can be tumble dried.<br />
● Sort laundry by fabric type.<br />
● Empty pockets and check buttons.<br />
● Close zippers and hooks and tie loose belts and<br />
strings.<br />
● Wring out each item in order to eliminate as much<br />
excess water as possible.<br />
! Do not load dripping wet clothes into the dryer.<br />
Maximum load size<br />
Do not load more than maximum capacity.<br />
These numbers refer to dry weight:<br />
Natural fibres: 8kg max (18lb)<br />
Synthetic fibres: 3kg max (6.6lb)<br />
! DO NOT overload the dryer as this could result in<br />
reduced drying performance.<br />
Typical weights<br />
Note: 1kg = 1000g (1lb = 16oz)<br />
Clothes<br />
Blouse Cotton 150g (5oz)<br />
Other 100g (3oz)<br />
Dress Cotton 500g (1lb 2oz)<br />
Other 350g (12oz)<br />
Jeans 700g (1lb 6oz)<br />
10 nappies 1000g (2lb 3oz)<br />
Shirt Cotton 300g (10oz)<br />
Other 200g (7oz)<br />
T-Shirt 125g (4oz)<br />
Wash Care Labels<br />
Look at the labels on your garments, especially when<br />
tumble drying for the first time. The following symbols<br />
are the most common:<br />
May be tumble dried<br />
Do not tumble dry<br />
Tumble dry at high heat setting<br />
Tumble dry at low heat setting<br />
Items not suitable for tumble drying<br />
● Articles that containing rubber or rubber-like<br />
materials or plastic film (pillows, cushions, or PVC<br />
rainwear), any other flammable articles or objects<br />
that contain flammable substances (towels soiled<br />
with hair spray).<br />
● Glass fibres (certain types of draperies)<br />
● Items which have been dry cleaned<br />
● Items with the ITCL Code (see Special<br />
clothing items). These can be cleaned with special<br />
at-home dry cleaning products. Follow instructions<br />
carefully.<br />
● Large bulky items (quilts, sleeping bags, pillows,<br />
cushions, large bedspreads etc). These expand<br />
when drying and would prevent airflow through<br />
the dryer.<br />
GB<br />
Household Items<br />
Duvet cover Cotton 1500g (3lb 5oz)<br />
(Double) Other 1000g (2lb 3oz)<br />
Large Tablecloth 700g (1lb 6oz)<br />
Small Tablecloth 250g (9oz)<br />
Tea Towel 100g (3oz)<br />
Bath Towel 700g (1lb 6oz)<br />
Hand Towel 350g (12oz)<br />
Double Sheet 500g (1lb 2oz)<br />
Single Sheet 350g (12oz)<br />
At the end of a drying cycle, cottons could still be<br />
damp if you grouped cottons and synthetics together.<br />
If this happens simply give them an additional short<br />
period of drying.<br />
● Note: The last 10 minutes of any time set is the<br />
Cool Tumble, so allow for this when setting the time,<br />
as this period will not dry your laundry.<br />
9
Laundry<br />
GB<br />
Special clothing items<br />
Blankets and Bedspreads: acrylic items (Acilan,<br />
Courtelle, Orion, Dralon) must be dried with special<br />
care on LOW heat setting. Avoid drying for a long<br />
period of time.<br />
●<br />
●<br />
Fabrics: items that are the same type of fabric but<br />
different textures and thicknesses may not have<br />
the same drying time.<br />
Quantity of laundry: single items or small loads<br />
may take longer to dry.<br />
Pleated or creased garments: read the manufacturer’s<br />
drying instructions on the garment.<br />
Starched articles: do not dry these with non-starched<br />
items. Make sure that as much of the starch solution is<br />
removed from the load as possible before placing it in<br />
the dryer. Do not over-dry: the starch will become<br />
powdery and leave your clothing limp, which defeats<br />
the purpose of starch.<br />
●<br />
●<br />
●<br />
Dryness: If you are going to iron some of your<br />
clothes, they can be taken out while still a bit<br />
damp. Others can be left longer if you need them<br />
to be completely dry.<br />
Heat setting.<br />
Room temperature: if the room where the dryer is<br />
located is cold, it will take longer for the dryer to<br />
dry your clothes.<br />
Drying times<br />
The table (see below) presents APPROXIMATE drying<br />
times in Minutes. Weights refer to dry garments.<br />
Times are approximate and can vary depending<br />
upon:<br />
●<br />
Bulk: some bulky items can be tumble dried with<br />
care. We suggest that you remove these items<br />
several times, shake them out, and return them to<br />
the dryer until finished.<br />
! Do not over-dry your clothes.<br />
All fabrics contain a little natural moisture, which<br />
keeps them soft and fluffy.<br />
●<br />
Amount of water retained in clothes after spin<br />
cycle: towels and delicates retain a lot of water.<br />
Cottons<br />
Drying times 800-1000 rpm in washing machine.<br />
High/Full<br />
Heat<br />
Half Load<br />
1 kg 2 kg 3 kg 4 kg<br />
5 kg 6 kg 7 kg<br />
Full Load<br />
8 kg<br />
30 - 40 40 - 55 55 - 70 70 - 80 80 - 90 95 - 120 120 - 140<br />
130 - 150<br />
Synthetics<br />
Gentle/Low<br />
Heat<br />
Acrylics<br />
Gentle/Low<br />
Heat<br />
Drying times on reduced spin in washing machine.<br />
Half Load<br />
Full Load<br />
1 kg 2 kg<br />
3 kg<br />
40 - 50<br />
50 - 70 70 - 90<br />
Drying times on reduced spin in washing machine.<br />
Half Load<br />
Full Load<br />
1 kg 2 kg<br />
40 - 60 55 - 75<br />
10
Warnings and Suggestions<br />
! The appliance has been designed and built according<br />
to international safety standards.<br />
These warnings are given for safety reasons and must<br />
be followed carefully.<br />
General safety<br />
● This tumble dryer is not intended for use by<br />
persons (including children) with reduced physical,<br />
sensory or mental capabilities, or lack of experience<br />
and knowledge, unless they have been given<br />
supervision or instruction concerning use of the<br />
appliance by a person responsible for their safety.<br />
● This tumble dryer has been designed for home,<br />
and not professional use.<br />
● Do not touch the appliance while barefoot or with<br />
wet hands or feet.<br />
● Unplug the machine by pulling on the plug, not<br />
the cord.<br />
● Children must not be in proximity of the dryer<br />
when in use. After using the dryer, turn it off and<br />
unplug it. Keep the door closed to make sure that<br />
children do not use it as a toy.<br />
● Children should be supervised to ensure that they<br />
do not play with the dryer.<br />
● The appliance must be installed correctly and<br />
have proper ventilation. The air intake at the front<br />
of the dryer and rear vent behind the dryer should<br />
never be obstructed (see Installation).<br />
● Never use the dryer on carpeting where the pile<br />
height would prevent air from entering the dryer<br />
from the base.<br />
● Check to see if the dryer is empty before loading it.<br />
● The back of the dryer could become very<br />
hot. Never touch it while in use.<br />
● Do not use the dryer unless the filter, water<br />
container and condenser are securely in place<br />
(see Maintenance).<br />
● Do not use liquid fabric softeners in the dryer, add<br />
it to the final rinse of your wash.<br />
● Do not overload the dryer (see Laundry for<br />
maximum loads).<br />
● Do not load items that are dripping wet.<br />
● Tumble dry items only if they have been washed<br />
with detergent and water, rinsed and been through<br />
the spin cycle. It is a fire hazard to dry items that<br />
HAVE NOT been washed with water.<br />
● Carefully check all instructions on clothing labels<br />
(see Laundry).<br />
● Do not dry garments that have been treated with<br />
chemical products.<br />
● Never dry articles that are contaminated with<br />
flammable substances (cooking oil, acetone, alcohol,<br />
petrol, kerosene, spot removers, turpentine, waxes,<br />
wax removers and hair sprays), unless washed in<br />
hot water with an extra amount of detergent.<br />
● Do not tumble dry rubber, rubber backed articles and<br />
clothes, pillows fitted with foam rubber pads, foam<br />
(latex foam), rubber, plastic, shower caps, waterproof<br />
textiles, nappy pants or liners, polythene or paper.<br />
● Do not tumble dry large, very bulky items.<br />
● Do not tumble dry acrylic fibres at high temperatures.<br />
● Remove all objects from pockets, especially<br />
lighters (risk of explosion).<br />
● Complete each programme with its Cool Tumble Phase.<br />
● Do not turn off the dryer when there are still warm<br />
items inside.<br />
● Clean the filter after each use (see Maintenance).<br />
● Empty the water container after each use (see<br />
Maintenance).<br />
● Clean the condenser unit at regular intervals<br />
(see Maintenance).<br />
● Do not allow lint to collect around the dryer.<br />
● Never climb on top of the dryer. It could result in damage.<br />
● Always follow electrical standards and requirements<br />
(see Installation).<br />
● Always buy original spare parts and accessories<br />
(see Service).<br />
! WARNING: Never stop the dryer before the end of the<br />
drying cycle unless all items are quickly removed and<br />
spread out so that the heat is dissipated.<br />
Recycling and disposal information<br />
As part of our continued commitment to helping the<br />
environment, we reserve the right to use quality recycled<br />
components to keep down customer costs and minimise<br />
material wastage.<br />
● Disposing of the packaging material: follow local<br />
regulations, so the packaging can be recycled.<br />
● To minimise risk of injury to children, remove the<br />
door and plug - then cut off mains cable, flush<br />
with the appliance. Dispose of these parts separately<br />
to ensure that the appliance can no longer be<br />
plugged into a mains socket.<br />
Disposal of old electrical appliances<br />
The European Directive 2002/96/EC on Waste Electrical<br />
and Electronic Equipment (WEEE), requires that old<br />
household electrical appliances must not be disposed<br />
of in the normal unsorted municipal waste stream. Old<br />
appliances must be collected separately in order to<br />
optimise the recovery and recycling of the materials<br />
they contain and reduce the impact on human health<br />
and the environment.<br />
The crossed out “wheeled bin” symbol on<br />
the product reminds you of your obligation,<br />
that when you dispose of the appliance it<br />
must be separately collected.<br />
Consumers should contact their local authority or<br />
retailer for information concerning the correct disposal<br />
of their old appliance.<br />
Saving energy and respecting the<br />
environment<br />
●<br />
●<br />
●<br />
Wring out items to eliminate excess water before<br />
tumble drying (if you use a washing machine first,<br />
select a high spin cycle). Doing this will save time<br />
and energy during drying.<br />
Always dry full loads - you save energy: single<br />
items or small loads take longer to dry.<br />
Clean the filter after each use to contain energy<br />
consumption costs (see Maintenance).<br />
GB<br />
11
Maintenance and Care<br />
GB<br />
Switching off the electricity<br />
! Unplug your dryer when not using it, when cleaning<br />
it and during all maintenance operations.<br />
Clean the filter after each cycle<br />
The filter is an important part of your dryer:<br />
it accumulates lint and fluff that is formed while drying.<br />
When finished drying, clean the filter by rinsing it<br />
under running water or with your vacuum cleaner.<br />
Should the filter become clogged up, the airflow inside<br />
the dryer will be seriously compromised: drying times<br />
lengthen and you will consume more energy. It may<br />
also damage your dryer.<br />
The filter is found in front of the dryer trim (see diagram).<br />
Removing the filter:<br />
1. Pull the plastic grip of the filter upwards (see diagram).<br />
2. Clean the filter and replace it correctly.<br />
Ensure the filter is fully located flush into the tumble<br />
dryer trim.<br />
! Do not use the dryer without replacing the filter.<br />
Empty the water container after each<br />
cycle<br />
Pull the container out of the dryer and empty it into a<br />
sink or other suitable drain.<br />
Replace the water container securely.<br />
Always check and empty the container before you<br />
start a new drying programme.<br />
Check the drum after each cycle<br />
Turn the drum manually in order to remove small items<br />
(handkerchiefs) that could have been left behind.<br />
Water container<br />
Filter<br />
Cleaning the drum<br />
! Do not use abrasives, steel wool or stainless steel<br />
cleaning agents to clean the drum.<br />
A coloured film may start to appear on the stainless<br />
steel drum, this may be caused by a combination of<br />
water and, or cleaning agents such as fabric conditioner<br />
from the wash. This coloured film will not affect the<br />
dryer performance.<br />
Cleaning the condenser unit<br />
Periodically (every month) remove the condenser unit<br />
and clean any build up of fluff from between the plates<br />
by rinsing it under the tap with cold water.<br />
This should be done with cold water from the rear of<br />
the condenser.<br />
Removing the condenser:<br />
1. Unplug the dryer and open the door.<br />
2. Pull open the condenser cover (see diagram).<br />
Release the three catches by turning 90˚ counterclockwise<br />
then pull on the grip and remove from<br />
the dryer.<br />
3. Clean the surface of the seals and replace, making<br />
sure that the catches have been secured.<br />
Cleaning the dryer<br />
● External parts in metal or plastic and rubber parts<br />
can be cleaned with a damp cloth.<br />
● Periodically (every 6 months) vacuum the front air<br />
intake grille and vents at the rear of the dryer, to<br />
remove any build up of fluff, lint or dust. Also to<br />
remove accumulation of fluff from the front of the<br />
condenser and filter areas, clean occasionally with<br />
a vacuum cleaner.<br />
! Do not use solvents or abrasives.<br />
! Your dryer uses special bearing components which<br />
do not need lubrication.<br />
! Have your dryer checked regularly by authorised<br />
technicians to ensure electrical and mechanical safety<br />
(see Service).<br />
Tap<br />
Rear<br />
Front<br />
Condenser unit<br />
Condenser cover<br />
Catches<br />
Handle<br />
Air intake<br />
Condenser unit<br />
12
Troubleshooting<br />
One day your dryer seems not to be working. Before you call your Service Centre (see Service), go through the<br />
following troubleshooting suggestions:<br />
GB<br />
Problem:<br />
Possible causes / Solution:<br />
The tumble dryer won’t start.<br />
Drying cycle will not begin.<br />
Its taking a long time to dry.<br />
Empty water light is flashing<br />
but the dryer has only been<br />
running for a short period.<br />
Empty water light is on and<br />
the water container is not full.<br />
The OPTION lights and the<br />
START/PAUSE light Flash<br />
amber.<br />
●<br />
●<br />
●<br />
●<br />
●<br />
●<br />
●<br />
●<br />
●<br />
●<br />
●<br />
●<br />
●<br />
●<br />
●<br />
●<br />
●<br />
●<br />
●<br />
●<br />
The plug is not plugged into the socket, or not making contact.<br />
There has been a power failure.<br />
The fuse has blown. Try to plug another appliance into the socket.<br />
You are using an extension cord? Try to plug the dryer’s power cord<br />
directly into the socket.<br />
The door is not closed securely?<br />
The PROGRAMMES knob has not been set properly (see Start and<br />
Programmes).<br />
The START/PAUSE button has not been pressed (see Start and Programmes).<br />
You have set a delayed time (see Start and Programmes).<br />
The filter has not been cleaned (see Maintenance).<br />
The water container needs emptying? The empty water light is flashing?<br />
(see Maintenance).<br />
The condenser needs cleaning? (see Maintenance).<br />
The temperature setting is not ideal for the type of fabric you are drying<br />
(see Start and Programmes, and see Laundry).<br />
The correct drying time has not been selected for the load (see Laundry).<br />
The air intake grille or rear vents are obstructed (see Installation, and see<br />
Maintenance).<br />
The items were too wet (see Laundry).<br />
The dryer was overloaded (see Laundry).<br />
The water container was probably not emptied at the start of the<br />
programme. Do not wait for the empty water signal, always check and<br />
empty the container before starting a new drying programme (see<br />
Maintenance).<br />
This is normal, the light flashes when the container is full. If the light is on<br />
but not flashing it is just a reminder to empty the container (see Start and<br />
Programmes).<br />
If the Option lights and the START/PAUSE light flash together with the<br />
Clean Condenser and Cool Tumble lights; Or the Progress lights and<br />
START/PAUSE light flash together with the Clean Filter, Clean Condenser,<br />
Cool Tumble and END lights on, then:<br />
- Turn off and remove the plug. Clean the filter and the condenser<br />
(see Maintenance). Then replace the plug, turn on and start another<br />
programme. If the same combination of lights still flash contact the<br />
Service Centre (see Service).<br />
If the Option lights and the START/PAUSE light flash with any other<br />
combination of lights on: Note down the lights that are on and contact the<br />
Service Centre (see Service).<br />
Programme finishes and<br />
clothes are damper than<br />
expected.<br />
! For safety the dryer has a maximum programme time of 4 hours. If an<br />
automatic programme has not sensed the required final moisture in this time<br />
the dryer will complete the programme and stop. Check the above points<br />
and run the programme again, if the results are still damp, contact the<br />
Service Centre (see Service).<br />
13
Service<br />
GB<br />
Before calling the Service Centre:<br />
●<br />
●<br />
Use the troubleshooting guide to see if you can<br />
solve the problem yourself (see Troubleshooting).<br />
If not, turn off the dryer and call the Service Centre<br />
closest to you.<br />
What to tell the Service Centre:<br />
● name, address and post code.<br />
● telephone number.<br />
● the type of problem.<br />
● the date of purchase.<br />
● the appliance model (Mod.).<br />
● the serial number (S/N).<br />
This information can be found on the data label inside<br />
the door of the machine.<br />
Spare Parts<br />
This dryer is a complex machine. Repairing it yourself<br />
or having a non-authorised person try to repair it could<br />
cause harm to one or more persons, could damage<br />
the machine and could invalidate the spare parts<br />
warranty.<br />
Call an authorised technician if you experience problems<br />
while using the machine.<br />
The spare parts have been designed exclusively for<br />
this appliance and not for other uses.<br />
Comparative Programmes<br />
●<br />
Programmes recommended for comparative test to EN61121<br />
Programme Programme to select Load size<br />
(EN61121)<br />
Dry Cotton Cottons - Cupboard Dry 2 8 kg<br />
Iron Dry Cotton Timed Dry High Heat (120 Minutes) 8 kg<br />
Easy-care textile Synthetics - Cupboard Dry 3 3 kg<br />
! Note: This is not a full list of programme options (see Start and Programmes).<br />
This appliance conforms to the following EC Directives:<br />
- 2006/95/EC (Low Voltage Equipment)<br />
- 89/336/EEC, 92/31/EEC and 93/68/EEC (Electromagnetic Compatibility)<br />
14
Folheto de instruções<br />
MÁQUINA DE SECAR ROUPA<br />
GB<br />
English, 1<br />
TCL G31<br />
TCL G31X<br />
P<br />
Português, 15<br />
GR<br />
EÏÏËÓÈο, 29<br />
Índice<br />
Informações importantes, 16-17<br />
Instalação, 18<br />
Onde colocar a sua máquina de secar roupa<br />
Ventilação<br />
Instruções de inversão da porta<br />
Drenagem da água<br />
Ligação eléctrica<br />
Antes de iniciar a utilização da sua máquina<br />
de secar roupa<br />
Descrição da máquina, 19<br />
Para abrir a porta<br />
Características<br />
Painel de controlo<br />
Arranque e programas, 20-22<br />
Escolher um programa<br />
Tabela de programas<br />
Controlos<br />
Roupa, 23-24<br />
Escolher a sua roupa<br />
Etiquetas de cuidado na lavagem<br />
Peças delicadas<br />
Tempos de secagem<br />
Avisos e Sugestões, 25<br />
Segurança geral<br />
Eliminação<br />
Poupança de energia e respeito pelo ambiente<br />
Manutenção e cuidado, 26<br />
Desligar a electricidade<br />
Limpar o filtro depois de cada ciclo<br />
Esvazie o recipiente de água após cada ciclo<br />
Verificar o tambor depois de cada ciclo<br />
Limpar a unidade do condensador<br />
Limpar a máquina<br />
Resolução de problemas, 27<br />
Reparações, 28<br />
Peças sobressalentes<br />
! Tenha este folheto de instruções à mão para consultá-lo sempre que necessário. Leve-o consigo se mudar de<br />
casa e, caso venda este aparelho, passe o folheto ao novo proprietário, de modo a certificar-se de que este folheto<br />
permanece com o equipamento e de que o novo proprietário pode estar informado acerca dos avisos e sugestões<br />
sobre o respectivo funcionamento.<br />
! Leia cuidadosamente as instruções; as páginas que se seguem contêm informações importantes acerca da<br />
instalação, bem como sugestões sobre o funcionamento da máquina.<br />
P<br />
15
Informações Importantes<br />
P<br />
Para que a sua secadora de condensador funcione de forma eficaz, deve seguir o plano de manutenção<br />
regular apresentado em baixo:<br />
Filtro...<br />
! TEM limpar o filtro de cotão a CADA ciclo de<br />
secagem.<br />
PASSO 1.<br />
Abra a porta da<br />
secadora.<br />
PASSO 2.<br />
Puxe o filtro para fora<br />
(utilizando as reentrâncias<br />
para os dedos).<br />
PASSO 3.<br />
Limpe os depósitos de<br />
cotão da quadrícula do<br />
filtro.<br />
PASSO 4.<br />
Instale novamente o filtro<br />
– NUNCA utilize a<br />
secadora sem o filtro<br />
instalado.<br />
! Não limpar o filtro a CADA ciclo de secagem afecta o desempenho da sua máquina.<br />
- Demorará mais tempo a secar e, como resultado, utilizará mais electricidade durante a secagem.<br />
Recipiente de água...<br />
! TEM de esvaziar o recipiente da água após CADA<br />
ciclo de secagem.<br />
PASSO 1.<br />
Puxe o recipiente da água<br />
na sua direcção e retire-o<br />
totalmente da secadora.<br />
PASSO 2.<br />
Esvazie toda a água<br />
acumulada no recipiente<br />
da água.<br />
PASSO 3.<br />
Instale novamente o<br />
recipiente da água,<br />
certificando-se de que<br />
está bem encaixado na<br />
respectiva posição.<br />
! A luz de ‘Esvaziar<br />
água’ permanece acesa<br />
para lembrá-lo despejar<br />
o recipiente da água no<br />
início e no fim de cada<br />
programa.<br />
! Não esvaziar o recipiente da água pode resultar em:<br />
- A máquina deixar de aquecer (pelo que a carga poderá estar ainda molhada no fim do ciclo de secagem).<br />
- A luz de ‘Esvaziar água’ fica intermitente para indicar que o recipiente da água está cheio.<br />
Primeira Utilização do Sistema de Recolha de Água<br />
Quando a sua secadora é nova, o recipiente de água não recolhe a água sem que seja devidamente preparado<br />
para a primeira utilização; é um processo que demora 1 ou 2 ciclos de secagem. Depois de previamente<br />
preparada, o recipiente recolhe água durante cada ciclo de secagem.<br />
16
Informações Importantes<br />
Unidade do condensador...<br />
P<br />
! É NECESSÁRIO limpar o cotão TODOS os meses.<br />
PASSO 1.<br />
Abra a tampa do<br />
condensador<br />
- segure na pega e puxe<br />
na sua direcção.<br />
PASSO 2.<br />
Retire o condensador,<br />
rodando os 3 grampos e<br />
puxando o condensador<br />
na sua direcção.<br />
(Pode existir alguma<br />
água nos tubos, o que é<br />
normal).<br />
PASSO 3.<br />
Lave o condensador, a<br />
partir da parte posterior,<br />
com água para retirar<br />
quaisquer depósitos de<br />
cotão.<br />
PASSO 4.<br />
Instale novamente a<br />
unidade do condensador<br />
- certifique-se de que a<br />
unidade é totalmente<br />
empurrada, que os 3<br />
grampos são bem<br />
apertados e que as setas<br />
de direcção no painel<br />
frontal do condensador<br />
estão a apontar para cima.<br />
●<br />
Verifique se:<br />
- As setas de posição estão a apontar para cima.<br />
- Os 3 grampos são novamente afixados na posição de ‘bloqueio’.<br />
Rodar os 3 grampos<br />
! Não limpar o condensador pode provocar a falha<br />
prematura da sua secadora<br />
17
Instalação<br />
P<br />
Onde colocar a sua máquina<br />
●<br />
18<br />
Instale a sua máquina a alguma distância de<br />
ligações de gás, fogões, aquecedores e placas de<br />
cozinha, uma vez que as chamas podem danificar<br />
o aparelho.<br />
mínima espaço 10 mm<br />
mínima espaço<br />
15 mm<br />
●<br />
Se pretende instalar o aparelho<br />
por baixo de uma bancada<br />
ou de um balcão, não se<br />
esqueça de deixar um<br />
espaço de 10 mm entre a<br />
bancada e quaisquer objectos<br />
ou acima do tampo da<br />
máquina e um espaço de<br />
15 mm entre as partes<br />
laterais da máquina e mobiliário ou paredes.<br />
Assegura assim a correcta circulação do ar.<br />
Certifique-se de que as ventilações posteriores não<br />
ficam obstruídas.<br />
Ventilação<br />
Quando a secadora estiver em utilização, tem de<br />
existir uma ventilação adequada. Certifique-se de que<br />
coloca a sua máquina num ambiente que não seja<br />
húmido e de que existe uma ventilação adequada. O<br />
fluxo de ar em torno da secadora é essencial para<br />
condensar a água produzida durante a lavagem; a<br />
secadora não funciona em perfeitas condições se<br />
encerrada no espaço fechado ou armário.<br />
! Não recomendamos a instalação da secadora num<br />
armário, mas o aparelho nunca deve ser instalado por<br />
trás de uma porta que se possa trancar, uma porta<br />
deslizante ou com uma dobradiça instalada no lado<br />
oposto à porta da máquina.<br />
! Se utilizar a secadora numa sala pequena e fria,<br />
pode gerar-se alguma condensação.<br />
Instruções de inversão da porta<br />
Trinco da<br />
porta<br />
Gancho<br />
Suporte da<br />
porta<br />
Gancho<br />
A porta da sua secadora é reversível e pode mudar-se<br />
facilmente. Mude o suportes de trinco na diagonal e<br />
os parafusos. Mude o trinco da porta e fechadura<br />
com as placas de paragem opostas (ver diagrama<br />
acima).<br />
Drenagem da água<br />
Se a sua secadora estiver instalada junto a um ponto<br />
de canalização, a água pode ser canalizada para este<br />
sistema. Isto afasta a necessidade de esvaziar o<br />
recipiente de água. Se a secadora estiver empilhada<br />
sobre ou instalada junto à máquina de lavar roupa,<br />
pode partilhar o mesmo ponto de canalização. A<br />
altura do cano deve ser inferior a 1m A partir da parte<br />
inferior da secadora.<br />
Retire o grampo e o tubo da<br />
posição mostrada (ver diagrama).<br />
Instale um tubo com um<br />
comprimento adequado no novo<br />
local (ver diagrama) e instale<br />
novamente o grampo.<br />
! Certifique-se de que o tubo não fica obstruído ou<br />
dobrado quando a secadora estiver na sua posição<br />
final.<br />
Ligações eléctricas<br />
Certifique-se do seguinte antes de introduzir a ficha<br />
numa tomada de corrente eléctrica:<br />
● A tomada tem de ter ligação à terra.<br />
● A tomada deve ter capacidade para suster a potência<br />
máxima de máquinas, que está indicada na chapa<br />
de classificação (ver Descrição da máquina de secar).<br />
●<br />
●<br />
Retire o grampo e o<br />
tubo deste ponto...<br />
...instale o novo tubo e<br />
monte o grampo aqui.<br />
A tensão deve encontrar-se dentro dos valores<br />
indicados na chapa de classificação (ver<br />
Descrição da máquina de secar).<br />
A tomada deve ser compatível com a ficha da<br />
máquina. Se não for este o caso, substitua a ficha<br />
ou a tomada.<br />
! A secadora não deve ser instalada ao ar livre, mesmo<br />
que seja num espaço abrigado. Pode ser extremamente<br />
perigosa a exposição à chuva ou tempestades.<br />
! Depois de instalada, a cablagem eléctrica e ficha da<br />
máquina deve estar facilmente alcançável.<br />
! Não utilize cabos de extensão.<br />
! O cabo de alimentação não deve ser dobrado ou pisado.<br />
! O fio de alimentação eléctrica deve ser verificado<br />
periodicamente e substituído por um fio preparado<br />
especialmente para esta secadora, apenas por técnicos<br />
autorizados (ver Reparações). Fios de alimentação<br />
novos ou mais longos são fornecidos sem custos<br />
adicionais por representantes autorizados.<br />
! O fabricante recusa qualquer responsabilidade caso<br />
estas regras não seja seguidas.<br />
! Se tiver dúvidas sobre o mencionado acima consulte<br />
um electricista qualificado.<br />
Antes de iniciar a utilização da sua<br />
máquina de secar roupa<br />
Depois de instalar a sua máquina e antes de iniciar a<br />
sua utilização, limpe o interior do tambor para<br />
remover qualquer pó que se tenha acumulado<br />
durante o transporte.
Descrição da máquina<br />
de secar<br />
Para abrir a porta<br />
Pressione e liberte o painel frontal na<br />
posição apresentada<br />
Características<br />
Recipiente de<br />
água<br />
Chapa de<br />
classificação<br />
P<br />
Números<br />
de modelo<br />
e de série<br />
Unidade do<br />
condensador<br />
(tampa abra)<br />
Painel de controlo<br />
Tampa do condensador<br />
Pega da tampa do condensador<br />
(Puxar para abrir)<br />
botão dos<br />
PROGRAMAS<br />
Indicador<br />
Filtro<br />
Luzes<br />
Progresso ou Atraso<br />
Entrada de ar<br />
Luz<br />
Limpar condensador<br />
Luz<br />
Limpar filtro<br />
Guia de Secagem<br />
Botão<br />
LIGAR/DESLIGAR<br />
O botão LIGAR/DESLIGAR : Se a secador estiver<br />
a funcionar e se premir este botão, a secador pára.<br />
Pressione novamente para reiniciar a secagem.<br />
O Guia de Secagem permite a consulta de uma<br />
tabela de utilização fácil, com a descrição dos tipos<br />
de tecidos e as capacidades de carga.<br />
O botão dos PROGRAMAS define o programa:<br />
rode-o até que o indicador esteja a apontar para o<br />
programa que pretende seleccionar (ver Arranque e<br />
Programas).<br />
Os botões/luzes de OPÇÃO seleccionam as opções<br />
disponíveis para o programa seleccionado. As luzes<br />
indicam que a opção foi seleccionada (ver Arranque e<br />
Programas).<br />
O botão INICIAR/PAUSA inicia um programa<br />
seleccionado. Quando pressionar este botão, é<br />
emitido um sinal sonoro e as luzes de progresso<br />
ficam intermitentes para confirmarem a acção.<br />
Durante a execução de um programa, se pressionar<br />
este botão o secador pára.<br />
A luz fica verde quando o programa está em<br />
funcionamento, laranja e intermitente se o programa<br />
estiver em pausa ou verde e intermitente se estiver á<br />
Botões e luzes de<br />
botão e luz Luz<br />
OPÇAO INICIAR/PAUSA Esvaziar água<br />
espera para iniciar um programa (ver Arranque e<br />
Programas).<br />
As luzes Progresso ou Atraso em estado intermitente<br />
indicam o estado do programa ou o tempo de atraso.<br />
Durante um início atrasado, as luzes passam a<br />
intermitente para indicar o atraso seleccionado.<br />
Quando não se encontram em estado intermitente,<br />
indicam cada fase do programa, acendendo a luz<br />
correspondente (ver Arranque e Programas).<br />
A luz indicadora Esvaziar água indica que o<br />
recipiente de água deve ser esvaziado. A luz demora<br />
alguns segundos a apagar-se depois de colocar<br />
novamente o recipiente de água vazio e, para que a<br />
luz se apague, a secadora deve estar em<br />
funcionamento (ver Controlos).<br />
Nota: Se a cuba da água se encher, a luz do indicador<br />
fica intermitente, a temperatura é desligada e a sua<br />
roupa não seca.<br />
A luz Limpar filtro lembra, antes de cada programa,<br />
que é essencial limpar o filtro de cada vez que a<br />
secadora é utilizada (ver Manutenção e cuidado).<br />
A luz Limpar condensador relembra que é<br />
essencial limpar o condensador em intervalos<br />
regulares (ver Manutenção e cuidado).<br />
19
Arranque e Programas<br />
P<br />
Escolher um programa<br />
1. Ligue a secadora a uma tomada de corrente<br />
eléctrica.<br />
2. Escolha a sua roupa de acordo com o tipo de<br />
tecido (ver Roupa).<br />
3. Abra a porta e certifique-se de que o filtro está<br />
limpo e bem colocado e de que o recipiente da<br />
água está vazio e na respectiva posição (ver<br />
Manutenção).<br />
4. Carregue a máquina e certifique-se de que<br />
nenhuma peça fica presa no fecho da porta.<br />
Feche a porta.<br />
5. Se nenhuma das luzes estiver acesa: Pressione o<br />
botão LIGAR/DESLIGAR .<br />
6. Escolha o programa de secagem após consulta<br />
da Guia de Programas (ver Programas) bem<br />
como as indicações para cada tecido (ver Roupa).<br />
- Seleccione um programa, rodando o botão<br />
PROGRAMAS.<br />
7. Defina um tempo de atraso, bem como outras<br />
opções, conforme necessário.<br />
Programa Engoma fácil<br />
8. A luz INICIAR/PAUSA está verde intermitente:<br />
- prima o botão INICIAR/PAUSA para iniciar.<br />
A luz verde deixa de piscar.<br />
Durante o programa de secagem, pode verificar<br />
a sua roupa e retirar peças que já estejam secas<br />
enquanto as restantes continuam a secar.<br />
Quando fechar novamente a porta, prima o<br />
botão INICIAR de modo a retomar a secagem.<br />
(Quando a porta está aberta, a luz INICIAR/PAUSA<br />
fica laranja intermitente. Depois de fechar a porta<br />
e premir o botão INICIAR/PAUSA, a luz<br />
INICIAR/PAUSA deixa de piscar e fica verde.)<br />
9. Quando o programa estiver concluído. Será<br />
emitido um sinal sonoro. Abra a porta, retire a<br />
roupa, limpe o filtro e coloque-o novamente.<br />
Esvazie o recipiente de água e coloque-o<br />
novamente (ver Manutenção).<br />
Se a opção Pós Anti-Vincos tiver sido<br />
seleccionada e não retirar a roupa imediatamente,<br />
a secadora roda ocasionalmente durante 10<br />
horas ou até abrir a porta.<br />
10. Desligue a secadora.<br />
O ‘Engoma fácil’ é um programa breve de 10 minutos (8 minutos de calor, seguidos de 2 minutos de um<br />
período de rotação a frio), que ventila as fibras das roupas que foram deixadas na mesma posição/Local<br />
durante um período de tempo prolongado. O ciclo relaxa as fibras e facilita a passagem a ferro.<br />
! O ‘Engoma fácil’ não é um programa de secagem e não deve ser utilizado com peças de roupa molhadas.<br />
Para obter os melhores resultados:<br />
1. Não carregue mais do que a capacidade máxima.<br />
Estes números referem-se ao peso em seco:<br />
Tecido<br />
Carga máxima<br />
Algodão e Misturas de algodão 2,5 kg<br />
Sintéticos<br />
2 kg<br />
Gangas<br />
2 kg<br />
2. Descarregue a secadora imediatamente após o fim do programa, pendure, dobre ou engome as peças de<br />
roupa e guarde-as no armário. Caso isto não seja possível, repita o programa.<br />
O efeito ‘Engoma fácil’ varia de tecido para tecido. Funciona bem com tecidos tradicionais como algodão e<br />
misturas de algodão e menos bem em fibras acrílicas e em materiais como Tencel®.<br />
20
Arranque e Programas<br />
Programas<br />
P<br />
! Se nenhuma das luzes estiver acesa; Prima o botão LIGAR/DESLIGADO e, em seguida, seleccione o programa.<br />
Programa O que faz... Como defini-lo... Nota:<br />
Engoma fácil<br />
Algodão<br />
Extra<br />
seco<br />
Algodão<br />
Armário<br />
Sintéticos<br />
Armário<br />
Secagem<br />
temporizada<br />
(150, 140, 120,<br />
100, 80, 70, 60,<br />
50, 40,30 ou 20<br />
minutos)<br />
Breve programa<br />
(aproximadamente 10<br />
minutos) que amacia as fibras<br />
da roupa que está pronta<br />
para ser engomada.<br />
Seca a roupa na definição<br />
Calor Alto, pronta a vestir.<br />
Seca a roupa na definição<br />
Calor Alto , pronta a ser<br />
guardada no armário.<br />
Seca a roupa na definição<br />
Baixo Calor, pronta a ser<br />
guardada no armário.<br />
Seca a roupa molhada que<br />
deseja secar com baixo<br />
calor ou cargas pequenas<br />
(menos de 1kg).<br />
Pode ser utilizado com a<br />
opção de calor alto, caso<br />
prefira utilizar um programa<br />
temporizado.<br />
1. Defina o interruptor PROGRAMA<br />
para a posição<br />
2. Seleccione qualquer Opção, se<br />
requerido.<br />
3. Pressione o botão INICIAR/PAUSA<br />
1. Defina o interruptor PROGRAMA<br />
para a posição<br />
2. Seleccione qualquer Opção, se<br />
requerido.<br />
3. Pressione o botão INICIAR/PAUSA<br />
1. Defina o interruptor PROGRAMA<br />
para a posição<br />
2. Seleccione qualquer Opção, se<br />
requerido.<br />
3. Pressione o botão INICIAR/PAUSA<br />
1. Defina o interruptor PROGRAMA<br />
para a posição<br />
2. Seleccione qualquer Opção, se<br />
requerido.<br />
3. Pressione o botão INICIAR/PAUSA<br />
1. Defina o interruptor PROGRAMA<br />
para o tempo pretendido: 150, 140,<br />
120, 100, 80, 70, 60, 50, 40, 30 ou 20.<br />
2. Seleccione qualquer Opção, se<br />
requerido.<br />
3. Pressione o botão INICIAR/PAUSA<br />
! Este não é um programa<br />
de secagem (ver página<br />
anterior).<br />
Opções disponíveis:<br />
Nenhuma<br />
Opções disponíveis:<br />
Início Atrasado<br />
Cuidados Pré-Vincos<br />
Cuidados Pós-Vincos<br />
Opções disponíveis:<br />
Início Atrasado<br />
Cuidados Pré-Vincos<br />
Cuidados Pós-Vincos<br />
Opções disponíveis:<br />
Início Atrasado<br />
Cuidados Pré-Vincos<br />
Cuidados Pós-Vincos<br />
Opções disponíveis:<br />
Calor Alto<br />
Início Atrasado<br />
Cuidados Pré-Vincos<br />
Cuidados Pós-Vincos<br />
Consulte os tempos de<br />
secagem propostos (ver<br />
Roupa).<br />
Rotação a<br />
frio<br />
Breve programa<br />
(aproximadamente 10 minutos)<br />
que arrefece fibras ou roupa.<br />
1. Defina o interruptor PROGRAMA<br />
para a posição<br />
2. Pressione o botão INICIAR/PAUSA<br />
Os últimos 10 minutos destes<br />
programas é o “Rotação a<br />
Frio” (ver em seguida)<br />
Options available:<br />
Nenhuma<br />
21
Arranque e Programas<br />
P<br />
Controlos<br />
● Botão dos PROGRAMAS<br />
! Cuidado, se a posição do botão dos PROGRAMAS<br />
fôr alterada após premir o botão INICIAR/PAUSA ,<br />
a nova posição NÃO alterará o programa seleccionado.<br />
Para alterar um programa seleccionado, prima o<br />
botão INICIAR/PAUSA ; a luz fica laranja e intermitente<br />
para indicar que o programa está em pausa.<br />
Seleccione o novo programa e quaisquer opções<br />
necessárias e, de seguida, a luz ficará verde. Prima<br />
novamente o botão INICIAR/PAUSA e o novo<br />
programa é iniciado.<br />
●<br />
22<br />
Botões / Luzes OPÇÃO<br />
Estes botões são utilizados para personalizar o<br />
programa seleccionado. Nem todas as opções são<br />
possíveis para todos os programas (ver Arranque e<br />
Programas). Se uma opção não são possíveis e caso<br />
prima o botão, será emitido um sinal sonoro será por<br />
três vezes. Se a opção estiver disponível, o sinal<br />
sonoro será emitido uma única vez e a luz de opção<br />
ao lado do botão acender-se-á para confirmar a<br />
selecção.<br />
Luzes Progresso ( Secagem, Rotação a frio,<br />
) / Atraso (3hr, 6hr, 9hr)<br />
Quando a luz ao lado do botão Atraso estiver acesa,<br />
estas luzes passarão a intermitente para indicar que o<br />
tempo de atraso foi seleccionado. Durante os outros<br />
programas, indicam o progresso do secador.<br />
Cada uma dessas luzes acende-se quando a fase<br />
correspondente for iniciada.<br />
Atraso de Tempo<br />
O início de alguns programas (ver Arranque e Programas)<br />
pode ser atrasado num máximo de 9 horas em fases<br />
de 3 horas. Certifique-se de que a garrafa de água<br />
está vazia antes de definir um início atrasado.<br />
Quando o início atrasado está seleccionado, a luz ao<br />
lado do botão “Atraso” ficará acesa e a luz do período<br />
de atraso seleccionado passará a intermitente (após<br />
premir o botão INICIAR/PAUSA).<br />
Para definir um início atrasado, prima o botão “Atraso<br />
de Tempo”. A luz ao lado do botão ficará acesa em<br />
conjunto com a luz de atraso “3hr”. Se premir novamente<br />
o botão, a definição de atraso avançará para “6hr”. A<br />
luz “3hr” será apagada e a luz “6hr” ficará acesa.<br />
Cada vez que premir o botão, a definição de atraso avança<br />
3 horas, conforme indicado pela luz correspondente.<br />
Se premir novamente o botão quando a luz “9hr” estiver<br />
acesa, o atraso será cancelado. Manter o botão<br />
Ligar/Desligar sob pressão também cancela esta opção.<br />
Cuidados Pré-Vincos<br />
Esta opção apenas está dosponível caso seja<br />
seleccionado um início atrasado. Por vezes, a roupa<br />
entra num ciclo de rotação durante o período atrasado,<br />
de modo a ajudar a prevenir a formação de vincos.<br />
Calor Alto<br />
Disponível para programas de Secagem Temporizada.<br />
Se premir este botão, seleccionará uma definição de<br />
calor alto e a luz ao longo do botão é acesa. Por<br />
predefinição, o calor dos programas temporizados é<br />
baixo. Se premir o botão quando a luz ao longo do<br />
botão se encontra acesa, seleccionará uma definição<br />
de baixo calor e a luz apagará.<br />
Cuidados Pós-Vincos<br />
Quando disponível e seleccionada, a máquina faz,<br />
algumas vezes, num ciclo de rotação após o final<br />
dos ciclos de secagem e Rotação a Frio, de modo a<br />
ajudar a prevenir a formação de vincos, caso não<br />
seja possível retirar a roupa imediatamente após a<br />
conclusão do programa. A luz fica acesa<br />
durante esta fase.<br />
Luz Esvaziar água / recipiente de água<br />
(Se esvaziou o secador, esta luz poderá ser ignorada,<br />
uma vez que não há necessidade de esvaziar o<br />
recipiente de água).<br />
Quando esta luz encontra-se acesa (não em estado<br />
intermitente), avisa-o que tem de esvaziar o<br />
recipientede água.<br />
Se o recipiente de água se encher durante um<br />
programa, o aquecedor desliga-se e o secador<br />
executa um período “Rotação Fria” , a luz passa a<br />
intermitente e será emitido um sinal sonoro. Deverá<br />
esvaziar o recipiente de água e reiniciar o secador,<br />
caso contrário, a roupa não ficará seca. Depois de<br />
reiniciar o secador, a luz demorará alguns segundos<br />
até se apagar.<br />
Para evitar este procedimento, esvazie sempre o<br />
recipiente de água cada vez que utilizar o secador<br />
(ver Manutenção).<br />
●<br />
Abertura da Porta<br />
A abertura da porta (ou premir o botão INICIAR/PAUSA<br />
) durante um programa provoca a interrupção do<br />
secador e os seguintes efeitos:<br />
● A luz INICIAR/PAUSA fica laranja e intermitente.<br />
● Durante uma fase de atraso, o mesmo prosseguirá<br />
com a contagem decrescente. O botão<br />
INICIAR/PAUSA terá de ser premido para<br />
retomar o programa de atraso.<br />
Uma das luzes de atraso passará a intermitente<br />
para indicar a definição de atraso actual.<br />
● O botão INICIAR/PAUSA terá de ser premido<br />
para retomar o programa. As luzes de progresso<br />
serão alteradas para indicar o estado actual<br />
INICIAR/PAUSA deixa de piscar e passa a verde.<br />
● Durante a fase “Cuidados Pós-Vincos” de um<br />
programa de secagem, o programa terminará. Se<br />
premir o botão INICIAR/PAUSA , um novo<br />
programa será reiniciado desde o princípio.<br />
● A alteração botão dos PROGRAMAS seleccionará<br />
um novo programa e a luz INICIAR/PAUSA fica<br />
verde e intermitente. Tal poderá ser utilizado para<br />
seleccionar o programa “Rotação a Frio” para<br />
arrefecer as peças, caso considere que estejam<br />
demasiado secas. Prima o botão INICIAR/PAUSA<br />
para iniciar o novo programa.<br />
●<br />
Nota<br />
Em caso de corte de electricidade, desligue a<br />
alimentação ou remova a ficha. Quando a<br />
electricidade for reposta, prima o botão<br />
INICIAR/PAUSA para retomar o programa.
Roupa<br />
Escolher a sua roupa<br />
• Consulte os símbolos nas etiquetas das roupas,<br />
de modo a certificar-se de que os artigos podem<br />
ser utilizados na secadora.<br />
• Escolha a roupa por tipo de tecido.<br />
• Esvazie os bolsos e verifique os botões.<br />
• Feche os fechos de correr e desaperte cintos e<br />
correias.<br />
• Torça cada peça de modo a eliminar o máximo de<br />
água possível.<br />
! Não carregue peças a pingar na secadora.<br />
Carga máxima<br />
Não carregue mais do que a capacidade máxima.<br />
Estes números referem-se ao peso em seco:<br />
Fibras naturais: 8 kg máx.<br />
Fibras sintéticas: 3 kg máx.<br />
! NÃO sobrecarregue a máquina, uma vez que pode<br />
resultar num desempenho de secagem reduzido.<br />
Carga típica<br />
Nota: 1kg = 1000g<br />
Roupas<br />
Blusa de algodão 150 g<br />
Outros<br />
100 g<br />
Vestido de algodão 500 g<br />
Outros<br />
350 g<br />
Calças de ganga<br />
700 g<br />
10 fraldas 1000 g<br />
Camisa de algodão 300 g<br />
Outros<br />
200 g<br />
T-Shirt<br />
125 g<br />
Etiquetas de cuidado na lavagem<br />
Observe as etiquetas nas suas peças de roupa,<br />
especialmente se está a utilizar a secadora pela<br />
primeira vez. Os símbolos que se seguem são os<br />
mais comuns:<br />
Pode ser seco na máquina<br />
Não pode ser seco na máquina<br />
Seque com a temperatura máxima<br />
Seque com a temperatura mínima<br />
Peças não adequadas para secagem na máquina<br />
• Artigos que contenham borracha ou materiais tipo<br />
borracha ou películas de plástico (almofadas ou<br />
material em PVC), quaisquer artigos inflamáveis ou<br />
objectos que contenham substâncias inflamáveis<br />
(toalhas vaporizadas com laca de cabelo).<br />
• Fibras de vidro (alguns tipos de reposteiros).<br />
• Artigos que tenham sido limpos a seco.<br />
• Itens com o código ITCL (ver Peças<br />
delicadas). Podem ser limpos com produtos de<br />
limpeza a seco domésticos. Siga as instruções<br />
cuidadosamente.<br />
• Peças volumosas (colchas, sacos-cama,<br />
almofadas, cobertas grandes, etc). Estes artigos<br />
expandem-se e podem impedir o fluxo de ar no<br />
interior da secadora.<br />
P<br />
Peças domésticas<br />
Capa de edredão em algodão 1500 g<br />
(Duplo) Outros 1000 g<br />
Toalha de mesa grande<br />
700 g<br />
Toalha de mesa pequena<br />
250 g<br />
Pano de cozinha<br />
100 g<br />
Toalhão de banho<br />
700 g<br />
Toalha de rosto<br />
350 g<br />
Lençol de banho<br />
500 g<br />
Lençol (solteiro)<br />
350 g<br />
No fim de um ciclo de secagem, os algodões ainda<br />
devem estar húmidos caso tenha agrupado algodões<br />
e sintéticos. Se isto acontecer, basta aplicar mais um<br />
breve período de secagem.<br />
● Nota: Nos últimos 10 minutos de cada período de<br />
tempo,procede-se à secagem a frio; tenha em<br />
consideração esta função ao definir o tempo, uma<br />
vez que este período não seca a sua roupa.<br />
23
Roupa<br />
P<br />
Peças delicadas<br />
Cobertores e cobertas de cama: artigos em acrílico<br />
(Acilan, Courtelle, Orion, Dralon) devem ser secos<br />
com especial cuidado com um TEMPERATURA<br />
BAIXA. Evite secar por um longo período de tempo.<br />
Peças pregueadas ou enrugadas: leia as instruções<br />
de secagem do fabricante da peça.<br />
Artigos com goma: não seque estes artigos com<br />
peças sem goma. Certifique-se de que retira o<br />
máximo da solução de goma da carga antes de<br />
colocá-la na secadora. Não seque em demasiado: a<br />
goma transforma-se em pó e deixa a sua roupa mole,<br />
eliminando o propósito da goma.<br />
Tempos de secagem<br />
A tabela (ver abaixo) apresenta tempos de secagem<br />
APROXIMADOS em Minutos. Os pesos referem-se a<br />
artigos secos.<br />
Estes tempos são aproximados e podem variar<br />
dependendo de:<br />
• Quantidade de água mantida nas roupas após o<br />
ciclo de centrifugação: as toalhas e peças<br />
delicadas retêm muita água.<br />
• Tecidos: artigos que sejam do mesmo tipo de<br />
tecido, mas que sejam de texturas e espessuras<br />
diferentes poderão não ter o mesmo tempo de<br />
secagem.<br />
• Quantidade de roupa: artigos únicos ou pequenas<br />
cargas podem demorar mais tempo a secar.<br />
• Secagem: Se pretender engomar algumas das<br />
suas roupas, podem ser retiradas da máquina<br />
ainda um pouco húmidas. As restantes poderão<br />
ficar mais tempo, se precisar delas<br />
completamente secas.<br />
• Definição de temperatura.<br />
• Temperatura ambiente: se o espaço em que a<br />
máquina está instalada estiver frio, poderá<br />
demorar mais tempo a secar as suas roupas.<br />
• Volumes: alguns artigos mais volumosos devem ser<br />
secos na máquina com cuidado. Sugerimos que<br />
remova estes artigos várias vezes, sacuda-os e<br />
volte a colocá-los na máquina até que estejam<br />
completamente secos.<br />
! Não seque em demasiado as suas roupas.<br />
Todos os tecidos contêm um pouco de humidade<br />
natural, que os mantêm suaves e macios.<br />
Algodão<br />
Tempos de secagem de 800-1000rpm na máquina de lavar<br />
Metade da carga<br />
Carga completa<br />
Calor Alto<br />
1 kg 2 kg 3 kg 4 kg<br />
5 kg 6 kg 7 kg<br />
8 kg<br />
Sintéticos<br />
30 - 40 40 - 55 55 - 70 70 - 80 80 - 90 95 - 120 120 - 140<br />
Tempos de secagem em centrifugação reduzida na máquina de lavar<br />
130 - 150<br />
Metade da carga<br />
Carga completa<br />
Baixo Calor<br />
Acrílicos<br />
Baixo Calor<br />
1 kg 2 kg<br />
3 kg<br />
40 - 50<br />
50 - 70 70 - 90<br />
Tempos de secagem em centrifugação reduzida na máquina de lavar<br />
Metade da carga<br />
Carga completa<br />
1 kg 2 kg<br />
40 - 60 55 - 75<br />
24
Avisos e Sugestões<br />
! O equipamento foi concebido e construído de<br />
acordo com normas de segurança internacionais.<br />
Estes avisos são apresentados por razões de<br />
segurança e devem ser seguidos minuciosamente.<br />
Segurança Geral<br />
● Esta secadora não se destina à utilização por pessoas<br />
(incluindo crianças) com capacidades físicas,<br />
sensoriais ou mentais reduzidas ou com falta de<br />
experiência ou conhecimento, a menos que tenham<br />
supervisão ou instruções quanto à utilização do<br />
aparelho por parte de uma pessoa responsável<br />
pela sua segurança.<br />
● Esta secadora foi concebida para utilização<br />
doméstica e não utilização profissional.<br />
● Não toque no equipamento com os pés<br />
descalços, nem com as mãos ou pés molhados.<br />
● Desligue a máquina retirando a ficha e não puxando<br />
o fio.<br />
● As crianças não devem aproximar-se da secadora<br />
durante a sua utilização. Depois da utilização da<br />
secadora, desligue-a no botão e da corrente<br />
eléctrica. Mantenha a porta fechada de modo que as<br />
crianças não utilizem a máquina como um brinquedo.<br />
● As crianças não devem ser deixadas sozinhas<br />
para se garantir que não brincam com a secadora.<br />
● O aparelho deve ser instalado correctamente com a<br />
ventilação adequada. A entrada de ar no painel<br />
frontal e a ventilação posterior por trás da secadora<br />
nunca devem estar obstruídos (ver Instalação).<br />
● Nunca utilize a secadora em carpetes, cuja altura<br />
impeça o ar de entrar na secadora a partir da base.<br />
● Verifique se a secadora está vazia antes de carregá-la.<br />
● O painel traseiro da secadora pode ficar<br />
muito quente. Nunca toque neste painel<br />
durante a utilização.<br />
● Não utilize a secadora sem que o filtro, o recipiente<br />
de água e o condensador estejam seguramente<br />
afixados nas respectivas posições (ver Manutenção).<br />
● Não utilize amaciador líquido na sua máquina de<br />
secar; adicione-o ao enxaguamento final da sua<br />
máquina de lavar.<br />
● Não sobrecarregue a secadora (ver Roupa para<br />
além das cargas máximas).<br />
● Não carregue peças que estejam a pingar.<br />
● Seque apenas artigos que tenham sido lavados com<br />
água e detergente, enxaguados e centrifugados.<br />
Existe um risco de incêndio se secar peças que<br />
NÃO tenham sido lavadas com água.<br />
● Verifique cuidadosamente todas as instruções nas<br />
etiquetas das roupas (ver Roupa).<br />
● Não seque peças de vestuário que tenham sido<br />
tratadas com produtos químicos.<br />
● Nunca secar artigos contaminados com substâncias<br />
inflamáveis (óleo de culinária, acetona, álcool,<br />
Gasolina, querosene, tira-nódoas, turpentina, ceras,<br />
removedores de cera e lacas para o cabelo), a<br />
menos que lavados com água quente e com uma<br />
quantidade considerável de detergente extra.<br />
● Não secar borracha, artigos com partes em borracha<br />
e peças de vestuário, almofadas com aplicações<br />
em borracha, espuma (espuma de látex), borracha,<br />
plástico, toucas de duche, têxteis impermeáveis,<br />
fraldas ou pensos descartáveis, polietileno ou papel.<br />
● Não seque artigos grandes e muito volumosos.<br />
● Não seque fibras acrílicas a altas temperaturas.<br />
● Remova todos os objectos dos bolsos, em especial,<br />
isqueiros (risco de explosão).<br />
● Complete cada programa com a respectiva Fase<br />
de rotação a frio.<br />
● Não desligue a máquina quando ainda existirem<br />
artigos quentes no interior.<br />
● Limpe o filtro após cada utilização (ver Manutenção).<br />
● Esvazie o recipiente de água e coloque-o<br />
novamente (ver Manutenção).<br />
● Limpe a unidade do condensador após intervalos<br />
regulares (ver Manutenção).<br />
● Não permita a acumulação de resíduos na secadora.<br />
● Nunca suba para cima da secadora. Pode<br />
resultar em ferimentos.<br />
● Siga sempre as normas e requisitos eléctricos<br />
(ver Instalação).<br />
● Compre sempre peças sobressalentes e acessórios<br />
originais (ver Reparação).<br />
! AVISO: Nunca parar a secadora antes do fim do<br />
ciclo de secagem, a menos que todos os artigos<br />
sejam rapidamente retirados e espalhados de modo a<br />
dissipar o calor.<br />
Informações Acerca de Reciclagem<br />
e Eliminação de Resíduos<br />
Como parte do nosso continuado empenho em ajudar<br />
o ambiente, reservamo-nos o direito de utilizar<br />
componentes de qualidade, de modo a manter os<br />
custos baixos para os clientes e minimizar o<br />
desperdício de material.<br />
● Eliminação do material da embalagem: siga os<br />
regulamentos locais, de modo que a embalagem<br />
possa ser reciclada.<br />
●<br />
De modo a minimizar o risco de lesões para crianças,<br />
remova a porta e a ficha e corte o fio eléctrico do<br />
aparelho. Elimine estas peças separadamente a<br />
fim de assegurar que o aparelho não possa mais<br />
ser ligado a uma tomada eléctrica.<br />
Recolha dos electrodomésticos<br />
A directiva Europeia 2002/96/CE referente à gestão de<br />
resíduos de aparelhos eléctricos e electrónicos (RAEE),<br />
prevê que os electrodomésticos não devem ser escoados<br />
no fluxo normal dos resíduos sólidos urbanos. Os<br />
aparelhos desactualizados devem ser recolhidos<br />
separadamente para optimizar a taxa de recuperação e<br />
reciclagem dos materiais que os compõem e impedir<br />
potenciais danos para a saúde humana e para o ambiente.<br />
O símbolo constituído por um contentor de lixo<br />
barrado com uma cruz deve ser colocado em todos<br />
os produtos por forma a recordar a obrigatoriedade<br />
de recolha separada.<br />
Os consumidores devem contactar as autoridades locais<br />
ou os pontos de venda para solicitar informação<br />
referente ao local apropriado onde devem depositar os<br />
electrodomésticos velhos.<br />
Poupar energia e respeitar o ambiente<br />
●<br />
●<br />
●<br />
Torça as peças de vestuário para eliminar o<br />
excesso de água antes de colocá-las na máquina de<br />
secar (se primeiro utilizar uma máquina de lavar,<br />
seleccione um ciclo de centrifugação elevado). Ao<br />
fazer isto, poupa tempo e energia durante a secagem.<br />
Seque sempre com cargas completas – assim,<br />
poupa energia: artigos únicos ou pequenas<br />
cargas podem demorar mais tempo a secar.<br />
Limpe o filtro após cada utilização para cortar nos<br />
custos de consumo de energia (ver Manutenção).<br />
P<br />
25
Manutenção e Cuidado<br />
P<br />
Desligar a electricidade<br />
! Desligue a secadora quando não estiver em utilização,<br />
durante tarefas de limpeza e durante todas as operações<br />
de manutenção.<br />
Limpar o filtro depois de cada ciclo<br />
O filtro é uma parte importante da sua secadora:<br />
acumula restos de fibras e resíduos que se formam<br />
durante a secagem. Pequenos objectos também<br />
podem ficar presos no filtro. Assim, após a secagem,<br />
limpe o filtro, lavando-o debaixo de água corrente ou<br />
limpe com o seu aspirador. Caso o filtro fique<br />
entupido, o fluxo de ar no interior da secadora fica<br />
seriamente comprometido: os tempos de secagem<br />
prolongam-se e consome mais energia. Também<br />
pode danificar a sua secadora.<br />
O filtro encontra-se na grelha frontal da secadora (ver<br />
diagrama).<br />
Remoção do filtro:<br />
1. Puxe a pega de plástico do filtro para cima (ver<br />
diagrama).<br />
2. Limpe o filtro e coloque-o novamente<br />
correctamente.<br />
Certifique-se de que o filtro está completamente<br />
encaixado na grelha da máquina.<br />
! Não utilize a máquina sem colocar novamente o filtro.<br />
Esvazie o recipiente de água após cada<br />
ciclo<br />
Puxe o recipiente para fora da secadora e esvazie-o<br />
num local adequado. Coloque novamente o recipiente<br />
de água de forma segura.<br />
Verifique sempre o recipiente de água e esvazie-o<br />
antes de iniciar um programa de secagem novo.<br />
Verificar o tambor depois de cada ciclo<br />
Rode o tambor manualmente, de modo a remover<br />
pequenos objectos (lenços) que podem ter ficado na<br />
máquina.<br />
Recipiente de água<br />
Filtro<br />
Limpar o tambor<br />
! Não utilize agentes de limpeza de aço inoxidável ou<br />
palha de aço, abrasivos, para limpar o tambor.<br />
É possível que uma película colorida comece a<br />
aparecer no tambor de aço inoxidável. Tal poderá ser<br />
causado por uma combinação de água e/ou agentes<br />
de limpeza como, por exemplo, amaciador de tecido<br />
da lavagem. Esta película colorida não afectará o<br />
desempenho do secador.<br />
Limpar a unidade do condensador<br />
Periodicamente (todos os meses), retire a unidade do<br />
condensador e limpe qualquer acumulação de cotão<br />
que se encontre entre as placas, enxaguando por<br />
baixo de água corrente fria. Este procedimento deve<br />
ser concluído com água fria a partir da parte traseira<br />
do condensador.<br />
Remoção do condensador:<br />
1. Desligue a secadora e abra a porta.<br />
2. Abra a tampa do condensador (ver diagrama).<br />
Solte os três suportes, rodando-os da direita para<br />
a esquerda a 90° e, em seguida, puxando a pega<br />
para removê-los da secadora.<br />
3. Limpe a superfície dos vedantes e coloque<br />
novamente, certificando-se de que os suportes<br />
estão bem fixos.<br />
Limpeza<br />
● As partes externas de metal ou em plástico e<br />
borracha podem ser limpas com um pano húmido.<br />
● Periodicamente (de 6 em 6 meses), aspire a grelha<br />
da entrada de ar frontal e as ventilações da parte<br />
posterior da secadora para retirar qualquer<br />
acumulação de cotão, linho ou pó. Remova também<br />
a acumulação de cotão da parte frontal do<br />
condensador e áreas dos filtros e limpe<br />
ocasionalmente com um aspirador.<br />
! Não utilize solventes nem produtos abrasivos.<br />
! A sua secadora utiliza componentes de rolamentos<br />
especiais que não necessitam de lubrificação.<br />
! Verifique a sua secadora regularmente por técnicos<br />
autorizados, de modo a certificar-se da segurança<br />
eléctrica e mecânica (ver Reparação).<br />
Torneia<br />
Traseira<br />
Unidade do condensador<br />
Tampa do condensador<br />
Suportes<br />
Pega<br />
Entrada<br />
de ar<br />
Frente<br />
Unidade do condensador<br />
26
Resolução de problemas<br />
Um dia a sua máquina parece não querer funcionar. Antes de contactar o seu Centro de Serviços (ver<br />
Reparação), analise as seguintes sugestões de resolução de problemas:<br />
P<br />
Problema:<br />
Causas possíveis / Solução:<br />
A secadora não inicia.<br />
O ciclo de secagem não inicia.<br />
Demora muito tempo a secar<br />
A luz Esvaziar água<br />
encontra-se em estado<br />
intermitente mas o secador<br />
apenas se encontra a<br />
funcionar há pouco tempo.<br />
A luz Esvaziar água<br />
encontra-se acesa e o<br />
recipiente de água não está<br />
cheio.<br />
A OPÇÃO acende-se e a luz<br />
INICIAR/PAUSA fica laranja e<br />
intermitente.<br />
●<br />
●<br />
●<br />
●<br />
●<br />
●<br />
●<br />
●<br />
●<br />
●<br />
●<br />
●<br />
●<br />
●<br />
●<br />
●<br />
●<br />
●<br />
●<br />
●<br />
A ficha não está ligada à tomada, ou não está a fazer contacto.<br />
Ocorreu uma falha de energia.<br />
Há um fusível queimado. Experimente ligar outro aparelho à tomada.<br />
Está a utilizar um cabo de extensão? Experimente ligar o fio de<br />
alimentação da secadora directamente à tomada.<br />
A porta está bem fechada?<br />
O botão PROGRAMAS não foi posicionado correctamente (ver Arranque<br />
e Programas).<br />
O botão INICIAR/PAUSA não foi posicionado correctamente (ver<br />
Arranque e Programas).<br />
Definiu um atraso do tempo (ver Arranque e Programas).<br />
O filtro não foi limpo (ver Manutenção).<br />
O recipiente de água tem de ser esvaziado? A luz esvaziar água<br />
encontra-se em estado intermitente? (ver Manutenção).<br />
O condensador tem de ser limpo? (ver Manutenção).<br />
A definição de temperatura não é ideal para o tipo de tecido que está a<br />
secar (ver Arranque e Programas, e ver Roupa).<br />
O tempo de secagem correcto não foi seleccionado para a carga (ver Roupa).<br />
A grelha de entrada de ar ou as grelhas traseiras estão obstruídas (ver<br />
Instalação, e ver Manutenção).<br />
As peças estavam demasiado molhadas (ver Roupa).<br />
A secadora foi sobrecarregada (ver Roupa).<br />
É provável que o recipiente de água não tenha sido esvaziado no início<br />
do programa. Não espere pelo sinal esvaziar água. Verifique sempre o<br />
recipiente e esvazie-o antes de iniciar um programa de secagem novo<br />
(ver Manutenção).<br />
Este procedimento é normal. A luz passa a intermitente quando o<br />
recipiente encontra-se cheio. Se a luz estiver acesa mas não em estado<br />
intermitente, significa que é apenas um aviso para esvaziar o recipiente<br />
(ver Arranque e Programas).<br />
Se a Opção estiver acesa e a luz INICIAR/PAUSA ficar intermitente em<br />
simultâneo com as luzes de Limpar condensador e Secagem a frio; ou<br />
se as luzes Progresso ou Atraso e a luz INICIAR/PAUSA ficar intermitente<br />
em simultâneo com as luzes Limpar filtro, Limpar condensador,<br />
Secagem a frio ou Fim (‘END’):<br />
- Desligue a máquina e desligue a ficha. Limpe o filtro e o condensador<br />
(ver Manutenção). Ligue novamente a ficha, ligue a máquina e, em<br />
seguida, inicie outro programa. Se a mesma combinação de luzes se<br />
mantiver intermitente, contacte o Centro de Serviços (ver Reparação).<br />
Se a Opçõa estiver acesa e a luz INICIAR/PAUSA ficar intermitente com<br />
qualquer outra combinação de luzes: anote as luzes que estão acesas e<br />
contacte o Centro de Serviço (ver Reparação).<br />
O programa acaba e as<br />
roupas estão mais húmidas<br />
do que deviam.<br />
! Por razões de segurança, a secadora tem um tempo de programa máximo<br />
de 4 horas. Se um programa automático não detectar a humidade final<br />
necessária durante este tempo, a secadora conclui o programa e pára.<br />
Verifique os pontos anteriores e execute novamente o programa; se os<br />
resultados continuarem húmidos, contacte o Centro de Serviço (ver<br />
Reparação).<br />
27
Reparação<br />
P<br />
Antes de contactar o Centro de<br />
Serviços:<br />
●<br />
●<br />
Utilize o guia de resolução de problemas para ver<br />
se consegue resolver o problema (ver Resolução<br />
de problemas).<br />
Caso contrário, desligue a secadora e contacte o<br />
Centro de Serviço mais próximo.<br />
O que dizer ao Centro de Serviço:<br />
● nome, morada e código postal.<br />
● número de telefone.<br />
● o tipo de problema.<br />
● a data de compra.<br />
● o modelo do aparelho (Mod.).<br />
● o número de série (S/N).<br />
Estas informações podem ser encontradas na<br />
etiqueta de dados, no interior da porta da máquina.<br />
Peças sobressalentes<br />
Esta secadora é uma máquina complexa. Repará-la<br />
sozinha ou através de um técnico não autorizado<br />
pode provocar danos a uma ou mais pessoas, pode<br />
danificar a máquina e pode invalidar a garantia das<br />
peças sobressalentes. Contacte um técnico<br />
autorizado se tiver problemas durante a utilização da<br />
máquina. As peças sobressalentes foram concebidas<br />
exclusivamente para este equipamento e não se<br />
destinam a outras utilizações.<br />
Programas Comparativos<br />
●<br />
Programas recomendados para o teste comparativo em conformidade com a norma EN61121<br />
Programa Programa a seleccionar Carga<br />
(EN61121)<br />
Algodão seco Algodão - Armário 2 8 kg<br />
Algodão de secagem a ferro Secagem temporizada - Calor Alto (120 minutos) 8 kg<br />
Têxteis delicados Sintéticos - Armário 3 3 kg<br />
! Nota: esta não é uma lista completa de opções do programa (ver Arranque e Programas).<br />
Este equipamento está em conformidade com as seguintes<br />
directivas da UE:<br />
- 2006/95/EC (Equipamento de Baixa Tensão)<br />
- 89/336/EEC, 92/31/EEC e 93/68/EEC (Compatibilidade Electromagnética)<br />
28
√‰ËÁ›Â˜ ¯Ú‹Û˘<br />
∆∂°¡ø∆∏ƒπ√<br />
GB<br />
English, 1<br />
TCL G31<br />
TCL G31X<br />
P<br />
Português, 15<br />
GR<br />
EÏÏËÓÈο, 29<br />
ÂÚȯfiÌÂÓ·<br />
ËÌ·ÓÙÈΤ˜ appleÏËÚÔÊÔڛ˜, 30-31<br />
∂ÁηٿÛÙ·ÛË, 32<br />
Ô˘ Ó· ÙÔappleÔıÂÙ‹ÛÂÙÂ ÙÔ ÛÙÂÁÓˆÙ‹ÚÈfi Û·˜<br />
∂Í·ÂÚÈÛÌfi˜<br />
√‰ËÁ›Â˜ ·ÓÙ›ÛÙÚÔÊ˘ ÙÔappleÔı¤ÙËÛ˘ applefiÚÙ·˜<br />
∞ÁˆÁfi˜ ·appleÔÛÙÚ¿ÁÁÈÛ˘ ÓÂÚÔ‡<br />
∏ÏÂÎÙÚÈ΋ Û‡Ó‰ÂÛË<br />
ÚÈÓ ·Ú¯›ÛÂÙ ӷ ¯ÚËÛÈÌÔappleÔț٠ÙÔ ÛÙÂÁÓˆÙ‹ÚÈfi Û·˜<br />
ÂÚÈÁÚ·Ê‹ ÙÂÁÓˆÙËÚ›Ô˘, 33<br />
°È· Ó· ·ÓÔ›ÍÂÙ ÙËÓ applefiÚÙ·<br />
÷ڷÎÙËÚÈÛÙÈο<br />
√ apple›Ó·Î·˜ ¯ÂÈÚÈÛÌÔ‡<br />
∂ÎΛÓËÛË Î·È appleÚÔÁÚ¿ÌÌ·Ù·, 34-36<br />
∂appleÈÏÔÁ‹ appleÚÔÁÚ¿ÌÌ·ÙÔ˜<br />
›Ó·Î·˜ appleÚÔÁÚ·ÌÌ¿ÙˆÓ<br />
ÃÂÈÚÈÛÙ‹ÚÈ·<br />
χÛÈÌÔ ÚÔ‡¯ˆÓ, 37-38<br />
¢È·¯ˆÚÈÛÌfi˜ ÚÔ‡¯ˆÓ<br />
√‰ËÁ›Â˜ ÛÙÂÁÓÒÌ·ÙÔ˜ ÛÙȘ ÂÙÈΤÙ˜<br />
ƒÔ‡¯· ÂȉÈ΋˜ ÊÚÔÓÙ›‰·˜<br />
ÃÚfiÓÔÈ ÛÙÂÁÓÒÌ·ÙÔ˜<br />
ÚÔÂȉÔappleÔÈ‹ÛÂȘ Î·È ˘appleԉ›ÍÂȘ, 39<br />
°ÂÓÈ΋ ·ÛÊ¿ÏÂÈ·<br />
∞applefiÚÚÈ„Ë<br />
∂ÍÔÈÎÔÓfiÌËÛË ÂÓ¤ÚÁÂÈ·˜ Î·È Û‚·ÛÌfi˜ ÛÙÔ appleÂÚÈ‚¿ÏÏÔÓ<br />
˘ÓÙ‹ÚËÛË Î·È ÊÚÔÓÙ›‰·, 40<br />
∞appleÔÛ‡Ó‰ÂÛË ·applefi ÙËÓ apple·ÚÔ¯‹ Ú‡̷ÙÔ˜<br />
∫·ı·ÚÈÛÌfi˜ Ê›ÏÙÚÔ˘ ÌÂÙ¿ ·applefi οı ¯Ú‹ÛË<br />
∂ÎÎÂÓÒÓÂÙ ÙÔÓ appleÂÚȤÎÙË ÓÂÚÔ‡ ÌÂÙ¿ ·applefi οı ·ÎÏÔ<br />
ŒÏÂÁ¯Ô˜ ÙÔ˘ ο‰Ô˘ ÌÂÙ¿ ·applefi οı ¯Ú‹ÛË<br />
∫·ı·ÚÈÛÌfi˜ Ù˘ ÌÔÓ¿‰·˜ Û˘Ìapple˘ÎÓˆÙ‹<br />
∫·ı·ÚÈÛÌfi˜ ÙÔ˘ ÛÙÂÁÓˆÙËÚ›Ô˘<br />
∞ÓÙÈÌÂÙÒappleÈÛË appleÚÔ‚ÏËÌ¿ÙˆÓ, 41<br />
∆¯ÓÈ΋ ˘appleÔÛÙ‹ÚÈÍË, 42<br />
∞ÓÙ·ÏÏ·ÎÙÈο<br />
! ∫Ú·Ù‹ÛÙ ·˘Ùfi ÙÔ ÂÁ¯ÂÈÚ›‰ÈÔ Ô‰ËÁÈÒÓ ¯Ú‹Û˘ appleÚÔÎÂÈ̤ÓÔ˘ Ó· ·Ó·ÙÚ¤¯ÂÙ Û ·˘Ùfi fiÙ·Ó ¯ÚÂÈ¿˙ÂÙ·È. ·›ÚÓÂÙÂ<br />
Ì·˙› Û·˜ ÙÔ ÂÁ¯ÂÈÚ›‰ÈÔ Û appleÂÚ›appleÙˆÛË ÌÂÙ·ÎfiÌÈÛ˘ , Î·È Û appleÂÚ›appleÙˆÛË appleÒÏËÛ˘ ‹ ÌÂÙ·‚›‚·Û˘ Ù˘ Û˘Û΢‹˜ ÛÂ<br />
ÙÚ›ÙÔ˘˜, ‚‚·ÈÒÓÂÙ fiÙÈ ÙÔ ÂÁ¯ÂÈÚ›‰ÈÔ ı· Û˘Óԉ‡ÂÈ ÙÔ ÛÙÂÁÓˆÙ‹ÚÈÔ, appleÚÔÎÂÈ̤ÓÔ˘ Ô Ó¤Ô˜ ȉÈÔÎÙ‹Ù˘ Ó·<br />
appleÏËÚÔÊÔÚÂ›Ù·È ÁÈ· ÙȘ appleÚÔÂȉÔappleÔÈ‹ÛÂȘ Î·È ˘appleԉ›ÍÂȘ Û¯ÂÙÈο Ì ÙË ÏÂÈÙÔ˘ÚÁ›· ÙÔ˘.<br />
! ¢È·‚¿ÛÙ ÙȘ Ô‰ËÁ›Â˜ ¯Ú‹Û˘ Ì appleÚÔÛÔ¯‹. √È ÂapplefiÌÂÓ˜ ÛÂÏ›‰Â˜ appleÂÚȤ¯Ô˘Ó ÛËÌ·ÓÙÈΤ˜ appleÏËÚÔÊÔڛ˜ ÁÈ· ÙËÓ<br />
ÂÁηٿÛÙ·ÛË Î·È ˘appleԉ›ÍÂȘ ÁÈ· ÙÔ ÙÚfiappleÔ ÏÂÈÙÔ˘ÚÁ›·˜ Ù˘ Û˘Û΢‹˜.<br />
GR<br />
29
ËÌ·ÓÙÈΤ˜ appleÏËÚÔÊÔڛ˜<br />
GR<br />
°È· ÙËÓ ·appleÔÙÂÏÂÛÌ·ÙÈ΋ ÏÂÈÙÔ˘ÚÁ›· ÙÔ˘ ÛÙÂÁÓˆÙËÚ›Ô˘ Ì ۇÛÙËÌ· Û˘Ìapple‡ÎÓˆÛ˘ ˘‰Ú·ÙÌÒÓ (Condenser dryer)<br />
appleÔ˘ ‰È·ı¤ÙÂÙÂ, appleÚ¤appleÂÈ Ó· ·ÎÔÏÔ˘ı›Ù ÙÔ apple·Ú·Î¿Ùˆ ¯ÚÔÓԉȿÁÚ·ÌÌ· Ù·ÎÙÈ΋˜ Û˘ÓÙ‹ÚËÛ˘:<br />
º›ÏÙÚÔ...<br />
! ƒ∂∂π Ó· ηı·Ú›˙ÂÙ ÙÔ Ê›ÏÙÚÔ ¯ÓÔ˘‰ÈÔ‡ ÌÂÙ¿<br />
·applefi ∫∞£∂ ·ÎÏÔ ÛÙÂÁÓÒÌ·ÙÔ˜.<br />
µ∏ª∞ 1<br />
∞ÓÔ›ÍÙ ÙËÓ applefiÚÙ· ÙÔ˘<br />
ÛÙÂÁÓˆÙËÚ›Ô˘ Û·˜.<br />
µ∏ª∞ 2<br />
∆Ú·‚‹ÍÙÂ Î·È ·Ê·ÈÚ¤ÛÙÂ<br />
ÙÔ Ê›ÏÙÚÔ (·applefi ÙȘ ‰‡Ô<br />
˘appleÔ‰Ô¯¤˜).<br />
µ∏ª∞ 3<br />
∫·ı·Ú›ÛÙ ÙȘ ÂÓ·appleÔı¤ÛÂȘ<br />
¯ÓÔ˘‰ÈÔ‡ ·applefi ÙÔ appleϤÁÌ·<br />
ÙÔ˘ Ê›ÏÙÚÔ˘.<br />
µ∏ª∞ 4<br />
∂apple·Ó·ÙÔappleÔıÂÙ‹ÛÙÂ ÙÔ<br />
Ê›ÏÙÚÔ - √∆∂ ÌË ı¤ÙÂÙÂ<br />
ÙÔ ÛÙÂÁÓˆÙ‹ÚÈÔ ÛÂ<br />
ÏÂÈÙÔ˘ÚÁ›· Â¿Ó ÙÔ Ê›ÏÙÚÔ<br />
‰ÂÓ ‚Ú›ÛÎÂÙ·È ÛÙË ı¤ÛË ÙÔ˘.<br />
! √ ÌË Î·ı·ÚÈÛÌfi˜ ÙÔ˘ Ê›ÏÙÚÔ˘ ÌÂÙ¿ ·applefi ∫∞£∂ ·ÎÏÔ ÛÙÂÁÓÒÌ·ÙÔ˜, ı· ÂappleËÚ¿ÛÂÈ ·ÚÓËÙÈο ÙËÓ ·applefi‰ÔÛË Ù˘<br />
Û˘Û΢‹˜ Û·˜.<br />
- £· ·apple·ÈÙÂ›Ù·È appleÂÚÈÛÛfiÙÂÚÔ˜ ¯ÚfiÓÔ˜ ÁÈ· ÙÔ ÛÙ¤Áӈ̷, Ì ·appleÔÙ¤ÏÂÛÌ· Ó· ηٷӷÏÒÓÂÙ·È appleÂÚÈÛÛfiÙÂÚË<br />
ËÏÂÎÙÚÈ΋ ÂÓ¤ÚÁÂÈ·.<br />
ÂÚȤÎÙ˘ ÓÂÚÔ‡...<br />
! ƒ∂∂π Ó· ÂÎÎÂÓÒÓÂÙ ÙÔÓ appleÂÚȤÎÙË ÓÂÚÔ‡ ÌÂÙ¿<br />
·applefi ∫∞£∂ ·ÎÏÔ ÛÙÂÁÓÒÌ·ÙÔ˜.<br />
µ∏ª∞ 1<br />
∆Ú·‚‹ÍÙ ÙÔÓ appleÂÚȤÎÙË<br />
ÓÂÚÔ‡ appleÚÔ˜ ÙÔ Ì¤ÚÔ˜ Û·˜,<br />
ÒÛÙÂ Ó· ÙÔÓ ·Ê·ÈÚ¤ÛÂÙÂ<br />
ÂÓÙÂÏÒ˜ ·applefi ÙÔ<br />
ÛÙÂÁÓˆÙ‹ÚÈÔ.<br />
µ∏ª∞ 2<br />
∞‰ÂÈ¿ÛÙ fiÏË ÙËÓ<br />
appleÔÛfiÙËÙ· ÓÂÚÔ‡ appleÔ˘<br />
¤¯ÂÈ Û˘ÁÎÂÓÙÚˆı› ÛÙÔÓ<br />
appleÂÚȤÎÙË ÓÂÚÔ‡.<br />
µ∏ª∞ 3<br />
∂apple·Ó·ÙÔappleÔıÂÙ‹ÛÙÂ ÙÔÓ<br />
appleÂÚȤÎÙË ÓÂÚÔ‡ ηÈ<br />
‚‚·Èˆı›Ù fiÙÈ ¤¯ÂÈ<br />
ÂÈÛ¯ˆÚ‹ÛÂÈ Î·Ï¿ ÛÙË<br />
ı¤ÛË ÙÔ˘.<br />
! ∏ ʈÙÂÈÓ‹ ¤Ó‰ÂÈÍË<br />
‘∞Ê·›ÚÂÛË ÓÂÚÔ‡’ apple·Ú·Ì¤ÓÂÈ<br />
·Ó·Ì̤ÓË – °È· Ó· Û·˜<br />
˘appleÂÓı˘Ì›˙ÂÈ fiÙÈ appleÚ¤appleÂÈ Ó·<br />
ÂÎÎÂÓÒÓÂÙ ÙÔÓ appleÂÚȤÎÙË<br />
ÓÂÚÔ‡ ηٿ ÙËÓ ¤Ó·ÚÍË Î·È<br />
ÙËÓ ÔÏÔÎÏ‹ÚˆÛË Î¿ıÂ<br />
appleÚÔÁÚ¿ÌÌ·ÙÔ˜.<br />
! ∏ ÌË ÂÎΤӈÛË ÙÔ˘ appleÂÚȤÎÙË ÓÂÚÔ‡ ¤¯ÂÈ ÙȘ ÂÍ‹˜ Û˘Ó¤appleÂȘ:<br />
- ∏ Û˘Û΢‹ ı· ÛÙ·Ì·Ù‹ÛÂÈ Ó· ‰ÈÔ¯ÂÙ‡ÂÈ ıÂÚÌfiÙËÙ· (Ì ·appleÔÙ¤ÏÂÛÌ· ÙÔ ÊÔÚÙ›Ô ÚÔ‡¯ˆÓ Ó· ÂÍ·ÎÔÏÔ˘ı› Ó·<br />
Â›Ó·È ˘ÁÚfi ÛÙÔ Ù¤ÏÔ˜ ÙÔ˘ ·ÎÏÔ˘ ÛÙÂÁÓÒÌ·ÙÔ˜).<br />
- ∏ ʈÙÂÈÓ‹ ¤Ó‰ÂÈÍË ‘∞Ê·›ÚÂÛË ÓÂÚÔ‡’ ·Ó·‚ÔÛ‚‹ÓÂÈ ÁÈ· Ó· Û·˜ ÂȉÔappleÔÈ‹ÛÂÈ fiÙÈ Ô appleÂÚȤÎÙ˘ ÓÂÚÔ‡ ›ӷÈ<br />
ÁÂÌ¿ÙÔ˜.<br />
ÚÔ¤Á¯˘ÛË ÙÔ˘ Û˘ÛÙ‹Ì·ÙÔ˜ Û˘ÏÏÔÁ‹˜ ÓÂÚÔ‡<br />
ŸÙ·Ó ÙÔ ÛÙÂÁÓˆÙ‹ÚÈÔ Â›Ó·È Î·ÈÓÔ‡ÚÈÔ, Ô Û˘Ìapple˘ÎÓˆÙ‹˜ ÓÂÚÔ‡ ı· ·Ú¯›ÛÂÈ Ó· Û˘ÁÎÂÓÙÚÒÓÂÈ ÓÂÚfi ÌfiÓÔ ÂÊfiÛÔÓ<br />
Á›ÓÂÈ appleÚÔ¤Á¯˘ÛË ÙÔ˘ Û˘ÛÙ‹Ì·ÙÔ˜... ·˘Ùfi Á›ÓÂÙ·È ÌÂÙ¿ ·applefi 1 ‹ 2 ·ÎÏÔ˘˜ ÛÙÂÁÓÒÌ·ÙÔ˜. ∂ÊfiÛÔÓ Ë appleÚÔ¤Á¯˘ÛË<br />
ÔÏÔÎÏËÚˆı›, Ô Û˘Ìapple˘ÎÓˆÙ‹˜ ı· ·Ú¯›ÛÂÈ Ó· Û˘ÏϤÁÂÈ ÓÂÚfi ηٿ ÙË ‰È¿ÚÎÂÈ· ÙˆÓ Î‡ÎÏˆÓ ÛÙÂÁÓÒÌ·ÙÔ˜.<br />
30
ËÌ·ÓÙÈΤ˜ appleÏËÚÔÊÔڛ˜<br />
ªÔÓ¿‰· Û˘Ìapple˘ÎÓˆÙ‹...<br />
GR<br />
! ƒ∂∂π Ó· ·appleÔÌ·ÎÚ‡ÓÂÙ ÙÔ ¯ÓÔ‡‰È ·applefi ÙÔÓ<br />
Û˘Ìapple˘ÎÓˆÙ‹ ∫∞£∂ Ì‹Ó·.<br />
µ∏ª∞ 1<br />
∞ÓÔ›ÍÙ ÙÔ Î¿Ï˘ÌÌ· ÙÔ˘<br />
Û˘Ìapple˘ÎÓˆÙ‹ - ÎÚ·Ù‹ÛÙÂ<br />
ÙË Ï·‚‹ Î·È ÙÚ·‚‹ÍÙÂ<br />
appleÚÔ˜ ÙÔ Ì¤ÚÔ˜ Û·˜.<br />
µ∏ª∞ 2<br />
∞Ê·ÈÚ¤ÛÙ ÙÔÓ Û˘Ìapple˘ÎÓˆÙ‹<br />
appleÂÚÈÛÙÚ¤ÊÔÓÙ·˜ Ù· 3<br />
ÎÏÈapple Î·È ÙÚ·‚ÒÓÙ·˜ ÙÔÓ<br />
appleÚÔ˜ ÙÔ Ì¤ÚÔ˜ Û·˜.<br />
(ÿÛˆ˜ ˘apple¿Ú¯ÂÈ Ï›ÁÔ ÓÂÚfi<br />
ÛÙÔ˘˜ ۈϋÓ˜,<br />
Ê·ÈÓfiÌÂÓÔ appleÔ˘ ›ӷÈ<br />
Ê˘ÛÈÔÏÔÁÈÎfi).<br />
µ∏ª∞ 3<br />
•ÂappleχÓÂÙ ÙÔÓ<br />
Û˘Ìapple˘ÎÓˆÙ‹ ÌÂ<br />
ÙÚ¯ԇÌÂÓÔ ÓÂÚfi ·applefi<br />
ÙËÓ apple›Ûˆ appleÚÔ˜ ÙËÓ<br />
ÌappleÚÔÛÙÈÓ‹ fi„Ë, ÁÈ· Ó·<br />
·Ê·ÈÚ¤ÛÂÙÂ Ù˘¯fiÓ<br />
Û˘ÁÎÂÓÙÚÒÛÂȘ ¯ÓÔ˘‰ÈÔ‡.<br />
µ∏ª∞ 4<br />
∂apple·Ó·ÙÔappleÔıÂÙ‹ÛÙÂ ÙË<br />
ÌÔÓ¿‰· Û˘Ìapple˘ÎÓˆÙ‹<br />
- ‚‚·Èˆı›Ù fiÙÈ Ë ÌÔÓ¿‰·<br />
¤¯ÂÈ ÂÈÛ¤ÏıÂÈ ÂÓÙÂÏÒ˜<br />
ÛÙË ı¤ÛË Ù˘, fiÙÈ Î·È Ù· 3<br />
ÎÏÈapplev ¤¯Ô˘Ó ·ÛÊ·Ï›ÛÂÈ<br />
Í·Ó¿ Î·È fiÙÈ Ù· ‚¤ÏË<br />
˘applefi‰ÂÈ͢ ı¤Û˘ ÛÙËÓ<br />
ÌappleÚÔÛÙÈÓ‹ fi„Ë ÙÔ˘<br />
Û˘Ìapple˘ÎÓˆÙ‹ ›ӷÈ<br />
ÛÙÚ·Ì̤ӷ appleÚÔ˜ Ù· Âapple¿Óˆ.<br />
●<br />
∂ϤÁÍÙ ¿Ó:<br />
- ∆· ‚¤ÏË ˘applefi‰ÂÈ͢ ı¤Û˘ Â›Ó·È ÛÙÚ·Ì̤ӷ appleÚÔ˜ Ù· Âapple¿Óˆ.<br />
- ∆· 3 ÎÏÈÎ ¤¯Ô˘Ó ·ÛÊ·Ï›ÛÂÈ Í·Ó¿ ÛÙË ı¤ÛË «ÎÏÂȉÒÌ·ÙÔ˜».<br />
ÂÚÈÛÙÚ¤„Ù ٷ 3 ÎÏÈapple<br />
! √ ÌË Î·ı·ÚÈÛÌfi˜ ÙÔ˘ Û˘Ìapple˘ÎÓˆÙ‹ ÌappleÔÚ› Ó·<br />
appleÚÔηϤÛÂÈ ÙËÓ appleÚfiˆÚË ·ÛÙÔ¯›· ÙÔ˘ ÛÙÂÁÓˆÙËÚ›Ô˘<br />
Û·˜.<br />
31
∂ÁηٿÛÙ·ÛË<br />
GR<br />
Ô‡ Ó· ÙÔappleÔıÂÙ‹ÛÂÙÂ ÙÔ ÛÙÂÁÓˆÙ‹ÚÈfi Û·˜<br />
●<br />
32<br />
∆ÔappleÔıÂÙ‹ÛÙÂ ÙÔ ÛÙÂÁÓˆÙ‹ÚÈfi Û·˜ ÛÂ ·applefiÛÙ·ÛË ·applefi<br />
ۈϋÓ˜ Áη˙ÈÔ‡, ÊÔ‡ÚÓÔ˘˜, ıÂÚÌ·ÓÙÈο ÛÒÌ·Ù· ‹<br />
Ì·ÁÂÈÚÈΤ˜ ÂÛٛ˜, ÁÈ·Ù› ÔÈ ÊÏfiÁ˜ ÌappleÔÚ› Ó·<br />
appleÚÔηϤÛÔ˘Ó ‚Ï¿‚˜ ÛÙË Û˘Û΢‹.<br />
∂Ï¿¯ÈÛÙÔ ÎÂÓfi 10mm<br />
∂Ï¿¯ÈÛÙ· ÎÂÓ¿<br />
15mm<br />
● ∂¿Ó appleÚfiÎÂÈÙ·È Ó·<br />
ÙÔappleÔıÂÙ‹ÛÂÙ ÙË Û˘Û΢‹<br />
οو ·applefi apple¿ÁÎÔ ÂÚÁ·Û›·˜,<br />
ÊÚÔÓÙ›ÛÙÂ Ó· ·Ê‹ÓÂÙÂ<br />
·applefiÛÙ·ÛË 10mm ·Ó¿ÌÂÛ·<br />
ÛÙË Û˘Û΢‹ Î·È ÔappleÔÈÔ‰‹appleÔÙÂ<br />
¿ÏÏÔ ·ÓÙÈΛÌÂÓÔ Âapple¿Óˆ<br />
·applefi ·˘Ù‹, Î·È 15 mm ÎÂÓfi<br />
·Ó¿ÌÂÛ· ÛÙȘ appleÏ¢ڤ˜ Ù˘<br />
Î·È Ù· appleÏ·˚Ó¿ ÙÔȯÒÌ·Ù· ÙÔ˘<br />
apple¿ÁÎÔ˘ ‹ ÙÔ˘˜ ÙÔ›¯Ô˘˜. ŒÙÛÈ ı· ÂÍ·ÛÊ·Ï›ÛÂÙ ۈÛÙ‹<br />
΢ÎÏÔÊÔÚ›· ÙÔ˘ ·¤Ú·. µÂ‚·Èˆı›Ù fiÙÈ ‰ÂÓ<br />
ÂÌappleÔ‰›˙ÔÓÙ·È Ù· ·ÓÔ›ÁÌ·Ù· ÂÍ·ÂÚÈÛÌÔ‡ ÛÙÔ apple›Ûˆ<br />
̤ÚÔ˜.<br />
∂Í·ÂÚÈÛÌfi˜<br />
ŸÙ·Ó ÙÔ ÛÙÂÁÓˆÙ‹ÚÈÔ ‚Ú›ÛÎÂÙ·È ÛÂ ÏÂÈÙÔ˘ÚÁ›·,<br />
appleÚ¤appleÂÈ Ó· ˘apple¿Ú¯ÂÈ Âapple·Ú΋˜ ÂÍ·ÂÚÈÛÌfi˜. µÂ‚·Èˆı›ÙÂ<br />
fiÙÈ ÂÁηıÈÛٿ٠ÙÔ ÛÙÂÁÓˆÙ‹ÚÈfi Û·˜ Û ¯ÒÚÔ ¯ˆÚ›˜<br />
˘ÁÚ·Û›· Ô ÔappleÔ›Ô˜ ·ÂÚ›˙ÂÙ·È Âapple·ÚÎÒ˜. ∏ ΢ÎÏÔÊÔÚ›·<br />
ÙÔ˘ ·¤Ú· Â›Ó·È ÛËÌ·ÓÙÈ΋ ÁÈ· ÙË Û˘Ìapple‡ÎÓˆÛË ÙÔ˘<br />
ÓÂÚÔ‡ appleÔ˘ apple·Ú¿ÁÂÙ·È Î·Ù¿ ÙËÓ appleχÛË. ∆Ô<br />
ÛÙÂÁÓˆÙ‹ÚÈÔ ‰ÂÓ ı· ÏÂÈÙÔ˘ÚÁ› ·appleÔÙÂÏÂÛÌ·ÙÈο ÛÂ<br />
ÎÏÂÈÛÙfi ¯ÒÚÔ ‹ Û ÓÙÔ˘Ï¿appleÈ.<br />
! ∏ ÂÁηٿÛÙ·ÛË ÙÔ˘ ÛÙÂÁÓˆÙËÚ›Ô˘ Û ÓÙÔ˘Ï¿appleÈ<br />
·ÓÙÂӉ›ÎÓ˘Ù·È Î·È, ÂappleÈappleϤÔÓ, ÙÔ ÛÙÂÁÓˆÙ‹ÚÈÔ ‰ÂÓ<br />
appleÚ¤appleÂÈ Û η̛· appleÂÚ›appleÙˆÛË Ó· ÂÁηٷÛÙ·ı› apple›Ûˆ<br />
·applefi applefiÚÙ· appleÔ˘ ÎÏÂȉÒÓÂÈ, ·applefi Û˘ÚfiÌÂÓË applefiÚÙ· ‹<br />
·applefi applefiÚÙ· ÌÂ Û‡ÚÙË ·apple¤Ó·ÓÙÈ ·applefi ÙËÓ applefiÚÙ· ÙÔ˘<br />
ÛÙÂÁÓˆÙËÚ›Ô˘.<br />
! ∂¿Ó ÙÔ ÛÙÂÁÓˆÙ‹ÚÈÔ ¯ÚËÛÈÌÔappleÔÈÂ›Ù·È ÛÂ<br />
appleÂÚÈÔÚÈṲ̂ÓÔ ‹ „˘¯Úfi ¯ÒÚÔ, ˘apple¿Ú¯ÂÈ appleÂÚ›appleÙˆÛË Ó·<br />
Û¯ËÌ·ÙÈÛÙ› Û˘Ìapple‡ÎÓˆÛË.<br />
√‰ËÁ›Â˜ ·ÓÙ›ÛÙÚÔÊ˘ ÙÔappleÔı¤ÙËÛ˘<br />
applefiÚÙ·˜<br />
YPTH<br />
OPTA<br />
MENTEE<br />
MENTEE<br />
APA°H<br />
OPTA<br />
∏ applefiÚÙ· ÙÔ˘ ÛÙÂÁÓˆÙËÚ›Ô˘ Û·˜ Â›Ó·È ·Ó·ÛÙÚ¤„ÈÌË<br />
Î·È ÌappleÔÚ› ‡ÎÔÏ· Ó· ·ÏÏ¿ÍÂÈ ı¤ÛË. ∂Ó·ÏÏ¿ÍÙÂ<br />
‰È·ÁˆÓ›ˆ˜ ÙË ı¤ÛË ÙˆÓ ÌÂÓÙÂÛ¤‰ˆÓ Î·È ÙˆÓ ÎÔ¯ÏÈÒÓ<br />
·applefiÊڷ͢. ∂Ó·ÏÏ¿ÍÙ ÙÔ Ì¿Ó‰·ÏÔ Î·È ÙËÓ ·Úapple¿ÁË<br />
Ù˘ applefiÚÙ·˜ Ì ÙȘ appleϿΘ ·applefiÊڷ͢ appleÔ˘<br />
‚Ú›ÛÎÔÓÙ·È ÛÙËÓ ·apple¤Ó·ÓÙÈ appleÏÂ˘Ú¿ (‚Ï. ÙÔ ‰È¿ÁÚ·ÌÌ·<br />
apple·Ú·apple¿Óˆ).<br />
∞ÁˆÁfi˜ ·appleÔÛÙÚ¿ÁÁÈÛ˘ ÓÂÚÔ‡<br />
∂¿Ó ÂÁηٷÛÙ‹ÛÂÙ ÙÔ ÛÙÂÁÓˆÙ‹ÚÈfi Û·˜ ‰›appleÏ· Û ·ÁˆÁfi<br />
·appleÔÛÙÚ¿ÁÁÈÛ˘, ÙfiÙ ÙÔ ÓÂÚfi ÌappleÔÚ› Ó· ‰ÈÔ¯ÂÙ‡ÂÙ·È<br />
ÛÙÔÓ ·ÁˆÁfi ·˘ÙfiÓ. ªÂ ÙÔÓ ÙÚfiappleÔ ·˘Ùfi, ‰ÂÓ ¯ÚÂÈ¿˙ÂÙ·È<br />
Ó· ÂÎÎÂÓÒÓÂÙ ÙÔÓ appleÂÚȤÎÙË ÓÂÚÔ‡. ∂¿Ó ÙÔ ÛÙÂÁÓˆÙ‹ÚÈÔ<br />
ÙÔappleÔıÂÙËı› Âapple¿Óˆ ‹ ÂÁηٷÛÙ·ı› ‰›appleÏ· Û appleÏ˘ÓÙ‹ÚÈÔ<br />
ÚÔ‡¯ˆÓ, ÙfiÙ ÌappleÔÚ› Ó· ¯ÚËÛÈÌÔappleÔÈÂ›Ù·È Ô ›‰ÈÔ˜ ·ÁˆÁfi˜<br />
Î·È ÁÈ· ÙȘ ‰‡Ô Û˘Û΢¤˜. √ ·ÁˆÁfi˜ ·appleÔÛÙÚ¿ÁÁÈÛ˘<br />
appleÚ¤appleÂÈ Ó· ‚Ú›ÛÎÂÙ·È Û ‡„Ô˜ ÌÈÎÚfiÙÂÚÔ ÙÔ˘ 1m (3') ·applefi<br />
ÙË ‚¿ÛË ÙÔ˘ ÛÙÂÁÓˆÙËÚ›Ô˘.<br />
∞Ê·ÈÚ¤ÛÙ ÙÔ ÎÏÈapple Î·È ÙÔÓ<br />
‡ηÌappleÙÔ ÛˆÏ‹Ó· ·applefi ÙË ı¤ÛË<br />
ÙÔ˘˜ (‚Ï. ‰È¿ÁÚ·ÌÌ·).<br />
∆ÔappleÔıÂÙ‹ÛÙ ¤Ó·Ó ‡ηÌappleÙÔ ÛˆÏ‹Ó·<br />
ηٿÏÏËÏÔ˘ Ì‹ÎÔ˘˜ ÛÙË Ó¤· ı¤ÛË<br />
appleÔ˘ ˘appleÔ‰ÂÈÎÓ‡ÂÙ·È (‚Ï. ‰È¿ÁÚ·ÌÌ·)<br />
Î·È appleÚÔÛ·ÚÌfiÛÙ ͷӿ ÙÔ ÎÏÈapple.<br />
! ŸÙ·Ó ÙÔ ÛÙÂÁÓˆÙ‹ÚÈÔ ÂÁηٷÛÙ·ı› ÛÙËÓ ÙÂÏÈ΋ ÙÔ˘<br />
ı¤ÛË, ‚‚·Èˆı›Ù fiÙÈ Ô Â‡Î·ÌappleÙÔ˜ ۈϋӷ˜ ‰ÂÓ<br />
Û˘ÌappleȤ˙ÂÙ·È Î·È ‰ÂÓ Û˘ÛÙÚ¤ÊÂÙ·È.<br />
∏ÏÂÎÙÚÈΤ˜ Û˘Ó‰¤ÛÂȘ<br />
ÚÔÙÔ‡ ÂÈÛ¿ÁÂÙ ÙÔÓ ÚÂ˘Ì·ÙÔÏ‹appleÙË ÛÙËÓ appleÚ›˙·<br />
‚‚·Èˆı›Ù ÁÈ· Ù· apple·Ú·Î¿Ùˆ:<br />
● ∏ appleÚ›˙· appleÚ¤appleÂÈ Ó· Â›Ó·È ÁÂȈ̤ÓË.<br />
● ∏ appleÚ›˙· appleÚ¤appleÂÈ Ó· ÌappleÔÚ› Ó· ˘appleÔÛÙËÚ›˙ÂÈ ÙË Ì¤ÁÈÛÙË<br />
ÈÛ¯‡ ÙˆÓ Û˘Û΢ÒÓ, Ë ÔappleÔ›· ˘appleÔ‰ÂÈÎÓ‡ÂÙ·È ÛÙËÓ<br />
ÂÙÈΤٷ ÔÓÔÌ·ÛÙÈÎÒÓ ÙÈÌÒÓ (‚Ï. ÂÚÈÁÚ·Ê‹ ÛÙÂÁÓˆÙËÚ›Ô˘).<br />
●<br />
●<br />
∞Ê·ÈÚ¤ÛÙ ÙÔ ÎÏÈapple ηÈ<br />
ÙÔÓ Â‡Î·ÌappleÙÔ ÛˆÏ‹Ó·<br />
·applefi ·˘Ùfi ÙÔ ÛËÌ›Ô...<br />
...appleÚÔÛ·ÚÌfiÛÙÂ ÙÔÓ<br />
ηÈÓÔ‡ÚÈÔ ÂÏ·ÛÙÈÎfi ۈϋӷ<br />
Î·È Âapple·Ó·ÙÔappleÔıÂÙ‹ÛÙÂ<br />
ÙÔ ÎÏÈapple ‰Ò.<br />
∏ Ù¿ÛË ÙÔ˘ Ú‡̷ÙÔ˜ appleÚ¤appleÂÈ Ó· ÂÌapple›appleÙÂÈ ÛÙÔ Â‡ÚÔ˜<br />
ÙÈÌÒÓ appleÔ˘ ˘appleÔ‰ÂÈÎÓ‡ÂÙ·È ÛÙËÓ ÂÙÈΤٷ ÔÓÔÌ·ÛÙÈÎÒÓ<br />
ÙÈÌÒÓ (‚Ï. ÂÚÈÁÚ·Ê‹ ÛÙÂÁÓˆÙËÚ›Ô˘).<br />
∏ appleÚ›˙· appleÚ¤appleÂÈ Ó· Â›Ó·È Û˘Ì‚·Ù‹ Ì ÙÔÓ ÚÂ˘Ì·ÙÔÏ‹appleÙË<br />
ÙÔ˘ ÛÙÂÁÓˆÙËÚ›Ô˘.  ‰È·ÊÔÚÂÙÈ΋ appleÂÚ›appleÙˆÛË,<br />
·ÓÙÈηٷÛÙ‹ÛÙ ÙÔÓ ÚÂ˘Ì·ÙÔÏ‹appleÙË ‹ ÙËÓ appleÚ›˙·.<br />
! ∆Ô ÛÙÂÁÓˆÙ‹ÚÈÔ ‰ÂÓ appleÚ¤appleÂÈ Ó· ÂÁηı›ÛÙ·Ù·È ÛÂ<br />
Â͈ÙÂÚÈÎfi ¯ÒÚÔ, ·ÎfiÌË Î·È Â¿Ó ·˘Ùfi˜ ηχappleÙÂÙ·È. ∏<br />
¤ÎıÂÛË Ù˘ Û˘Û΢‹˜ ÛÙË ‚ÚÔ¯‹ ‹ Û ηٷÈÁ›‰Â˜<br />
ÂÏÏԯ‡ÂÈ ÛËÌ·ÓÙÈÎÔ‡˜ ÎÈÓ‰‡ÓÔ˘˜.<br />
! ªÂÙ¿ ÙËÓ ÂÁηٿÛÙ·ÛË, ÙÔ ËÏÂÎÙÚÈÎfi ηÏÒ‰ÈÔ Î·È Ô<br />
ÚÂ˘Ì·ÙÔÏ‹appleÙ˘ ÙÔ˘ ÛÙÂÁÓˆÙËÚ›Ô˘ appleÚ¤appleÂÈ Ó· ›ӷÈ<br />
‡ÎÔÏ· appleÚÔÛ‚¿ÛÈÌ·.<br />
! ªË ¯ÚËÛÈÌÔappleÔț٠appleÚÔÂÎÙ¿ÛÂȘ.<br />
! ∆Ô Î·ÏÒ‰ÈÔ ÙÔ˘ Ú‡̷ÙÔ˜ ‰ÂÓ appleÚ¤appleÂÈ Ó· οÌappleÙÂÙ·È ‹<br />
Ó· Û˘ÌappleȤ˙ÂÙ·È.<br />
! ∆Ô Î·ÏÒ‰ÈÔ Ú‡̷ÙÔ˜ appleÔ˘ apple·Ú¤¯ÂÙ·È appleÚ¤appleÂÈ Ó· ÂϤÁ¯ÂÙ·È<br />
Ù·ÎÙÈο Î·È Ó· ·ÓÙÈηı›ÛÙ·Ù·È ·applefi ηÏÒ‰ÈÔ ÙÔ ÔappleÔ›Ô<br />
ηٷÛ΢¿˙ÂÙ·È ·appleÔÎÏÂÈÛÙÈο ÁÈ· ÙÔ Û˘ÁÎÂÎÚÈ̤ÓÔ<br />
ÛÙÂÁÓˆÙ‹ÚÈÔ Î·È ÙÔappleÔıÂÙÂ›Ù·È ·applefi ÂÍÔ˘ÛÈÔ‰ÔÙË̤ÓÔ˘˜<br />
Ù¯ÓÈÎÔ‡˜ (‚Ï. ˘ÓÙ‹ÚËÛË). ∫·ÈÓÔ‡ÚÈ· ‹ Ì·ÎÚ‡ÙÂÚ·<br />
ηÏ҉ȷ Ú‡̷ÙÔ˜ apple·Ú¤¯ÔÓÙ·È Ì ÂappleÈappleϤÔÓ ¯Ú¤ˆÛË ·applefi<br />
ÂÍÔ˘ÛÈÔ‰ÔÙË̤ÓÔ˘˜ ·ÓÙÈappleÚÔÛÒappleÔ˘˜.<br />
! √ ηٷÛ΢·ÛÙ‹˜ ‰ÂÓ Ê¤ÚÂÈ Î·Ì›· ¢ı‡ÓË Û appleÂÚ›appleÙˆÛË<br />
ÌË Ù‹ÚËÛ˘ ÔappleÔÈ·Û‰‹appleÔÙ ·applefi ÙȘ apple·Ú·apple¿Óˆ Ô‰ËÁ›Â˜.<br />
! ∂¿Ó ¤¯ÂÙ ·appleÔڛ˜ Û¯ÂÙÈο Ì ٷ apple·Ú·apple¿Óˆ,<br />
Û˘Ì‚Ô˘Ï¢Ù›Ù ÂÍÂȉÈÎÂ˘Ì¤ÓÔ ËÏÂÎÙÚÔÏfiÁÔ.<br />
ÚÈÓ ·applefi ÙËÓ appleÚÒÙË ¯Ú‹ÛË ÙÔ˘<br />
ÛÙÂÁÓˆÙËÚ›Ô˘ Û·˜<br />
∞ÊÔ‡ ÂÁηٷÛÙ‹ÛÂÙ ÙÔ ÛÙÂÁÓˆÙ‹ÚÈÔ Î·È appleÚÔÙÔ‡ ÙÔ<br />
¯ÚËÛÈÌÔappleÔÈ‹ÛÂÙÂ, ηı·Ú›ÛÙ ÙÔ ÂÛˆÙÂÚÈÎfi ÙÔ˘<br />
Ù˘Ìapple¿ÓÔ˘ ÁÈ· Ó· ·appleÔÌ·ÎÚ‡ÓÂÙ ÙË ÛÎfiÓË appleÔ˘ ÌappleÔÚ› Ó·<br />
¤¯ÂÈ Û˘ÛÛˆÚ¢Ù› ηٿ ÙË ÌÂÙ·ÊÔÚ¿.
ÂÚÈÁÚ·Ê‹ ÙÂÁÓˆÙËÚ›Ô˘<br />
°È· Ó· ·ÓÔ›ÍÂÙ ÙËÓ applefiÚÙ·<br />
ȤÛÙÂ Î·È ·Ê‹ÛÙ ÙÔ ÌappleÚÔÛÙÈÓfi<br />
appleÏ·›ÛÈÔ ÛÙÔ ÛËÌÂ›Ô appleÔ˘ ˘appleÔ‰ÂÈÎÓ‡ÂÙ·È.<br />
÷ڷÎÙËÚÈÛÙÈο<br />
ÂÚȤÎÙ˘ ÓÂÚÔ‡<br />
ÕÓÔÈÁÌ·<br />
ÂÈÛfi‰Ô˘ ·¤Ú·<br />
GR<br />
∞ÚÈıÌfi˜<br />
ªÔÓÙ¤ÏÔ˘ &<br />
ÂÈÚ¿˜<br />
ªÔÓ¿‰·<br />
Û˘Ìapple˘ÎÓˆÙ‹<br />
(¯ˆÚ›˜ Î¿Ï˘ÌÌ·)<br />
›Ó·Î·˜ ¯ÂÈÚÈÛÌÔ‡<br />
∫Ô˘Ìapple›<br />
∂ÓÂÚÁÔappleÔ›ËÛ˘/∞appleÂÓÂÚÁÔappleÔ›ËÛ˘<br />
∫¿Ï˘ÌÌ· Û˘Ìapple˘ÎÓˆÙ‹<br />
§·‚‹ ηχÌÌ·ÙÔ˜ Û˘Ìapple˘ÎÓˆÙ‹<br />
(∆Ú·‚‹ÍÙ ÁÈ· Ó· ·ÓÔ›ÍÂÙÂ)<br />
∫Ô˘Ìapple› / ʈÙÂÈÓ‹ ¤Ó‰ÂÈÍË<br />
∂∫∫π¡∏∏ / ƒ√øƒπ¡∏ ¢π∞∫√∏ §∂π∆√Àƒ°π∞<br />
ŒÓ‰ÂÈÍË<br />
º›ÏÙÚÔ<br />
∫Ô˘ÌappleÈ¿ / ʈÙÂÈÓ¤˜<br />
ÂӉ›ÍÂȘ §∂π∆√Àƒ°πø¡<br />
¯¿Ú·<br />
ÂÈÛfi‰Ô˘<br />
·¤Ú·<br />
ºˆÙÂÈÓ‹ ¤Ó‰ÂÈÍË<br />
∫·ı·ÚÈÛÌÔ‡ Û˘Ìapple˘ÎÓˆÙ‹<br />
ºˆÙÂÈÓ‹ ¤Ó‰ÂÈÍË<br />
∫·ı·ÚÈÛÌÔ‡ Ê›ÏÙÚÔ˘<br />
√‰ËÁfi˜ ÛÙÂÁÓÒÌ·ÙÔ˜<br />
∫Ô˘Ìapple›<br />
ƒ√°ƒ∞ªª∞∆ø¡<br />
∫Ô˘Ìapple› ∂¡∂ƒ°√√π∏∏/∞∂¡∂ƒ°√√π∏∏ : ∞Ó<br />
ÙÔ ÛÙÂÁÓˆÙ‹ÚÈÔ ÏÂÈÙÔ˘ÚÁ› Î·È apple·Ù‹ÛÂÙ ·˘Ùfi ÙÔ ÎÔ˘Ìapple›,<br />
‰È·ÎfiappleÙÂÙ·È Ë ÏÂÈÙÔ˘ÚÁ›· ÙÔ˘. ∞Ó ÙÔ apple·Ù‹ÛÂÙ ͷӿ, ÙÔ<br />
ÛÙÂÁÓˆÙ‹ÚÈÔ ÍÂÎÈÓ¿ Ó· ÏÂÈÙÔ˘ÚÁ›.<br />
√ √‰ËÁfi˜ ÙÂÁÓÒÌ·ÙÔ˜ Û·˜ ÂappleÈÙÚ¤appleÂÈ Ó· Û˘Ì‚Ô˘Ï‡ÂÛÙÂ<br />
¤Ó· ÊÈÏÈÎfi appleÚÔ˜ ÙÔ ¯Ú‹ÛÙË apple›Ó·Î· Ì هappleÔ˘˜ ˘Ê·ÛÌ¿ÙˆÓ<br />
Î·È ‰˘Ó·ÙfiÙËÙ˜ ÊfiÚÙˆÛ˘.<br />
∆Ô ÎÔ˘Ìapple› ƒ√°ƒ∞ªª∞∆∞ ÂappleÈϤÁÂÈ ÙÔ ÂappleÈı˘ÌËÙfi<br />
appleÚfiÁÚ·ÌÌ·: appleÂÚÈÛÙÚ¤„Ù ÙÔ Ì¤¯ÚÈ Ë ¤Ó‰ÂÈÍË Ó· ÊÙ¿ÛÂÈ ÛÙÔ<br />
appleÚfiÁÚ·ÌÌ· appleÔ˘ ÂappleÈı˘Ì›Ù (‚Ï. ∂ÎΛÓËÛË Î·È ÚÔÁÚ¿ÌÌ·Ù·).<br />
ªÂ Ù· ÎÔ˘ÌappleÈ¿/ʈÙÂÈÓ¤˜ ÂӉ›ÍÂȘ §∂π∆√Àƒ°πø¡ ÌappleÔÚ›ÙÂ<br />
Ó· ÂappleÈϤÍÂÙ ÙȘ ‰È·ı¤ÛÈ̘ ÏÂÈÙÔ˘ÚÁ›Â˜ ÁÈ· ÙÔ appleÚfiÁÚ·ÌÌ·<br />
appleÔ˘ ¤¯ÂÙ ÂappleÈϤÍÂÈ. √È ÊˆÙÂÈÓ¤˜ ÂӉ›ÍÂȘ ˘appleÔ‰ÂÈÎÓ‡Ô˘Ó fiÙÈ<br />
¤¯ÂÙ ÂappleÈϤÍÂÈ ÙË Û˘ÁÎÂÎÚÈ̤ÓË ÏÂÈÙÔ˘ÚÁ›· (‚Ï. ∂ÎΛÓËÛË<br />
Î·È ÚÔÁÚ¿ÌÌ·Ù·).<br />
∆Ô ÎÔ˘Ìapple›/ʈÙÂÈÓ‹ ¤Ó‰ÂÈÍË ∂∫∫π¡∏∏ / ƒ√øƒπ¡∏<br />
¢π∞∫√∏ §∂π∆√Àƒ°π∞ ÍÂÎÈÓ¿ ÙÔ ÂappleÈÏÂÁ̤ÓÔ<br />
appleÚfiÁÚ·ÌÌ·. ŸÙ·Ó apple·Ù‹ÛÂÙ ÙÔ ÎÔ˘Ìapple› ·˘Ùfi, ·ÎÔ‡ÁÂÙ·È ¤Ó·<br />
˯ËÙÈÎfi Û‹Ì· Î·È ÔÈ ÂӉ›ÍÂȘ appleÚÔfi‰Ô˘ ·Ó·‚ÔÛ‚‹ÛÔ˘Ó ÁÈ·<br />
Ó· ÂappleȂ‚·ÈÒÛÔ˘Ó ÙË Û˘ÁÎÂÎÚÈ̤ÓË ÂÓ¤ÚÁÂÈ·. ŸÙ·Ó<br />
ÏÂÈÙÔ˘ÚÁ› οappleÔÈÔ appleÚfiÁÚ·ÌÌ· Î·È ÎÚ·Ù‹ÛÂÙ ÙÔ ÎÔ˘Ìapple›<br />
·˘Ùfi apple·ÙË̤ÓÔ, Ë ÏÂÈÙÔ˘ÚÁ›· ÙÔ˘ appleÚÔÁÚ¿ÌÌ·ÙÔ˜<br />
‰È·ÎfiappleÙÂÙ·È appleÚÔÛˆÚÈÓ¿ Î·È ÙÔ ÛÙÂÁÓˆÙ‹ÚÈÔ ÛÙ·Ì·Ù¿ÂÈ.<br />
∏ ʈÙÂÈÓ‹ ¤Ó‰ÂÈÍË ¤¯ÂÈ appleÚ¿ÛÈÓÔ ¯ÚÒÌ· fiÙ·Ó ÏÂÈÙÔ˘ÚÁ›<br />
οappleÔÈÔ appleÚfiÁÚ·ÌÌ·, ·Ó·‚ÔÛ‚‹ÓÂÈ Î·È ¤¯ÂÈ appleÔÚÙÔηϛ ¯ÚÒÌ·<br />
fiÙ·Ó Ë ÏÂÈÙÔ˘ÚÁ›· ÙÔ˘ appleÚÔÁÚ¿ÌÌ·ÙÔ˜ ¤¯ÂÈ ‰È·ÎÔapple›<br />
appleÚÔÛˆÚÈÓ¿ ‹ ·Ó·‚ÔÛ‚‹ÓÂÈ Î·È ¤¯ÂÈ appleÚ¿ÛÈÓÔ ¯ÚÒÌ· fiÙ·Ó ÙÔ<br />
ºˆÙÂÈÓ¤˜ ÂӉ›ÍÂȘ ∞Ê·›ÚÂÛË ÓÂÚÔ‡<br />
ÚÔfi‰Ô˘ ‹ ∫·ı˘ÛÙ¤ÚËÛ˘ ºˆÙÂÈÓ‹ ¤Ó‰ÂÈÍË<br />
ÛÙÂÁÓˆÙ‹ÚÈÔ ‚Ú›ÛÎÂÙ·È Û ηٿÛÙ·ÛË ·Ó·ÌÔÓ‹˜ ÁÈ· ÙËÓ<br />
¤Ó·ÚÍË ÂÓfi˜ appleÚÔÁÚ¿ÌÌ·ÙÔ˜ (‚Ï. ∂ÎΛÓËÛË Î·È<br />
ÚÔÁÚ¿ÌÌ·Ù·).<br />
√È ÊˆÙÂÈÓ¤˜ ÂӉ›ÍÂȘ ÚÔfi‰Ô˘ ‹ ∫·ı˘ÛÙ¤ÚËÛ˘<br />
˘appleÔ‰ÂÈÎÓ‡Ô˘Ó ÙËÓ Î·Ù¿ÛÙ·ÛË ÙÔ˘ appleÚÔÁÚ¿ÌÌ·ÙÔ˜ ‹, fiÙ·Ó<br />
·Ó·‚ÔÛ‚‹ÓÔ˘Ó, ÙÔ ¯ÚfiÓÔ Î·ı˘ÛÙ¤ÚËÛ˘. ∫·Ù¿ ÙË ‰È¿ÚÎÂÈ·<br />
ÌÈ·˜ ÂÎΛÓËÛ˘ Ì ηı˘ÛÙ¤ÚËÛË, ÔÈ ÊˆÙÂÈÓ¤˜ ÂӉ›ÍÂȘ<br />
·Ó·‚ÔÛ‚‹ÓÔ˘Ó ÁÈ· Ó· ˘appleԉ›ÍÔ˘Ó ÙËÓ ÂappleÈÏÂÁ̤ÓË<br />
ηı˘ÛÙ¤ÚËÛË. ∫¿ı ÛÙ¿‰ÈÔ ÙÔ˘ appleÚÔÁÚ¿ÌÌ·ÙÔ˜ ˘appleÔ‰ÂÈÎÓ‡ÂÙ·È<br />
·applefi ÙËÓ ·ÓÙ›ÛÙÔÈ¯Ë ÊˆÙÂÈÓ‹ ¤Ó‰ÂÈÍË (¯ˆÚ›˜ Ó· ·Ó·‚ÔÛ‚‹ÓÂÈ)<br />
(‚Ï. ∂ÎΛÓËÛË Î·È ÚÔÁÚ¿ÌÌ·Ù·).<br />
∏ ʈÙÂÈÓ‹ ¤Ó‰ÂÈÍË ·Ê·›ÚÂÛ˘ ÓÂÚÔ‡ ˘appleÔ‰ÂÈÎÓ‡ÂÈ fiÙÈ Ô<br />
appleÂÚȤÎÙ˘ ÓÂÚÔ‡ Â›Ó·È appleÏ‹Ú˘ Î·È appleÚ¤appleÂÈ Ó· ·‰ÂÈ¿ÛÂÈ. ∏<br />
ʈÙÂÈÓ‹ ¤Ó‰ÂÈÍË Û‚‹ÓÂÈ ÌÂÚÈο ‰Â˘ÙÂÚfiÏÂappleÙ· ÌÂÙ¿ ÙËÓ<br />
Âapple·Ó·ÙÔappleÔı¤ÙËÛË ÙÔ˘ ¿‰ÂÈÔ˘ appleÂÚȤÎÙË ÓÂÚÔ‡. °È· Ó· Á›ÓÂÈ<br />
·˘Ùfi, ÙÔ ÛÙÂÁÓˆÙ‹ÚÈÔ appleÚ¤appleÂÈ Ó· ‚Ú›ÛÎÂÙ·È ÛÂ ÏÂÈÙÔ˘ÚÁ›·<br />
(‚Ï. ÃÂÈÚÈÛÙ‹ÚÈ·).<br />
ËÌ›ˆÛË: ŸÙ·Ó ÁÂÌ›˙ÂÈ ÙÔ ‰Ô¯Â›Ô ÓÂÚÔ‡, Ë ÊˆÙÂÈÓ‹<br />
¤Ó‰ÂÈÍË ·Ó·‚ÔÛ‚‹ÓÂÈ, Ë Ú‡ıÌÈÛË ıÂÚÌÔÎÚ·Û›·˜<br />
·appleÂÓÂÚÁÔappleÔÈÂ›Ù·È Î·È Ù· ÚÔ‡¯· Û·˜ ‰ÂÓ ÛÙÂÁÓÒÓÔ˘Ó.<br />
ÚÈÓ ·applefi οı appleÚfiÁÚ·ÌÌ·, Ë ÊˆÙÂÈÓ‹ ¤Ó‰ÂÈÍË ∫·ı·ÚÈÛÌÔ‡<br />
Ê›ÏÙÚÔ˘ Û·˜ ˘appleÂÓı˘Ì›˙ÂÈ fiÙÈ appleÚ¤appleÂÈ Ó· ηı·Ú›˙ÂÙ ÙÔ<br />
Ê›ÏÙÚÔ Î¿ı ÊÔÚ¿ appleÔ˘ ¯ÚËÛÈÌÔappleÔț٠ÙÔ ÛÙÂÁÓˆÙ‹ÚÈÔ (‚Ï.<br />
˘ÓÙ‹ÚËÛË Î·È ÊÚÔÓÙ›‰·).<br />
∏ ʈÙÂÈÓ‹ ¤Ó‰ÂÈÍË ∫·ı·ÚÈÛÌÔ‡ Û˘Ìapple˘ÎÓˆÙ‹ Û·˜<br />
˘appleÂÓı˘Ì›˙ÂÈ fiÙÈ appleÚ¤appleÂÈ Ó· ηı·Ú›˙ÂÙ ÙÔ Û˘Ìapple˘ÎÓˆÙ‹ ·Ó¿<br />
Ù·ÎÙ¿ ¯ÚÔÓÈο ‰È·ÛÙ‹Ì·Ù· (‚Ï. ˘ÓÙ‹ÚËÛË Î·È ÊÚÔÓÙ›‰·).<br />
33
∂ÎΛÓËÛË Î·È appleÚÔÁÚ¿ÌÌ·Ù·<br />
GR<br />
∂appleÈÏÔÁ‹ appleÚÔÁÚ¿ÌÌ·ÙÔ˜<br />
1. ˘Ó‰¤ÛÙ ÙÔ ÛÙÂÁÓˆÙ‹ÚÈÔ ÛÙËÓ appleÚ›˙·.<br />
2. •Â¯ˆÚ›ÛÙ ٷ appleÏ˘Ì¤Ó· Û·˜ ÚÔ‡¯· ·Ó¿ÏÔÁ· ÌÂ<br />
ÙÔÓ Ù‡appleÔ ˘Ê¿ÛÌ·ÙÔ˜ (‚Ï. χÛÈÌÔ ÚÔ‡¯ˆÓ).<br />
3. ∞ÓÔ›ÍÙ ÙËÓ applefiÚÙ· ÁÈ· Ó· ‚‚·Èˆı›Ù fiÙÈ ÙÔ<br />
Ê›ÏÙÚÔ Â›Ó·È Î·ı·Úfi Î·È ‚Ú›ÛÎÂÙ·È ÛÙË ı¤ÛË ÙÔ˘,<br />
Î·È fiÙÈ Ô appleÂÚȤÎÙ˘ ÓÂÚÔ‡ Â›Ó·È ¿‰ÂÈÔ˜ Î·È ÛÙË<br />
ı¤ÛË ÙÔ˘ (‚Ï. ˘ÓÙ‹ÚËÛË).<br />
4. ∆ÔappleÔıÂÙ‹ÛÙ ÛÙÔ ÂÛˆÙÂÚÈÎfi Ù· ÚÔ‡¯· ηÈ<br />
‚‚·Èˆı›Ù fiÙÈ ‰ÂÓ ÂÌappleÔ‰›˙Ô˘Ó ÙËÓ applefiÚÙ· Ó·<br />
ÎÏÂȉÒÛÂÈ. ∫Ï›ÛÙ ÙËÓ applefiÚÙ·.<br />
5. ∞Ó ‰ÂÓ ¤¯ÂÈ ·Ó¿„ÂÈ Î·Ì›· ʈÙÂÈÓ‹ ¤Ó‰ÂÈÍË: ·Ù‹ÛÙÂ<br />
ÙÔ ÎÔ˘Ìapple› ∂¡∂ƒ°√√π∏∏/∞∂¡∂ƒ°√√π∏∏<br />
6. ∂appleÈϤÍÙ ¤Ó· appleÚfiÁÚ·ÌÌ·, ·ÊÔ‡ Û˘Ì‚Ô˘Ï¢Ù›ÙÂ<br />
ÙÔÓ √‰ËÁfi appleÚÔÁÚ·ÌÌ¿ÙˆÓ (‚Ï. ÚÔÁÚ¿ÌÌ·Ù·)<br />
ηıÒ˜ Î·È ÙȘ ˘appleԉ›ÍÂȘ ÁÈ· οı هappleÔ<br />
˘Ê¿ÛÌ·ÙÔ˜ (‚Ï. ƒÔ‡¯·).<br />
- ∂appleÈϤÍÙ ¤Ó· appleÚfiÁÚ·ÌÌ· appleÂÚÈÛÙÚ¤ÊÔÓÙ·˜ ÙÔ<br />
‰È·ÎfiappleÙË ƒ√°ƒ∞ªª∞∆ø¡.<br />
7. ƒ˘ıÌ›ÛÙ ÙÔ ¯ÚfiÓÔ Î·ı˘ÛÙ¤ÚËÛ˘ Î·È ÙȘ<br />
˘applefiÏÔÈapple˜ ÏÂÈÙÔ˘ÚÁ›Â˜, Â¿Ó Â›Ó·È ·apple·Ú·›ÙËÙÔ.<br />
8. ∏ ʈÙÂÈÓ‹ ¤Ó‰ÂÈÍË ∂∫∫π¡∏∏/ƒ√øƒπ¡∏<br />
¢π∞∫√∏ §∂π∆√Àƒ°π∞ ¤¯ÂÈ appleÚ¿ÛÈÓÔ ¯ÚÒÌ·<br />
Î·È ·Ó·‚ÔÛ‚‹ÓÂÈ:<br />
- ·Ù‹ÛÙ ÙÔ ÎÔ˘Ìapple› ∂∫∫π¡∏∏/ƒ√øƒπ¡∏<br />
¢π∞∫√∏ §∂π∆√Àƒ°π∞ ÁÈ· Ó· ÍÂÎÈÓ‹ÛÂÈ Ë<br />
ÏÂÈÙÔ˘ÚÁ›·. ∏ appleÚ¿ÛÈÓË ÊˆÙÂÈÓ‹ ¤Ó‰ÂÈÍË ÛÙ·Ì·Ù¿<br />
Ó· ·Ó·‚ÔÛ‚‹ÓÂÈ.<br />
∫·Ù¿ ÙË ‰È¿ÚÎÂÈ· ÙÔ˘ appleÚÔÁÚ¿ÌÌ·ÙÔ˜ ÛÙÂÁÓÒÌ·ÙÔ˜,<br />
ÌappleÔÚ›Ù ӷ ÂϤÁ¯ÂÙ ٷ appleÏ˘Ì¤Ó· ÚÔ‡¯· Î·È Ó·<br />
·appleÔÌ·ÎÚ‡ÓÂÙ ·˘Ù¿ appleÔ˘ ÛÙ¤ÁÓˆÛ·Ó ÂÓÒ Ù· ¿ÏÏ·<br />
Û˘Ó¯›˙Ô˘Ó Ó· ÛÙÂÁÓÒÓÔ˘Ó. ŸÙ·Ó ÎÏ›ÛÂÙ apple¿ÏÈ<br />
ÙËÓ applefiÚÙ· apple·Ù‹ÛÙ ÙÔ ÎÔ˘Ìapple› ∂∫∫π¡∏∏ /<br />
ƒ√øƒπ¡∏ ¢π∞∫√∏ §∂π∆√Àƒ°π∞ ÁÈ· ÙËÓ<br />
ÂÎ Ó¤Ô˘ ÂÎΛÓËÛË ÙÔ˘ ÛÙÂÁÓÒÌ·ÙÔ˜.<br />
(ŸÙ·Ó ·ÓÔ›ÁÂÙ ÙËÓ applefiÚÙ·, Ë ÊˆÙÂÈÓ‹ ¤Ó‰ÂÈÍË<br />
∂∫∫π¡∏∏/ƒ√øƒπ¡∏ ¢π∞∫√∏<br />
§∂π∆√Àƒ°π∞ Á›ÓÂÙ·È appleÔÚÙÔηϛ ηÈ<br />
·Ó·‚ÔÛ‚‹ÓÂÈ. ŸÙ·Ó ÎÏ›ÛÂÙ ÙËÓ applefiÚÙ· ηÈ<br />
apple·Ù‹ÛÂÙ ÙÔ ÎÔ˘Ìapple› ∂∫∫π¡∏∏/ƒ√øƒπ¡∏<br />
¢π∞∫√∏ §∂π∆√Àƒ°π∞, Ë ÊˆÙÂÈÓ‹ ¤Ó‰ÂÈÍË<br />
∂∫∫π¡∏∏/ƒ√øƒπ¡∏ ¢π∞∫√∏<br />
§∂π∆√Àƒ°π∞ Á›ÓÂÙ·È appleÚ¿ÛÈÓË Î·È ÛÙ·Ì·Ù¿ Ó·<br />
·Ó·‚ÔÛ‚‹ÓÂÈ).<br />
9. ŸÙ·Ó ÙÔ appleÚfiÁÚ·ÌÌ· ÔÏÔÎÏËÚÒÓÂÙ·È. ∞ÎÔ‡ÁÂÙ·È Ô<br />
‹¯Ô˜ ÙÔ˘ Ì˯·ÓÈÛÌÔ‡ appleÚÔÂȉÔappleÔ›ËÛ˘. ∞ÓÔ›ÍÙÂ<br />
ÙËÓ applefiÚÙ·, ·Ê·ÈÚ¤ÛÙ ٷ ÚÔ‡¯·, ηı·Ú›ÛÙ ÙÔ<br />
Ê›ÏÙÚÔ Î·È ‚¿ÏÙ ÙÔ apple¿ÏÈ ÛÙË ı¤ÛË ÙÔ˘.<br />
∂ÎÎÂÓÒÛÙÂ Î·È Âapple·Ó·ÙÔappleÔıÂÙ‹ÛÙ ÙÔÓ appleÂÚȤÎÙË<br />
ÓÂÚÔ‡ (‚Ï. ˘ÓÙ‹ÚËÛË).<br />
∞Ó ¤¯ÂÙ ÂappleÈϤÍÂÈ ÙË ÏÂÈÙÔ˘ÚÁ›· ÙÂÏÈ΋˜<br />
appleÚÔÛÙ·Û›·˜ ÙˆÓ ÚÔ‡¯ˆÓ ·applefi ÙÔ Ù۷ϿΈ̷ ηÈ<br />
‰ÂÓ ‚Á¿ÏÂÙ ·Ì¤Ûˆ˜ Ù· ÚÔ‡¯· ·applefi ÙÔ ÛÙÂÁÓˆÙ‹ÚÈÔ,<br />
ÙÔ ÛÙÂÁÓˆÙ‹ÚÈÔ ı· ·Ó·‰Â‡ÂÈ Ù· ÚÔ‡¯· ·Ó¿<br />
‰È·ÛÙ‹Ì·Ù·, ÁÈ· 10 ÒÚ˜ ‹ ̤¯ÚÈ Ó· ·ÓÔ›ÍÂÙ ÙËÓ<br />
applefiÚÙ·.<br />
10. ∞appleÔÛ˘Ó‰¤ÛÙ ÙÔ ÛÙÂÁÓˆÙ‹ÚÈÔ ·applefi ÙËÓ appleÚ›˙·.<br />
ÚfiÁÚ·ÌÌ· ∂‡ÎÔÏÔ˘ ȉÂÚÒÌ·ÙÔ˜<br />
∆Ô ‘∂‡ÎÔÏÔ È‰¤ÚˆÌ·’ Â›Ó·È ¤Ó· Û‡ÓÙÔÌÔ 10ÏÂappleÙÔ appleÚfiÁÚ·ÌÌ· (8 ÏÂappleÙ¿ ıÂÚÌÔ‡ Î·È 2 ÏÂappleÙ¿ ÎÚ‡Ô˘ ·¤Ú·) appleÔ˘<br />
Ì·Ï·ÎÒÓÂÈ ÙȘ ›Ó˜ ÚÔ‡¯ˆÓ appleÔ˘ ¤¯Ô˘Ó Ì›ÓÂÈ ÁÈ· ÌÂÁ¿ÏÔ ‰È¿ÛÙËÌ· ÛÙËÓ ›‰È· ı¤ÛË ‹ ÛÙÔ ›‰ÈÔ ÛËÌ›Ô. ∏ ΢ÎÏÈ΋<br />
appleÂÚÈÊÔÚ¿ ¯·Ï·ÚÒÓÂÈ ÙȘ ›Ó˜ Î·È ÙȘ οÓÂÈ appleÈÔ Â‡ÎÔϘ ÛÙÔ Ûȉ¤ÚˆÌ· Î·È ÙÔ ‰›appleψ̷.<br />
! ∆Ô ‘∂‡ÎÔÏÔ È‰¤ÚˆÌ·’ ‰ÂÓ Â›Ó·È appleÚfiÁÚ·ÌÌ· ÛÙÂÁÓÒÌ·ÙÔ˜ Î·È ‰ÂÓ appleÚ¤appleÂÈ Ó· ¯ÚËÛÈÌÔappleÔÈÂ›Ù·È ÁÈ· ‚ÚÂÁ̤ӷ<br />
ÚÔ‡¯·.<br />
°È· ηχÙÂÚ· ·appleÔÙÂϤÛÌ·Ù·:<br />
1. ªËÓ ÊÔÚÙÒÓÂÙ appleÂÚÈÛÛfiÙÂÚÔ ·applefi ÙË Ì¤ÁÈÛÙË ¯ˆÚËÙÈÎfiÙËÙ·.<br />
√È ·ÎfiÏÔ˘ıÔÈ ·ÚÈıÌÔ› ·Ó·Ê¤ÚÔÓÙ·È Û ‚¿ÚÔ˜ ÛÙÂÁÓÒÓ ÚÔ‡¯ˆÓ:<br />
⁄Ê·ÛÌ·<br />
ª¤ÁÈÛÙÔ ÊÔÚÙ›Ô<br />
µ·Ì‚·ÎÂÚ¿ Î·È Ì›ÁÌ·Ù· ‚·Ì‚·ÎÂÚÒÓ 2,5kg<br />
˘ÓıÂÙÈο<br />
2kg<br />
¡Ù¤ÓÈÌ(Ù˙ËÓ)<br />
2kg<br />
2. ∞‰ÂÈ¿ÛÙ ÙÔ ÛÙÂÁÓˆÙ‹ÚÈÔ ·Ì¤Ûˆ˜ ÌÂÙ¿ ÙÔ Ù¤ÏÔ˜ ÙÔ˘ appleÚÔÁÚ¿ÌÌ·ÙÔ˜, ÎÚÂÌ¿ÛÙÂ, ‰ÈappleÏÒÛÙ ‹ ÛȉÂÚÒÛÙ ٷ<br />
ÚÔ‡¯· Î·È Ê˘Ï¿ÍÙ ٷ ÛÙËÓ ÓÙÔ˘Ï¿apple·. ∞Ó ·˘Ùfi ‰ÂÓ Â›Ó·È ‰˘Ó·ÙfiÓ, Âapple·Ó·Ï¿‚ÂÙ ÙÔ appleÚfiÁÚ·ÌÌ·.<br />
∆Ô ·appleÔÙ¤ÏÂÛÌ· ÙÔ˘ appleÚÔÁÚ¿ÌÌ·ÙÔ˜ ‘∂‡ÎÔÏÔ È‰¤ÚˆÌ·’ appleÔÈΛÏÂÈ ·applefi ‡Ê·ÛÌ· Û ‡Ê·ÛÌ·. §ÂÈÙÔ˘ÚÁ› ηϿ ÛÙ·<br />
apple·Ú·‰ÔÛȷο ˘Ê¿ÛÌ·Ù·, fiappleˆ˜ Ù· ‚·Ì‚·ÎÂÚ¿ ‹ Ù· Ì›ÁÌ·Ù· ‚·Ì‚·ÎÂÚÒÓ, Î·È ÏÈÁfiÙÂÚÔ Î·Ï¿ Û ·ÎÚ˘ÏÈο ηÈ<br />
˘ÏÈο fiappleˆ˜ ÙÔ Tencel®.<br />
34
∂ÎΛÓËÛË Î·È appleÚÔÁÚ¿ÌÌ·Ù·<br />
ÚÔÁÚ¿ÌÌ·Ù·<br />
! ∞Ó ‰ÂÓ ¤¯ÂÈ ·Ó¿„ÂÈ Î·Ì›· ʈÙÂÈÓ‹ ¤Ó‰ÂÈÍË, apple·Ù‹ÛÙ ÙÔ ÎÔ˘Ìapple› ∂¡∂ƒ°√√π∏∏/∞∂¡∂ƒ°√√π∏∏<br />
Î·È ÛÙË Û˘Ó¤¯ÂÈ· ÂappleÈϤÍÙ ¤Ó· appleÚfiÁÚ·ÌÌ·.<br />
GR<br />
ÚfiÁÚ·ÌÌ· ∆È Î¿ÓÂÈ... Ò˜ Ó· ÙÔ Ú˘ıÌ›ÛÂÙÂ… ËÌ›ˆÛË:<br />
∂‡ÎÔÏÔ<br />
Ûȉ¤ÚˆÌ·<br />
µ·Ì‚·ÎÂÚ¿<br />
∂ÓÙÂÏÒ˜<br />
ÛÙÂÁÓ¿<br />
µ·Ì‚·ÎÂÚ¿<br />
Ù¤Áӈ̷ ÛÙË<br />
ÓÙÔ˘Ï¿apple·<br />
˘ÓıÂÙÈο<br />
Ù¤Áӈ̷ ÛÙË<br />
ÓÙÔ˘Ï¿apple·<br />
Ù¤Áӈ̷ ÌÂ<br />
¯ÚÔÓÔ̤ÙÚËÛË<br />
(150, 140, 120,<br />
100, 80, 70, 60,<br />
50, 40,30 ‹ 20<br />
ÏÂappleÙ¿)<br />
º¿ÛË ∫Ú‡Ô˘<br />
ÙÂÁÓÒÌ·ÙÔ˜<br />
‡ÓÙÔÌÔ appleÚfiÁÚ·ÌÌ·<br />
(appleÂÚ›appleÔ˘ 10 ÏÂappleÙ¿) appleÔ˘<br />
Ì·Ï·ÎÒÓÂÈ ÙȘ ›Ó˜ ÙˆÓ<br />
ÚÔ‡¯ˆÓ appleÔ˘ appleÚfiÎÂÈÙ·È<br />
Ó· ÛȉÂÚˆıÔ‡Ó.<br />
ÙÂÁÓÒÓÂÈ Ù· ÚÔ‡¯· Û·˜<br />
Û À„ËÏ‹ £ÂÚÌÔÎÚ·Û›·,<br />
ÒÛÙ ӷ Â›Ó·È ¤ÙÔÈÌ· Ó·<br />
Ù· ÊÔÚ¤ÛÂÙÂ.<br />
ÙÂÁÓÒÓÂÈ Ù· ÚÔ‡¯· Û·˜<br />
Û À„ËÏ‹ £ÂÚÌÔÎÚ·Û›·,<br />
ÒÛÙ ӷ Â›Ó·È ¤ÙÔÈÌ· Ó·<br />
ÙÔappleÔıÂÙËıÔ‡Ó ÛÙË ı¤ÛË<br />
ÙÔ˘˜.<br />
ÙÂÁÓÒÓÂÈ Ù· ÚÔ‡¯· Û·˜<br />
Û ÷ÌËÏ‹ £ÂÚÌÔÎÚ·Û›·,<br />
ÒÛÙ ӷ Â›Ó·È ¤ÙÔÈÌ· Ó·<br />
ÙÔappleÔıÂÙËıÔ‡Ó ÛÙË ı¤ÛË<br />
ÙÔ˘˜.<br />
ÙÂÁÓÒÓÂÈ ˘ÁÚ¿ ÚÔ‡¯·<br />
Ù· ÔappleÔ›· ÂappleÈı˘Ì›Ù ӷ<br />
ÛÙÂÁÓÒÛÂÙÂ ÛÂ ¯·ÌËÏ‹<br />
ıÂÚÌÔÎÚ·Û›· ‹ ÌÈÎÚ¿<br />
‚¿ÚË (ÌÈÎÚfiÙÂÚ· ·applefi 1 kg).<br />
ªappleÔÚ› Ó·<br />
¯ÚËÛÈÌÔappleÔÈËı› Î·È ÛÂ<br />
À„ËÏ‹ £ÂÚÌÔÎÚ·Û›·, ·Ó<br />
ÂappleÈı˘Ì›Ù ӷ<br />
¯ÚËÛÈÌÔappleÔÈ‹ÛÂÙÂ ¤Ó·<br />
appleÚfiÁÚ·ÌÌ· Û˘ÁÎÂÎÚÈ̤Ó˘<br />
¯ÚÔÓÈ΋˜ ‰È¿ÚÎÂÈ·˜.<br />
‡ÓÙÔÌÔ appleÚfiÁÚ·ÌÌ·<br />
(appleÂÚ›appleÔ˘ 10 ÏÂappleÙ¿) ÙÔ<br />
ÔappleÔ›Ô ÌÂÈÒÓÂÈ ÙË<br />
ıÂÚÌÔÎÚ·Û›· ÙˆÓ ÈÓÒÓ<br />
ÙˆÓ ÚÔ‡¯ˆÓ.<br />
1. °˘Ú›ÛÙ ÙÔ ÎÔ˘Ìapple› ƒ√°ƒ∞ªª∞∆∞<br />
ÛÙÔ .<br />
2. ȤÛÙ ÙÔ ÎÔ˘Ìapple› ∂∫∫π¡∏∏ /<br />
ƒ√øƒπ¡∏ ¢π∞∫√∏<br />
§∂π∆√Àƒ°π∞<br />
1. °˘Ú›ÛÙ ÙÔ ÎÔ˘Ìapple› ƒ√°ƒ∞ªª∞∆∞<br />
ÛÙÔ .<br />
2. ∂appleÈϤÍÙ ÙȘ ·apple·ÈÙÔ‡ÌÂÓ˜<br />
ÏÂÈÙÔ˘ÚÁ›Â˜.<br />
3. ȤÛÙ ÙÔ ÎÔ˘Ìapple› ∂∫∫π¡∏∏ /<br />
ƒ√øƒπ¡∏ ¢π∞∫√∏<br />
§∂π∆√Àƒ°π∞<br />
1. °˘Ú›ÛÙ ÙÔ ÎÔ˘Ìapple› ƒ√°ƒ∞ªª∞∆∞<br />
ÛÙÔ .<br />
2. ∂appleÈϤÍÙ ÙȘ ·apple·ÈÙÔ‡ÌÂÓ˜<br />
ÏÂÈÙÔ˘ÚÁ›Â˜.<br />
3. ȤÛÙ ÙÔ ÎÔ˘Ìapple› ∂∫∫π¡∏∏ /<br />
ƒ√øƒπ¡∏ ¢π∞∫√∏<br />
§∂π∆√Àƒ°π∞<br />
1. °˘Ú›ÛÙ ÙÔ ÎÔ˘Ìapple› ƒ√°ƒ∞ªª∞∆∞<br />
ÛÙÔ .<br />
2. ∂appleÈϤÍÙ ÙȘ ·apple·ÈÙÔ‡ÌÂÓ˜<br />
ÏÂÈÙÔ˘ÚÁ›Â˜.<br />
3. ȤÛÙ ÙÔ ÎÔ˘Ìapple› ∂∫∫π¡∏∏ /<br />
ƒ√øƒπ¡∏ ¢π∞∫√∏<br />
§∂π∆√Àƒ°π∞<br />
1. °˘Ú›ÛÙ ÙÔ ÎÔ˘Ìapple› ƒ√°ƒ∞ªª∞∆∞<br />
ÛÙÔÓ ÂappleÈı˘ÌËÙfi ¯ÚfiÓÔ 150, 140,<br />
120, 100, 80, 70, 60, 50, 40, 30 ‹ 20.<br />
2. ∂appleÈϤÍÙ ÙȘ ·apple·ÈÙÔ‡ÌÂÓ˜<br />
ÏÂÈÙÔ˘ÚÁ›Â˜.<br />
3. ȤÛÙ ÙÔ ÎÔ˘Ìapple› ∂∫∫π¡∏∏ /<br />
ƒ√øƒπ¡∏ ¢π∞∫√∏<br />
§∂π∆√Àƒ°π∞<br />
1. °˘Ú›ÛÙ ÙÔ ÎÔ˘Ìapple› ƒ√°ƒ∞ªª∞∆∞<br />
ÛÙÔ .<br />
2. ȤÛÙ ÙÔ ÎÔ˘Ìapple› ∂∫∫π¡∏∏ /<br />
ƒ√øƒπ¡∏ ¢π∞∫√∏<br />
§∂π∆√Àƒ°π∞<br />
! ∞˘Ùfi ÙÔ appleÚfiÁÚ·ÌÌ·<br />
‰ÂÓ Â›Ó·È ÁÈ· ÛÙ¤Áӈ̷<br />
(‚Ï. appleÚÔËÁÔ‡ÌÂÓË<br />
ÛÂÏ›‰·).<br />
¢È·ı¤ÛÈ̘ ÏÂÈÙÔ˘ÚÁ›Â˜:<br />
∫·Ì›·<br />
¢È·ı¤ÛÈ̘ ÏÂÈÙÔ˘ÚÁ›Â˜:<br />
ŒÓ·ÚÍË Ì ηı˘ÛÙ¤ÚËÛË<br />
∞Ú¯È΋ ÏÂÈÙÔ˘ÚÁ›· appleÚÔÛÙ·Û›·˜ ÙˆÓ<br />
ÚÔ‡¯ˆÓ ·applefi ÙÔ Ù۷ϿΈ̷<br />
∆ÂÏÈ΋ ÏÂÈÙÔ˘ÚÁ›· appleÚÔÛÙ·Û›·˜ ÙˆÓ<br />
ÚÔ‡¯ˆÓ ·applefi ÙÔ Ù۷ϿΈ̷<br />
¢È·ı¤ÛÈ̘ ÏÂÈÙÔ˘ÚÁ›Â˜:<br />
ŒÓ·ÚÍË Ì ηı˘ÛÙ¤ÚËÛË<br />
∞Ú¯È΋ ÏÂÈÙÔ˘ÚÁ›· appleÚÔÛÙ·Û›·˜ ÙˆÓ<br />
ÚÔ‡¯ˆÓ ·applefi ÙÔ Ù۷ϿΈ̷<br />
∆ÂÏÈ΋ ÏÂÈÙÔ˘ÚÁ›· appleÚÔÛÙ·Û›·˜ ÙˆÓ<br />
ÚÔ‡¯ˆÓ ·applefi ÙÔ Ù۷ϿΈ̷<br />
¢È·ı¤ÛÈ̘ ÏÂÈÙÔ˘ÚÁ›Â˜:<br />
ŒÓ·ÚÍË Ì ηı˘ÛÙ¤ÚËÛË<br />
∞Ú¯È΋ ÏÂÈÙÔ˘ÚÁ›· appleÚÔÛÙ·Û›·˜ ÙˆÓ<br />
ÚÔ‡¯ˆÓ ·applefi ÙÔ Ù۷ϿΈ̷<br />
∆ÂÏÈ΋ ÏÂÈÙÔ˘ÚÁ›· appleÚÔÛÙ·Û›·˜ ÙˆÓ<br />
ÚÔ‡¯ˆÓ ·applefi ÙÔ Ù۷ϿΈ̷<br />
¢È·ı¤ÛÈ̘ ÏÂÈÙÔ˘ÚÁ›Â˜:<br />
À„ËÏ‹ £ÂÚÌÔÎÚ·Û›·<br />
ŒÓ·ÚÍË Ì ηı˘ÛÙ¤ÚËÛË<br />
∞Ú¯È΋ ÏÂÈÙÔ˘ÚÁ›· appleÚÔÛÙ·Û›·˜ ÙˆÓ<br />
ÚÔ‡¯ˆÓ ·applefi ÙÔ Ù۷ϿΈ̷<br />
∆ÂÏÈ΋ ÏÂÈÙÔ˘ÚÁ›· appleÚÔÛÙ·Û›·˜ ÙˆÓ<br />
ÚÔ‡¯ˆÓ ·applefi ÙÔ Ù۷ϿΈ̷<br />
˘Ì‚Ô˘Ï¢Ù›Ù ÙÔ˘˜<br />
appleÚÔÙÂÈÓfiÌÂÓÔ˘˜ ¯ÚfiÓÔ˘˜<br />
ÛÙÂÁÓÒÌ·ÙÔ˜ (‚Ï. χÛÈÌÔ ÚÔ‡¯ˆÓ).<br />
∆· ÙÂÏÂ˘Ù·›· 10 ÏÂappleÙ¿ ÙˆÓ<br />
Û˘ÁÎÂÎÚÈÌ¤ÓˆÓ appleÚÔÁÚ·ÌÌ¿ÙˆÓ<br />
·appleÔÙÂÏÔ‡Ó ÙË Ê¿ÛË ∫Ú‡Ô˘<br />
ÛÙÂÁÓÒÌ·ÙÔ˜ (‚Ï. apple·Ú·Î¿Ùˆ).<br />
¢È·ı¤ÛÈ̘ ÏÂÈÙÔ˘ÚÁ›Â˜:<br />
∫·Ì›·<br />
35
∂ÎΛÓËÛË Î·È appleÚÔÁÚ¿ÌÌ·Ù·<br />
GR<br />
ÃÂÈÚÈÛÙ‹ÚÈ·<br />
● ∫Ô˘Ìapple› ƒ√°ƒ∞ªª∞∆ø¡<br />
! ÚÔÂȉÔappleÔ›ËÛË, ∞Ó ·ÏÏ¿ÍÂÈ Ë ı¤ÛË ÙÔ˘ ‰È·ÎfiappleÙË, ·ÊÔ‡<br />
apple·Ù‹Û·Ù ÙÔ ÎÔ˘Ìapple› ∂∫∫π¡∏∏ / ƒ√øƒπ¡∏ ¢π∞∫√∏<br />
§∂π∆√Àƒ°π∞ , Ë Ó¤· ı¤ÛË ¢∂¡ ı· ·ÏÏ¿ÍÂÈ ÙÔ ÂappleÈÏÂÁ̤ÓÔ<br />
appleÚfiÁÚ·ÌÌ·.<br />
°È· Ó· ·ÏÏ¿ÍÂÙ ¤Ó· ÂappleÈÏÂÁ̤ÓÔ appleÚfiÁÚ·ÌÌ·, apple·Ù‹ÛÙ ÙÔ<br />
ÎÔ˘Ìapple› ∂∫∫π¡∏∏/ƒ√øƒπ¡∏ ¢π∞∫√∏ §∂π∆√Àƒ°π∞<br />
. ∏ ʈÙÂÈÓ‹ ¤Ó‰ÂÈÍË Á›ÓÂÙ·È appleÔÚÙÔηϛ Î·È ·Ó·‚ÔÛ‚‹ÓÂÈ ÁÈ·<br />
Ó· ˘appleԉ›ÍÂÈ ÙËÓ appleÚÔÛˆÚÈÓ‹ ‰È·ÎÔapple‹ Ù˘ ÏÂÈÙÔ˘ÚÁ›·˜ ÙÔ˘<br />
appleÚÔÁÚ¿ÌÌ·ÙÔ˜. ∂appleÈϤÍÙ ¤Ó· Ó¤Ô appleÚfiÁÚ·ÌÌ· Î·È ÙȘ<br />
·apple·ÈÙÔ‡ÌÂÓ˜ ÏÂÈÙÔ˘ÚÁ›Â˜. ∏ ʈÙÂÈÓ‹ ¤Ó‰ÂÈÍË Á›ÓÂÙ·È appleÚ¿ÛÈÓË<br />
Î·È ·Ó·‚ÔÛ‚‹ÓÂÈ. ·Ù‹ÛÙ ͷӿ ÙÔ ÎÔ˘Ìapple› ∂∫∫π¡∏∏ /<br />
ƒ√øƒπ¡∏ ¢π∞∫√∏ §∂π∆√Àƒ°π∞ ÁÈ· Ó· ÍÂÎÈÓ‹ÛÂÈ<br />
ÙÔ Ó¤Ô appleÚfiÁÚ·ÌÌ·.<br />
● ∫Ô˘ÌappleÈ¿ / ʈÙÂÈÓ¤˜ ÂӉ›ÍÂȘ §∂π∆√Àƒ°πø¡<br />
ªappleÔÚ›Ù ӷ ¯ÚËÛÈÌÔappleÔÈ‹ÛÂÙ ٷ ÎÔ˘ÌappleÈ¿ ·˘Ù¿ ÁÈ· Ó·<br />
Ú˘ıÌ›ÛÂÙ ÙÔ ÂappleÈÏÂÁ̤ÓÔ appleÚfiÁÚ·ÌÌ· Û‡Ìʈӷ Ì ÙȘ<br />
·apple·ÈÙ‹ÛÂȘ Û·˜. ¢ÂÓ Â›Ó·È ‰È·ı¤ÛÈ̘ fiϘ ÔÈ ÏÂÈÙÔ˘ÚÁ›Â˜ ÁÈ·<br />
οı appleÚfiÁÚ·ÌÌ· (‚Ï. ∂ÎΛÓËÛË Î·È ÚÔÁÚ¿ÌÌ·Ù·). ∞Ó Î¿appleÔÈ·<br />
ÏÂÈÙÔ˘ÚÁ›· ‰ÂÓ Â›Ó·È ‰È·ı¤ÛÈÌË Î·È apple·Ù‹ÛÂÙ ÙÔ ·ÓÙ›ÛÙÔȯÔ<br />
ÎÔ˘Ìapple›, Ô Ì˯·ÓÈÛÌfi˜ appleÚÔÂȉÔappleÔ›ËÛ˘ ı· ÂÓÂÚÁÔappleÔÈËı› ÙÚÂȘ<br />
ÊÔÚ¤˜. ∞Ó Ë ÏÂÈÙÔ˘ÚÁ›· Â›Ó·È ‰È·ı¤ÛÈÌË, ·ÎÔ‡ÁÂÙ·È ¤Ó· ˯ËÙÈÎfi<br />
Û‹Ì· Î·È ·Ó¿‚ÂÈ Ë ÊˆÙÂÈÓ‹ ¤Ó‰ÂÈÍË ‰›appleÏ· ÛÙÔ ÎÔ˘Ìapple› Ù˘<br />
·ÓÙ›ÛÙÔȯ˘ ÏÂÈÙÔ˘ÚÁ›·˜, ÁÈ· Ó· ÂappleȂ‚·ÈÒÛÂÈ ÙËÓ ÂappleÈÏÔÁ‹ Û·˜.<br />
ºˆÙÂÈÓ¤˜ ÂӉ›ÍÂȘ ÚÔfi‰Ô˘ ( Ù¤Áӈ̷, ∫Ú‡Ô<br />
ÛÙ¤Áӈ̷, ) / ∫·ı˘ÛÙ¤ÚËÛ˘ (3 ÒÚ˜, 6 ÒÚ˜, 9 ÒÚ˜)<br />
ŸÙ·Ó Â›Ó·È ·Ó·Ì̤ÓË Ë ÊˆÙÂÈÓ‹ ¤Ó‰ÂÈÍË ‰›appleÏ· ÛÙÔ ÎÔ˘Ìapple›<br />
ηı˘ÛÙ¤ÚËÛ˘, ·Ó¿‚Ô˘Ó Î·È ·˘Ù¤˜ ÔÈ ÊˆÙÂÈÓ¤˜ ÂӉ›ÍÂȘ, ÒÛÙÂ<br />
Ó· ˘appleÔ‰ÂÈÎÓ‡ÂÙ·È Ô ÂappleÈÏÂÁ̤ÓÔ˜ ¯ÚfiÓÔ˜ ηı˘ÛÙ¤ÚËÛ˘. ∫·Ù¿ ÙË<br />
‰È¿ÚÎÂÈ· ¿ÏÏˆÓ appleÚÔÁÚ·ÌÌ¿ÙˆÓ, ÔÈ ÂӉ›ÍÂȘ ·˘Ù¤˜ ˘appleÔ‰ÂÈÎÓ‡Ô˘Ó<br />
ÙËÓ appleÚfiÔ‰Ô ÙÔ˘ ÛÙÂÁÓˆÙËÚ›Ô˘ Î·È ·Ó¿‚Ô˘Ó Ì ÙË ÛÂÈÚ¿, ηıÒ˜<br />
ÍÂÎÈÓ¿ Ë ·ÓÙ›ÛÙÔÈ¯Ë Ê¿ÛË.<br />
∫·ı˘ÛÙ¤ÚËÛË<br />
∏ ÂÎΛÓËÛË ÔÚÈÛÌ¤ÓˆÓ appleÚÔÁÚ·ÌÌ¿ÙˆÓ (‚Ï. ∂ÎΛÓËÛË Î·È<br />
ÚÔÁÚ¿ÌÌ·Ù·) ÌappleÔÚ› Ó· ηı˘ÛÙÂÚ‹ÛÂÈ ¤ˆ˜ Î·È 9 ÒÚ˜, ÛÂ<br />
‚‹Ì·Ù· ÙˆÓ ÙÚÈÒÓ ˆÚÒÓ. ÚÈÓ Ú˘ıÌ›ÛÂÙ ÙËÓ Î·ı˘ÛÙ¤ÚËÛË Ù˘<br />
ÂÎΛÓËÛ˘, ‚‚·Èˆı›Ù fiÙÈ ÙÔ ‰Ô¯Â›Ô ÓÂÚÔ‡ Â›Ó·È ¿‰ÂÈÔ.<br />
∫·Ù¿ ÙË ‰È¿ÚÎÂÈ·˜ Ù˘ ηı˘ÛÙ¤ÚËÛ˘ Ù˘ ÂÎΛÓËÛ˘, ·Ó¿‚ÂÈ Ë<br />
ʈÙÂÈÓ‹ ¤Ó‰ÂÈÍË ‰›appleÏ· ÛÙÔ ÎÔ˘Ìapple› ηı˘ÛÙ¤ÚËÛ˘ Î·È Ë ÊˆÙÂÈÓ‹<br />
¤Ó‰ÂÈÍË Ù˘ appleÂÚÈfi‰Ô˘ ηı˘ÛÙ¤ÚËÛ˘ ·Ó·‚ÔÛ‚‹ÓÂÈ (·ÊÔ‡<br />
apple·Ù‹ÛÂÙ ÙÔ ÎÔ˘Ìapple› ÂÎΛÓËÛ˘). °È· Ó· ηıÔÚ›ÛÙ ÙËÓ<br />
ηı˘ÛÙ¤ÚËÛË Ù˘ ÂÎΛÓËÛ˘, apple·Ù‹ÛÙ ÙÔ ÎÔ˘Ìapple› ∫·ı˘ÛÙ¤ÚËÛ˘<br />
ÂÎΛÓËÛ˘. £· ·Ó¿„ÂÈ Ë ÊˆÙÂÈÓ‹ ¤Ó‰ÂÈÍË ‰›appleÏ· ÛÙÔ ÎÔ˘Ìapple›,<br />
ηıÒ˜ Î·È Ë ÊˆÙÂÈÓ‹ ¤Ó‰ÂÈÍË Ù˘ ηı˘ÛÙ¤ÚËÛ˘ 3 ˆÚÒÓ. ∞Ó<br />
apple·Ù‹ÛÂÙ ͷӿ ÙÔ ÎÔ˘Ìapple›, Ë Î·ı˘ÛÙ¤ÚËÛË ı· appleÚÔ¯ˆÚ‹ÛÂÈ ÛÙË<br />
Ú‡ıÌÈÛË ÙˆÓ 6 ˆÚÒÓ, ı· Û‚‹ÛÂÈ Ë ÊˆÙÂÈÓ‹ ¤Ó‰ÂÈÍË ÙˆÓ 3 ˆÚÒÓ<br />
Î·È ı· ·Ó¿„ÂÈ Ë ÊˆÙÂÈÓ‹ ¤Ó‰ÂÈÍË ÙˆÓ 6 ˆÚÒÓ. ∫¿ı ÊÔÚ¿ appleÔ˘<br />
apple·Ù¿Ù ÙÔ ÎÔ˘Ìapple›, Ë Î·ı˘ÛÙ¤ÚËÛË appleÚÔ¯ˆÚ¿ ηٿ 3 ÒÚ˜, fiappleˆ˜<br />
˘appleÔ‰ÂÈÎÓ‡ÂÙ·È ·applefi ÙËÓ ·ÓÙ›ÛÙÔÈ¯Ë ÊˆÙÂÈÓ‹ ¤Ó‰ÂÈÍË. ∞Ó Â›Ó·È<br />
·Ó·Ì̤ÓË Ë ÊˆÙÂÈÓ‹ ¤Ó‰ÂÈÍË ÙˆÓ 9 ˆÚÒÓ Î·È apple·Ù‹ÛÂÙ ͷӿ ÙÔ<br />
ÎÔ˘Ìapple›, Ë Î·ı˘ÛÙ¤ÚËÛË ·Î˘ÚÒÓÂÙ·È. ∂apple›Û˘, ÌappleÔÚ›Ù ӷ<br />
·Î˘ÚÒÛÂÙ ÙËÓ Î·ı˘ÛÙ¤ÚËÛË ÎÚ·ÙÒÓÙ·˜ apple·ÙË̤ÓÔ ÙÔ ÎÔ˘Ìapple›<br />
∂ÓÂÚÁÔappleÔ›ËÛ˘/∞appleÂÓÂÚÁÔappleÔ›ËÛ˘.<br />
∞Ú¯È΋ ÏÂÈÙÔ˘ÚÁ›· appleÚÔÛÙ·Û›·˜ ÙˆÓ ÚÔ‡¯ˆÓ ·applefi ÙÔ Ù۷ϿΈ̷<br />
ŸÙ·Ó ¤¯ÂÈ ÂÓÂÚÁÔappleÔÈËı› Ë Û˘ÁÎÂÎÚÈ̤ÓË ÏÂÈÙÔ˘ÚÁ›· Î·È ¤¯ÂÈ<br />
ÂappleÈÏÂÁ› ¤Ó·ÚÍË Ì ηı˘ÛÙ¤ÚËÛË, Ù· ÚÔ‡¯· ·Ó·‰Â‡ÔÓÙ·È Î·Ù¿<br />
‰È·ÛÙ‹Ì·Ù· ÛÙË ‰È¿ÚÎÂÈ· Ù˘ appleÂÚÈfi‰Ô˘ ηı˘ÛÙ¤ÚËÛ˘, ÒÛÙ ӷ<br />
ÌË ‰ËÌÈÔ˘ÚÁËıÔ‡Ó ˙¿Ú˜.<br />
À„ËÏ‹ £ÂÚÌÔÎÚ·Û›·<br />
¢È·Ù›ıÂÙ·È ÁÈ· ÚÔÁÚ¿ÌÌ·Ù· ÙÂÁÓÒÌ·ÙÔ˜ ˘ÁÎÂÎÚÈ̤Ó˘<br />
ÃÚÔÓÈ΋˜ ¢È¿ÚÎÂÈ·˜. ·Ù‹ÛÙ ·˘Ùfi ÙÔ ÎÔ˘Ìapple›, ÁÈ· Ó·<br />
ÂÌÊ·ÓÈÛÙ› Ë Ú‡ıÌÈÛË ˘„ËÏ‹˜ ıÂÚÌÔÎÚ·Û›·˜. ∞Ó¿‚ÂÈ Ë ÊˆÙÂÈÓ‹<br />
¤Ó‰ÂÈÍË ‰›appleÏ· ÛÙÔ ÎÔ˘Ìapple›. ∆· appleÚÔÁÚ¿ÌÌ·Ù· Û˘ÁÎÂÎÚÈ̤Ó˘<br />
¯ÚÔÓÈ΋˜ ‰È¿ÚÎÂÈ·˜ ÏÂÈÙÔ˘ÚÁÔ‡Ó ‚¿ÛÂÈ appleÚÔÂappleÈÏÔÁ‹˜ Û ¯·ÌËÏ‹<br />
ıÂÚÌÔÎÚ·Û›·. ∞Ó Ë ÊˆÙÂÈÓ‹ ¤Ó‰ÂÈÍË ‰›appleÏ· ÛÙÔ ÎÔ˘Ìapple› ›ӷÈ<br />
·Ó·Ì̤ÓË, ÙfiÙ Ì ÙÔ apple¿ÙËÌ· ÙÔ˘ ÎÔ˘ÌappleÈÔ‡ ÂappleÈϤÁÂÙ·È Ú‡ıÌÈÛË<br />
¯·ÌËÏ‹˜ ıÂÚÌÔÎÚ·Û›·˜ Î·È Ë ÊˆÙÂÈÓ‹ ¤Ó‰ÂÈÍË Û‚‹ÓÂÈ.<br />
∆ÂÏÈ΋ ÏÂÈÙÔ˘ÚÁ›· appleÚÔÛÙ·Û›·˜ ÙˆÓ ÚÔ‡¯ˆÓ ·applefi ÙÔ Ù۷ϿΈ̷<br />
ŸÙ·Ó Â›Ó·È ÂÓÂÚÁÔappleÔÈË̤ÓË, Ù· ÚÔ‡¯· ÛÙÂÁÓÒÓÔÓÙ·È Î·Ù¿<br />
‰È·ÛÙ‹Ì·Ù· ÌÂÙ¿ ÙÔ Ù¤ÏÔ˜ ÙˆÓ Î‡ÎÏˆÓ ÛÙÂÁÓÒÌ·ÙÔ˜ Î·È ÎÚ‡Ô˘<br />
ÛÙÂÁÓÒÌ·ÙÔ˜, ÒÛÙ ӷ ÌË ‰ËÌÈÔ˘ÚÁËıÔ‡Ó ˙¿Ú˜, Û appleÂÚ›appleÙˆÛË<br />
appleÔ˘ ‰ÂÓ Â›ÛÙ Û ı¤ÛË Ó· ‚Á¿ÏÂÙ ٷ ÚÔ‡¯· ·applefi ÙÔ<br />
ÛÙÂÁÓˆÙ‹ÚÈÔ ·Ì¤Ûˆ˜ ÌÂÙ¿ ÙË Ï‹ÍË ÙÔ˘ appleÚÔÁÚ¿ÌÌ·ÙÔ˜. ∫·Ù¿ ÙË<br />
‰È¿ÚÎÂÈ· Ù˘ Ê¿Û˘ ·˘Ù‹˜ Â›Ó·È ·Ó·Ì̤ÓË Ë ÊˆÙÂÈÓ‹ ¤Ó‰ÂÈÍË<br />
ºˆÙÂÈÓ‹ ŒÓ‰ÂÈÍË ∞Ê·›ÚÂÛ˘ ¡ÂÚÔ‡ / ¢Ô¯Â›Ô<br />
(∞Ó ¤¯ÂÙÂ Û˘Ó‰¤ÛÂÈ ÙÔ ÛÙÂÁÓˆÙ‹ÚÈfi Û·˜ Ì ·ÁˆÁfi, ÌappleÔÚ›ÙÂ<br />
Ó· ·ÁÓÔ‹ÛÂÙ ÙË Û˘ÁÎÂÎÚÈ̤ÓË ÊˆÙÂÈÓ‹ ¤Ó‰ÂÈÍË, ηıÒ˜ ‰ÂÓ<br />
¯ÚÂÈ¿˙ÂÙ·È Ó· ·‰ÂÈ¿ÛÂÙ ÙÔÓ appleÂÚȤÎÙË ÓÂÚÔ‡).<br />
ŸÙ·Ó Â›Ó·È ·Ó·Ì̤ÓË Ë Û˘ÁÎÂÎÚÈ̤ÓË ÊˆÙÂÈÓ‹ ¤Ó‰ÂÈÍË (fi¯È fiÙ·Ó<br />
·Ó·‚ÔÛ‚‹ÓÂÈ) Û·˜ ˘appleÂÓı˘Ì›˙ÂÈ Ó· ·‰ÂÈ¿ÛÂÙ ÙÔÓ appleÂÚȤÎÙË ÓÂÚÔ‡.<br />
∞Ó ÙÔ ‰Ô¯Â›Ô ÓÂÚÔ‡ ÁÂÌ›ÛÂÈ Î·Ù¿ ÙË ‰È¿ÚÎÂÈ· ÂÓfi˜ appleÚÔÁÚ¿ÌÌ·ÙÔ˜,<br />
·appleÂÓÂÚÁÔappleÔÈÂ›Ù·È Ô ıÂÚÌ·ÓÙ‹Ú·˜ Î·È ÙÔ ÛÙÂÁÓˆÙ‹ÚÈÔ ÂÎÙÂÏ›<br />
∫Ú‡Ô Ù¤Áӈ̷ ÁÈ· Û˘ÁÎÂÎÚÈ̤ÓË appleÂÚ›Ô‰Ô, ÂÓÒ ·Ó·‚ÔÛ‚‹ÓÂÈ Ë<br />
ʈÙÂÈÓ‹ ¤Ó‰ÂÈÍË Î·È Ô Ì˯·ÓÈÛÌfi˜ appleÚÔÂȉÔappleÔ›ËÛ˘ ÂÎapple¤ÌappleÂÈ ÙÔ<br />
¯·Ú·ÎÙËÚÈÛÙÈÎfi ‹¯Ô. Ú¤appleÂÈ Ó· ·‰ÂÈ¿ÛÂÙ ÙÔ ‰Ô¯Â›Ô ÓÂÚÔ‡ ηÈ<br />
Ó· ÍÂÎÈÓ‹ÛÂÙ ÂÎ Ó¤Ô˘ ÙÔ ÛÙÂÁÓˆÙ‹ÚÈÔ.  ‰È·ÊÔÚÂÙÈ΋<br />
appleÂÚ›appleÙˆÛË Ù· ÚÔ‡¯· ‰ÂÓ ı· ÛÙÂÁÓÒÛÔ˘Ó. ∞ÊÔ‡ ÍÂÎÈÓ‹ÛÂÙ ÂÎ<br />
Ó¤Ô˘ ÙÔ ÛÙÂÁÓˆÙ‹ÚÈÔ, ı· ¯ÚÂÈ·ÛÙÔ‡Ó ÌÂÚÈο ‰Â˘ÙÂÚfiÏÂappleÙ·<br />
̤¯ÚÈ Ó· Û‚‹ÛÂÈ Ë ÊˆÙÂÈÓ‹ ¤Ó‰ÂÈÍË. °È· Ó· ·appleÔʇÁÂÙ ÙË<br />
‰È·‰Èηۛ· ·˘Ù‹, ·‰ÂÈ¿˙ÂÙ ÙÔ ‰Ô¯Â›Ô ÓÂÚÔ‡ ÌÂÙ¿ ·applefi οıÂ<br />
¯Ú‹ÛË ÙÔ˘ ÛÙÂÁÓˆÙËÚ›Ô˘ (‚Ï. ˘ÓÙ‹ÚËÛË).<br />
● ÕÓÔÈÁÌ· fiÚÙ·˜<br />
∞Ó ·ÓÔ›ÍÂÙ ÙËÓ applefiÚÙ· (‹ apple·Ù‹ÛÂÙ ÙÔ ÎÔ˘Ìapple› ∂¡∞ƒ•∏ /<br />
ƒ√øƒπ¡∏ ¢π∞∫√∏ §∂π∆√Àƒ°π∞ ) ηٿ ÙË ‰È¿ÚÎÂÈ·<br />
ÂÓfi˜ appleÚÔÁÚ¿ÌÌ·ÙÔ˜, ı· ‰È·ÎÔapple› Ë ÏÂÈÙÔ˘ÚÁ›· ÙÔ˘<br />
ÛÙÂÁÓˆÙËÚ›Ô˘ Î·È ı· Û˘Ì‚Ô‡Ó Ù· ÂÍ‹˜:<br />
● ∏ ʈÙÂÈÓ‹ ¤Ó‰ÂÈÍË ∂∫∫π¡∏∏ / ƒ√øƒπ¡∏<br />
¢π∞∫√∏ §∂π∆√Àƒ°π∞ Á›ÓÂÙ·È appleÔÚÙÔηϛ ηÈ<br />
·Ó·‚ÔÛ‚‹ÓÂÈ.<br />
● ∫·Ù¿ ÙË ‰È¿ÚÎÂÈ· ÌÈ·˜ Ê¿Û˘ ηı˘ÛÙ¤ÚËÛ˘, ı· Û˘Ó¯ÈÛÙ›<br />
Ë ·ÓÙ›ÛÙÚÔÊË Ì¤ÙÚËÛË Ù˘ ηı˘ÛÙ¤ÚËÛ˘. °È· Ó·<br />
Û˘Ó¯ÈÛÙ› ÙÔ appleÚfiÁÚ·ÌÌ· ηı˘ÛÙ¤ÚËÛ˘ appleÚ¤appleÂÈ Ó·<br />
apple·Ù‹ÛÂÙ ÙÔ ÎÔ˘Ìapple› ∂∫∫π¡∏∏ / ƒ√øƒπ¡∏<br />
¢π∞∫√∏ §∂π∆√Àƒ°π∞ . ª›· ·applefi ÙȘ ʈÙÂÈÓ¤˜<br />
ÂӉ›ÍÂȘ ηı˘ÛÙ¤ÚËÛ˘ ı· ·Ó·‚ÔÛ‚‹ÓÂÈ ˆ˜ ¤Ó‰ÂÈÍË ÁÈ·<br />
ÙËÓ ÙÚ¤¯Ô˘Û· Ú‡ıÌÈÛË Î·ı˘ÛÙ¤ÚËÛ˘.<br />
● °È· Ó· Û˘Ó¯ÈÛÙ› ÙÔ appleÚfiÁÚ·ÌÌ· appleÚ¤appleÂÈ Ó· apple·Ù‹ÛÂÙ ÙÔ<br />
ÎÔ˘Ìapple› ∂∫∫π¡∏∏ / ƒ√øƒπ¡∏ ¢π∞∫√∏<br />
§∂π∆√Àƒ°π∞ . ∏ ʈÙÂÈÓ‹ ¤Ó‰ÂÈÍË appleÚÔfi‰Ô˘ ·ÏÏ¿˙ÂÈ<br />
Î·È ÂÌÊ·Ó›˙ÂÈ appleϤÔÓ ÙËÓ ÙÚ¤¯Ô˘Û· ηٿÛÙ·ÛË, ÂÓÒ Ë<br />
ʈÙÂÈÓ‹ ¤Ó‰ÂÈÍË ∂¡∞ƒ•∏/¢π∞∫√∏ §∂π∆√Àƒ°π∞<br />
ÛÙ·Ì·Ù¿ Ó· ·Ó·‚ÔÛ‚‹ÓÂÈ Î·È Á›ÓÂÙ·È appleÚ¿ÛÈÓË.<br />
● ∫·Ù¿ ÙË ‰È¿ÚÎÂÈ· Ù˘ ÙÂÏÈ΋˜ ÏÂÈÙÔ˘ÚÁ›·˜ appleÚÔÛÙ·Û›·˜<br />
ÙˆÓ ÚÔ‡¯ˆÓ ·applefi ÙÔ Ù۷ϿΈ̷ ÂÓfi˜ appleÚÔÁÚ¿ÌÌ·ÙÔ˜<br />
ÛÙÂÁÓÒÌ·ÙÔ˜ Î·È ÔappleÔÈ·‰‹appleÔÙ ÛÙÈÁÌ‹ Ù˘ ‰È¿ÚÎÂÈ·˜<br />
ÂÓfi˜ appleÚÔÁÚ¿ÌÌ·ÙÔ˜ ∞ÂÚÈÛÌÔ‡ ‹ ∫Ú‡Ô˘ ÙÂÁÓÒÌ·ÙÔ˜, ÙÔ<br />
appleÚfiÁÚ·ÌÌ· ı· ÔÏÔÎÏËÚˆı›. ∞Ó apple·Ù‹ÛÂÙ ÙÔ ÎÔ˘Ìapple›<br />
∂∫∫π¡∏∏/ƒ√øƒπ¡∏ ¢π∞∫√∏ §∂π∆√Àƒ°π∞<br />
ÙÔ appleÚfiÁÚ·ÌÌ· ı· ÍÂÎÈÓ‹ÛÂÈ Î·È apple¿ÏÈ ·applefi ÙËÓ ·Ú¯‹.<br />
● ∞Ó ·ÏÏ¿ÍÂÙ ÙÔ ÎÔ˘Ìapple› appleÚÔÁÚ·ÌÌ¿ÙˆÓ, ÂappleÈϤÁÂÙ ¤Ó·<br />
ηÈÓÔ‡ÚÈÔ appleÚfiÁÚ·ÌÌ·, ÂÓÒ Ë ÊˆÙÂÈÓ‹ ¤Ó‰ÂÈÍË ∂∫∫π¡∏∏<br />
/ ƒ√øƒπ¡∏ §∂π∆√Àƒ°π∞ ı· Á›ÓÂÈ appleÚ¿ÛÈÓË Î·È ı·<br />
·Ó·‚ÔÛ‚‹ÓÂÈ. ªappleÔÚ›Ù ӷ ¯ÚËÛÈÌÔappleÔÈ‹ÛÂÙ ÙË ÏÂÈÙÔ˘ÚÁ›·<br />
·˘Ù‹, ÁÈ· Ó· ÂappleÈϤÍÂÙ appleÚfiÁÚ·ÌÌ· ∫Ú‡Ô˘ ÙÂÁÓÒÌ·ÙÔ˜<br />
ÁÈ· Ó· ÌÂÈÒÛÂÙ ÙË ıÂÚÌÔÎÚ·Û›· ÙˆÓ ÚÔ‡¯ˆÓ, ·Ó ıˆÚ›ÙÂ<br />
fiÙÈ ¤¯Ô˘Ó ÛÙÂÁÓÒÛÂÈ ·ÚÎÂÙ¿. ·Ù‹ÛÙ ÙÔ ÎÔ˘Ìapple› ∂∫∫π¡∏∏<br />
/ ƒ√øƒπ¡∏ ¢π∞∫√∏ §∂π∆√Àƒ°π∞ ÁÈ· Ó·<br />
ÍÂÎÈÓ‹ÛÂÙ ¤Ó· ηÈÓÔ‡ÚÈÔ appleÚfiÁÚ·ÌÌ·.<br />
● ËÌ›ˆÛË:<br />
∞Ó appleÚÔ·„ÂÈ ‰È·ÎÔapple‹ Ú‡̷ÙÔ˜, ·appleÂÓÂÚÁÔappleÔÈ‹ÛÙ ÙËÓ apple·ÚÔ¯‹<br />
‹ ‚Á¿ÏÙ ÙÔ ÛÙÂÁÓˆÙ‹ÚÈÔ ·applefi ÙËÓ appleÚ›˙·. ∞ÊÔ‡ Âapple·Ó¤ÏıÂÈ ÙÔ<br />
Ú‡̷, apple·Ù‹ÛÙ ÙÔ ÎÔ˘Ìapple› ∂∫∫π¡∏∏/ƒ√øƒπ¡∏<br />
¢π∞∫√∏ §∂π∆√Àƒ°π∞ ÁÈ· Ó· Û˘Ó¯ÈÛÙ› ÙÔ<br />
appleÚfiÁÚ·ÌÌ·.<br />
36
χÛÈÌÔ ÚÔ‡¯ˆÓ<br />
¢È·¯ˆÚÈÛÌfi˜ ÚÔ‡¯ˆÓ<br />
●<br />
●<br />
●<br />
●<br />
●<br />
∂ϤÁÍÙ ٷ ۇ̂ÔÏ· ÛÙȘ ÂÙÈΤÙ˜ ÙˆÓ ÚÔ‡¯ˆÓ ÁÈ·<br />
Ó· ‚‚·Èˆı›Ù fiÙÈ ÂappleÈÙÚ¤appleÂÙ·È Ó· ÌappleÔ˘Ó ÛÙÔ<br />
ÛÙÂÁÓˆÙ‹ÚÈÔ.<br />
•Â¯ˆÚ›ÛÙ ٷ ÚÔ‡¯· ·Ó¿ Ù‡appleÔ ˘Ê¿ÛÌ·ÙÔ˜.<br />
∞‰ÂÈ¿ÛÙ ÙȘ ÙÛ¤apple˜ Î·È ÂϤÁÍÙ ٷ ÎÔ˘ÌappleÈ¿.<br />
∫Ï›ÛÙ ÊÂÚÌÔ˘¿Ú Î·È ÎfiappleÈÙÛ˜ Î·È ‰¤ÛÙÂ Ï˘Ù¤˜<br />
˙ÒÓ˜ Î·È ÎÔÚ‰fiÓÈ·.<br />
Ù‡„Ù ηϿ οı ÚÔ‡¯Ô ÁÈ· Ó· ·appleÔÌ·ÎÚ‡ÓÂÙÂ<br />
fiÛÔ appleÂÚÈÛÛfiÙÂÚÔ ÓÂÚfi Á›ÓÂÙ·È.<br />
! ªËÓ ‚¿˙ÂÙ ‚ÚÂÁ̤ӷ ÚÔ‡¯· appleÔ˘ ·ÎfiÌË ÛÙ¿˙Ô˘Ó<br />
̤۷ ÛÙÔ ÛÙÂÁÓˆÙ‹ÚÈÔ.<br />
ª¤ÁÈÛÙÔ Ì¤ÁÂıÔ˜ ÊÔÚÙ›Ô˘<br />
ªËÓ ÊÔÚÙÒÓÂÙ appleÂÚÈÛÛfiÙÂÚÔ ·applefi ÙË Ì¤ÁÈÛÙË<br />
¯ˆÚËÙÈÎfiÙËÙ·. √È ·ÎfiÏÔ˘ıÔÈ ·ÚÈıÌÔ› ·Ó·Ê¤ÚÔÓÙ·È ÛÂ<br />
‚¿ÚÔ˜ ÛÙÂÁÓÒÓ ÚÔ‡¯ˆÓ:<br />
º˘ÛÈο ˘Ê¿ÛÌ·Ù·: 8 kg max<br />
˘ÓıÂÙÈο ˘Ê¿ÛÌ·Ù·: 3 kg max<br />
! ª∏¡ ˘appleÂÚÊÔÚÙÒÓÂÙ ÙÔ ÛÙÂÁÓˆÙ‹ÚÈÔ, ÁÈ·Ù› ÌappleÔÚ›<br />
Ó· ÌÂȈı› Ë ·applefi‰ÔÛË ÙÔ˘ ÛÙÂÁÓÒÌ·ÙÔ˜.<br />
˘Ó‹ıË ÊÔÚÙ›·<br />
ËÌ›ˆÛË: 1kg = 1000g<br />
ƒÔ‡¯·<br />
ªappleÏÔ‡˙˜ µ·Ì‚¿ÎÈ 150g<br />
ÕÏÏÔ<br />
100g<br />
ºÔڤ̷ٷ µ·Ì‚¿ÎÈ 500g<br />
ÕÏÏÔ<br />
350g<br />
∆˙ËÓ<br />
700g<br />
10 apple¿Ó˜ 1000g<br />
Ô˘Î¿ÌÈÛ· µ·Ì‚¿ÎÈ 300g<br />
ÕÏÏÔ<br />
200g<br />
∫ÔÓÙÔÌ¿ÓÈη<br />
125g<br />
§Â˘Î¿ ›‰Ë<br />
·appleψ̷ÙÔı‹Î˜ µ·Ì‚¿ÎÈ 1500g<br />
(‰ÈappleÏ¿) ÕÏÏÔ 1000g<br />
ªÂÁ¿ÏÔ ÙÚ·appleÂ˙ÔÌ¿ÓÙÈÏÔ<br />
700g<br />
ªÈÎÚfi ÙÚ·appleÂ˙ÔÌ¿ÓÙÈÏÔ<br />
250g<br />
ÂÙÛÂÙ¿ÎÈ· ÎÔ˘˙›Ó·˜<br />
100g<br />
ÂÙÛ¤Ù˜ Ìapple¿ÓÈÔ˘<br />
700g<br />
ÂÙÛ¤Ù˜ ¯ÂÚÈÒÓ<br />
350g<br />
ÂÓÙfiÓÈ· ‰ÈappleÏ¿<br />
500g<br />
ÂÓÙfiÓÈ· ÌÔÓ¿<br />
350g<br />
ÙÔ Ù¤ÏÔ˜ ÂÓfi˜ appleÚÔÁÚ¿ÌÌ·ÙÔ˜, Ù· ‚·Ì‚·ÎÂÚ¿<br />
ÌappleÔÚ› Ó· ‰È·ÙËÚÔ‡Ó ·ÎfiÌË ˘ÁÚ·Û›· ·Ó Ù· ¤¯ÂÙÂ<br />
‚¿ÏÂÈ Ì·˙› ÌÂ Û˘ÓıÂÙÈο.  ·˘Ù‹ ÙËÓ appleÂÚ›appleÙˆÛË,<br />
·appleÏÒ˜ ·Ê‹ÛÙÂ appleÂÚÈÛÛfiÙÂÚÔ ¯ÚfiÓÔ ÁÈ· Ó·<br />
ÛÙÂÁÓÒÛÔ˘Ó.<br />
● ËÌ›ˆÛË: ∫·Ù¿ ÙË Ú‡ıÌÈÛË ÙÔ˘ ¯ÚfiÓÔ˘<br />
ÛÙÂÁÓÒÌ·ÙÔ˜ Ï¿‚ÂÙ ˘applefi„Ë fiÙÈ Ù· ÙÂÏÂ˘Ù·›· 10<br />
ÏÂappleÙ¿ ÙÔ˘ ¯ÚfiÓÔ˘ appleÔ˘ Ú˘ıÌ›˙ÂÙ Á›ÓÂÙ·È ÙÔ ∫Ú‡Ô<br />
Ù¤Áӈ̷, ηıÒ˜ ηٿ ÙÔ ‰È¿ÛÙËÌ· ·˘Ùfi Ù· ÚÔ‡¯·<br />
Û·˜ ‰ÂÓ ÛÙÂÁÓÒÓÔ˘Ó.<br />
√‰ËÁ›Â˜ ÛÙÂÁÓÒÌ·ÙÔ˜ ÛÙȘ ÂÙÈΤÙ˜<br />
ÚÔÛ¤¯ÂÙ ÙȘ ÂÙÈΤÙ˜ ÙˆÓ ÚÔ‡¯ˆÓ Û·˜, ÂȉÈο ·Ó<br />
appleÚfiÎÂÈÙ·È Ó· Ù· ÛÙÂÁÓÒÛÂÙÂ ÛÙÔ ÛÙÂÁÓˆÙ‹ÚÈÔ ÁÈ·<br />
appleÚÒÙË ÊÔÚ¿. ∆· ·ÎfiÏÔ˘ı· ۇ̂ÔÏ· Â›Ó·È Ù· appleÈÔ<br />
Û˘ÓËıÈṲ̂ӷ:<br />
∫·Ù¿ÏÏËÏÔ ÁÈ· ÛÙÂÁÓˆÙ‹ÚÈÔ<br />
ªËÓ ‚¿˙ÂÙ ÛÙÔ ÛÙÂÁÓˆÙ‹ÚÈÔ<br />
Ù¤Áӈ̷ Û ˘„ËÏ‹ ıÂÚÌÔÎÚ·Û›·<br />
Ù¤Áӈ̷ Û ¯·ÌËÏ‹ ıÂÚÌÔÎÚ·Û›·<br />
∂›‰Ë ·Î·Ù¿ÏÏËÏ· ÁÈ· ÙÔ ÛÙÂÁÓˆÙ‹ÚÈÔ<br />
● ∂›‰Ë appleÔ˘ appleÂÚȤ¯Ô˘Ó ηԢÙÛԇΠ‹ Û˘Ó·Ê‹ ˘ÏÈο ‹<br />
appleÏ·ÛÙÈΤ˜ ÂappleÈÊ¿ÓÂȘ (Ì·ÍÈÏ¿ÚÈ· ‹ ·‰È¿‚ÚÔ¯·<br />
·applefi PVC), ÔappleÔÈ·‰‹appleÔÙ ¿ÏÏ· ‡ÊÏÂÎÙ· ›‰Ë ‹<br />
·ÓÙÈΛÌÂÓ· appleÔ˘ appleÂÚȤ¯Ô˘Ó ‡ÊÏÂÎÙ˜ ‡Ï˜ (apple.¯.<br />
appleÂÙÛ¤Ù˜ ÂÌappleÔÙÈṲ̂Ó˜ Ì ϷÎ).<br />
● À·ÏfiÈÓ˜ (Û˘ÁÎÂÎÚÈ̤ÓÔÈ Ù‡appleÔÈ ˘Ê·ÛÌ¿ÙˆÓ).<br />
● ∂›‰Ë appleÔ˘ ¤¯Ô˘Ó appleÂÚ¿ÛÂÈ ·applefi ÛÙÂÁÓfi ηı¿ÚÈÛÌ·.<br />
● ∂›‰Ë Ì ÙÔÓ Îˆ‰ÈÎfi ITCL (‚Ï. ƒÔ‡¯· ÂȉÈ΋˜<br />
ÊÚÔÓÙ›‰·˜). ∞˘Ù¿ ÌappleÔÚÔ‡Ó Ó· ηı·ÚÈÛÙÔ‡Ó ÌÂ<br />
ÂȉÈο ÔÈÎȷο appleÚÔ˚fiÓÙ· ÁÈ· ÛÙÂÁÓfi ηı¿ÚÈÛÌ·.<br />
∞ÎÔÏÔ˘ı‹ÛÙ appleÚÔÛÂÎÙÈο ÙȘ Ô‰ËÁ›Â˜.<br />
● ªÂÁ¿Ï· ÔÁÎÒ‰Ë Â›‰Ë (apple·appleÏÒÌ·Ù·, ˘appleÓfiÛ·ÎÔÈ,<br />
Ì·ÍÈÏ¿ÚÈ·, ÌÂÁ¿Ï· ηχÌÌ·Ù· ÎÚ‚·ÙÈÒÓ ÎÏapple), Ù·<br />
ÔappleÔ›· ‰È·ÛÙ¤ÏÏÔÓÙ·È Î·Ù¿ ÙÔ ÛÙ¤Áӈ̷ ηÈ<br />
ÂÌappleÔ‰›˙Ô˘Ó ÙË ÚÔ‹ ÙÔ˘ ·¤Ú· ̤۷ ÛÙÔ<br />
ÛÙÂÁÓˆÙ‹ÚÈÔ.<br />
GR<br />
37
χÛÈÌÔ ÚÔ‡¯ˆÓ<br />
GR<br />
ƒÔ‡¯· ÂȉÈ΋˜ ÊÚÔÓÙ›‰·˜<br />
∫Ô˘‚¤ÚÙ˜ Î·È Î·Ï‡ÌÌ·Ù·: Ù· ·ÎÚ˘ÏÈο ›‰Ë (Acilan,<br />
Courtelle, Orion, Dralon) appleÚ¤appleÂÈ Ó· ÛÙÂÁÓÒÓÔÓÙ·È ÌÂ<br />
ÂȉÈ΋ ÊÚÔÓÙ›‰· ‹ Û Ã∞ª∏§∏ ıÂÚÌÔÎÚ·Û›·.<br />
∞appleÔʇÁÂÙ ÌÂÁ¿ÏÔ ¯ÚfiÓÔ ÛÙÂÁÓÒÌ·ÙÔ˜ .<br />
ƒÔ‡¯· Ì appleȤÙ˜ ‹ Ù۷ΛÛÂȘ: ‰È·‚¿ÛÙ ÙȘ Ô‰ËÁ›Â˜<br />
ÛÙÂÁÓÒÌ·ÙÔ˜ ÙÔ˘ ηٷÛ΢·ÛÙ‹ Âapple¿Óˆ ÛÙ· ÚÔ‡¯·.<br />
∫ÔÏÏ·ÚÈṲ̂ӷ ›‰Ë: ÌËÓ Ù· ÛÙÂÁÓÒÓÂÙ ̷˙› Ì ›‰Ë<br />
appleÔ˘ ‰ÂÓ Â›Ó·È ÎÔÏÏ·ÚÈṲ̂ӷ. µÂ‚·Èˆı›Ù fiÙÈ ÙÔ<br />
‰È¿Ï˘Ì· Ù˘ ·Ì˘ÏfiÎÔÏÏ·˜ ¤¯ÂÈ ·Ê·ÈÚÂı› fiÛÔ<br />
appleÂÚÈÛÛfiÙÂÚÔ Á›ÓÂÙ·È ·applefi Ù· ›‰Ë appleÚÈÓ Ù· ‚¿ÏÂÙ ÛÙÔ<br />
ÛÙÂÁÓˆÙ‹ÚÈÔ. ªËÓ ÛÙÂÁÓÒÓÂÙ ˘appleÂÚ‚ÔÏÈο, ÁÈ·Ù› Ë<br />
·Ì˘ÏfiÎÔÏÏ· ı· ÌÂÙ·ÙÚ·apple› Û ÛÎfiÓË Î·È ı· οÓÂÈ Ù·<br />
ÚÔ‡¯· Û·˜ ̷Ϸο, οÙÈ appleÔ˘ ·Ó·ÈÚ› ÙÔ ÛÎÔapplefi ÙÔ˘<br />
ÎÔÏÏ·Ú›ÛÌ·ÙÔ˜.<br />
ÃÚfiÓÔÈ ÛÙÂÁÓÒÌ·ÙÔ˜<br />
√ apple›Ó·Î·˜ (‚Ï. apple·Ú·Î¿Ùˆ) apple·ÚÔ˘ÛÈ¿˙ÂÈ ∫∞∆∞<br />
ƒ√∂°°π∏ ÙÔ ¯ÚfiÓÔ ÛÙÂÁÓÒÌ·ÙÔ˜ Û §ÂappleÙ¿.<br />
∆Ô ‚¿ÚÔ˜ ·Ó·Ê¤ÚÂÙ·È Û ÛÙÂÁÓ¿ ÚÔ‡¯·:<br />
√È ¯ÚfiÓÔÈ ¤¯Ô˘Ó ˘appleÔÏÔÁÈÛÙ› ηٿ appleÚÔÛ¤ÁÁÈÛË Î·È<br />
ÌappleÔÚ› Ó· ‰È·ÊÔÚÔappleÔÈËıÔ‡Ó ·Ó¿ÏÔÁ· ÌÂ:<br />
●<br />
ÙËÓ appleÔÛfiÙËÙ· ÙÔ˘ ÓÂÚÔ‡ appleÔ˘ apple·Ú·Ì¤ÓÂÈ ÛÙ·<br />
ÚÔ‡¯· ÌÂÙ¿ ÙÔ ÛÙ‡„ÈÌÔ: ÔÈ appleÂÙÛ¤Ù˜ Î·È Ù·<br />
¢·›ÛıËÙ· ÚÔ‡¯· Û˘ÁÎÚ·ÙÔ‡Ó appleÔχ ÓÂÚfi.<br />
●<br />
●<br />
●<br />
●<br />
●<br />
ÙÔ ‡Ê·ÛÌ·: ›‰Ë ·applefi ÙÔ ›‰ÈÔ ‡Ê·ÛÌ· ·ÏÏ¿ ÌÂ<br />
‰È·ÊÔÚÂÙÈ΋ ˘Ê‹ Î·È apple¿¯Ô˜ ÌappleÔÚ› Ó· ¤¯Ô˘Ó<br />
‰È·ÊÔÚÂÙÈÎfi ¯ÚfiÓÔ ÛÙÂÁÓÒÌ·ÙÔ˜.<br />
ÙËÓ appleÔÛfiÙËÙ· ÙˆÓ appleÏ˘Ì¤ÓˆÓ ÚÔ‡¯ˆÓ: ÌÂÌÔӈ̤ӷ<br />
ÚÔ‡¯· ‹ ÌÈÎÚ¿ ÊÔÚÙ›· ÌappleÔÚ› Ó· ¯ÚÂÈ·ÛÙÔ‡Ó<br />
appleÂÚÈÛÛfiÙÂÚË ÒÚ· Ó· ÛÙÂÁÓÒÛÔ˘Ó.<br />
µ·ıÌfi˜ ÛÙÂÁÓÒÌ·ÙÔ˜: ·Ó ı¤ÏÂÙ ӷ ÛȉÂÚÒÛÂÙÂ<br />
οappleÔÈ· ·applefi Ù· ÚÔ‡¯· Û·˜, ÌappleÔÚ›Ù ӷ Ù· ‚Á¿ÏÂÙÂ<br />
ÂÓÒ ‰È·ÙËÚÔ‡Ó ·ÎfiÌË Ï›ÁË ˘ÁÚ·Û›·. ∆· ˘applefiÏÔÈapple·<br />
ÌappleÔÚÔ‡Ó Ó· Ì›ÓÔ˘Ó appleÂÚÈÛÛfiÙÂÚÔ ·Ó Ù· ı¤ÏÂÙÂ<br />
ÂÓÙÂÏÒ˜ ÛÙÂÁÓ¿.<br />
ÙË Ú‡ıÌÈÛË ıÂÚÌÔÎÚ·Û›·˜.<br />
ÙË ıÂÚÌÔÎÚ·Û›· ‰ˆÌ·Ù›Ô˘: ·Ó Ô ¯ÒÚÔ˜ fiappleÔ˘<br />
‚Ú›ÛÎÂÙ·È ÙÔ ÛÙÂÁÓˆÙ‹ÚÈÔ Â›Ó·È ÎÚ‡Ô˜, ÙÔ<br />
ÛÙÂÁÓˆÙ‹ÚÈÔ ı· ¯ÚÂÈ·ÛÙ› appleÂÚÈÛÛfiÙÂÚÔ ¯ÚfiÓÔ ÁÈ·<br />
Ó· ÛÙÂÁÓÒÛÂÈ Ù· ÚÔ‡¯· Û·˜.<br />
● ÙÔÓ fiÁÎÔ: ÌÂÚÈο ÔÁÎÒ‰Ë Â›‰Ë ÌappleÔÚÔ‡Ó Ó·<br />
ÛÙÂÁÓÒÛÔ˘Ó Ì ÂȉÈ΋ ÊÚÔÓÙ›‰·. ˘ÓÈÛÙԇ̠ӷ Ù·<br />
‚Á¿˙ÂÙ ηٿ ‰È·ÛÙ‹Ì·Ù·, Ó· Ù· ÙÈÓ¿˙ÂÙÂ Î·È Ó· Ù·<br />
Í·Ó·‚¿˙ÂÙ ÛÙÔ ÛÙÂÁÓˆÙ‹ÚÈÔ Ì¤¯ÚÈ Ó·<br />
ÛÙÂÁÓÒÛÔ˘Ó.<br />
! ªËÓ ÛÙÂÁÓÒÓÂÙ ˘appleÂÚ‚ÔÏÈο Ù· ÚÔ‡¯· Û·˜.<br />
ŸÏ˜ ÔÈ ›Ó˜ appleÂÚȤ¯Ô˘Ó οappleÔÈ· Ê˘ÛÈ΋ ˘ÁÚ·Û›·, appleÔ˘<br />
Ù· ‰È·ÙËÚ› ̷Ϸο Î·È ·ÊÚ¿Ù·.<br />
µ·Ì‚·ÎÂÚ¿<br />
À„ËÏ‹<br />
ıÂÚÌÔÎÚ·Û›·<br />
ÃÚfiÓÔÈ ÛÙÂÁÓÒÌ·ÙÔ˜ ÁÈ· appleχÛÈÌÔ ÛÙȘ 800-1000 ÛÙÚÔʤ˜ ÛÙÔ appleÏ˘ÓÙ‹ÚÈÔ<br />
ªÈÛfi ÊÔÚÙ›Ô<br />
1 kg 2 kg 3 kg 4 kg<br />
Ï‹Ú˜ ÊÔÚÙ›Ô<br />
5 kg 6 kg 7 kg 8 kg<br />
30 - 40 40 - 55 55 - 70 70 - 80 80 - 90 95 - 120 120 - 140 130 - 150<br />
˘ÓıÂÙÈο<br />
ÃÚfiÓÔÈ ÛÙÂÁÓÒÌ·ÙÔ˜ ÁÈ· appleχÛÈÌÔ Ì ÌÂȈ̤Ó˜ ÛÙÚÔʤ˜ ÛÙÔ appleÏ˘ÓÙ‹ÚÈÔ<br />
ªÈÛfi ÊÔÚÙ›Ô<br />
Ï‹Ú˜ ÊÔÚÙ›Ô<br />
÷ÌËÏ‹<br />
ıÂÚÌÔÎÚ·Û›·<br />
∞ÎÚ˘ÏÈο<br />
1 kg 2 kg<br />
3 kg<br />
40 - 50<br />
50 - 70 70 - 90<br />
ÃÚfiÓÔÈ ÛÙÂÁÓÒÌ·ÙÔ˜ ÁÈ· appleχÛÈÌÔ Ì ÌÂȈ̤Ó˜ ÛÙÚÔʤ˜ ÛÙÔ appleÏ˘ÓÙ‹ÚÈÔ<br />
ªÈÛfi ÊÔÚÙ›Ô<br />
Ï‹Ú˜ ÊÔÚÙ›Ô<br />
÷ÌËÏ‹<br />
ıÂÚÌÔÎÚ·Û›·<br />
1 kg 2 kg<br />
40 - 60 55 - 75<br />
38
ÚÔÂȉÔappleÔÈ‹ÛÂȘ ηÈ<br />
˘appleԉ›ÍÂȘ<br />
! ∏ Û˘Û΢‹ ¤¯ÂÈ Û¯Â‰È·ÛÙ› Î·È Î·Ù·Û΢·ÛÙ› Û‡Ìʈӷ<br />
Ì ٷ ‰ÈÂıÓ‹ appleÚfiÙ˘apple· ·ÛÊ·Ï›·˜.<br />
√È appleÚÔÂȉÔappleÔÈ‹ÛÂȘ ·˘Ù¤˜ apple·Ú¤¯ÔÓÙ·È ÁÈ· ÏfiÁÔ˘˜<br />
·ÛÊ·Ï›·˜ Î·È appleÚ¤appleÂÈ Ó· ÙËÚÔ‡ÓÙ·È Ì appleÚÔÛÔ¯‹.<br />
°ÂÓÈ΋ ·ÛÊ¿ÏÂÈ·<br />
● ∆Ô ÛÙÂÁÓˆÙ‹ÚÈÔ ·˘Ùfi ‰ÂÓ appleÚÔÔÚ›˙ÂÙ·È ÁÈ· ¯Ú‹ÛË ·applefi<br />
¿ÙÔÌ· (appleÂÚÈÏ·Ì‚·ÓÔÌ¤ÓˆÓ apple·È‰ÈÒÓ) Ì ÌÂȈ̤Ó˜<br />
ۈ̷ÙÈΤ˜, ·ÈÛıËÙËÚȷΤ˜ ‹ appleÓÂ˘Ì·ÙÈΤ˜ ÈηÓfiÙËÙ˜,<br />
Ì ¤ÏÏÂÈ„Ë ÂÌappleÂÈÚ›·˜ ‹ ÁÓÒÛˆÓ, ÂÎÙfi˜ ¿Ó<br />
¯ÚËÛÈÌÔappleÔÈÔ‡Ó ÙË Û˘Û΢‹ ˘applefi ÙËÓ ÂappleÔappleÙ›· ‹<br />
ηıÔ‰‹ÁËÛË ·ÙfiÌÔ˘ ˘apple‡ı˘ÓÔ˘ ÁÈ· ÙËÓ ·ÛÊ¿ÏÂÈ¿ ÙÔ˘˜.<br />
● ∆Ô ÛÙÂÁÓˆÙ‹ÚÈÔ ·˘Ùfi ¤¯ÂÈ Û¯Â‰È·ÛÙ› ÁÈ· ÔÈÎȷ΋ ηÈ<br />
fi¯È ÁÈ· Âapple·ÁÁÂÏÌ·ÙÈ΋ ¯Ú‹ÛË.<br />
● ªËÓ ·ÁÁ›˙ÂÙ ÙË Û˘Û΢‹ fiÙ·Ó Â›ÛÙ ͢applefiÏËÙÔÈ ‹<br />
¤¯ÂÙ ‚ÚÂÁ̤ӷ ¯¤ÚÈ· ‹ applefi‰È·.<br />
● ŸÙ·Ó ‚Á¿˙ÂÙ ÙË Û˘Û΢‹ ·applefi ÙËÓ appleÚ›˙·, ÙÚ·‚¿Ù ÙÔ<br />
ÚÂ˘Ì·ÙÔÏ‹appleÙË (ÊȘ) Î·È fi¯È ÙÔ Î·ÏÒ‰ÈÔ.<br />
● ∆· apple·È‰È¿ ‰ÂÓ appleÚ¤appleÂÈ Ó· ‚Ú›ÛÎÔÓÙ·È ÎÔÓÙ¿ ÛÙÔ<br />
ÛÙÂÁÓˆÙ‹ÚÈÔ fiÙ·Ó ÏÂÈÙÔ˘ÚÁ›. ªÂÙ¿ ÙË ¯Ú‹ÛË,<br />
·appleÂÓÂÚÁÔappleÔÈ‹ÛÙ ÙÔ ÛÙÂÁÓˆÙ‹ÚÈÔ Î·È ‚Á¿ÏÙ ÙÔ ·applefi<br />
ÙËÓ appleÚ›˙·. ∫ڷٿ٠ÙËÓ applefiÚÙ· ÎÏÂÈÛÙ‹ ÁÈ· Ó· ‚‚·Èˆı›ÙÂ<br />
fiÙÈ Ù· apple·È‰È¿ ‰ÂÓ ı· ÙË ¯ÚËÛÈÌÔappleÔÈÔ‡Ó Û·Ó apple·È¯Ó›‰È.<br />
●<br />
∆· apple·È‰È¿ ‰ÂÓ appleÚ¤appleÂÈ Ó· ̤ÓÔ˘Ó ¯ˆÚ›˜ Âapple›‚Ï„Ë, ÒÛÙÂ<br />
Ó· ‰È·ÛÊ·Ï›˙ÂÙ·È fiÙÈ ‰ÂÓ apple·›˙Ô˘Ó Ì ÙÔ ÛÙÂÁÓˆÙ‹ÚÈÔ.<br />
● ∏ Û˘Û΢‹ appleÚ¤appleÂÈ Ó· ÂÁηı›ÛÙ·Ù·È ÛˆÛÙ¿ Î·È Ó·<br />
·ÂÚ›˙ÂÙ·È Âapple·ÚÎÒ˜. ∏ ›ÛÔ‰Ô˜ ·¤Ú· ÛÙËÓ ÌappleÚÔÛÙÈÓ‹<br />
fi„Ë Î·È Ë Ôapple›ÛıÈ· Ôapple‹ ·ÂÚÈÛÌÔ‡ ÛÙËÓ apple›Ûˆ fi„Ë ÙÔ˘<br />
ÛÙÂÁÓˆÙËÚ›Ô˘ ‰ÂÓ appleÚ¤appleÂÈ Ó· ÊÚ¿ÛÛÔÓÙ·È appleÔÙ¤. (‚Ï.<br />
∂ÁηٿÛÙ·ÛË).<br />
●<br />
ÔÙ¤ ÌËÓ ¯ÚËÛÈÌÔappleÔț٠ÙÔ ÛÙÂÁÓˆÙ‹ÚÈÔ Âapple¿Óˆ ÛÂ<br />
¯·ÏÈ¿ fiappleÔ˘ ÙÔ ‡„Ô˜ ÙÔ˘ apple¤ÏÔ˘˜ ÌappleÔÚ› Ó· ÂÌappleÔ‰›˙ÂÈ<br />
ÙËÓ Â›ÛÔ‰Ô ÙÔ˘ ·¤Ú· ÛÙÔ ÛÙÂÁÓˆÙ‹ÚÈÔ ·applefi ÙË ‚¿ÛË.<br />
● ∂ϤÁÍÙ ·Ó ÙÔ ÛÙÂÁÓˆÙ‹ÚÈÔ Â›Ó·È ¿‰ÂÈÔ appleÚÈÓ ÙÔ ÁÂÌ›ÛÂÙÂ.<br />
● ∆Ô apple›Ûˆ ̤ÚÔ˜ ÙÔ˘ ÛÙÂÁÓˆÙËÚ›Ô˘ ÌappleÔÚ› Ó·<br />
˙ÂÛÙ·ı› appleÔχ. ÔÙ¤ ÌËÓ ÙÔ ·ÁÁ›˙ÂÙ ÙËÓ<br />
ÒÚ· appleÔ˘ ÏÂÈÙÔ˘ÚÁ›.<br />
●<br />
●<br />
●<br />
●<br />
●<br />
●<br />
●<br />
●<br />
●<br />
●<br />
●<br />
●<br />
ªË ¯ÚËÛÈÌÔappleÔț٠ÙÔ ÛÙÂÁÓˆÙ‹ÚÈÔ Â¿Ó ÙÔ Ê›ÏÙÚÔ, Ô<br />
appleÂÚȤÎÙ˘ ÓÂÚÔ‡ Î·È Ô Û˘Ìapple˘ÎÓˆÙ‹˜ ‰ÂÓ ¤¯Ô˘Ó<br />
ÛÙÂÚˆı› ηϿ ÛÙË ı¤ÛË ÙÔ˘˜ (‚Ï. ˘ÓÙ‹ÚËÛË).<br />
ªË ¯ÚËÛÈÌÔappleÔț٠˘ÁÚfi Ì·Ï·ÎÙÈÎfi ˘Ê·ÛÌ¿ÙˆÓ ÛÙÔ<br />
ÛÙÂÁÓˆÙ‹ÚÈÔ. ÚÔÛı¤ÛÙ ÙÔ ÛÙÔ ÙÂÏÂ˘Ù·›Ô ͤappleÏ˘Ì·.<br />
ªËÓ ˘appleÂÚÊÔÚÙÒÓÂÙ ÙÔ ÛÙÂÁÓˆÙ‹ÚÈÔ (‚Ï. χÛÈÌÔ<br />
ÚÔ‡¯ˆÓ) ÁÈ· ̤ÁÈÛÙ· ÊÔÚÙ›·.<br />
ªËÓ ‚¿˙ÂÙ ÛÙÔ ÛÙÂÁÓˆÙ‹ÚÈÔ appleÏ˘Ì¤Ó· ÚÔ‡¯· appleÔ˘ ÛÙ¿˙Ô˘Ó.<br />
¿˙ÂÙ ÛÙÔ ÛÙÂÁÓˆÙ‹ÚÈÔ ÚÔ‡¯· ÌfiÓÔ ·Ó ¤¯Ô˘Ó appleÏ˘ı› ÌÂ<br />
·appleÔÚÚ˘apple·ÓÙÈÎfi Î·È ÓÂÚfi, ¤¯Ô˘Ó ÍÂappleÏ˘ı› Î·È ÛÙ˘ÊÙ›.<br />
Àapple¿Ú¯ÂÈ Î›Ó‰˘ÓÔ˜ apple˘ÚηÁÈ¿˜ ·Ó ÛÙÂÁÓÒÓÂÙ ÚÔ‡¯· appleÔ˘<br />
¢∂¡ ¤¯Ô˘Ó appleÏ˘ı› Ì ÓÂÚfi.<br />
∂ϤÁÍÙ appleÚÔÛÂÎÙÈο fiϘ ÙȘ Ô‰ËÁ›Â˜ ÛÙȘ ÂÙÈΤÙ˜<br />
ÙˆÓ ÚÔ‡¯ˆÓ (‚Ï. χÛÈÌÔ ÚÔ‡¯ˆÓ).<br />
ªËÓ ÛÙÂÁÓÒÓÂÙ ÚÔ‡¯· appleÔ˘ ¤¯Ô˘Ó ˘appleÔ‚ÏËı› ÛÂ<br />
¯ËÌÈο appleÚÔ˚fiÓÙ·.<br />
ÔÙ¤ ÌË ÛÙÂÁÓÒÓÂÙ ·ÓÙÈΛÌÂÓ· appleÔ˘ ¤¯Ô˘Ó ÂappleÈÌÔÏ˘Óı›<br />
·applefi ‡ÊÏÂÎÙ˜ Ô˘Û›Â˜ (Ï¿‰È Ì·ÁÂÈڤ̷ÙÔ˜, ·ÎÂÙfiÓË,<br />
ÔÈÓfiappleÓÂ˘Ì·, appleÂÙڤϷÈÔ, ÎËÚÔ˙›ÓË, ·Ê·ÈÚÂÙÈο ÏÂΤ‰ˆÓ,<br />
ÙÂÚ‚ÈÓı¤Ï·ÈÔ, ÎÂÚÈ¿, ·Ê·ÈÚÂÙÈο ÎÂÚÈÒÓ Î·È ÛappleÚ¤È<br />
Ì·ÏÏÈÒÓ), ÂÎÙfi˜ Â¿Ó Ù· appleχÓÂÙ appleÚÒÙ· Û ˙ÂÛÙfi<br />
ÓÂÚfi Î·È ·ÚÎÂÙ‹ appleÔÛfiÙËÙ· ·appleÔÚÚ˘apple·ÓÙÈÎÔ‡.<br />
ªË ‚¿˙ÂÙ ÛÙÔ ÛÙÂÁÓˆÙ‹ÚÈÔ Î·Ô˘ÙÛÔ‡Î, ·ÓÙÈΛÌÂÓ·<br />
Î·È ÚÔ‡¯· Ì Âapple¤Ó‰˘ÛË ·applefi ηԢÙÛÔ‡Î, Ì·ÍÈÏ¿ÚÈ·<br />
Ì Âapple¤Ó‰˘ÛË ·applefi ·ÊÚ҉˜ ηԢÙÛÔ‡Î, ·ÊÚfi Ï¿ÙÂÍ,<br />
ηԢÙÛÔ‡Î, appleÏ·ÛÙÈÎfi, ÛÎÔ˘Ê¿ÎÈ· Ìapple¿ÓÈÔ˘, ·‰È¿‚ÚÔ¯·<br />
˘Ê¿ÛÌ·Ù·, apple¿Ó˜ ‚ڷοÎÈ· ‹ apple¿Ó˜, appleÔÏ˘ı¤ÓÈÔ ‹ ¯·ÚÙ›.<br />
ªËÓ ÛÙÂÁÓÒÓÂÙ ÌÂÁ¿Ï·, appleÔχ ÔÁÎÒ‰Ë Â›‰Ë.<br />
ªËÓ ÛÙÂÁÓÒÓÂÙ ·ÎÚ˘ÏÈο ˘Ê¿ÛÌ·Ù· Û ˘„ËϤ˜<br />
ıÂÚÌÔÎڷۛ˜.<br />
∞Ê·ÈÚ¤ÛÙ fiÏ· Ù· ·ÓÙÈΛÌÂÓ· ·applefi ÙȘ ÙÛ¤apple˜,<br />
ȉȷ›ÙÂÚ· ÙÔ˘˜ ·Ó·appleÙ‹Ú˜ (ΛӉ˘ÓÔ˜ ¤ÎÚË͢).<br />
● √ÏÔÎÏËÚÒÓÂÙ Û fiÏ· Ù· appleÚÔÁÚ¿ÌÌ·Ù· ÙË º¿ÛË<br />
∫Ú‡Ô˘ ÙÂÁÓÒÌ·ÙÔ˜.<br />
● ªËÓ ·appleÂÓÂÚÁÔappleÔț٠ÙÔ ÛÙÂÁÓˆÙ‹ÚÈÔ ÂÓÒ appleÂÚȤ¯ÂÈ<br />
·ÎfiÌË ˙ÂÛÙ¿ ÚÔ‡¯·.<br />
● ∫·ı·Ú›˙ÂÙ ÙÔ Ê›ÏÙÚÔ ÌÂÙ¿ ·applefi οı ¯Ú‹ÛË (‚Ï.<br />
˘ÓÙ‹ÚËÛË).<br />
● ∂ÎÎÂÓÒÓÂÙ ÙÔÓ appleÂÚȤÎÙË ÓÂÚÔ‡ ÌÂÙ¿ ·applefi οıÂ<br />
¯Ú‹ÛË (‚Ï. ˘ÓÙ‹ÚËÛË).<br />
● ∫·ı·Ú›˙ÂÙ ÙË ÌÔÓ¿‰· ÙÔ˘ Û˘Ìapple˘ÎÓˆÙ‹ ·Ó¿ Ù·ÎÙ¿<br />
¯ÚÔÓÈο ‰È·ÛÙ‹Ì·Ù· (‚Ï. ˘ÓÙ‹ÚËÛË).<br />
● ªËÓ ·Ê‹ÓÂÙ ӷ Û˘ÁÎÂÓÙÚÒÓÂÙ·È ¯ÓÔ‡‰È Á‡Úˆ ·applefi<br />
ÙÔ ÛÙÂÁÓˆÙ‹ÚÈÔ.<br />
● ÔÙ¤ ÌËÓ ·Ó‚·›ÓÂÙ Âapple¿Óˆ ÛÙÔ ÛÙÂÁÓˆÙ‹ÚÈÔ, ÌappleÔÚ›<br />
Ó· appleÚÔηϤÛÙ ‚Ï¿‚Ë.<br />
● ¿ÓÙ· ÙËÚ›Ù ٷ ËÏÂÎÙÚÈο appleÚfiÙ˘apple· Î·È ÙȘ<br />
appleÚԉȷÁڷʤ˜ (‚Ï. ∂ÁηٿÛÙ·ÛË).<br />
● ¿ÓÙ· ·ÁÔÚ¿˙ÂÙ ÁÓ‹ÛÈ· ·ÓÙ·ÏÏ·ÎÙÈο Î·È ·ÍÂÛÔ˘¿Ú<br />
(‚Ï. ∆¯ÓÈ΋ ˘appleÔÛÙ‹ÚÈÍË).<br />
! ƒ√∂π¢√√π∏∏: ÔÙ¤ ÌË ‰È·ÎfiappleÙÂÙ ÙË ÏÂÈÙÔ˘ÚÁ›· ÙÔ˘<br />
ÛÙÂÁÓˆÙËÚ›Ô˘ appleÚÈÓ ·applefi ÙÔ Ù¤ÏÔ˜ ÙÔ˘ ·ÎÏÔ˘ ÛÙÂÁÓÒÌ·ÙÔ˜,<br />
ÂÎÙfi˜ Â¿Ó fiÏ· Ù· ·ÓÙÈΛÌÂÓ· ·Ê·ÈÚÂıÔ‡Ó Î·È ·appleψıÔ‡Ó<br />
ÁÚ‹ÁÔÚ·, ÒÛÙ ӷ Á›ÓÂÈ ‰È¿¯˘ÛË Ù˘ ıÂÚÌfiÙËÙ·˜.<br />
ÏËÚÔÊÔڛ˜ ·Ó·Î‡ÎψÛ˘ Î·È ·applefiÚÚȄ˘<br />
ÙÔ appleÏ·›ÛÈÔ Ù˘ Û˘Ó¯ԇ˜ ÌÈ·˜ ‰¤ÛÌ¢Û˘ ÁÈ· ÙËÓ<br />
appleÚÔÛÙ·Û›· ÙÔ˘ appleÂÚÈ‚¿ÏÏÔÓÙÔ˜, ‰È·ÙËÚԇ̠ÙÔ ‰Èη›ˆÌ·<br />
Ó· ¯ÚËÛÈÌÔappleÔÈԇ̠·Ó·Î˘Îψ̤ӷ ÂÍ·ÚÙ‹Ì·Ù· appleÔÈfiÙËÙ·˜<br />
ÁÈ· Ì›ˆÛË ÙÔ˘ ÎfiÛÙÔ˘˜ ÙÔ˘ appleÂÏ¿ÙË Î·È ÙˆÓ ·appleÔ‚Ï‹ÙˆÓ.<br />
● ∞applefiÚÚÈ„Ë ÙˆÓ ˘ÏÈÎÒÓ Û˘Û΢·Û›·˜: ÙËÚ›Ù ÙÔ˘˜<br />
ηÓÔÓÈÛÌÔ‡˜ ÙÔ˘ ÙfiappleÔ˘ ‰È·ÌÔÓ‹˜ Û·˜, appleÚÔÎÂÈ̤ÓÔ˘<br />
Ó· ·Ó·Î˘ÎÏÒÛÂÙ ÙË Û˘Û΢·Û›·.<br />
●<br />
∏ ‰È¿ıÂÛË ÙˆÓ apple·Ï·ÈÒÓ ËÏÂÎÙÚÈÎÒÓ Û˘Û΢ÒÓ<br />
∏ Â˘Úˆapple·˚΋ Ô‰ËÁ›· 2002/96/EK ÁÈ· Ù· ∞applefi‚ÏËÙ· ∏ÏÂÎÙÚÈÎÔ‡<br />
Î·È ∏ÏÂÎÙÚÔÓÈÎÔ‡ ∂ÍÔappleÏÈÛÌÔ‡ (∞∏∏∂), ·apple·ÈÙ› fiÙÈ ÔÈ apple·Ï·È¤˜<br />
ÔÈÎȷΤ˜ ËÏÂÎÙÚÈΤ˜ Û˘Û΢¤˜ ‰ÂÓ appleÚ¤appleÂÈ Ó· ·appleÔ‚¿ÏÔÓÙ·È Ì·˙› ÌÂ<br />
Ù· ˘applefiÏÔÈapple· ·applefi‚ÏËÙ· ÙÔ˘ ‰ËÌÔÙÈÎÔ‡ ‰ÈÎÙ‡Ô˘. √È apple·Ï·È¤˜<br />
Û˘Û΢¤˜ appleÚ¤appleÂÈ Ó· Û˘ÏϯıÔ‡Ó ¯ˆÚÈÛÙ¿ appleÚÔÎÂÈ̤ÓÔ˘ Ó·<br />
‚ÂÏÙÈÛÙÔappleÔÈËıÔ‡Ó Ë ·appleÔηٿÛÙ·ÛË Î·È Ë ·Ó·Î‡ÎψÛË ÙˆÓ<br />
˘ÏÈÎÒÓ appleÔ˘ appleÂÚȤ¯Ô˘Ó Î·È Ì ÛÎÔapplefi ÙË Ì›ˆÛË ÙˆÓ ‚Ï·‚ÂÚÒÓ<br />
ÂappleÈappleÙÒÛÂˆÓ ÛÙËÓ ·ÓıÚÒappleÈÓË ˘Á›· Î·È ÙÔ appleÂÚÈ‚¿ÏÏÔÓ.<br />
∆Ô Û‡Ì‚ÔÏÔ Ì ÙÔ ‰ÈÂÁÚ·Ì̤ÓÔ "‰Ô¯Â›Ô ·appleÔ‚Ï‹ÙˆÓ" ÛÙÔ appleÚÔ˚fiÓ<br />
˘appleÂÓı˘Ì›˙ÂÈ Û ۷˜ ÙËÓ ˘appleÔ¯Ú¤ˆÛ‹ Û·˜, appleˆ˜ fiÙ·Ó ÂappleÈı˘Ì›Ù ӷ<br />
appleÂÙ¿ÍÂÙ ÙË Û˘Û΢‹ ,appleÚ¤appleÂÈ Ó· Û˘Ïϯı› ¯ˆÚÈÛÙ¿.<br />
√È Î·Ù·Ó·ÏˆÙ¤˜ ı· appleÚ¤appleÂÈ Ó· ·apple¢ı‡ÓÔÓÙ·È ÛÙȘ ÙÔappleÈΤ˜ ·Ú¯¤˜ ‹<br />
ÛÙ· ηٷÛÙ‹Ì·Ù· ÏÈ·ÓÈ΋˜ ÁÈ· appleÏËÚÔÊÔڛ˜ appleÔ˘ ·ÊÔÚÔ‡Ó ÙË<br />
ÛˆÛÙ‹ ‰È¿ıÂÛË ÙˆÓ apple·Ï·ÈÒÓ ËÏÂÎÙÚÈÎÒÓ Û˘Û΢ÒÓ.<br />
∂ÍÔÈÎÔÓfiÌËÛË ÂÓ¤ÚÁÂÈ·˜ Î·È Û‚·ÛÌfi˜<br />
ÛÙÔ appleÂÚÈ‚¿ÏÏÔÓ<br />
●<br />
°È· Ó· ÂÏ·¯ÈÛÙÔappleÔÈËı› Ô Î›Ó‰˘ÓÔ˜ ÙÚ·˘Ì·ÙÈÛÌÔ‡ ÙˆÓ<br />
apple·È‰ÈÒÓ, ·Ê·ÈÚ¤ÛÙ ÙËÓ applefiÚÙ· Î·È ÙÔ ‚‡ÛÌ·. ÙË<br />
Û˘Ó¤¯ÂÈ·, Îfi„Ù ÙÔ Î·ÏÒ‰ÈÔ ÎÂÓÙÚÈ΋˜ ÙÚÔÊÔ‰ÔÛ›·˜<br />
ÛÙÔ ÛËÌÂ›Ô ·applefi ÙÔ ÔappleÔ›Ô ÂͤگÂÙ·È ·applefi ÙË Û˘Û΢‹.<br />
∆· ÂÍ·ÚÙ‹Ì·Ù· ·˘Ù¿ appleÚ¤appleÂÈ Ó· ·appleÔÚÚ›appleÙÔÓÙ·È Í¯ˆÚÈÛÙ¿,<br />
ÒÛÙ ӷ ÌËÓ Â›Ó·È appleϤÔÓ ‰˘Ó·Ù‹ Ë Û‡Ó‰ÂÛË Ù˘<br />
Û˘Û΢‹˜ ÛÙËÓ appleÚ›˙· ÎÂÓÙÚÈ΋˜ ÙÚÔÊÔ‰ÔÛ›·˜.<br />
Ù‡„Ù ηϿ Ù· ÚÔ‡¯· ÁÈ· Ó· ·appleÔÌ·ÎÚ‡ÓÂÙ ÙËÓ<br />
appleÂÚ›ÛÛÂÈ· ÓÂÚÔ‡ appleÚÈÓ Ù· ‚¿ÏÂÙÂ ÛÙÔ ÛÙÂÁÓˆÙ‹ÚÈÔ<br />
(·Ó appleÚÒÙ· ¯ÚËÛÈÌÔappleÔÈ‹ÛÂÙ appleÏ˘ÓÙ‹ÚÈÔ, ÂappleÈϤÍÙÂ<br />
˘„ËϤ˜ ÛÙÚÔʤ˜ ÛÙÔ ÛÙ‡„ÈÌÔ). ŒÙÛÈ ı·<br />
ÂÍÔÈÎÔÓÔÌ‹ÛÂÙ ¯ÚfiÓÔ Î·È ÂÓ¤ÚÁÂÈ· ÛÙÔ ÛÙ¤Áӈ̷.<br />
● ¿ÓÙ· ‚¿˙ÂÙ ÛÙÔ ÛÙÂÁÓˆÙ‹ÚÈÔ appleÏ‹Ú˜ ÊÔÚÙ›Ô –<br />
ÂÍÔÈÎÔÓƠ̂٠ÂÓ¤ÚÁÂÈ·: ÌÂÌÔӈ̤ӷ ÚÔ‡¯· ‹ ÌÈÎÚ¿<br />
ÊÔÚÙ›· ¯ÚÂÈ¿˙ÔÓÙ·È appleÂÚÈÛÛfiÙÂÚË ÒÚ· Ó· ÛÙÂÁÓÒÛÔ˘Ó.<br />
● ∫·ı·Ú›ÛÙ ÙÔ Ê›ÏÙÚÔ ÌÂÙ¿ ·applefi οı ¯Ú‹ÛË ÁÈ· Ó·<br />
appleÂÚÈÔÚ›ÛÂÙ ÙÔ ÎfiÛÙÔ˜ ηٷӿψÛ˘ ÂÓ¤ÚÁÂÈ·˜<br />
(‚Ï. ˘ÓÙ‹ÚËÛË).<br />
39<br />
GR
˘ÓÙ‹ÚËÛË Î·È ÊÚÔÓÙ›‰·<br />
GR<br />
∞appleÔÛ‡Ó‰ÂÛË ·applefi ÙÔ ËÏÂÎÙÚÈÎfi ‰›ÎÙ˘Ô<br />
! ∞appleÔÛ˘Ó‰¤ÂÙ ÙÔ ÛÙÂÁÓˆÙ‹ÚÈfi Û·˜ ·applefi ÙËÓ appleÚ›˙·<br />
fiÙ·Ó ‰ÂÓ ÙÔ ¯ÚËÛÈÌÔappleÔÈ›ÙÂ, fiÙ·Ó ÙÔ Î·ı·Ú›˙ÂÙ ηÈ<br />
ÛÙË ‰È¿ÚÎÂÈ· fiÏˆÓ ÙˆÓ ÂÚÁ·ÛÈÒÓ Û˘ÓÙ‹ÚËÛ˘.<br />
∫·ı·Ú›˙ÂÙ ÙÔ Ê›ÏÙÚÔ ÌÂÙ¿ ·applefi οıÂ<br />
ÛÙ¤Áӈ̷<br />
∆Ô Ê›ÏÙÚÔ Â›Ó·È ¤Ó· ÛËÌ·ÓÙÈÎfi ̤ÚÔ˜ ÙÔ˘ ÛÙÂÁÓˆÙËÚ›Ô˘<br />
Û·˜: Û˘ÁÎÂÓÙÚÒÓÂÈ ÙÔ ¯ÓÔ‡‰È appleÔ˘ ‰ËÌÈÔ˘ÚÁÂ›Ù·È ÛÙË<br />
‰È¿ÚÎÂÈ· ÙÔ˘ ÛÙÂÁÓÒÌ·ÙÔ˜. ŸÙ·Ó ÙÂÏÂÈÒÛÂÙ Ì ÙÔ<br />
ÛÙ¤Áӈ̷ ÏÔÈapplefiÓ, ηı·Ú›ÛÙ ÙÔ Ê›ÏÙÚÔ ÍÂappleϤÓÔÓÙ¿˜<br />
ÙÔ Ì ÙÚ¯ԇÌÂÓÔ ÓÂÚfi ‹ Ì ÙËÓ ËÏÂÎÙÚÈ΋ ÛÎÔ‡apple·.<br />
∞Ó ÙÔ Ê›ÏÙÚÔ ÊÚ¿ÍÂÈ, Ë ÚÔ‹ ÙÔ˘ ·¤Ú· ̤۷ ÛÙÔ<br />
ÛÙÂÁÓˆÙ‹ÚÈÔ apple·ÚÂÌappleÔ‰›˙ÂÙ·È ÛËÌ·ÓÙÈο: Ô ¯ÚfiÓÔ˜<br />
ÛÙÂÁÓÒÌ·ÙÔ˜ ÌÂÁ·ÏÒÓÂÈ Î·È Î·Ù·Ó·ÏÒÓÂÙ·È<br />
appleÂÚÈÛÛfiÙÂÚË ÂÓ¤ÚÁÂÈ·. ªappleÔÚÔ‡Ó Âapple›Û˘ Ó·<br />
appleÚÔÎÏËıÔ‡Ó ‚Ï¿‚˜ ÛÙÔ ÛÙÂÁÓˆÙ‹ÚÈfi Û·˜.<br />
∆Ô Ê›ÏÙÚÔ ‚Ú›ÛÎÂÙ·È ÌappleÚÔÛÙ¿ ·applefi ÙÔ appleÏ·›ÛÈÔ Ù˘<br />
applefiÚÙ·˜ ÙÔ˘ ÛÙÂÁÓˆÙËÚ›Ô˘ (‚Ï. ‰È¿ÁÚ·ÌÌ·).<br />
∞Ê·›ÚÂÛË ÙÔ˘ Ê›ÏÙÚÔ˘:<br />
1. ∆Ú·‚‹ÍÙ ÙËÓ appleÏ·ÛÙÈ΋ Ï·‚‹ ÙÔ˘ Ê›ÏÙÚÔ˘ appleÚÔ˜ Ù·<br />
Âapple¿Óˆ (‚Ï. ‰È¿ÁÚ·ÌÌ·).<br />
2. ∫·ı·Ú›ÛÙ ÙÔ Ê›ÏÙÚÔ Î·È Í·Ó·‚¿ÏÙ ÙÔ ÛÙË ı¤ÛË<br />
ÙÔ˘ ÛˆÛÙ¿. µÂ‚·Èˆı›Ù fiÙÈ ÙÔ Ê›ÏÙÚÔ Â›Ó·È<br />
«¯ˆÓ¢Ùfi» ÛÙÔ appleÏ·›ÛÈÔ Ù˘ applefiÚÙ·˜ ÙÔ˘ ÛÙÂÁÓˆÙËÚ›Ô˘.<br />
! ªËÓ ¯ÚËÛÈÌÔappleÔț٠ÙÔ ÛÙÂÁÓˆÙ‹ÚÈÔ ·Ó ‰ÂÓ<br />
·ÓÙÈηٷÛÙ‹ÛÂÙ ÙÔ Ê›ÏÙÚÔ.<br />
∂ÎÎÂÓÒÓÂÙ ÙÔÓ appleÂÚȤÎÙË ÓÂÚÔ‡ ÌÂÙ¿<br />
·applefi οı ·ÎÏÔ<br />
∆Ú·‚‹ÍÙÂ Î·È ·Ê·ÈÚ¤ÛÙ ÙÔÓ appleÂÚȤÎÙË ·applefi ÙÔ<br />
ÛÙÂÁÓˆÙ‹ÚÈÔ Î·È ·‰ÂÈ¿ÛÙ ÙÔÓ Û ÓÂÚÔ¯‡ÙË ‹ ÛÂ<br />
¿ÏÏÔ Î·Ù¿ÏÏËÏÔ ·ÁˆÁfi ·appleÔÛÙÚ¿ÁÁÈÛ˘.<br />
∂apple·Ó·ÙÔappleÔıÂÙ‹ÛÙ ÙÔÓ appleÂÚȤÎÙË ÓÂÚÔ‡<br />
ÛÙÂÚÂÒÓÔÓÙ¿˜ ÙÔÓ Î·Ï¿.<br />
¿ÓÙ· ÂϤÁ¯ÂÙÂ Î·È ÂÎÎÂÓÒÓÂÙ ÙÔÓ appleÂÚȤÎÙË appleÚÈÓ<br />
ÍÂÎÈÓ‹ÛÂÙÂ ¤Ó· Ó¤Ô appleÚfiÁÚ·ÌÌ· ÛÙÂÁÓÒÌ·ÙÔ˜.<br />
ŒÏÂÁ¯Ô˜ ÙÔ˘ ο‰Ô˘ ÌÂÙ¿ ·applefi οıÂ<br />
¯Ú‹ÛË<br />
°˘Ú›ÛÙ ÙÔÓ Î¿‰Ô Ì ÙÔ ¯¤ÚÈ ÁÈ· Ó· ·Ê·ÈÚ¤ÛÂÙ ÌÈÎÚ¿<br />
·ÓÙÈΛÌÂÓ· (apple.¯. Ì·ÓÙËÏ¿ÎÈ·) appleÔ˘ ÌappleÔÚ› Ó· ¤¯Ô˘Ó<br />
Ì›ÓÂÈ Ì¤Û·.<br />
ÂÚȤÎÙ˘ ÓÂÚÔ‡<br />
∫·ı·ÚÈÛÌfi˜ ÙÔ˘ ο‰Ô˘<br />
! °È· ÙÔÓ Î·ı·ÚÈÛÌfi ÙÔ˘ ο‰Ô˘ ÌË ¯ÚËÛÈÌÔappleÔÈ›ÙÂ<br />
ÏÂÈ·ÓÙÈο ̤۷, ηı·ÚÈÛÙÈο Û‡ÚÌ·Ù· ‹ ηı·ÚÈÛÙÈο<br />
ÁÈ· ·ÓÔÍ›‰ˆÙ· Û·Ë.<br />
∂Ó‰¤¯ÂÙ·È Ó· ·Ú¯›ÛÂÈ Ó· ÂÌÊ·Ó›˙ÂÙ·È ÌÈ· ¤Á¯ÚˆÌË<br />
ÌÂÌ‚Ú¿ÓË apple¿Óˆ ÛÙÔÓ ·ÓÔÍ›‰ˆÙÔ Î¿‰Ô ÏfiÁˆ<br />
Û˘Ó‰˘·ÛÌÔ‡ ÓÂÚÔ‡ Î·È /‹ ηı·ÚÈÛÙÈÎÒÓ Ì¤ÛˆÓ, fiappleˆ˜<br />
Ì·Ï·ÎÙÈο ÚÔ‡¯ˆÓ. ∏ ¤Á¯ÚˆÌË ÌÂÌ‚Ú¿ÓË ‰ÂÓ ı·<br />
ÂappleËÚ¿ÛÂÈ ÙËÓ ·applefi‰ÔÛË ÙÔ˘ ÛÙÂÁÓˆÙ‹ÚÈÔ˘.<br />
∫·ı·ÚÈÛÌfi˜ Ù˘ ÌÔÓ¿‰·˜ Û˘Ìapple˘ÎÓˆÙ‹<br />
∞Ó¿ ‰È·ÛÙ‹Ì·Ù· (οı ̋ӷ) ·Ê·ÈÚ›Ù ÙË ÌÔÓ¿‰·<br />
Û˘Ìapple˘ÎÓˆÙ‹ Î·È ·appleÔÌ·ÎÚ‡ÓÂÙ ÙÔ ¯ÓÔ‡‰È appleÔ˘ ¤¯ÂÈ<br />
Û˘ÁÎÂÓÙÚˆı› ÌÂٷ͇ ÙˆÓ appleÏ·ÎÒÓ ‚¿˙ÔÓÙ·˜ ÙË<br />
ÌÔÓ¿‰· οو ·applefi ÙË ‚Ú‡ÛË Î·È ÍÂappleϤÓÔÓÙ¿˜ ÙËÓ ÌÂ<br />
ÎÚ‡Ô ÓÂÚfi.<br />
°È· ÙÔÓ ÛÎÔapplefi ·˘Ùfi, appleÚ¤appleÂÈ Ó· ‰È¤Ú¯ÂÙ·È ÎÚ‡Ô ÓÂÚfi<br />
·applefi ÙÔ apple›Ûˆ ̤ÚÔ˜ ÙÔ˘ Û˘Ìapple˘ÎÓˆÙ‹.<br />
∞Ê·›ÚÂÛË ÙÔ˘ Û˘Ìapple˘ÎÓˆÙ‹:<br />
1. ∞appleÔÛ˘Ó‰¤ÛÙ ÙÔ ÛÙÂÁÓˆÙ‹ÚÈÔ ·applefi ÙËÓ appleÚ›˙· ηÈ<br />
·ÓÔ›ÍÙ ÙËÓ applefiÚÙ·.<br />
2. ∆Ú·‚‹ÍÙÂ Î·È ·ÓÔ›ÍÙ ÙÔ Î¿Ï˘ÌÌ· ÙÔ˘ Û˘Ìapple˘ÎÓˆÙ‹<br />
(‚Ï. ‰È¿ÁÚ·ÌÌ·). ∞appleÂÏ¢ıÂÚÒÛÙ ÙȘ ÙÚÂȘ ·Úapple¿Á˜<br />
ÛÙÚ¤ÊÔÓÙ·˜ ·ÚÈÛÙÂÚfiÛÙÚÔÊ· ηٿ 90˚ ηÈ, ÛÙË<br />
Û˘Ó¤¯ÂÈ·, ÙÚ·‚‹ÍÙ ·applefi ÙË Ï·‚‹ Î·È ·Ê·ÈÚ¤ÛÙÂ<br />
ÙÔÓ Û˘Ìapple˘ÎÓˆÙ‹ ·applefi ÙÔ ÛÙÂÁÓˆÙ‹ÚÈÔ.<br />
3. ∫·ı·Ú›ÛÙ ÙËÓ ÂappleÈÊ¿ÓÂÈ· ÙˆÓ ÌÔÓˆÙÈÎÒÓ Î·È<br />
Âapple·Ó·ÙÔappleÔıÂÙ‹ÛÙ ÙÔÓ Û˘Ìapple˘ÎÓˆÙ‹. µÂ‚·Èˆı›ÙÂ<br />
fiÙÈ ÔÈ ·Úapple¿Á˜ ¤¯Ô˘Ó ·ÛÊ·Ï›ÛÂÈ.<br />
∫·ı·ÚÈÛÌfi˜<br />
● Ù· Â͈ÙÂÚÈο ÌÂÙ·ÏÏÈο ‹ appleÏ·ÛÙÈο Î·È Ï·ÛÙȯ¤ÓÈ·<br />
̤ÚË Ô Î·ı·ÚÈÛÌfi˜ ÌappleÔÚ› Ó· Á›ÓÂÈ Ì ˘ÁÚfi apple·Ó›.<br />
● ∞Ó¿ ‰È·ÛÙ‹Ì·Ù· (οı 6 Ì‹Ó˜) ηı·Ú›˙ÂÙ ÌÂ<br />
ËÏÂÎÙÚÈ΋ ÛÎÔ‡apple· ÙË Û¯¿Ú· Ù˘ ÌappleÚÔÛÙÈÓ‹˜ ÂÈÛfi‰Ô˘<br />
·¤Ú· Î·È ÙȘ Ôapple¤˜ ·ÂÚÈÛÌÔ‡ ÛÙËÓ apple›Ûˆ fi„Ë ÙÔ˘<br />
ÛÙÂÁÓˆÙËÚ›Ô˘, ÒÛÙ ӷ ·appleÔÌ·ÎÚ‡ÓÂÙ·È Ù˘¯fiÓ<br />
Û˘ÁΤÓÙÚˆÛË ¯ÓÔ˘‰ÈÔ‡, ÈÓÒÓ ‹ ÛÎfiÓ˘. ∂apple›Û˘,<br />
ηı·Ú›˙ÂÙÂ Û˘¯Ó¿ Ì ËÏÂÎÙÚÈ΋ ÛÎÔ‡apple· ÁÈ· Ó·<br />
·appleÔÌ·ÎÚ‡ÓÂÙ ÙË Û˘ÁΤÓÙÚˆÛË ¯ÓÔ˘‰ÈÔ‡ ·applefi ÙËÓ<br />
ÌappleÚÔÛÙÈÓ‹ fi„Ë ÙÔ˘ Û˘Ìapple˘ÎÓˆÙ‹ Î·È ·applefi ÙËÓ<br />
appleÂÚÈÔ¯‹ ÙÔ˘ Ê›ÏÙÚÔ˘.<br />
! ªËÓ ¯ÚËÛÈÌÔappleÔț٠‰È·Ï˘ÙÈο ‹ ‰È·‚ÚˆÙÈο.<br />
! ∆Ô ÛÙÂÁÓˆÙ‹ÚÈfi Û·˜ ¯ÚËÛÈÌÔappleÔÈ› ÂȉÈο ÂÍ·ÚÙ‹Ì·Ù·<br />
Ì›ˆÛ˘ Ù˘ ÙÚÈ‚‹˜ appleÔ˘ ‰ÂÓ ¯ÚÂÈ¿˙ÔÓÙ·È ÏÈapple·ÓÙÈÎfi.<br />
! ¡· ·apple¢ı‡ÓÂÛÙ ٷÎÙÈο Û ÂÍÔ˘ÛÈÔ‰ÔÙË̤ÓÔ˘˜<br />
Ù¯ÓÈÎÔ‡˜ ÁÈ· ÙÔÓ ¤ÏÂÁ¯Ô ÙÔ˘ ÛÙÂÁÓˆÙËÚ›Ô˘ Û·˜,<br />
ÒÛÙ ӷ ÂÍ·ÛÊ·Ï›ÛÂÙ ËÏÂÎÙÚÈ΋ Î·È Ì˯·ÓÈ΋<br />
·ÛÊ¿ÏÂÈ· (‚Ï. ∆¯ÓÈ΋ ˘appleÔÛÙ‹ÚÈÍË).<br />
µÚ‡ÛË<br />
º›ÏÙÚÔ<br />
›Ûˆ fi„Ë<br />
ªÔÓ¿‰· Û˘Ìapple˘ÎÓˆÙ‹<br />
∫¿Ï˘ÌÌ· Û˘Ìapple˘ÎÓˆÙ‹<br />
∞Úapple¿Á˜<br />
§·‚‹<br />
∂›ÛÔ‰Ô˜<br />
·¤Ú·<br />
ªappleÚÔÛÙÈÓ‹ fi„Ë<br />
ªÔÓ¿‰· Û˘Ìapple˘ÎÓˆÙ‹<br />
40
∞ÓÙÈÌÂÙÒappleÈÛË appleÚÔ‚ÏËÌ¿ÙˆÓ<br />
∫¿appleÔÈ· ÛÙÈÁÌ‹ ÌappleÔÚ› Ó· ‰È·appleÈÛÙÒÛÂÙ fiÙÈ ÙÔ ÛÙÂÁÓˆÙ‹ÚÈfi Û·˜ ‰ÂÓ ÏÂÈÙÔ˘ÚÁ›. ÚÈÓ Î·Ï¤ÛÂÙ ÙÔ ∫¤ÓÙÚÔ ∆¯ÓÈ΋˜<br />
Â͢appleËÚ¤ÙËÛ˘ ˜ (‚Ï. ∆¯ÓÈ΋ Â͢appleËÚ¤ÙËÛË), ‰È·‚¿ÛÙ ÙȘ ·ÎfiÏÔ˘ı˜ appleÚÔÙ¿ÛÂȘ ·ÓÙÈÌÂÙÒappleÈÛ˘ appleÚÔ‚ÏËÌ¿ÙˆÓ:<br />
Úfi‚ÏËÌ·:<br />
∆Ô ÛÙÂÁÓˆÙ‹ÚÈÔ ‰ÂÓ Ìapple·›ÓÂÈ<br />
ÛÂ ÏÂÈÙÔ˘ÚÁ›·<br />
Èı·Ó¿ ·›ÙÈ· / §‡ÛË<br />
●<br />
●<br />
●<br />
●<br />
●<br />
●<br />
●<br />
√ ÚÂ˘Ì·ÙÔÏ‹appleÙ˘ (ÊȘ) ‰ÂÓ Â›Ó·È ÛÙËÓ appleÚ›˙· ‹ ‰ÂÓ Î¿ÓÂÈ Âapple·Ê‹.<br />
Àapple¿Ú¯ÂÈ ‰È·ÎÔapple‹ Ú‡̷ÙÔ˜.<br />
∏ ·ÛÊ¿ÏÂÈ· ¤¯ÂÈ Î·Â›. ¢ÔÎÈÌ¿ÛÙ ӷ Û˘Ó‰¤ÛÂÙ ÌÈ· ¿ÏÏË Û˘Û΢‹ ÛÙËÓ appleÚ›˙·.<br />
ª‹appleˆ˜ ¯ÚËÛÈÌÔappleÔț٠ηÏÒ‰ÈÔ appleÚÔ¤ÎÙ·Û˘; ¢ÔÎÈÌ¿ÛÙ ӷ Û˘Ó‰¤ÛÂÙ ÙÔ<br />
ÙÚÔÊÔ‰ÔÙÈÎfi ηÏÒ‰ÈÔ ÙÔ˘ ÛÙÂÁÓˆÙËÚ›Ô˘ ·apple¢ı›·˜ ÛÙËÓ appleÚ›˙·.<br />
∏ applefiÚÙ· ‰ÂÓ ¤¯ÂÈ ÎÏ›ÛÂÈ Î·Ï¿<br />
¢ÂÓ Ú˘ı̛۷Ù ۈÛÙ¿ ÙÔ ÎÔ˘Ìapple› ƒ√°ƒ∞ªª∞∆∞ (‚Ï. ∂ÎΛÓËÛË Î·È ÚÔÁÚ¿ÌÌ·Ù·).<br />
¢ÂÓ appleȤ۷Ù ÙÔ ÎÔ˘Ìapple› ∂∫∫π¡∏∏ / ƒ√øƒπ¡∏ ¢π∞∫√∏<br />
§∂π∆√Àƒ°π∞ (‚Ï. ∂ÎΛÓËÛË Î·È ÚÔÁÚ¿ÌÌ·Ù·).<br />
GR<br />
∏ ‰È·‰Èηۛ· ÛÙÂÁÓÒÌ·ÙÔ˜ ‰ÂÓ<br />
ÍÂÎÈÓ¿<br />
∆Ô ÛÙ¤Áӈ̷ ηı˘ÛÙÂÚ› appleÔχ<br />
∞Ó·‚ÔÛ‚‹ÓÂÈ Ë ÊˆÙÂÈÓ‹<br />
¤Ó‰ÂÈÍË ·Ê·›ÚÂÛ˘ ÓÂÚÔ‡,<br />
apple·Ú¿ ÙË ÌÈÎÚ‹ ‰È¿ÚÎÂÈ·<br />
ÏÂÈÙÔ˘ÚÁ›·˜ ÙÔ˘ ÛÙÂÁÓˆÙËÚ›Ô˘.<br />
∞Ó¿‚ÂÈ Ë ÊˆÙÂÈÓ‹ ¤Ó‰ÂÈÍË<br />
·Ê·›ÚÂÛ˘ ÓÂÚÔ‡, ÂÓÒ Ô<br />
appleÂÚȤÎÙ˘ ÓÂÚÔ‡ ‰ÂÓ Â›Ó·È<br />
appleÏ‹Ú˘.<br />
●<br />
●<br />
●<br />
●<br />
●<br />
●<br />
●<br />
●<br />
●<br />
●<br />
●<br />
Œ¯ÂÙ ÂappleÈϤÍÂÈ Î·ı˘ÛÙ¤ÚËÛË (‚Ï. ∂ÎΛÓËÛË Î·È ÚÔÁÚ¿ÌÌ·Ù·).<br />
∆Ô Ê›ÏÙÚÔ ‰ÂÓ ¤¯ÂÈ Î·ı·ÚÈÛÙ› (‚Ï. ˘ÓÙ‹ÚËÛË).<br />
ª‹appleˆ˜ appleÚ¤appleÂÈ Ó· ÂÎÎÂÓÒÛÂÙ ÙÔÓ appleÂÚȤÎÙË ÓÂÚÔ‡? ∏ ʈÙÂÈÓ‹ ¤Ó‰ÂÈÍË<br />
·Ê·›ÚÂÛ˘ ÓÂÚÔ‡ ·Ó¿‚ÂÈ? (‚Ï. ˘ÓÙ‹ÚËÛË).<br />
Ú¤appleÂÈ Ó· ηı·Ú›ÛÂÙ ÙÔÓ Û˘Ìapple˘ÎÓˆÙ‹? (‚Ï. ˘ÓÙ‹ÚËÛË).<br />
∏ Ú‡ıÌÈÛË ıÂÚÌÔÎÚ·Û›·˜ ‰ÂÓ Â›Ó·È È‰·ÓÈ΋ ÁÈ· ÙÔÓ Ù‡appleÔ ÙˆÓ ˘Ê·ÛÌ¿ÙˆÓ<br />
appleÔ˘ ÛÙÂÁÓÒÓÂÙ (‚Ï. ∂ÎΛÓËÛË Î·È ÚÔÁÚ¿ÌÌ·Ù·, ‚Ï. χÛÈÌÔ ÚÔ‡¯ˆÓ).<br />
¢ÂÓ ¤¯ÂÈ ÂappleÈÏÂÁ› Ô ÛˆÛÙfi˜ ¯ÚfiÓÔ˜ ÛÙÂÁÓÒÌ·ÙÔ˜ ÁÈ· ÙÔ ‚¿ÚÔ˜ ÙˆÓ<br />
ÚÔ‡¯ˆÓ (‚Ï. χÛÈÌÔ ÚÔ‡¯ˆÓ).<br />
∏ Û¯¿Ú· Ù˘ ÂÈÛfi‰Ô˘ ·¤Ú· ‹ ÔÈ apple›Ûˆ Ôapple¤˜ ·ÂÚÈÛÌÔ‡ ¤¯Ô˘Ó ·appleÔÊÚ·¯ı›<br />
(‚Ï. ∂ÁηٿÛÙ·ÛË, ‚Ï. ˘ÓÙ‹ÚËÛË).<br />
∆· ÚÔ‡¯· ‹Ù·Ó appleÔχ ˘ÁÚ¿ (‚Ï. χÛÈÌÔ ÚÔ‡¯ˆÓ).<br />
∆Ô ÛÙÂÁÓˆÙ‹ÚÈÔ ‹Ù·Ó ˘appleÂÚ‚ÔÏÈο ÊÔÚو̤ÓÔ (‚Ï. χÛÈÌÔ ÚÔ‡¯ˆÓ).<br />
Èı·ÓfiÓ Ó· ÌËÓ ·‰ÂÈ¿Û·Ù ÙÔ ‰Ô¯Â›Ô ÓÂÚÔ‡ ÛÙËÓ ·Ú¯‹ ÙÔ˘ appleÚÔÁÚ¿ÌÌ·ÙÔ˜.<br />
ªËÓ appleÂÚÈ̤ÓÂÙ ÙÔ Û‹Ì· ·Ê·›ÚÂÛ˘ ÓÂÚÔ‡, ÂϤÁ¯ÂÙ apple¿ÓÙ· Î·È ·‰ÂÈ¿˙ÂÙÂ<br />
ÙÔ ‰Ô¯Â›Ô appleÚÈÓ ÍÂÎÈÓ‹ÛÂÙ ¤Ó· Ó¤Ô appleÚfiÁÚ·ÌÌ· ÛÙÂÁÓÒÌ·ÙÔ˜ (‚Ï. ˘ÓÙ‹ÚËÛË).<br />
∞˘Ùfi Â›Ó·È Ê˘ÛÈÔÏÔÁÈÎfi, ÁÈ·Ù› Ë ÊˆÙÂÈÓ‹ ¤Ó‰ÂÈÍË ·Ó·‚ÔÛ‚‹ÓÂÈ fiÙ·Ó Â›Ó·È<br />
ÁÂÌ¿ÙÔ˜ Ô appleÂÚȤÎÙ˘. ∞Ó Ë ÊˆÙÂÈÓ‹ ¤Ó‰ÂÈÍË Â›Ó·È ·Ó·Ì̤ÓË ¯ˆÚ›˜ Ó·<br />
·Ó·‚ÔÛ‚‹ÓÂÈ, Û·˜ ˘appleÂÓı˘Ì›˙ÂÈ ·appleÏÒ˜ fiÙÈ appleÚ¤appleÂÈ Ó· ÂÎÎÂÓÒÛÂÙ ÙÔÓ<br />
appleÂÚȤÎÙË ÓÂÚÔ‡ (‚Ï. ∂ÎΛÓËÛË Î·È ÚÔÁÚ¿ÌÌ·Ù·).<br />
√È ÊˆÙÂÈÓ¤˜ ÂӉ›ÍÂȘ<br />
§∂π∆√Àƒ°πø¡ Î·È Ë ÊˆÙÂÈÓ‹<br />
¤Ó‰ÂÈÍË ∂∫∫π¡∏∏ /<br />
ƒ√øƒπ¡∏ ¢π∞∫√∏<br />
§∂π∆√Àƒ°π∞ Á›ÓÔÓÙ·È<br />
appleÔÚÙÔηϛ Î·È ·Ó·‚ÔÛ‚‹ÓÔ˘Ó<br />
ªÂÙ¿ ÙÔ Ù¤ÏÔ˜ ÙÔ˘<br />
appleÚÔÁÚ¿ÌÌ·ÙÔ˜ Ù· ÚÔ‡¯· ›ӷÈ<br />
appleÈÔ ˘ÁÚ¿ ·applefi fiÙÈ ·Ó·ÌÂÓfiÙ·Ó.<br />
● ∞Ó ÔÈ ÊˆÙÂÈÓ¤˜ ÂӉ›ÍÂȘ §ÂÈÙÔ˘ÚÁÈÒÓ Î·È Ë ÊˆÙÂÈÓ‹ ¤Ó‰ÂÈÍË ∂∫∫π¡∏∏ /<br />
ƒ√øƒπ¡∏ ¢π∞∫√∏ §∂π∆√Àƒ°π∞ ·Ó·‚ÔÛ‚‹ÓÔ˘Ó Ì·˙› Ì ÙȘ<br />
ʈÙÂÈÓ¤˜ ÂӉ›ÍÂȘ ∫·ı·ÚÈÛÌÔ‡ Û˘Ìapple˘ÎÓˆÙ‹ Î·È ∫Ú‡Ô˘ ÙÂÁÓÒÌ·ÙÔ˜ ‹ ·Ó Ë<br />
ʈÙÂÈÓ¤˜ ÂӉ›ÍÂȘ ÚÔfi‰Ô˘ ‹ ∫·ı˘ÛÙ¤ÚËÛ˘ Î·È ËʈÙÂÈÓ‹ ¤Ó‰ÂÈÍË<br />
∂∫∫π¡∏∏/ƒ√øƒπ¡∏ ¢π∞∫√∏ §∂π∆√Àƒ°π∞ ·Ó·‚ÔÛ‚‹ÓÂÈ Ì·˙› ÌÂ<br />
ÙȘ ʈÙÂÈÓ¤˜ ÂӉ›ÍÂȘ ∫·ı·ÚÈÛÌÔ‡ Ê›ÏÙÚÔ˘, ∫·ı·ÚÈÛÌÔ‡ Û˘Ìapple˘ÎÓˆÙ‹,<br />
∫Ú‡Ô˘ ÙÂÁÓÒÌ·ÙÔ˜ Î·È ∆∂§√À, ÙfiÙÂ:<br />
- ∞appleÂÓÂÚÁÔappleÔÈ‹ÛÙ ÙÔ ÛÙÂÁÓˆÙ‹ÚÈÔ Î·È ‚Á¿ÏÙ ÙÔ ·applefi ÙËÓ appleÚ›˙·.<br />
∫·ı·Ú›ÛÙ ÙÔ Ê›ÏÙÚÔ Î·È ÙÔ Û˘Ìapple˘ÎÓˆÙ‹ (‚Ï. ˘ÓÙ‹ÚËÛË).<br />
∞ÓÙÈηٷÛÙ‹ÛÙ ÙËÓ appleÚ›˙·, ÂÓÂÚÁÔappleÔÈ‹ÛÙ ÙÔ ÛÙÂÁÓˆÙ‹ÚÈÔ Î·È ÍÂÎÈÓ‹ÛÙÂ<br />
¤Ó· ¿ÏÏÔ appleÚfiÁÚ·ÌÌ·. ∞Ó ÂÍ·ÎÔÏÔ˘ıÔ‡Ó Ó· ·Ó·‚ÔÛ‚‹ÓÔ˘Ó ÔÈ ›‰È˜<br />
ʈÙÂÈÓ¤˜ ÂӉ›ÍÂȘ Ì ÙÔÓ ›‰ÈÔ Û˘Ó‰˘·ÛÌfi, ÂappleÈÎÔÈÓˆÓ‹ÛÙ Ì ÙÔ ∫¤ÓÙÚÔ<br />
∆¯ÓÈ΋˜ ÀappleÔÛÙ‹ÚÈ͢ (‚Ï. ∆¯ÓÈ΋ ˘appleÔÛÙ‹ÚÈÍË).<br />
● ∞Ó ·Ó·‚ÔÛ‚‹ÓÔ˘Ó ÔÈ ÊˆÙÂÈÓ¤˜ ÂӉ›ÍÂȘ §ÂÈÙÔ˘ÚÁÈÒÓ Î·È Ë ÊˆÙÂÈÓ‹ ¤Ó‰ÂÈÍË<br />
∂∫∫π¡∏∏ / ƒ√øƒπ¡∏ ¢π∞∫√∏ §∂π∆√Àƒ°π∞ Ì ÔappleÔÈÔÓ‰‹appleÔÙ ¿ÏÏÔ<br />
Û˘Ó‰˘·ÛÌfi: ËÌÂÈÒÛÙ appleÔȘ ʈÙÂÈÓ¤˜ ÂӉ›ÍÂȘ ·Ó·‚ÔÛ‚‹ÓÔ˘Ó Î·È ÂappleÈÎÔÈÓˆÓ‹ÛÙÂ<br />
Ì ÙÔ ∫¤ÓÙÚÔ ∆¯ÓÈ΋˜ ÀappleÔÛÙ‹ÚÈ͢ (‚Ï. ∆¯ÓÈ΋ ˘appleÔÛÙ‹ÚÈÍË).<br />
! °È· ÏfiÁÔ˘˜ ·ÛÊ·Ï›·˜ Ô Ì¤ÁÈÛÙÔ˜ ¯ÚfiÓÔ˜ Û˘Ó¯ԇ˜ ÏÂÈÙÔ˘ÚÁ›·˜ ÙÔ˘<br />
ÛÙÂÁÓˆÙËÚ›Ô˘ Â›Ó·È 4 ÒÚ˜. ∞Ó ‰ÂÓ ¤¯ÂÈ ·ÓȯÓ¢Ù› Ë ·apple·ÈÙÔ‡ÌÂÓË ÙÂÏÈ΋<br />
˘ÁÚ·Û›· ·applefi οappleÔÈÔ ·˘ÙfiÌ·ÙÔ appleÚfiÁÚ·ÌÌ· ̤۷ ÛÙÔ ¯ÚÔÓÈÎfi ‰È¿ÛÙËÌ· ·˘Ùfi,<br />
ı· ÔÏÔÎÏËÚˆı› ÙÔ appleÚfiÁÚ·ÌÌ· Î·È ı· ÙÂÚÌ·ÙÈÛÙ› Ë ÏÂÈÙÔ˘ÚÁ›· ÙÔ˘<br />
ÛÙÂÁÓˆÙËÚ›Ô˘. ∂ϤÁÍÙ ٷ apple·Ú·apple¿Óˆ ÛËÌ›· Î·È ÂÓÂÚÁÔappleÔÈ‹ÛÙ ÂÎ Ó¤Ô˘ ÙÔ<br />
appleÚfiÁÚ·ÌÌ·. ∞Ó Ù· ÚÔ‡¯· ÂÍ·ÎÔÏÔ˘ı‹ÛÔ˘Ó Ó· Â›Ó·È ˘ÁÚ¿, ÂappleÈÎÔÈÓˆÓ‹ÛÙ Ì ÙÔ<br />
∫¤ÓÙÚÔ ∆¯ÓÈ΋˜ ÀappleÔÛÙ‹ÚÈ͢ (‚Ï. ∆¯ÓÈ΋ ˘appleÔÛÙ‹ÚÈÍË).<br />
41
∆¯ÓÈ΋ ˘appleÔÛÙ‹ÚÈÍË<br />
GR<br />
ÚÈÓ Î·Ï¤ÛÂÙ ÙÔ ∫¤ÓÙÚÔ Ù¯ÓÈ΋˜<br />
Â͢appleËÚ¤ÙËÛ˘ :<br />
●<br />
●<br />
ÃÚËÛÈÌÔappleÔÈ›ÛÙ ÙÔÓ Ô‰ËÁfi ·ÓÙÈÌÂÙÒappleÈÛ˘<br />
appleÚÔ‚ÏËÌ¿ÙˆÓ ÁÈ· Ó· ‰Â›Ù ·Ó ÌappleÔÚ›Ù ӷ χÛÂÙÂ<br />
ÙÔ appleÚfi‚ÏËÌ· ÌfiÓÔÈ Û·˜ (µÏ. ∞ÓÙÈÌÂÙÒappleÈÛË<br />
appleÚÔ‚ÏËÌ¿ÙˆÓ).<br />
∞Ó ‰ÂÓ ÌappleÔÚ›Ù , ·appleÂÓÂÚÁÔappleÔÈ‹ÛÙ ÙÔ<br />
ÛÙÂÁÓˆÙ‹ÚÈÔ Î·È Î·Ï¤ÛÙ ÙÔ appleÏËÛȤÛÙÂÚÔ ∫¤ÓÙÚÔ<br />
Ù¯ÓÈ΋˜ ˘appleÔÛÙ‹ÚÈ͢.<br />
∞ÓÙ·ÏÏ·ÎÙÈο<br />
∆Ô Û˘ÁÎÂÎÚÈ̤ÓÔ ÛÙÂÁÓˆÙ‹ÚÈÔ Â›Ó·È ¤Ó· appleÔχappleÏÔÎÔ<br />
Ì˯¿ÓËÌ·. ∏ appleÚÔÛapple¿ıÂÈ· Ó· ÙÔ ÂappleÈÛ΢¿ÛÂÙ ÂÛ›˜<br />
ÔÈ ›‰ÈÔÈ ‹ οappleÔÈÔ ÌË Î·Ù·ÚÙÈṲ̂ÓÔ ¿ÙÔÌÔ ÌappleÔÚ› Ó·<br />
appleÚÔηϤÛÂÈ ÙÚ·˘Ì·ÙÈÛÌfi Û ¤Ó· ‹ appleÂÚÈÛÛfiÙÂÚ·<br />
¿ÙÔÌ·, Ó· ‰ËÌÈÔ˘ÚÁ‹ÛÂÈ ‚Ï¿‚˜ ÛÙË Û˘Û΢‹ Î·È Ó·<br />
ı¤ÛÂÈ ¿Î˘ÚË ÙËÓ ÂÁÁ‡ËÛË ·ÓÙ·ÏÏ·ÎÙÈÎÒÓ.<br />
∫·Ï¤ÛÙ ÂÍÔ˘ÛÈÔ‰ÔÙË̤ÓÔ Ù¯ÓÈÎfi ·Ó ·ÓÙÈÌÂÙˆapple›˙ÂÙÂ<br />
appleÚÔ‚Ï‹Ì·Ù· ηٿ ÙË ¯Ú‹ÛË Ù˘ Û˘Û΢‹˜.<br />
∆· ·ÓÙ·ÏÏ·ÎÙÈο ¤¯Ô˘Ó ۯ‰ȷÛÙ› ·appleÔÎÏÂÈÛÙÈο ÁÈ·<br />
ÙË Û˘ÁÎÂÎÚÈ̤ÓË Û˘Û΢‹ Î·È fi¯È ÁÈ· ¿ÏϘ ¯Ú‹ÛÂȘ.<br />
∆È Ó· ·Ó·Ê¤ÚÂÙ ÛÙÔ ∫¤ÓÙÚÔ Ù¯ÓÈ΋˜ ˘appleÔÛÙ‹ÚÈ͢ :<br />
● fiÓÔÌ·, ‰È‡ı˘ÓÛË Î·È Ù·¯˘‰ÚÔÌÈÎfi ÎÒ‰Èη.<br />
● ·ÚÈıÌfi ÙËÏÂÊÒÓÔ˘.<br />
● ÙÔ Â›‰Ô˜ ÙÔ˘ appleÚÔ‚Ï‹Ì·ÙÔ˜.<br />
● ÙËÓ ËÌÂÚÔÌËÓ›· ·ÁÔÚ¿˜.<br />
● ÙÔ ÌÔÓÙ¤ÏÔ Ù˘ Û˘Û΢‹˜ (Mod.).<br />
● ÙÔÓ ·ÚÈıÌfi ÛÂÈÚ¿˜ (S/N).<br />
∞˘Ù¤˜ ÙȘ appleÏËÚÔÊÔڛ˜ ı· ÙȘ ‚Ú›Ù ÛÙËÓ ÂÙÈΤٷ<br />
¯·Ú·ÎÙËÚÈÛÙÈÎÒÓ ÛÙËÓ ÂÛˆÙÂÚÈ΋ appleÏÂ˘Ú¿ Ù˘ applefiÚÙ·˜<br />
Ù˘ Û˘Û΢‹˜.<br />
˘ÁÎÚÈÙÈο ÚÔÁÚ¿ÌÌ·Ù·<br />
●<br />
˘ÓÈÛÙÒÌÂÓ· appleÚÔÁÚ¿ÌÌ·Ù· ÁÈ· Û˘ÁÎÚÈÙÈ΋ ‰ÔÎÈÌ‹ Ì ÙÔ EN61121<br />
ÚfiÁÚ·ÌÌ· ÚfiÁÚ·ÌÌ· appleÚÔ˜ ÂappleÈÏÔÁ‹ ª¤ÁÂıÔ˜<br />
(EN61121)<br />
ÊÔÚÙ›Ô˘<br />
Ù¤Áӈ̷ µ·Ì‚·ÎÂÚÒÓ µ·Ì‚·ÎÂÚ¿ - Ù¤Áӈ̷ ÛÙË ÓÙÔ˘Ï¿apple· 2 8 kg<br />
Ù¤Áӈ̷ µ·Ì‚·ÎÂÚÒÓ ÁÈ· ȉ¤ÚˆÌ· Ù¤Áӈ̷ À„ËÏ‹˜ £ÂÚÌÔÎÚ·Û›·˜<br />
˘ÁÎÂÎÚÈ̤Ó˘ ÃÚÔÓÈ΋˜ ¢È¿ÚÎÂÈ·˜ (120 §ÂappleÙ¿)<br />
8 kg<br />
∂˘·›ÛıËÙ· ˘Ê¿ÛÌ·Ù· ˘ÓıÂÙÈο - Ù¤Áӈ̷ ÛÙË ÓÙÔ˘Ï¿apple· 3 3 kg<br />
! ËÌ›ˆÛË: ∞˘Ù‹ Ë Ï›ÛÙ· ÏÂÈÙÔ˘ÚÁÈÒÓ appleÚÔÁÚ·ÌÌ¿ÙˆÓ ‰ÂÓ Â›Ó·È appleÏ‹Ú˘ (‚Ï. ∂ÎΛÓËÛË Î·È ÚÔÁÚ¿ÌÌ·Ù·).<br />
∏ apple·ÚÔ‡Û· Û˘Û΢‹ Â›Ó·È Û˘Ì‚·Ù‹ Ì ÙȘ ÂÍ‹˜ Ô‰ËÁ›Â˜ Ù˘ ∂∂:<br />
- 2006/95/∂√∫ (√‰ËÁ›· ÷ÌËÏ‹˜ ∆¿Û˘)<br />
- 89/336/∂√∫, 92/31/∂√∫ Î·È 93/68/∂√∫ (√‰ËÁ›· ∏ÏÂÎÙÚÔÌ·ÁÓËÙÈ΋˜ ˘Ì‚·ÙfiÙËÙ·˜)<br />
42
195079671.00 W<br />
07/2009 - SIMLEX . Four Ashes, Wolverhampton<br />
44