Manual tehnic expresoare Gaggia Platinum Swing UP - Cafea
Manual tehnic expresoare Gaggia Platinum Swing UP - Cafea Manual tehnic expresoare Gaggia Platinum Swing UP - Cafea
4 Water tank APPLIANCE Cup stacking surface Hot water / steam knob ACCESSORIES Control panel E-Plus System Dispensing head “Milk Island” connection “Aqua Prima” water fi lter Drip tray + grill Hot water / steam spout Coffee bean hopper Ground coffee measuring scoop Socket for power cable Coffee bean hopper cover Compartment for pre-ground coffee Power button Service door Coffee grounds drawer Brew Group Drip tray Water hardness tester Grinder adjustment key Lubricant for the Power cable brew group
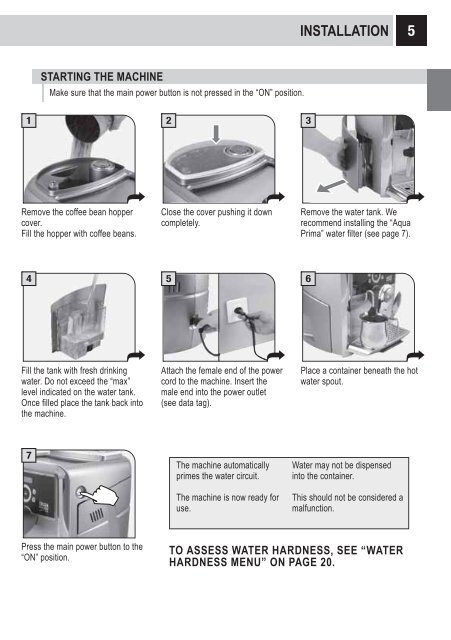
1 2 3 4 7 STARTING THE MACHINE Make sure that the main power button is not pressed in the “ON” position. Remove the coffee bean hopper cover. Fill the hopper with coffee beans. Fill the tank with fresh drinking water. Do not exceed the “max” level indicated on the water tank. Once fi lled place the tank back into the machine. Press the main power button to the “ON” position. Close the cover pushing it down completely. 5 Attach the female end of the power cord to the machine. Insert the male end into the power outlet (see data tag). The machine automatically primes the water circuit. The machine is now ready for use. INSTALLATION 6 5 Remove the water tank. We recommend installing the “Aqua Prima” water fi lter (see page 7). Place a container beneath the hot water spout. Water may not be dispensed into the container. This should not be considered a malfunction. TO ASSESS WATER HARDNESS, SEE “WATER HARDNESS MENU” ON PAGE 20.
- Page 1 and 2: Operation and maintenance manual Be
- Page 3 and 4: PROGRAMMING THE MACHINE ...........
- Page 5: INSTRUCTIONS FOR THE ELECTRICAL COR
- Page 9 and 10: 4 “AQUA PRIMA” WATER FILTER To
- Page 11 and 12: COFFEE INTENSITY The E-Plus System
- Page 13 and 14: 1 2 4 Note: DISPENSING BEVERAGES WI
- Page 15 and 16: 1 2 3 4 7 DISPENSING STEAM Place a
- Page 17 and 18: 1 2 3 4 MILK ISLAND (OPTIONAL) This
- Page 19 and 20: 1 2 3 Check that the water and coff
- Page 21 and 22: MACHINE SETTINGS To change the mach
- Page 23 and 24: “FILTER ALARM” MENU > mach. set
- Page 25 and 26: 1 2 4 1 2 4 Filter state > maintena
- Page 27 and 28: Note: before beginning the descalin
- Page 29 and 30: 1 2 4 7 Group washing > maintenance
- Page 31 and 32: 1 2 4 SPECIAL FUNCTIONS This menu a
- Page 33 and 34: 1 2 4 7 CLEANING THE BREW GROUP The
- Page 35 and 36: TROUBLESHOOTING PROBLEMS CAUSES SOL
- Page 37 and 38: concentration of dust or oily subst
- Page 40 and 41: IV ÍNDICE PRECAUÇÕES IMPORTANTES
- Page 42 and 43: 2 PRECAUÇÕES IMPORTANTES Durante
- Page 44 and 45: 4 APARELHO Plano de apoio para chá
- Page 46 and 47: 6 INSTALAÇÃO SELECCIONE O IDIOMA
- Page 48 and 49: 8 VISOR Entra no menu de programaç
- Page 50 and 51: 10 DISTRIBUIÇÃO DO PRODUTO É POS
- Page 52 and 53: 12 1 2 3 4 7 DISTRIBUIÇÃO DO PROD
- Page 54 and 55: 14 1 2 4 5 6 7 DISTRIBUIÇÃO DO PR
1 2 3<br />
4<br />
7<br />
STARTING THE MACHINE<br />
Make sure that the main power button is not pressed in the “ON” position.<br />
Remove the coffee bean hopper<br />
cover.<br />
Fill the hopper with coffee beans.<br />
Fill the tank with fresh drinking<br />
water. Do not exceed the “max”<br />
level indicated on the water tank.<br />
Once fi lled place the tank back into<br />
the machine.<br />
Press the main power button to the<br />
“ON” position.<br />
Close the cover pushing it down<br />
completely.<br />
5<br />
Attach the female end of the power<br />
cord to the machine. Insert the<br />
male end into the power outlet<br />
(see data tag).<br />
The machine automatically<br />
primes the water circuit.<br />
The machine is now ready for<br />
use.<br />
INSTALLATION<br />
6<br />
5<br />
Remove the water tank. We<br />
recommend installing the “Aqua<br />
Prima” water fi lter (see page 7).<br />
Place a container beneath the hot<br />
water spout.<br />
Water may not be dispensed<br />
into the container.<br />
This should not be considered a<br />
malfunction.<br />
TO ASSESS WATER HARDNESS, SEE “WATER<br />
HARDNESS MENU” ON PAGE 20.


