MANUAL DE INSTALAÇÃO DE CAMPO - Victaulic
MANUAL DE INSTALAÇÃO DE CAMPO - Victaulic
MANUAL DE INSTALAÇÃO DE CAMPO - Victaulic

Create successful ePaper yourself
Turn your PDF publications into a flip-book with our unique Google optimized e-Paper software.
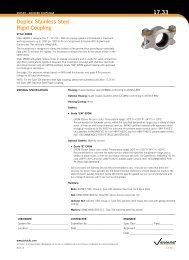
Informações úteis sobre o Modelo 107H<br />
Diâmetro nominal<br />
polegadas ou mm<br />
2 – 2 1/2<br />
76,1 mm<br />
3 – 5<br />
139,7 mm<br />
165,1 mm<br />
6 – 8<br />
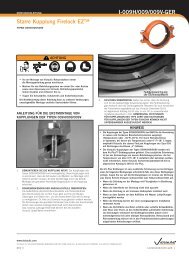
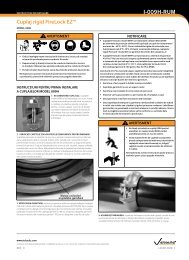
Instruções para reinstalação<br />
de acoplamentos Modelo 107H<br />
Diâmetro Tamanho da porca Tamanho do soquete<br />
Diâmetro externo<br />
real do tubo<br />
polegadas/mm<br />
como os segmentos do acoplamento se moldam<br />
ao diâmetro externo do tubo/componentes<br />
do acoplamento durante a instalação inicial,<br />
poderá não ser possível instalar o tubo/<br />
componentes do acoplamento no acoplamento<br />
caso haja necessidade de uma reinstalação.<br />
se isto acontecer, siga os passos seguintes<br />
para reinstalar o acoplamento.<br />
1. Verifique se o sistema está completamente<br />
despressurizado e drenado antes de tentar<br />
desmontar qualquer acoplamento.<br />
2. siga os passos 2 – 3 da página 74.<br />
3. LUBRIFIQUE O ANEL <strong>DE</strong> VEDAÇÃO:<br />
aplique uma camada fina de lubrificante<br />
<strong>Victaulic</strong> ou lubrificante siliconado nas bordas<br />
do anel de vedação e na parte externa. é normal<br />
que a superfície do anel de vedação tenha<br />
uma aparência branca acinzentada depois<br />
de começar a funcionar. NOTA: OS SEGMENTOS<br />
E ANÉIS <strong>DE</strong> VEDAÇÃO PARA ACOPLAMENTOS<br />
107H NÃO SÃO INTERCAMBIáVEIS COM<br />
SEGMENTOS E ANÉIS <strong>DE</strong> VEDAÇÃO PARA<br />
ACOPLAMENTOS 107.<br />
ACOPLAMENTOS PRONTOS PARA <strong>INSTALAÇÃO</strong><br />
PARA TUBOS COM EXTREMIDA<strong>DE</strong> RANHURADA<br />
INSTRUÇÕES <strong>DE</strong> <strong>INSTALAÇÃO</strong> REV_E<br />
polegadas/<br />
Métrico<br />
polegadas/<br />
mm<br />
2,375 – 2,875 3/8 11/16<br />
60,3 – 73,0 M10 17<br />
3,000 3/8 11/16<br />
76,1 M10 17<br />
3,500 – 5,563 1/2 7/8<br />
88,9 – 141,3 M12 22<br />
5,500 1/2 7/8<br />
139,7 M12 22<br />
6,500 5/8 1 1/16<br />
165,1 M16 27<br />
6,625 – 8,625 5/8 1 1/16<br />
168,3 – 219,1 M16 27<br />
Extremidade<br />
do tubo<br />
Aba central<br />
do anel de<br />
vedação<br />
4. MONTE O ANEL <strong>DE</strong> VEDAÇÃO: insira<br />
a ponta ranhurada de um tubo/componentes<br />
do acoplamento no anel de vedação até ele tocar<br />
na aba central do anel.<br />
5. CONECTE O TUBO/COMPONENTES<br />
<strong>DE</strong> ACOPLAMENTO: alinhe as duas<br />
pontas ranhuradas do tubo/componentes<br />
do acoplamento. insira a outra ponta<br />
do tubo/componentes do acoplamento no anel<br />
de vedação até ele tocar na aba central do anel.<br />
NOTA: nenhuma parte do anel de vedação<br />
deve se estender na ranhura de algum tubo/<br />
componentes do acoplamento.<br />
I-100-PORB_77