Ultra S - Normstahl
Ultra S - Normstahl
Ultra S - Normstahl

You also want an ePaper? Increase the reach of your titles
YUMPU automatically turns print PDFs into web optimized ePapers that Google loves.
48<br />
English<br />
End position „DOWN“<br />
[35] There are two possibilities for confirming<br />
end position „DOWN“:<br />
• 10 seconds after reaching the<br />
closed position automatically or<br />
• by pushing of button 3 or 4.<br />
Once the end position „DOWN“ is<br />
learned, the drive lamp flashes<br />
twice, subsequently the door is run<br />
automatically into opened position<br />
again.<br />
Force in „UP“-direction<br />
[35] During run into end position „UP“<br />
the control learns the force automatically.<br />
The drive stops automatically,<br />
once the end position „UP“ is<br />
reached. For confirming the<br />
learned force, there are two possibilities:<br />
• 10 seconds after reaching the<br />
opened position automatically or<br />
• by pushing button 3 or 4.<br />
Once the force values in „UP“-direction<br />
have been saved, the drive<br />
lamp flashes once, subsequently<br />
the door is run into closed position<br />
automatically.<br />
Force in „DOWN“-direction<br />
[35] During run into end position<br />
„DOWN“, the control is learning the<br />
force automatically. The drive stops<br />
automatically, once the end position<br />
„DOWN“ is reached. At the<br />
same time the force values in<br />
„DOWN“-direction are saved. 2<br />
seconds after reaching the end position<br />
„DOWN“, the door is automatically<br />
run into opened position<br />
in order to avoid locking out the fitter<br />
from the garage.<br />
After finishing the above-described<br />
learning runs, only the learned button is<br />
active, see paragraph „Hand-held transmitter<br />
operation“.<br />
Learning without transmitter<br />
End position „UP“<br />
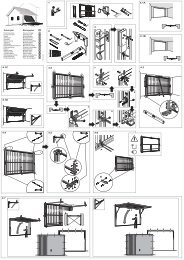
[36] Unlock western plug with yellow<br />
bridge (6) and pull out.<br />
[37] Activate „Impulse“ button (1) and<br />
keep it pushed. The door moves to<br />
open. Release the „Impulse“ button<br />
as soon as the desired end position<br />
„UP“ is reached.<br />
[38] Plug western plug back in.<br />
A correction of end position „UP“ in<br />
closing direction is possible now by<br />
means of the „Impulse“ button.<br />
[39] Confirm reached end position „UP“<br />
by pushing the „Program“ button<br />
(2), the drive lamp flashes 3 times.<br />
Once the end position „UP“ is<br />
learned, the door is run automatically<br />
in closing direction. The door<br />
drive stops automatically, if the<br />
right closed position is reached.<br />
End position „DOWN“<br />
There are two possibilities for confirming<br />
end position „DOWN“:<br />
• 10 seconds after reaching the<br />
opened position automatically or<br />
[39] • by pushing the „Program“ button<br />
(2).<br />
Once the end position „DOWN“ is<br />
learned, the drive lamp flashes<br />
twice, subsequently the door is run<br />
automatically back into opened position.<br />
Force in „UP“-direction<br />
During run into end position „UP“<br />
the control learns the force automatically.<br />
The drive stops automatically,<br />
once the end position „UP“ is<br />
reached. For confirming the<br />
learned force, there are two possibilities:<br />
• 10 seconds after reaching the<br />
opened position automatically or<br />
[39] • by pushing the „Program“ button<br />
(2).<br />
Once the force values in „UP“-direction<br />
have been saved, the drive<br />
lamp flashes once, subsequently<br />
the door is run into closed position<br />
automatically.<br />
Force in „DOWN“-direction<br />
During run into end position<br />
„DOWN“, the control is learning the<br />
force automatically. The drive<br />
stops automatically, once the end<br />
position „DOWN“ is reached. At<br />
the same time the force values in<br />
„DOWN“-direction are saved. 2<br />
seconds after reaching the end position<br />
„DOWN“, the door is automatically<br />
run into opened position<br />
in order to avoid locking out the fitter<br />
from the garage.<br />
Checking obstruction<br />
safeguard<br />
The obstruction safeguard is safety<br />
equipment that protects against crushing,<br />
and should prevent injuries caused<br />
by the closing door (static switching-off<br />
force: 150 N).<br />
[40] Perform test run:<br />
Stop door from outside with both<br />
hands in hip height. During closing<br />
procedure, the door has to stop automatically<br />
and run back about 30<br />
cm, if it meets resistance. During<br />
opening procedure it has to stop<br />
automatically, if it is held back.<br />
Operation<br />
Instruct all persons, who are involved<br />
in using the door equipment,<br />
with respect to safe and proper operation<br />
of it.<br />
There is a risk of injury due to crushing<br />
or cutting at the closing edges<br />
and with the mechanical device. Open<br />
and close the door only when you can<br />
see the area of movement of the door<br />
and when no people are in the immediate<br />
vicinity!<br />
Hand-held transmitter<br />
operation<br />
Keep transmitters away from<br />
children. Activate the hand-held transmitter<br />
only, if you can see the door<br />
area well. Watch the moving door and<br />
keep persons away, until the door is<br />
completely closed or opened.<br />
Learn transmitter<br />
The topmost button of the hand-held<br />
transmitter is learned for the radio remote<br />
control by the manufacturer already.<br />
If you want to learn a further button<br />
of the transmitter or a second transmitter,<br />
proceed as follows (for learning,<br />
hold transmitter as close as possible to<br />
the drive head):<br />
[41] Push „Program“ button (2) briefly –<br />
the red LED (3) flashes once: Activate<br />
within 20 seconds a notlearned<br />
transmitter button – the red<br />
LED lights continuously (learning is<br />
finished).<br />
In case of wrong learning, the radio<br />
commands can be reset again, see [46].<br />
For putting further hand-held transmitters<br />
into operation, repeat the entire<br />
learning procedure and proceed as<br />
aforesaid.