CG40EK (LP) CG40EYA (TP) - Hitachi
CG40EK (LP) CG40EYA (TP) - Hitachi
CG40EK (LP) CG40EYA (TP) - Hitachi

You also want an ePaper? Increase the reach of your titles
YUMPU automatically turns print PDFs into web optimized ePapers that Google loves.
Fig.1-1<br />
Fig.1-2<br />
Fig.1-3<br />
Fig.1-3B Fig.1-3C Fig.1-3D<br />
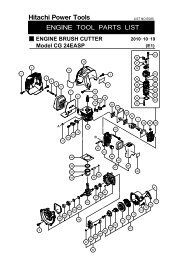
3. Assembly procedures<br />
Drive shaft to engine (Fig. 1-1)<br />
Attach the engine to the clutch case (2) with the<br />
four screws or bolts (1) provided.<br />
Installation of handle (Fig. 1-2)<br />
Attach the handle to the drive shaft tube with<br />
the angle towards the engine.<br />
Adjust the location to the most comfortable<br />
position but not too close to power head before<br />
operation.<br />
Installation of handle (Fig. 1-3, 3B)<br />
Remove the handle bracket (1) from the<br />
assembly. (Fig. 1-3)<br />
Place the handles and attach the handle<br />
bracket with four bolts lightly. Adjust to<br />
appropriate position. Then fix it firmly with the<br />
bolts.<br />
Unhook the hip pad and wrap the tubed stop<br />
cords and throttle wire (1) with it. (Fig. 1-3B)<br />
NOTE for <strong>CG40EYA</strong> (<strong>TP</strong>) (Fig. 1-3C, 3D)<br />
The drive shaft and the engine of this model are<br />
pre-assembled at the factory. All you have to<br />
do is attach throttle grip on the handle with a<br />
screw and a nut and then install it on the handle<br />
brackets. Finger-tighten the knob nut securely.<br />
GB-7