CG40EK (LP) CG40EYA (TP) - Hitachi
CG40EK (LP) CG40EYA (TP) - Hitachi
CG40EK (LP) CG40EYA (TP) - Hitachi

You also want an ePaper? Increase the reach of your titles
YUMPU automatically turns print PDFs into web optimized ePapers that Google loves.
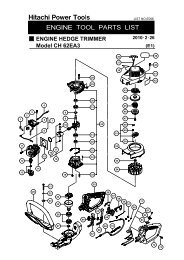
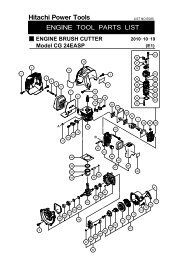
Fig. 2-1 Fig. 2-2<br />
Fig. 2-2B<br />
Fig. 2-2C Fig. 2-3<br />
4. Operating procedures.<br />
Fuel (Fig. 2-1)<br />
WARNING!<br />
The trimmer is equipped with a two-stroke<br />
engine. Always run the engine on fuel,<br />
which is mixed with oil.<br />
Provide good ventilation, when fueling or<br />
handling fuel.<br />
Fuel<br />
Always use branded 89 octane unleaded<br />
gasoline.<br />
Use genuine two-cycle oil or use a mix<br />
between 25:1 to 50:1, please consult the oil<br />
bottle for the ratio or HITACHI dealer.<br />
Only for the state of California at 50:1.<br />
If genuine oil is not available, use an antioxidant<br />
added quality oil expressly labeled for<br />
air-cooled 2-cycle engine use(JASO FC<br />
GRADE OIL or ISO EGC GRADE). Do not use<br />
BIA or TCW (2-stroke water-cooling type)<br />
mixed oil.<br />
Never use multi-grade oil (10 W/30) or waste<br />
oil.<br />
Always mix fuel and oil in a separate clean<br />
container.<br />
Always start by filling half the amount of fuel,<br />
which is to be used. Then add the whole amount<br />
of oil. Mix (shake) the fuel mixture. Add the<br />
remaining amount of fuel.<br />
Mix (shake) the fuel-mix thoroughly before filling<br />
the fuel tank.<br />
Fueling<br />
WARNING!<br />
Always shut off the engine before refueling.<br />
Slowly open the fuel tank, when filling up<br />
with fuel, so that possible over-pressure<br />
disappears.<br />
Tighten the fuel cap carefully, after fueling.<br />
Always move the trimmer at least 3 m (10<br />
ft.) from the fueling area before starting.<br />
Before fueling, clean the tank cap area carefully,<br />
to ensure that no dirt falls into the tank. Make sure<br />
that the fuel is well mixed by shaking the container,<br />
before fueling.<br />
Starting (Fig. 2-2, 2B)<br />
CAUTION!<br />
Before starting, make sure the cutting attachment<br />
does not touch anything.<br />
1. Set ignition switch (1) to ON position.<br />
(Fig. 2-2)<br />
* Push priming bulb (4) several times so that<br />
fuel flows through return pipe (5) (If so<br />
equipped)(Fig. 2-2C)<br />
2. With the safety trigger (2) pressed (if so<br />
equipped), pull throttle trigger and push<br />
throttle lock (3), then slowly release the<br />
throttle trigger first, then the safety trigger.<br />
This will lock the throttle in starting position.<br />
3. Set choke lever to CLOSED position (4).<br />
(Fig. 2-3)<br />
4. Pull recoil starter briskly, taking care to keep<br />
the handle in your grasp and not allowing it<br />
to snap back.<br />
5. When you hear the engine want to start,<br />
return choke lever to RUN position (open).<br />
Then pull recoil starter briskly again.<br />
NOTE!<br />
If engine does not start, repeat procedures from<br />
2 to 5.<br />
6. After starting engine, pull throttle trigger to<br />
release throttle lock. Then allow the engine<br />
about 2-3 minutes to warm up before<br />
subjecting it to any load.<br />
GB-11