CG40EK (LP) CG40EYA (TP) - Hitachi
CG40EK (LP) CG40EYA (TP) - Hitachi
CG40EK (LP) CG40EYA (TP) - Hitachi

You also want an ePaper? Increase the reach of your titles
YUMPU automatically turns print PDFs into web optimized ePapers that Google loves.
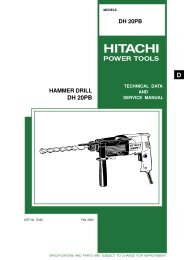
Fig. 1-10<br />
Fig. 1-10B<br />
5<br />
17cm<br />
17cm<br />
CH-100<br />
Fig. 1-10C<br />
Fig. 1-11<br />
Installation of cutting blade (Fig.1-10,10B)<br />
(If so equipped)<br />
When installing a cutting blade, make sure that<br />
there are no cracks or any damage in it and that<br />
the cutting edges are facing the correct direction.<br />
NOTE!<br />
When installing cutter holder cap (1), be sure to<br />
set concave side upward.<br />
Insert the allen wrench (2) into the hole of the<br />
angle transmission in order to lock the cutter<br />
holder (3). Please note that the cutter fixing bolt<br />
or nut (4) has left-handed threads, (clockwise to<br />
loosen/counter-clockwise to tighten). Tighten the<br />
fixing bolt or nut with the box wrench.<br />
WARNING!<br />
For HITACHI BRAIN heads or HITACHI alloy<br />
head, use only flexible, non-metallic line<br />
recommended by the manufacturer. Never<br />
use wire or wire ropes. They can break off<br />
and become a dangerous projectile.<br />
NOTE!<br />
When using HITACHI alloy head (CH-100), initial<br />
cutting line length should be about 17cm each.<br />
(Fig. 1-11)<br />
NOTE!<br />
If your unit is of a nut securing type and<br />
equipped with a cotter pin, the blade must be<br />
retained with a new cotter pin (5) each time<br />
installed. (Fig. 1-10C)<br />
CAUTION!<br />
Before operation, make sure the blade has been<br />
properly installed.<br />
CAUTION!<br />
If your unit is equipped with protection cover<br />
under a cutting blade, check it for wear or cracks<br />
before operation. If any damage or wear is found,<br />
replace it, as it is an article of consumption.<br />
Installation of the BRAIN cutting head<br />
NOTE!<br />
For installation see your BRAIN Owner's<br />
manual, provided with the BRAIN cutting head.<br />
GB-10