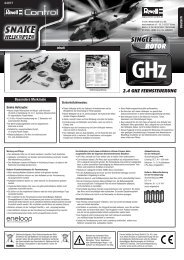
2.4 GHz FERNSTEUERUNG - Revell Control
2.4 GHz FERNSTEUERUNG - Revell Control
2.4 GHz FERNSTEUERUNG - Revell Control

Create successful ePaper yourself
Turn your PDF publications into a flip-book with our unique Google optimized e-Paper software.
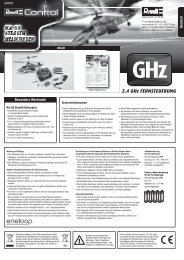
Connection of the helicopter to the remote control<br />
Your helicopter has already been connected to the remote control in the factory. Should you have to reconnect the remote please proceed as follows:<br />
1. Switch off helicopter and remote control.<br />
2. Push and hold the right-hand trim button.<br />
3. Switch the remote control on whilst the right trim button is pushed down.<br />
4. The red LED on the remote control is flashing.<br />
5. Now switch on the helicopter, the LED underneath the helicopter is flashing.<br />
6. As soon as the red LED on the remote control flashes continuously, the connection<br />
is completed and you can start.<br />
Guidelines on safe flying<br />
English<br />
4. General flight tips:<br />
• Always lay the helicopter down on a smooth surface. A slanting surface may negatively affect<br />
the starting characteristics of the helicopter.<br />
• Always move the regulator slowly and sensitively.<br />
• Always observe the helicopter and not the remote control unit!<br />
• Move the actuating regulator downwards slightly as soon as the helicopter lifts off from the<br />
ground. In order to maintain the flying height, adapt the actuating regulator settings.<br />
• If the helicopter goes lower, move the actuating regulator upwards slightly.<br />
• If the helicopter rises, move the actuating regulator downwards slightly.<br />
• In order to fly into a curve, it is often sufficient to tap the direction regulator gently into the<br />
appropriate direction. During the first flight attempts, people tend to control the helicopter too<br />
vehemently. The control regulator should always be moved slowly and carefully - never quickly<br />
or suddenly.<br />
• Beginners should, after trimming, first try to command the actuating regulator correctly. The<br />
helicopter does not necessarily have to fly straight ahead at first - it is more important to maintain<br />
a consistent height of approximately one metre above the floor by repeated, brief tapping<br />
of the actuating regulator. Only then should you practice moving the helicopter left and right.<br />
5. SUITABLE FLIGHT ENVIRONMENT:<br />
The location in which the helicopter is flown must fulfil the following criteria:<br />
1. It should be a closed room in which there are no strong draughts. If possible,<br />
no air conditioning, heating fans etc. should be present which may generate air streams.<br />
2. The room should be at least 10 m long, 6 m wide and 3 m high.<br />
3. There should be no objects in the room (fans, lamps etc.) which might hinder flight.<br />
4. On starting, you must ensure that all living creatures - including the pilot - are standing<br />
at least 1-2 m away from the helicopter when the flight begins.<br />
5. Always observe the helicopter to ensure it does not fly at the pilot, other people or animals<br />
and injure them.<br />
Caution!<br />
Since 2005, there is an obligation of insurance for model aircraft and helicopters flown outdoors.<br />
Please consult your private liability insurance and make sure that your new and present<br />
models are included in this insurance. Please obtain this confirmation in writing and store<br />
it at a safe place. Alternatively, DMFV offers in the Internet on www.dmfv.aero a free trial<br />
membership incl. insurance.<br />
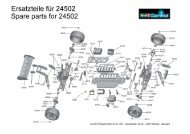
Tips for operation<br />
After a crash, always move the slide control completely downwards.<br />
If the helicopter rotor blades are damaged and you have to replace them, proceed as follows:<br />
Ensure that you do not mix<br />
up the rotor blades before<br />
assembly.<br />
Replacing the rotor blades<br />
1. Take a Phillips screwdriver and<br />
carefully unscrew the screws on<br />
the rotor blade.<br />
2. Now carefully pull the rotor<br />
blade off the holder.<br />
3. Insert the new rotor blade carefully into the<br />
holder and tighten the screw.<br />
Caution: Do not screw in the screw too tightly.<br />
The rotor blade must have some play.<br />
Problem: The rotor blades do not move.<br />
Resolution Safety of Tips errors<br />
Cause: • The ON/OFF switch is set to “OFF”.<br />
• The battery power is too low or drained.<br />
Remedy: • Turn the ON/OFF switch to “ON”.<br />
• Charge up the battery (power pack).<br />
Problem: The helicopter stops for no clear<br />
reason during flight and drops.<br />
Cause: • The battery power is too low.<br />
Remedy: • Charge up the battery.<br />
Problem: The helicopter cannot be<br />
controlled.<br />
Cause: • Another infrared source is disturbing the<br />
signal transmission.<br />
• The signal transmission is disturbed due to<br />
bright light irradiation.<br />
Remedy: • Avoid possible infrared disturbance sources<br />
or switch them off.<br />
• Use the helicopter in a different location.<br />
Problem: The helicopter only pivots on its<br />
own axis to the left or right.<br />
Cause: • Connection between helicopter and remote<br />
control has disconnected.<br />
Remedy: • Reconnect helicopter and remote control<br />
(see above)<br />
You can find further tips and tricks on the Internet at www.revell-control.de.<br />
Service guidelines<br />
At www.revell-control.de, you can find our possibilities to order,<br />
replacement tips for spare parts, and further useful information<br />
on all <strong>Revell</strong> <strong>Control</strong> models.<br />
www.revell-control.de<br />
8