Kenwood Limited, New Lane, Havant, Hampshire PO9 2NH
Kenwood Limited, New Lane, Havant, Hampshire PO9 2NH
Kenwood Limited, New Lane, Havant, Hampshire PO9 2NH

You also want an ePaper? Increase the reach of your titles
YUMPU automatically turns print PDFs into web optimized ePapers that Google loves.
English<br />
before using your <strong>Kenwood</strong><br />
attachment<br />
● Read these instructions carefully and<br />
retain for future reference.<br />
● Remove all packaging and any<br />
labels.<br />
safety<br />
● Switch off the appliance before fitting<br />
and removing this attachment.<br />
● Keep your fingers away from moving<br />
parts and the openings on the<br />
attachment.<br />
● Never leave the appliance<br />
unattended when it is operating.<br />
● Never use a damaged attachment<br />
and/or appliance.<br />
● Always ensure loose articles and<br />
clothing are secured before using<br />
this attachment.<br />
● Do not let infirm people use the<br />
appliance without supervision.<br />
● Do not let children use or play with<br />
the appliance.<br />
● Only use the appliance for its<br />
intended domestic use. <strong>Kenwood</strong><br />
will not accept any liability if the<br />
appliance is subject to improper use,<br />
or failure to comply with these<br />
instructions.<br />
before using for the first time<br />
● Wipe clean with a damp cloth. Do<br />
not immerse in water.<br />
key<br />
<br />
<br />
<br />
<br />
<br />
adjustable knob<br />
pasta feed roller<br />
flat pasta attachment<br />
oultet catch<br />
slow speed outlet cover<br />
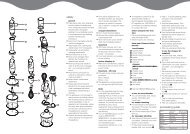
to assemble<br />
1 To remove the slow speed outlet<br />
cover, slide the catch then pull off.<br />
2 Hold the catch back and insert the<br />
attachment into the outlet drive and<br />
turn until the drive clicks into place -<br />
you may have to turn it both ways.<br />
When the drive is engaged, rotate<br />
the attachment so that the pin is in a<br />
vertical position, then engage the pin<br />
into the slot.<br />
3 Release the catch.<br />
to use your pasta maker<br />
1 Make your pasta dough. Follow one<br />
of the dough recipes supplied.<br />
2 Set the adjustable knob on the side<br />
of the pasta attachment to number 1<br />
by pulling the knob out and turning.<br />
3 Flatten a piece of dough and sprinkle<br />
some flour between the rollers.<br />
4 Turn the kitchen machine to speed<br />
1 (you will see the rollers turning).<br />
5 Pass the piece of dough through the<br />
rollers repeating until you get a<br />
smooth surface. (Folding the dough<br />
in half across its width or length<br />
between rollings will help to achieve<br />
this).<br />
6 Adjust the knob progressively from 1<br />
to 9, each time re-feeding the dough<br />
through the attachment to achieve<br />
the desired thickness . Pasta<br />
thickness using settings 5 to 7 is<br />
recommended.<br />
7 Cut the rolled pasta into<br />
desired/manageable pieces.<br />
Use as required.<br />
2