2.4 GHz FERNSTEUERUNG - Revell Control
2.4 GHz FERNSTEUERUNG - Revell Control
2.4 GHz FERNSTEUERUNG - Revell Control

Create successful ePaper yourself
Turn your PDF publications into a flip-book with our unique Google optimized e-Paper software.
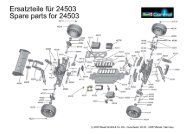
Helicopter:<br />
Helicopter and remote control unit<br />
Stabiliser<br />
Contradirectional<br />
rotor blades<br />
Tail rotor<br />
ON/OFF switch<br />
English<br />
Remote control unit:<br />
Landing skids<br />
<strong>GHz</strong> antenna<br />
Left trimming<br />
Right trimming<br />
Charging indicator LED<br />
<strong>Control</strong> switch<br />
Actuating regulator up/down<br />
Power LED<br />
Forward and backward flight<br />
Fly to the right/left<br />
Charging cable compartment<br />
Insert batteries<br />
1. Screw open the cover and<br />
remove it.<br />
2. Insert 6 x 1.5 V AA batteries and<br />
observe the polarity information as<br />
shown in the battery compartment.<br />
3. Close the battery compartment<br />
cover and screw it shut.<br />
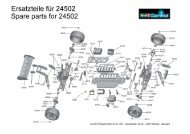
Recharging the helicopter<br />
Caution: Before charging and after each flight, the battery must cool down for 10 to 15 minutes. Otherwise the battery may be damaged. The charging procedure is electronically monitored;<br />
in spite of this the device must not be left unsupervised.<br />
1. Switch off the helicopter and the<br />
remote control unit.<br />
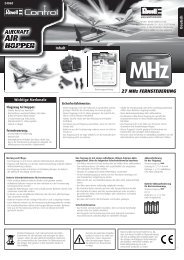
2. Insert the charging cable plug carefully into<br />
the charging socket on the helicopter (Fig. 1).<br />
The plug should fit into the charging socket<br />
easily - DO NOT USE FORCE. If the plug is not<br />
inserted correctly into the charging socket, the<br />
helicopter may be damaged and there may be<br />
a risk of injury.<br />
3. Switch on the remote control unit; the Power<br />
LED will light up red (Fig. 2).<br />
4. The charging status LED will now light up green<br />
to indicate the charging procedure (Fig. 3)<br />
5. The charging procedure is complete as soon<br />
as the green LED has gone out completely.<br />
6. After the charging procedure, set the power<br />
switch to “OFF” and disconnect the charging<br />
cable from the helicopter again.<br />
7. Note: if the red LED starts to flash when being<br />
charged, the batteries in the transmitter are<br />
weak and should be exchanged.<br />
6<br />
Fig. 2 Fig. 3<br />
Fig. 1<br />
After a charging time of<br />
approx. 30 minutes, the<br />
helicopter is able to fly for<br />
approximately 7 minutes.<br />
You can also charge your helicopter with<br />
the enclosed USB cable:<br />
a. Switch off the helicopter<br />
b. Insert the charging cable plug carefully<br />
into the charging socket on the<br />
helicopter (Fig. 1). The plug should fit<br />
into the charging socket easily - DO NOT<br />
USE FORCE. If the plug is not inserted<br />
correctly into the charging socket, the<br />
helicopter may be damaged and there<br />
may be a risk of injury.<br />
c. Insert the USB plug into a free USB port<br />
d. The charging procedure is complete as<br />
soon as the USB plug lights up<br />
e. After charging, remove the USB plug<br />
from the USB port