FKS 2200 B1 - Lidl Service Website
FKS 2200 B1 - Lidl Service Website
FKS 2200 B1 - Lidl Service Website

Create successful ePaper yourself
Turn your PDF publications into a flip-book with our unique Google optimized e-Paper software.
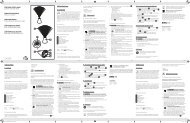
E<br />
1. Release the chain brake by shifting<br />
the brake arm over against<br />
the front grip (8).<br />
2. Place the electric chainsaw onto<br />
a solid, flat surface. It must not<br />
contact any objects.<br />
3. Connect the device to the mains<br />
voltage.<br />
4. Hold the electric chainsaw firmly<br />
with both hands, with the right<br />
hand on the rear grip and the left<br />
hand on the front handle. Thumb<br />
and finger must close securely<br />
over the handles.<br />
5. Turn on the electric chainsaw.<br />
6. Activate the chain braking lever<br />
(3), with running motor, with the<br />
left hand. Chain should stop<br />
abruptly.<br />
7. Once the chain brake is working<br />
properly, release the on/off<br />
switch and the chain brake.<br />
If the chain brake does not function<br />
correctly, you must not use<br />
the electric chainsaw. A slack<br />
saw chain leads to danger of injury.<br />
Return the electric chainsaw to<br />
our <strong>Service</strong>-Center for repair<br />
(see P. 109 for our address).<br />
Checking the oil automatic<br />
system<br />
Check the oil level and the oil automatic<br />
system before commencement of work.<br />
• Switch on the chainsaw and hold it<br />
above a bright background. The saw<br />
must not touch the ground.<br />
GB IE<br />
If an oil trace can be seen, the chainsaw<br />
is working trouble-free.<br />
J<br />
4. Clean the oil passages of the<br />
chain bar ( J 26), in order to<br />
guarantee a trouble-free, automatic<br />
oiling of the saw chain during<br />
operation.<br />
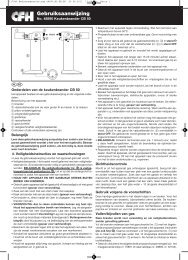
Changing the saw bar<br />
F<br />
1. Switch the saw off and unplug it<br />
from the mains.<br />
2. Lay the saw on a flat surface.<br />
3. Loosen the safety bolt (15) underneath<br />
the tensioning unit.<br />
Turn the fastening bolt (14) anticlockwise<br />
to remove the sprocket<br />
chain wheel covering (16).<br />
4. Remove the saw bar and saw<br />
chain. To remove the guide bar<br />
(4), raise it to an angle of approx.<br />
45 degrees. This will make<br />
it easier to take the saw chain<br />
(5) off the sprocket (23).<br />
5. To fit the new bar, place the bar<br />
onto the bar bolt with the tensioning<br />
plate pointing outwards<br />
(23).<br />
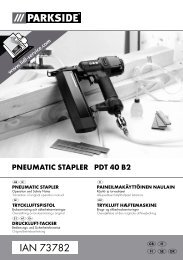
Fitting the saw chain<br />
G<br />
1. Switch the saw off and unplug it<br />
from the mains.<br />
2. Spread the chain (5) out into a<br />
loop with the cutting edges running<br />
clockwise .<br />
15