KMR 1700 D - Kärcher
KMR 1700 D - Kärcher KMR 1700 D - Kärcher
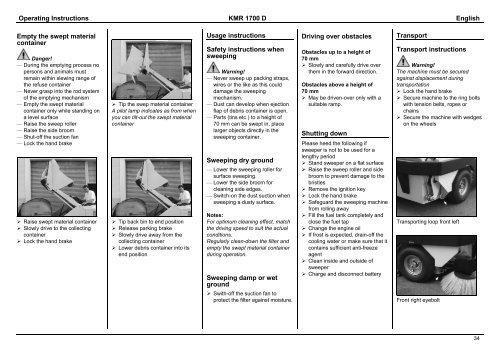
Operating Instructions KMR 1700 D English Empty the swept material container Danger! — During the emptying process no persons and animals must remain within slewing range of the refuse container — Never grasp into the rod system of the emptying mechanism — Empty the swept material container only while standing on a level surface — Raise the sweep roller — Raise the side broom — Shut-off the suction fan — Lock the hand brake Raise swept material container Slowly drive to the collecting container Lock the hand brake Tip the swep material container A pilot lamp indicates as from when you can tilt-out the swept material container Tip back bin to end position Release parking brake Slowly drive away from the collecting container Lower debris container into its end position Usage instructions Safety instructions when sweeping Warning! — Never sweep up packing straps, wires or the like as this could damage the sweeping mechanism. — Dust can develop when ejection flap of debris container is open. — Parts (tins etc.) to a height of 70 mm can be swept in, place larger objects directly in the sweeping container. Sweeping dry ground — Lower the sweeping roller for surface sweeping. — Lower the side broom for cleaning side edges. — Switch-on the dust suction when sweeping a dusty surface. Notes: For optimum cleaning effect, match the driving speed to suit the actual conditions. Regularly clean-down the filter and empty the swept material container during operation. Sweeping damp or wet ground Swith-off the suction fan to protect the filter against moisture. Driving over obstacles Obstacles up to a height of 70 mm Slowly and carefully drive over them in the forward direction. Obstacles above a height of 70 mm May be driven-over only with a suitable ramp. Shutting down Please heed the following if sweeper is not to be used for a lengthy period Stand sweeper on a flat surface Raise the sweep roller and side broom to prevent damage to the bristles Remove the ignition key Lock the hand brake Safeguard the sweeping machine from rolling away Fill the fuel tank completely and close the fuel tap Change the engine oil If frost is expected, drain-off the cooling water or make sure that it contains sufficient anti-freeze agent Clean inside and outside of sweeper Charge and disconnect battery Transport Transport instructions Warning! The machine must be secured against displacement during transportation Lock the hand brake Secure machine to the ring bolts with tension belts, ropes or chains Secure the machine with wedges on the wheels Transporting loop front left Front right eyebolt 34
Operating Instructions KMR 1700 D English Rear eyebolt Cleaning and maintenance Stand sweeper on a flat surface Pull-off the key Lock the hand brake Internal cleaning Danger! Wear dust mask! Wear safety goggles! Notes: Clean with a rag Blow-out with compressed air External cleaning Clean with a moist rag Note: Do not use aggresive cleaning agents! Maintenance intervals Elapsed-time meter Elapsed-time meter indicates maintenance interval times Maintenance by the customer Daily maintenance Check the engine oil level Check the cooling water level Check the tyre air pressure Check roller and side brush for wear and trapped straps Additional maintenance once a week Clean radiator Check the hydraulic oil level Additional maintenance every 100 hours/ once a year Change the engine oil Replace the oil filter insert Lubricate the bearings and cylinders Check V-belt tension Checking the battery acid level Cleaning the fuel filter Check fuel hose and clamp Cleaning the air filter elements Check hydraulic system Additional maintenance every 200 hours/ every six months Check the cooler hoses and clamps Maintenance according to degree of wear Replace sealing strips Replacing the sweep roller Replacing the side broom Notes: Where maintenance is undertaken by the customer, all service and maintenance work must be carried out by a qualified employee. A Kärcher specialist dealer can be consulted whenever support is necessary. Observe the instructions given in the maintenance booklet 5.950-547 Maintenance by the customer service department Maintenance after 20 operating hours First inspection Maintenance operations every 400 operating hours/ every six months Maintenance operations every 1200 operating hours Note: To safeguard warranty rights, during the warranty period all service and maintenance work must be performed by an authorised Kärcher after sales service. Maintenance tasks Notes on safety Warning! Read and observe the attached brochure before commencing maintenance tasks. Safety precautions No.. 5.956-250 Warning! Preparations Stand sweeper on a flat surface Remove the ignition key Lock the hand brake Always insert locking rod when bin is raised Toolkit Position of the tool kit Check engine oil level and top-up At the earliest, check 5ºmin after stopping the motor Pull-out the oil dip rod Wipe the oil dip rod and push it in 35
- Page 1 and 2: KMR 1700 D 1.186-114.0 www.karcher.
- Page 3 and 4: Betriebsanleitung KMR 1700 D Deutsc
- Page 5 and 6: Betriebsanleitung KMR 1700 D Deutsc
- Page 7 and 8: Betriebsanleitung KMR 1700 D Deutsc
- Page 9 and 10: Betriebsanleitung KMR 1700 D Deutsc
- Page 11 and 12: Betriebsanleitung KMR 1700 D Deutsc
- Page 13 and 14: Betriebsanleitung KMR 1700 D Deutsc
- Page 15 and 16: Betriebsanleitung KMR 1700 D Deutsc
- Page 17 and 18: Betriebsanleitung KMR 1700 D Deutsc
- Page 19 and 20: Betriebsanleitung KMR 1700 D Deutsc
- Page 21 and 22: Betriebsanleitung KMR 1700 D Deutsc
- Page 23 and 24: Betriebsanleitung KMR 1700 D Deutsc
- Page 25 and 26: Betriebsanleitung KMR 1700 D Deutsc
- Page 27 and 28: Operating Instructions KMR 1700 D E
- Page 29 and 30: Operating Instructions KMR 1700 D E
- Page 31 and 32: Operating Instructions KMR 1700 D E
- Page 33: Operating Instructions KMR 1700 D E
- Page 37 and 38: Operating Instructions KMR 1700 D E
- Page 39 and 40: Operating Instructions KMR 1700 D E
- Page 41 and 42: Operating Instructions KMR 1700 D E
- Page 43 and 44: Operating Instructions KMR 1700 D E
- Page 45 and 46: Operating Instructions KMR 1700 D E
- Page 47 and 48: Operating Instructions KMR 1700 D E
- Page 49 and 50: Notice d'utilisation KMR 1700 D Fra
- Page 51 and 52: Notice d'utilisation KMR 1700 D Fra
- Page 53 and 54: Notice d'utilisation KMR 1700 D Fra
- Page 55 and 56: Notice d'utilisation KMR 1700 D Fra
- Page 57 and 58: Notice d'utilisation KMR 1700 D Fra
- Page 59 and 60: Notice d'utilisation KMR 1700 D Fra
- Page 61 and 62: Notice d'utilisation KMR 1700 D Fra
- Page 63 and 64: Notice d'utilisation KMR 1700 D Fra
- Page 65 and 66: Notice d'utilisation KMR 1700 D Fra
- Page 67 and 68: Notice d'utilisation KMR 1700 D Fra
- Page 69 and 70: Notice d'utilisation KMR 1700 D Fra
- Page 71 and 72: Notice d'utilisation KMR 1700 D Fra
- Page 73 and 74: Notice d'utilisation KMR 1700 D Fra
- Page 75 and 76: Istruzioni per l'uso KMR 1700 D Ita
- Page 77 and 78: Istruzioni per l'uso KMR 1700 D Ita
- Page 79 and 80: Istruzioni per l'uso KMR 1700 D Ita
- Page 81 and 82: Istruzioni per l'uso KMR 1700 D Ita
- Page 83 and 84: Istruzioni per l'uso KMR 1700 D Ita
Operating Instructions <strong>KMR</strong> <strong>1700</strong> D English<br />
Empty the swept material<br />
container<br />
Danger!<br />
— During the emptying process no<br />
persons and animals must<br />
remain within slewing range of<br />
the refuse container<br />
— Never grasp into the rod system<br />
of the emptying mechanism<br />
— Empty the swept material<br />
container only while standing on<br />
a level surface<br />
— Raise the sweep roller<br />
— Raise the side broom<br />
— Shut-off the suction fan<br />
— Lock the hand brake<br />
Raise swept material container<br />
Slowly drive to the collecting<br />
container<br />
Lock the hand brake<br />
Tip the swep material container<br />
A pilot lamp indicates as from when<br />
you can tilt-out the swept material<br />
container<br />
Tip back bin to end position<br />
Release parking brake<br />
Slowly drive away from the<br />
collecting container<br />
Lower debris container into its<br />
end position<br />
Usage instructions<br />
Safety instructions when<br />
sweeping<br />
Warning!<br />
— Never sweep up packing straps,<br />
wires or the like as this could<br />
damage the sweeping<br />
mechanism.<br />
— Dust can develop when ejection<br />
flap of debris container is open.<br />
— Parts (tins etc.) to a height of<br />
70 mm can be swept in, place<br />
larger objects directly in the<br />
sweeping container.<br />
Sweeping dry ground<br />
— Lower the sweeping roller for<br />
surface sweeping.<br />
— Lower the side broom for<br />
cleaning side edges.<br />
— Switch-on the dust suction when<br />
sweeping a dusty surface.<br />
Notes:<br />
For optimum cleaning effect, match<br />
the driving speed to suit the actual<br />
conditions.<br />
Regularly clean-down the filter and<br />
empty the swept material container<br />
during operation.<br />
Sweeping damp or wet<br />
ground<br />
Swith-off the suction fan to<br />
protect the filter against moisture.<br />
Driving over obstacles<br />
Obstacles up to a height of<br />
70 mm<br />
Slowly and carefully drive over<br />
them in the forward direction.<br />
Obstacles above a height of<br />
70 mm<br />
May be driven-over only with a<br />
suitable ramp.<br />
Shutting down<br />
Please heed the following if<br />
sweeper is not to be used for a<br />
lengthy period<br />
Stand sweeper on a flat surface<br />
Raise the sweep roller and side<br />
broom to prevent damage to the<br />
bristles<br />
Remove the ignition key<br />
Lock the hand brake<br />
Safeguard the sweeping machine<br />
from rolling away<br />
Fill the fuel tank completely and<br />
close the fuel tap<br />
Change the engine oil<br />
If frost is expected, drain-off the<br />
cooling water or make sure that it<br />
contains sufficient anti-freeze<br />
agent<br />
Clean inside and outside of<br />
sweeper<br />
Charge and disconnect battery<br />
Transport<br />
Transport instructions<br />
Warning!<br />
The machine must be secured<br />
against displacement during<br />
transportation<br />
Lock the hand brake<br />
Secure machine to the ring bolts<br />
with tension belts, ropes or<br />
chains<br />
Secure the machine with wedges<br />
on the wheels<br />
Transporting loop front left<br />
Front right eyebolt<br />
34


