rotationslaser dw077 - Service - DeWALT
rotationslaser dw077 - Service - DeWALT
rotationslaser dw077 - Service - DeWALT

Create successful ePaper yourself
Turn your PDF publications into a flip-book with our unique Google optimized e-Paper software.
ENGLISH<br />
44<br />
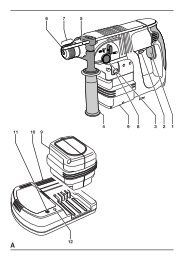
• Use the keys (20) to move the laser head until the<br />
laser line aligns with the position mark (fig. A).<br />
Slope alignment (fig. A)<br />
If the application requires the laser line to align at<br />
a slope angle, proceed as follows:<br />
• With the tool switched on and the laser head<br />
rotating, activate the manual leveling mode.<br />
• Align the laser line with the slope:<br />
– Use the keys (20) to adjust the tool in the X-axis.<br />
– Use the keys (21) to adjust the tool in the Y-axis.<br />
Instructions for use<br />
• Always observe the safety instructions<br />
and applicable regulations.<br />
• Always mark the center of the laser line or dot.<br />
• To increase working distance and accuracy,<br />
set up the tool in the middle of your working area.<br />
• Extreme temperature changes cause movement<br />
of internal parts that may affect the accuracy of<br />
the tool. Regularly check the accuracy while<br />
using the tool under these circumstances.<br />
• Although the tool corrects small out-of-level<br />
errors automatically, when it has registered a<br />
bump, re-adjustment to balance or set-up may<br />
be required.<br />
• If the tool has been dropped or has tipped over,<br />
have the laser head calibrated by a qualified<br />
repair agent.<br />
• For your own comfort, always use the remote<br />
control to operate the tool. The remote control<br />
not only allows you to operate the tool from a<br />
distance, it also keeps you from touching the<br />
tool, thereby reducing the risk of affecting the<br />
tool’s balance and set-up.<br />
Prior to operation:<br />
• Carry out the field calibration checks to confirm<br />
its accuracy.<br />
• Make sure the tool has been set up securely.<br />
Switching on and off (fig. A)<br />
• To switch the tool on, press the on/off switch (1).<br />
• To switch the tool off, press the on/off switch (1)<br />
again.<br />
Setting the rotation speed (fig. G)<br />
The laser head can be set to different rotation speed<br />
settings, thus determining the quality of the line.<br />
• Press the key (19). The rotation speed will cycle<br />
from “fast” to “medium”, “slow”, “crawling” and<br />
“stationary” each time the key is pressed.<br />
• For a bright line, set the laser head to a slow<br />
rotation speed.<br />
• For a solid line, set the laser head to a fast<br />
rotation speed.<br />
Rotating the laser head (fig. H1 & H2)<br />
In the stationary position, the laser head can be<br />
moved both to the left and to the right.<br />
Level applications:<br />
• Use the keys (20) to move the laser head into the<br />
required direction.<br />
Plumb applications:<br />
• Use the keys (21) to move the laser head into the<br />
required direction.<br />
Manually rotating the laser head (fig. H2)<br />
The laser head can also be rotated manually.<br />
• Turn the laser head (10) into the required position.<br />
Do not attempt to move the laser head<br />
while it is rotating at a preset rotation<br />
speed.<br />
Scan mode (fig. I)<br />
The laser head can be set to different speed settings<br />
while moving back and forth, thus projecting<br />
a scanning laser line.<br />
• Press the key (18) to activate the scan mode.<br />
The scan speed starts at “fast” rate.<br />
• To set the scan speed press the key (19). The<br />
scan speed will cycle from “crawling” to “slow”,<br />
“medium” and “fast” each time the key is pressed.<br />
• Level applications:<br />
– Use the keys (20) to move the scan area into<br />
the required direction.<br />
– Use the keys (21) to adjust the scan area.<br />
• Plumb applications:<br />
– Use the keys (21) to move the scan area into<br />
the required direction.<br />
• Press the key (18) to discontinue the scan mode.