Manual de instrucciones - Makita
Manual de instrucciones - Makita
Manual de instrucciones - Makita

You also want an ePaper? Increase the reach of your titles
YUMPU automatically turns print PDFs into web optimized ePapers that Google loves.
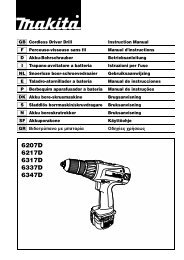
Operation<br />
Hold the handle firmly. Switch on the tool and wait until<br />
the wheel attains full speed before lowering gently into<br />
the cut. When the wheel contacts the workpiece, gradually<br />
bear down on the handle to perform the cut. When<br />
the cut is completed, switch off the tool and WAIT UNTIL<br />
THE WHEEL HAS COME TO A COMPLETE STOP<br />
before returning the handle to the fully elevated position.<br />
CAUTION:<br />
Proper handle pressure during cutting and maximum cutting<br />
efficiency can be <strong>de</strong>termined by the amount of<br />
sparks that is produced while cutting. Your pressure on<br />
the handle should be adjusted to produce the maximum<br />
amount of sparks. Do not force the cut by applying excessive<br />
pressure on the handle. Reduced cutting efficiency,<br />
premature wheel wear, as well as, possible damage to<br />
the tool, cut-off wheel or workpiece may result.<br />
Cutting capacity<br />
Max. cutting capacity varies <strong>de</strong>pending upon the cutting angle and workpiece shape.<br />
Applicable wheel diameter: 355 mm.<br />
Cutting<br />
angle<br />
Workpiece<br />
shape<br />
90° 115 mm 119 mm<br />
For tools with the un<strong>de</strong>r cover (Fig. 14)<br />
To remove the collected dust from the un<strong>de</strong>r cover, place<br />
the tool with its si<strong>de</strong> up and pull the un<strong>de</strong>r cover open<br />
after removing the wing bolt as shown in the figure. Be<br />
sure to close and secure the un<strong>de</strong>r cover with the wing<br />
bolt after the removal of dust.<br />
Carrying the tool (Fig. 15)<br />
Fold down the tool head to the position where you can<br />
attach the chain to the hook on the handle.<br />
MAINTENANCE<br />
CAUTION:<br />
Always be sure that the tool is switched off and<br />
unplugged before carrying out any work on the tool.<br />
Replacement of carbon brushes (Fig. 16 & 17)<br />
Replace carbon brushes when they are worn down to the<br />
limit mark. Both i<strong>de</strong>ntical carbon brushes should be<br />
replaced at the same time.<br />
To maintain product safety and reliability, repairs, maintenance<br />
or adjustment should be carried out by a <strong>Makita</strong><br />
Authorized Service Center.<br />
A<br />
A<br />
A x B B<br />
115 mm x 130 mm<br />
102 mm x 194 mm<br />
70 mm x 233 mm<br />
137 mm<br />
45° 115 mm 106 mm 115 mm x 103 mm 100 mm<br />
A<br />
A<br />
A<br />
7