Untitled - Kenwood
Untitled - Kenwood Untitled - Kenwood
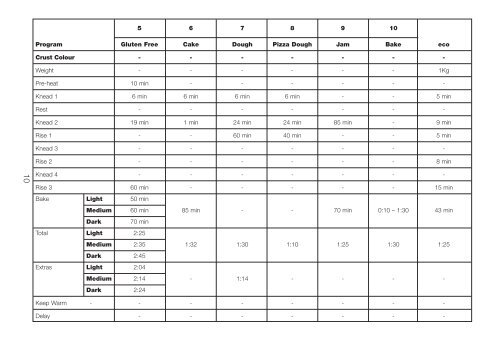
10 5 6 7 8 9 10 Program Gluten Free Cake Dough Pizza Dough Jam Bake eco Crust Colour - - - - - - - Weight - - - - - - 1Kg Pre-heat 10 min - - - - - - Knead 1 6 min 6 min 6 min 6 min - - 5 min Rest - - - - - - - Knead 2 19 min 1 min 24 min 24 min 85 min - 9 min Rise 1 - - 60 min 40 min - - 5 min Knead 3 - - - - - - - Rise 2 - - - - - - 8 min Knead 4 - - - - - - - Rise 3 60 min - - - - - 15 min Bake Light 50 min Medium 60 min 85 min - - 70 min 0:10 – 1:30 43 min Dark 70 min Total Light 2:25 Medium 2:35 1:32 1:30 1:10 1:25 1:30 1:25 Dark 2:45 Extras Light 2:04 Medium 2:14 - 1:14 - - - - Dark 2:24 Keep Warm - - - - - - - - Delay - - - - - - -
delay timer The Delay timer allows you to delay the bread making process up to 15 hours. The delayed start cannot be used with programs (5), (6), (7) (10) or the eco program button. IMPORTANT: When using this delayed start function you must not use perishable ingredients – things that ‘go off’ easily at room temperature or above, such as milk, egg, cheese and yoghurt etc. To use the DELAY TIMER simply place the ingredients in the bread pan and lock the pan into the bread maker. Then: ● Press the MENU button to choose the required program – the program cycle time is displayed. ● Select the crust colour and size required. ● Then set the delay timer. ● Press the TIMER button and keep pressing until the total time required is displayed. If you go past the required time press the TIMER button to go back. The timer button when pressed, moves in 10 minute increments. You do not need to work out the difference between the program time selected and the total hours required as the bread maker will automatically include the setting cycle time. Example: Finished loaf required at 7am. If the bread maker is set up with the required recipe ingredients at 10pm the evening before, total time to be set on the delayed timer is 9 hours. ● Press the MENU button to choose your program e.g. 1 and use the TIMER button to scroll the time in 10 minute increments to display ‘9:00’. If you go past ‘9:00’, simply press the TIMER button until you return to ‘9:00’. ● Press the START/STOP button and the display colon (:) will flash. The timer will start to count down. ● If you make a mistake or wish to change the time set, press the START/STOP button until the screen clears. You can then reset the time. power interruption protection Your Bread Maker has an 8 minute power interruption protection in case the unit is accidentally unplugged during operation. The unit will continue the program if plugged back in straight away. care and cleaning ● Unplug the bread maker and allow to cool completely before cleaning. ● Do not immerse either the bread maker body or the outside base of the bread pan in water. ● Do not use abrasive scouring pads or metal implements. ● Use a soft damp cloth to clean the outside surfaces of the bread maker if necessary. baking chamber/heating element ● To reduce the risk of smoking and burning odours during the baking cycle, regularly remove any spillages from inside the oven chamber and off the heating element. ● Wipe the inside of the baking chamber with a soft damp cloth and dry. ● Carefully wipe the heating element with a soft damp cloth. To avoid damage take care when cleaning the element - avoid pushing down or lifting the element up. bread pan ● Do not dishwash the bread pan. ● Clean the bread pan and the kneader immediately after each use by partially filling the pan with warm soapy water. Leave to soak for 5 to 10 minutes. To remove the kneader, turn clockwise and lift off. Finish cleaning with a soft cloth, rinse and dry. If the kneader cannot be removed after 10 minutes, hold the shaft from underneath the pan and twist back and forth until the kneader is released. lid ● Lift off the lid and clean with warm soapy water. ● Do not dishwash the lid. ● Ensure the lid is completely dry before refitting to the bread maker. bread maker feet ● Always use the bread maker on a clean dry worksurface. ● To prevent the bread maker from moving around on the worksurface during operation, keep the feet clean by wiping regularly with a damp cloth. 11
- Page 1 and 2: BM260
- Page 3 and 4: 1 8 bk 9 ml 450 400 350 300 250 200
- Page 5 and 6: 4 5 6 10 11 12 1 10 16 17 18 500g 7
- Page 7 and 8: how to measure ingredients (refer t
- Page 9 and 10: 5 bread/dough program chart program
- Page 11 and 12: 7 French Style Crust Colour Light
- Page 13: 9 Brioche (Sweet) Crust Colour Lig
- Page 17 and 18: Brioche Bread (use light crust colo
- Page 19 and 20: Bread rolls Program 7 Ingredients 1
- Page 21 and 22: Summer Fruit Jam Program 9 Ingredie
- Page 23 and 24: ingredients The major ingredient in
- Page 25 and 26: adapting your own recipes After you
- Page 27 and 28: troubleshooting guide Following are
- Page 29 and 30: troubleshooting guide (continued) P
- Page 31 and 32: service and customer care ● If th
- Page 33 and 34: legenda 1 handvat van het deksel 2
- Page 35 and 36: 31 brood/deeg-programmakaart progra
- Page 37 and 38: 33 Stokbrood Korstkleur Licht Medi
- Page 39 and 40: 35 Brioche (Zoet) Korstkleur Licht
- Page 41 and 42: vertragingstimer Met de programmeer
- Page 43 and 44: Recepten (voeg de ingrediënten aan
- Page 45 and 46: Glutenvrij brood Programma 5 Ingred
- Page 47 and 48: Pizzadeeg Programma 8 Ingrediënten
- Page 49 and 50: Kant-en-klaar-mixen eco-toets De ec
- Page 51 and 52: Zoetmiddelen Gebruik witte of bruin
- Page 53 and 54: Algemene tips De resultaten van het
- Page 55 and 56: Het opsporen en oplossen van proble
- Page 57 and 58: Het opsporen en oplossen van proble
- Page 59 and 60: avant d’utiliser votre appareil K
- Page 61 and 62: utilisation de votre machine à pai
- Page 63 and 64: 59 Pain Premium Couleur de la cro
10<br />
5 6 7 8 9 10<br />
Program Gluten Free Cake Dough Pizza Dough Jam Bake eco<br />
Crust Colour - - - - - - -<br />
Weight - - - - - - 1Kg<br />
Pre-heat 10 min - - - - - -<br />
Knead 1 6 min 6 min 6 min 6 min - - 5 min<br />
Rest - - - - - - -<br />
Knead 2 19 min 1 min 24 min 24 min 85 min - 9 min<br />
Rise 1 - - 60 min 40 min - - 5 min<br />
Knead 3 - - - - - - -<br />
Rise 2 - - - - - - 8 min<br />
Knead 4 - - - - - - -<br />
Rise 3 60 min - - - - - 15 min<br />
Bake Light 50 min<br />
Medium 60 min 85 min - - 70 min 0:10 – 1:30 43 min<br />
Dark 70 min<br />
Total Light 2:25<br />
Medium 2:35 1:32 1:30 1:10 1:25 1:30 1:25<br />
Dark 2:45<br />
Extras Light 2:04<br />
Medium 2:14 - 1:14 - - - -<br />
Dark 2:24<br />
Keep Warm - - - - - - - -<br />
Delay - - - - - - -


