Montagehandleiding hor 1000 plisséhordeur - Schadebo
Montagehandleiding hor 1000 plisséhordeur - Schadebo
Montagehandleiding hor 1000 plisséhordeur - Schadebo
- No tags were found...

Create successful ePaper yourself
Turn your PDF publications into a flip-book with our unique Google optimized e-Paper software.
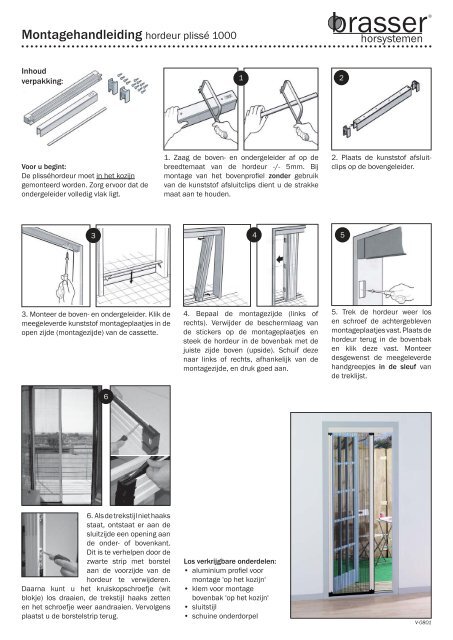
<strong>Montagehandleiding</strong> <strong>hor</strong>deur plissé <strong>1000</strong>Inhoudverpakking:12Voor u begint:De plissé<strong>hor</strong>deur moet in het kozijngemonteerd worden. Zorg ervoor dat deondergeleider volledig vlak ligt.1. Zaag de boven- en ondergeleider af op debreedtemaat van de <strong>hor</strong>deur -/- 5mm. Bijmontage van het bovenprofi el zonder gebruikvan de kunststof afsluitclips dient u de strakkemaat aan te houden.2. Plaats de kunststof afsluitclipsop de bovengeleider.3453. Monteer de boven- en ondergeleider. Klik demeegeleverde kunststof montageplaatjes in deopen zijde (montagezijde) van de cassette.4. Bepaal de montagezijde (links ofrechts). Verwijder de beschermlaag vande stickers op de montageplaatjes ensteek de <strong>hor</strong>deur in de bovenbak met dejuiste zijde boven (upside). Schuif dezenaar links of rechts, afhankelijk van demontagezijde, en druk goed aan.5. Trek de <strong>hor</strong>deur weer losen schroef de achtergeblevenmontageplaatjes vast. Plaats de<strong>hor</strong>deur terug in de bovenbaken klik deze vast. Monteerdesgewenst de meegeleverdehandgreepjes in de sleuf vande treklijst.66. Als de trekstijl niet haaksstaat, ontstaat er aan desluitzijde een opening aande onder- of bovenkant.Dit is te verhelpen door dezwarte strip met borstelaan de voorzijde van de<strong>hor</strong>deur te verwijderen.Daarna kunt u het kruiskopschroefje (witblokje) los draaien, de trekstijl haaks zettenen het schroefje weer aandraaien. Vervolgensplaatst u de borstelstrip terug.Los verkrijgbare onderdelen:• aluminium profi el voormontage 'op het kozijn'• klem voor montagebovenbak 'op het kozijn'• sluitstijl• schuine onderdorpelV-0801
Assembly instructions insect screening door pleated <strong>1000</strong>Contents:12Before you start:The insect screening door has to bemounted in-frame. Make sure that youapply the threshold strip completely<strong>hor</strong>izontal.1. Cut the top rail and threshold strip to size: width-/- 5 mm. When you do not apply the closing clips(end caps) to the top rail (see fi g. 2), please donot deduct 5 mm.2. Apply the closing clips (endcaps) to the top rail (optional).3453. Install the top rail and threshold strip. Applythe mounting clips into the open side (mountingside) of the insect screening cassette.64. Determine the mounting side (leftor right). Remove the protective layerfrom the mounting clips. Put the insectscreening cassette into the top rail (payattention to the label 'upside') and installit perpendicular to the fl oor. Slide themounting side against the doorframe todetermine the position of the mountingclips and press tightly.5. Pull the insect screeningcassette carefully away, leavingthe mounting clips to thedoorframe. Fix the mountingclips to the doorframe. Slide themounting side of the cassetteback into the clips and pressfi rmly. If desired, fi x de doorhandles into the groove of thehandle profi le.6. When the handle profi le(cassette) is not installedperpendicular tot the fl oor,there will be an opening atthe upper or lower closingside. To solve this, removethe black strip (with brush)at the front side. Loosenthe screw, adjust the handle profi le verticallyand retighten the screw. Press the black brushstrip back into place.Optional parts available:• aluminium profi le for onframemounting• steel clip for mounting toprail on-frame• closing profi le• slanting bottom railV-0801