Manuel technique (pdf, 4.16 MB) - Niko
Manuel technique (pdf, 4.16 MB) - Niko
Manuel technique (pdf, 4.16 MB) - Niko

You also want an ePaper? Increase the reach of your titles
YUMPU automatically turns print PDFs into web optimized ePapers that Google loves.
230V~<br />
2,2A µ<br />
50Hz<br />
1XX-7804X<br />
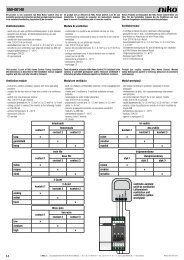
Read the complete user manual before carrying out the installation and activating the system.<br />
1. DESCRIPTION<br />
This electronic flush-mounting motion detector is part of the <strong>Niko</strong> product range of sensors and actuators.<br />
This range offers a number of comfort functions in combination with various switching functions.<br />
The motion detector switches on the load (lighting) if movement of a heat source is detected and if the daylight<br />
level is lower than the preset lux value. The device detects movement with the aid of Passive Infrared<br />
technology (PIR).<br />
3. SETTINGS<br />
Under the hinged cover at the front of the flush-mounting motion detector, there are two potentiometers for<br />
setting the following parameters:<br />
➊ light sensitivity<br />
➋ switch-off delay<br />
➊<br />
2<br />
LUX<br />
5<br />
30<br />
➋<br />
The control of this switch occurs via a sensor and an actuator:<br />
• A sensor is the visible electronic component that – automatically or after manual control – sends a<br />
switching command to the connected actuator for being performed. This component is available in all<br />
<strong>Niko</strong> finishes and colours. The sensor is clicked onto the actuator.<br />
• An actuator is the switching component that performs the action requested by the connected sensor,<br />
such as switching the light. This component is located behind the sensor in the flush-mounting box.<br />
40 - 400W<br />
EXT1<br />
R<br />
The motion detector (sensor) is intended for indoor use only in an environment with non-condensing atmospheric<br />
humidity. This sensor is combined with a two-wire base (40 – 400 W, 230 V) (actuator) to which an external<br />
push button or switch (phase L, 230 Vac) can be connected. With this push button or switch, you can control<br />
the motion detector from various locations.<br />
The device (actuator + sensor) is supplied on a pre-assembled metal base (45 x 45) and is available with an<br />
actuator without claws (1XX-78040) or an actuator with claws (1XX-78041). The flush surround plate must be<br />
ordered separately.<br />
2. INSTALLATION<br />
2.1. Connection<br />
Danger: Disconnect all power before installing the flush-mounting motion detector. Do not connect the device<br />
to the mains voltage until installation has been completed (including the flush surround plate).<br />
A. One lighting circuit with one detection point<br />
Connect the flush-mounting motion detector and the load according to the following wiring diagram:<br />
L<br />
230 Vac<br />
N<br />
E1<br />
230V~<br />
2,2A µ<br />
50Hz<br />
L<br />
B. Use of an external push button or switch<br />
You connect an external push button or switch to the flush-mounting motion detector if you must also be<br />
able to control the device manually.<br />
Follow the wiring diagram below to connect the push button or switch:<br />
L<br />
L<br />
230 Vac<br />
N<br />
Potentiometer Range Action<br />
± 2 – 1000 lux Using a screwdriver, rotate the potentiometer to the:<br />
• left: dark, ± 2 lux ( )<br />
• right: daylight, ± 1000 lux ( )<br />
± 5 s – 30 min Using a screwdriver, rotate the potentiometer to the:<br />
• left: ± 5 s<br />
• right: ± 30 min<br />
4. OPERATION AND USE<br />
Usage warnings:<br />
• The function of the motion detector is not to make the installation voltage-free (by interruption).<br />
• Making the circuit voltage-free to change a defective bulb is only possible by switching off the upstream<br />
main switch or the automatic fuse.<br />
4.1. Maximum permitted load<br />
Check the table below to find out the maximum load for each type of lamp at an ambient temperature of 0 to<br />
40°C.<br />
Type of lighting Symbol Maximum load<br />
incandescent lamps, 230 V halogen<br />
lamps (resistive load)<br />
1.7 A – 400 W<br />
4.2. Activating the system<br />
The flush-mounting motion detector is ready for use 90 seconds after connecting to the mains voltage<br />
(warm-up time):<br />
• First, the red LED behind the sensor lens lights up for three seconds.<br />
• Five seconds later, the light switches on, regardless of whether the room is light or dark.<br />
• If no motion is detected in the time period between 80 and 90 seconds, the connected lighting is switched off.<br />
• If motion is detected in that time frame, the light continues to be illuminated during the preset switch-off delay.<br />
4.3. General<br />
The integrated sensor continuously measures the daylight level in the detection area (180°) and compares this<br />
level to the preset lux value. Thanks to the sensor, the light switches on automatically only if the detector detects<br />
motion within the detection range and if the daylight level falls below the preset lux value:<br />
N 230 Vac E1 L<br />
E1<br />
230V~<br />
2,2A µ<br />
50Hz<br />
L<br />
230V~<br />
2,2A µ<br />
50Hz<br />
• The lighting remains switched on as long as motion is detected.<br />
• After the last motion is detected, the lighting remains switched on for the duration of the preset<br />
switch-off delay. As soon as the switch-off delay has elapsed, the lighting switches off.<br />
• The lighting switches off automatically as soon the preset daylight level has been reached.<br />
C. Staircase function<br />
Follow the wiring diagram below to connect the staircase function:<br />
N<br />
230 Vac<br />
L<br />
E1<br />
L<br />
,<br />
O<br />
170-0300X<br />
170-0300X<br />
,<br />
O<br />
170-0160X<br />
,<br />
2.2. Mounting<br />
Tip: Do not install the flush-mounting motion detector in direct sunlight or in the vicinity of heat sources or air<br />
currents (ventilation or air conditioning). This can activate the motion detector unnecessarily.<br />
Tip: Mount the flush-mounting motion detector at the location where the light intensity (lux value) is best<br />
measured.<br />
Mount the flush-mounting motion detector in a flush-mounting box with a flush-mounting depth of minimum<br />
40 mm at a height between 0.8 and 1.2 m.<br />
After a power interruption, the lighting is switched on for the duration of the switch-off delay if at that<br />
moment the daylight is less intense than the preset lux value.<br />
4.4. Manual operation<br />
The flush-mounting motion detector has two modes. Besides the automatic or PIR mode (see section 4.3.), you<br />
can also switch the lighting on and off manually.<br />
Step Action Result<br />
1 Press the button on the top of<br />
the sensor briefly (< 5 s):<br />
- The lighting remains switched on for four hours.<br />
- During this time, the red LED behind the sensor lens is also<br />
illuminated.<br />
- After four hours, the sensor resumes its normal operation<br />
(automatic mode).<br />
- The red LED switches off.<br />
2 Press this button again. - The lighting is switched off.<br />
- The sensor detects no movement for a period of ten seconds.<br />
- After ten seconds, the sensor resumes its normal operation.<br />
To block the shift to the manual mode, connect the voltage (the same phase as the power supply voltage) to the<br />
external input terminal 1 (E1) of the actuator.<br />
nv <strong>Niko</strong> sa Industriepark West 40, BE-9100 Sint-Niklaas, Belgium — tel. +32 3 778 90 00 — fax +32 3 777 71 20 — e-mail: support@niko.be — www.niko.eu PM1XX7804X-00001R12331