Plasmacluster Ion Generating Unit for Replacement - Sharp
Plasmacluster Ion Generating Unit for Replacement - Sharp Plasmacluster Ion Generating Unit for Replacement - Sharp
PARTS NAME Louvers (Air outlet of Plasmacluster Ion) High density Plasmacluster Ion is discharged forward. (Do not put anything in front of the unit.) Plasmacluster Ion Generating Unit (Inside) Please open the cover only when replacing the Plasmacluster Ion Generating Unit. (See page E-9) Power cord Plug Filter (Air Intake) * Clean the fi lter periodically. * Do not block the air intake or do not put anything into the unit. ENGLISH CONTROL PANEL FILTER CLEAN Light (yellow) UNIT REPLACEMENT Light (red) HIGH MED LOW OPERATION Button UNIT RESET Button FILTER RESET Button AUTO RESTART Switch FIX THE OPERATION COVER BY SCREW If necessary, operation cover can be fi xed by accessary screw. Fan Speed Indicator (blue) Press this button for 3 seconds after replacing the Plasmacluster Ion Gennerating Unit. Don't press it for any other purposes. After cleaning the fi lter, plug the power cord and press the FILTER RESET button for 3 seconds. РУССКИЙ NEDERLANDS FRANÇAIS DEUTSCH washer rubber cover screw E-3
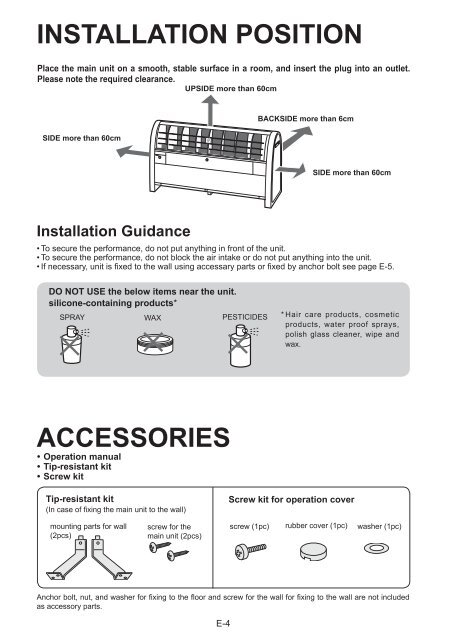
INSTALLATION POSITION Place the main unit on a smooth, stable surface in a room, and insert the plug into an outlet. Please note the required clearance. UPSIDE more than 60cm SIDE more than 60cm BACKSIDE more than 6cm SIDE more than 60cm Installation Guidance • To secure the performance, do not put anything in front of the unit. • To secure the performance, do not block the air intake or do not put anything into the unit. • If necessary, unit is fi xed to the wall using accessary parts or fi xed by anchor bolt see page E-5. DO NOT USE the below items near the unit. silicone-containing products* SPRAY WAX PESTICIDES * Hair care products, cosmetic products, water proof sprays, polish glass cleaner, wipe and wax. ACCESSORIES • Operation manual • Tip-resistant kit • Screw kit Tip-resistant kit (In case of fi xing the main unit to the wall) Screw kit for operation cover mounting parts for wall (2pcs) screw for the main unit (2pcs) screw (1pc) rubber cover (1pc) washer (1pc) Anchor bolt, nut, and washer for fi xing to the fl oor and screw for the wall for fi xing to the wall are not included as accessory parts. E-4
- Page 1 and 2: プラズマクラスターイオ
- Page 3: IMPORTANT SAFETY INSTRUCTIONS When
- Page 7 and 8: OPERATION * This operation manual i
- Page 9 and 10: PLASMACLUSTER ION GENERATING UNIT R
- Page 11 and 12: HOW TO REPLACE THE PLASMACLUSTER IO
- Page 13 and 14: TROUBLESHOOTING Before calling for
- Page 16 and 17: DEUTSCH INHALT WICHTIGE SICHERHEITS
- Page 18 and 19: TEILEBEZEICHNUNG Lüftungsgitter (L
- Page 20 and 21: AUFSTELLEN DES GERÄTES 1 Lösen Si
- Page 22 and 23: REINIGUNG UND PFLEGE WARNUNG: Wenn
- Page 24 and 25: SO TAUSCHEN SIE DIE PLASMACLUSTER-I
- Page 26 and 27: TECHNISCHE DATEN Modell Stromanschl
- Page 28: A. Entsorgungsinformationen für Be
- Page 31 and 32: INSTRUCTIONS IMPORTANTES RELATIVES
- Page 33 and 34: POSITION D’INSTALLATION Placez l
- Page 35 and 36: FONCTIONNEMENT * Ce manuel d’util
- Page 37 and 38: REMPLACEMENT DE L'UNITÉ GÉNÉRATR
- Page 39 and 40: COMMENT REMPLACER L’UNITÉ GÉNÉ
- Page 41 and 42: RÉSOLUTION DES PROBLÈMES Avant d
- Page 44 and 45: NEDERLAND INHOUD BELANGRIJKE VOORZO
- Page 46 and 47: BENAMING VAN DE ONDERDELEN Roosters
- Page 48 and 49: HOE DE UNIT INSTALLEREN 1 Schroef d
- Page 50 and 51: REINIGEN EN ONDERHOUD WAARSCHUWING:
- Page 52 and 53: HOE DE PLASMACLUSTER ION GENERATION
INSTALLATION POSITION<br />
Place the main unit on a smooth, stable surface in a room, and insert the plug into an outlet.<br />
Please note the required clearance.<br />
UPSIDE more than 60cm<br />
SIDE more than 60cm<br />
BACKSIDE more than 6cm<br />
SIDE more than 60cm<br />
Installation Guidance<br />
• To secure the per<strong>for</strong>mance, do not put anything in front of the unit.<br />
• To secure the per<strong>for</strong>mance, do not block the air intake or do not put anything into the unit.<br />
• If necessary, unit is fi xed to the wall using accessary parts or fi xed by anchor bolt see page E-5.<br />
DO NOT USE the below items near the unit.<br />
silicone-containing products*<br />
SPRAY WAX PESTICIDES * Hair care products, cosmetic<br />
products, water proof sprays,<br />
polish glass cleaner, wipe and<br />
wax.<br />
ACCESSORIES<br />
• Operation manual<br />
• Tip-resistant kit<br />
• Screw kit<br />
Tip-resistant kit<br />
(In case of fi xing the main unit to the wall)<br />
Screw kit <strong>for</strong> operation cover<br />
mounting parts <strong>for</strong> wall<br />
(2pcs)<br />
screw <strong>for</strong> the<br />
main unit (2pcs)<br />
screw (1pc) rubber cover (1pc) washer (1pc)<br />
Anchor bolt, nut, and washer <strong>for</strong> fi xing to the fl oor and screw <strong>for</strong> the wall <strong>for</strong> fi xing to the wall are not included<br />
as accessory parts.<br />
E-4


