BUNK BED JOY - File dans ta chambre
BUNK BED JOY - File dans ta chambre BUNK BED JOY - File dans ta chambre
First dreams First stepsQuax® www.quax.eu info@quax.eu 32 LOUISE 01 01 43XX BUNK BED JOY 54 01 18xx Kinderbed met verstelbare Stapelbed bodem KInderbett mit verstelbarer Etagenbett Boden Lit enfant avec Lit fond superposé réglable Babybed with adjustable Bunk bottom bed Step 9 - Placing the ladder continued : use the parts of step 8, the base (H), two hooks (10) and 8 wood screws (11) Place the base (H) in front of the provided openingson the ladder posts between the bottom step, the second one and on the lower bed side without bars. Place the hooks in the angles formed by the ladder posts and the base. Insert eight wood screws (11) through the drillings of the hooks and tighten. Step 10 - Placing the ladder continued : use the parts of step 9 and two wood screws (8) Insert two wood screws (8) through the openings at the base of the ladder (H) and tighten in the bed side.
BUNK BED JOY 54 01 18xx Stapelbed Etagenbett Lit superposé Bunk bed Step 11 - Installing the mattress supports : use the parts of step 10, all 32 bottom slats (I) and 64 wood screws (7) Slide the slats (I) on the provided profi les of the bed sides. Push the wood screws (7) through all provided openings of the mattress supports and tighten to the bed sides. Now tighten all connections of step 7 fi rmly. Step 12 - Finishing the bed : use the parts of step 11 and the remaining caps (9) Push a cap (9) in every opening with a visible woodscrew. See details A and B. First dreams Quax® First steps www.quax.eu info@quax.eu 33
- Page 1 and 2: BUNK BED JOY 54 01 18xx Stapelbed E
- Page 3 and 4: BUNK BED JOY 54 01 18xx 2. Veilighe
- Page 5 and 6: BUNK BED JOY 54 01 18xx 4. Het in e
- Page 7 and 8: BUNK BED JOY 54 01 18xx Stapelbed E
- Page 9 and 10: BUNK BED JOY 54 01 18xx Stapelbed E
- Page 11 and 12: BUNK BED JOY 54 01 18xx 2. Sécurit
- Page 13 and 14: BUNK BED JOY 54 01 18xx 4. Montage
- Page 15 and 16: BUNK BED JOY 54 01 18xx Stapelbed E
- Page 17 and 18: BUNK BED JOY 54 01 18xx Stapelbed E
- Page 19 and 20: BUNK BED JOY 54 01 18xx 2. Sicherhe
- Page 21 and 22: BUNK BED JOY 54 01 18xx 4. Der Zusa
- Page 23 and 24: BUNK BED JOY 54 01 18xx Stapelbed E
- Page 25 and 26: BUNK BED JOY 54 01 18xx Stapelbed E
- Page 27 and 28: BUNK BED JOY 54 01 18xx 2. Safety a
- Page 29 and 30: BUNK BED JOY 54 01 18xx 4. Assembli
- Page 31: BUNK BED JOY 54 01 18xx Stapelbed E
<strong>BUNK</strong> <strong>BED</strong> <strong>JOY</strong> 54 01 18xx<br />
S<strong>ta</strong>pelbed<br />
E<strong>ta</strong>genbett<br />
Lit superposé<br />
Bunk bed<br />
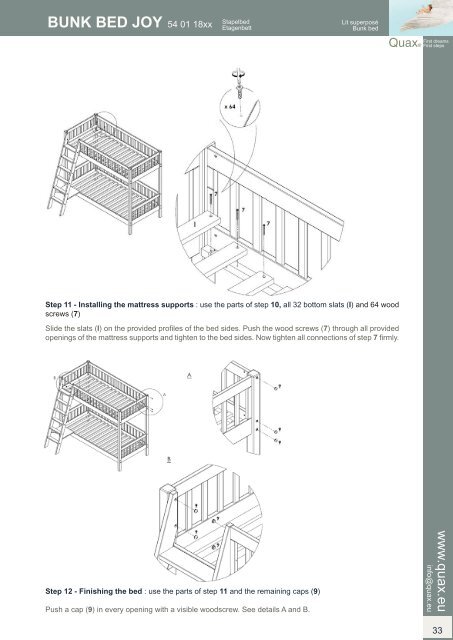
Step 11 - Ins<strong>ta</strong>lling the mattress supports : use the parts of step 10, all 32 bottom slats (I) and 64 wood<br />
screws (7)<br />
Slide the slats (I) on the provided profi les of the bed sides. Push the wood screws (7) through all provided<br />
openings of the mattress supports and tighten to the bed sides. Now tighten all connections of step 7 fi rmly.<br />
Step 12 - Finishing the bed : use the parts of step 11 and the remaining caps (9)<br />
Push a cap (9) in every opening with a visible woodscrew. See de<strong>ta</strong>ils A and B.<br />
First dreams Quax® First steps<br />
www.quax.eu<br />
info@quax.eu<br />
33


