20x-1280x - Lidl Service Website
20x-1280x - Lidl Service Website
20x-1280x - Lidl Service Website

Create successful ePaper yourself
Turn your PDF publications into a flip-book with our unique Google optimized e-Paper software.
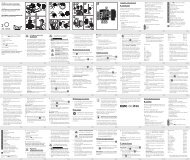
9. Setup MicrOcular<br />
Note<br />
The MicrOcular only works without the Barlow lens supplied.<br />
Magnification setting is changed by using the MicrOcular and<br />
must be reset by focussing anew.<br />
Remove the Barlow lens (illustration 6. 3) and eyepiece currently in use from<br />
the eyepiece holders (illustration 1. 5) and replace them with the MikrOkular<br />
(microscope eyepiece) (illustration 5. 4a) and reducer lens (illustration 5. 4b) as<br />
in illustration 5 in the holders (illustration 5.5)<br />
Please do not yet connect MikrOkular and PC. Please go through<br />
the items below in sequence.<br />
10. Installation and use of the software<br />
10.1 Installation of the image processing software Photomizer SE<br />
1 Insert the CD-ROM supplied in your CD or DVD drive. The installation<br />
menu opens automatically. If it doesn't, please switch to Windows<br />
Explorer and select your CD drive. Start the file “setup.exe“ by double-clicking<br />
it.<br />
2. A choice of languages is shown. Choose your preference.<br />
Confirm it by clicking "OK".<br />
At the "Welcome" screen, click "Next">“.<br />
4. In the next screen you will be asked for the "Destination Folder".<br />
Confirm your input with "Next>".<br />
5. The setup status screen shows. This advises current operation status<br />
with a progress bar. This may take a few minutes.<br />
6. The "Completed the Photomizer Setup Wizard" screen shows. Click<br />
here on "Finish".<br />
Note<br />
To use the MikrOkular long-term we recommend it always be<br />
connected to the same USB port.<br />
10.2 MikrOkular driver installation<br />
During Photomizer SE software installation the correct driver for your<br />
operating system will be installed automatically. No manual input is<br />
needed.<br />
In rare cases the device may not be recognised by your computer. As<br />
a rule you need then only install the driver manually from the CD. If this<br />
fails please refer to the troubleshooting chapter that follows.<br />
10.3 Troubleshooting: the device isn't recognised by the computer<br />
(USB)<br />
1. This occurs in rare cases whith some OEM Windows Vista or XP<br />
versions. The device is not defective. Updating the notebook or PC<br />
USB driver usually suffices.<br />
2. If not, proceed as below. (The maker cannot accept any liability<br />
whatsoever in these cases 1 ).<br />
Delete ghost devices. These are devices not actually currently connected<br />
to your computer. The reason for this is that Windows generates<br />
a system settings entry for each USB device ( e.g USB Stick) on<br />
each port. It then seeks that/those device/s each time it's started. This<br />
slows down USB device recognition and Windows booting and causes<br />
non-recognition of USB ports.<br />
Cleaning up the system environment and deleting devices that are no<br />
longer in use helps here. To do so right click WORKPLACE (COMPU-<br />
TER in Vista) and open the PROPERTIES menu. Then click the<br />
ADVANCED tab (ADVANCED SYSTEM SETTINGS in Vista) and then<br />
ENVIRONMENT VARIABLES. Choose the NEW option in ENVIRON-<br />
MENT VARIABLES. Enter the following under VARIABLE NAME.<br />
devmgr_show_nonpresent_devices<br />
Under VARIABLE VALUE enter "1".<br />
Confirm your input with OK and then reboot the computer.<br />
Change to the device manager. In the VIEW menu activate the SHOW<br />
DEVICES OPTION. The ghost devices previously not shown will now<br />
be displayed in light grey. Check the various categories including<br />
USB, memory size, etc. Only delete entries for devices you no longer<br />
use. 1<br />
1 Source: Microsoft Knowledge Base<br />
http://support.microsoft.com/kb/315539/en<br />
System requirements: Intel X86 processor with at least 2.0 GHz speed,<br />
200 MB hard disc space, 512 MB RAM memory, Windows XP, Vista<br />
(32-bit) or Windows 7 and a free USB port (not via a hub if possible).<br />
- 6 -<br />
11 Using the MicrOcular<br />
11.1 Preparation<br />
1. Slide a specimen under your microscope and focus on it.<br />
2. Remove the eyepiece and Barlow lens from the eyepiece support<br />
and the dust cap from your MikrOkular and install same in the eyepiece<br />
supports instead of the Barlow lens.<br />
3. Start your PC if you haven't yet and connect your MikrOkular to the<br />
USB port of your computer.<br />
11.2 Showing and saving MikrOkular images on your PC.<br />
1. Start the Photomizer SE Software.<br />
2. Click "Open camera"<br />
3. If you have more than one device connected up select the one you<br />
want from the choice offered. Click "SoC PC-Camera" or<br />
"MikrOkular". Omit this step if you only have a single device connected<br />
up.<br />
4. The camera image should now be visible on your screen. Focus the<br />
microscope image.<br />
5. Click "Capture" to record an image. It will then be shown on the<br />
right.<br />
6. Click on it to select it and then click "Transfer image".<br />
7. This takes you to the Photomizer SE software.<br />
8. File - Save as<br />
Tip<br />
Enlargement can be doubled by omitting the reducer lens (illustration<br />
5.4b). Pull the MikrOkular (Ill. 5.4a) out of the reducer<br />
lens (ill. 5.4b) and remove it to do so. Then reinsert the<br />
MikrOkular in the eyepiece holders. You may need to re-focus<br />
using the focussing device (ill. 1.9).<br />
11.3 The Photomizer SE software<br />
If you need help in the "Photomizer SE" programme click "?" and then<br />
"Open help". If you need further assistance please visit the maker's<br />
home page at www.photomizer.net