Bedienungsanleitung Seite 3 Instrucciones de uso Página 29 Mode ...
Bedienungsanleitung Seite 3 Instrucciones de uso Página 29 Mode ...
Bedienungsanleitung Seite 3 Instrucciones de uso Página 29 Mode ...

You also want an ePaper? Increase the reach of your titles
YUMPU automatically turns print PDFs into web optimized ePapers that Google loves.
<strong>Bedienungsanleitung</strong> <strong>Seite</strong> 3<br />
<strong>Instrucciones</strong> <strong>de</strong> <strong>uso</strong> <strong>Página</strong> <strong>29</strong><br />
Mo<strong>de</strong> d’emploi Page 55<br />
Instruction Manual Page 81<br />
Istruzioni per l’<strong>uso</strong> Pagina 107<br />
Kullanım Kılavuzu Sayfa 133
Deutsch<br />
<strong>Bedienungsanleitung</strong><br />
WALTHER PPQ<br />
3
HINWEIS<br />
Diese <strong>Bedienungsanleitung</strong> beschreibt die Bedienung <strong>de</strong>r Pistole für zivile Anwen<strong>de</strong>r.<br />
Die Vorgaben für <strong>de</strong>n behördlichen Einsatz <strong>de</strong>r Pistole können von <strong>de</strong>n Angaben in<br />
dieser <strong>Bedienungsanleitung</strong> abweichen.<br />
In dieser <strong>Bedienungsanleitung</strong> wird von einer Lage <strong>de</strong>r Pistole ausgegangen, die <strong>de</strong>m<br />
normalen Anschlag entspricht; d.h. mit horizontalem Lauf und mit nach unten weisen<strong>de</strong>m<br />
Griff, wobei die Mündung nach vorne zeigt. Angaben, wie „oben“, „unten“,<br />
„rechts“, „links“ sowie „vorn“ und „hinten“ beziehen sich auf die Sicht eines die<br />
Pistole im Anschlag halten<strong>de</strong>n Schützen.<br />
Die Erklärungen beziehen sich auf die Bedienung durch Rechtshän<strong>de</strong>r. Linkshän<strong>de</strong>r<br />
verfahren bitte in <strong>de</strong>r für sie entsprechen<strong>de</strong>n Weise.<br />
4
INHALTSVERZEICHNIS<br />
1. Sicherheitshinweise 6<br />
2. Produktbeschreibung 7<br />
2.1. Funktionsablauf 7<br />
2.2. Lieferumfang 8<br />
2.3. Munition 8<br />
2.4. Bedien- und Funktionselemente 9<br />
3. Bedienung 12<br />
3.1. Überprüfung <strong>de</strong>r Pistole 12<br />
3.2. La<strong>de</strong>n 13<br />
3.3. Schießen 14<br />
3.4. Magazinwechsel 15<br />
3.5. Entla<strong>de</strong>n 15<br />
3.6. Verhalten bei Versagern 16<br />
4. Demontage, Reinigen, Ölen und Pflege 17<br />
4.1. Hauptgruppen 17<br />
4.2. Schlagbolzeneinheit 18<br />
4.3. Auszieher 19<br />
4.4. Magazin 20<br />
4.5. Reinigen 21<br />
4.6. Ölen 21<br />
4.7. Vorbereitung zur Lagerung 22<br />
5. Anpassung <strong>de</strong>r Pistole an <strong>de</strong>n Bediener 24<br />
5.1. Griff 24<br />
5.2. Riemenöse 24<br />
5.3. Visierung 24<br />
6. Explosionsdarstellung 26<br />
7. Teileliste 27<br />
8. Technische Daten 28<br />
5
1. Sicherheitshinweise<br />
• Lesen Sie diese <strong>Bedienungsanleitung</strong> vor Benutzung <strong>de</strong>r Pistole gründlich durch. Benutzen<br />
Sie die Pistole erst dann, wenn Sie die Anleitung verstan<strong>de</strong>n haben.<br />
Je<strong>de</strong> Beschreibung von Pistolenteilen und alle Tätigkeiten sind im Allgemeinen nur einmal in<br />
dieser <strong>Bedienungsanleitung</strong> aufgeführt. Je nach Umfang wird <strong>de</strong>shalb ggf. auf bereits vorhan<strong>de</strong>ne<br />
Beschreibungen in an<strong>de</strong>ren Kapiteln hingewiesen.<br />
• Zur Durchführung <strong>de</strong>r Sicherheitsüberprüfung und vor <strong>de</strong>r Benutzung, bei Störungen und vor<br />
<strong>de</strong>m Reinigen ist zu prüfen, ob die Pistole entla<strong>de</strong>n (Magazin aus <strong>de</strong>r Pistole und Patronenlager<br />
frei), <strong>de</strong>r Lauf frei von Fremdkörpern und das Magazin leer ist.<br />
• Bewahren Sie die Pistole und Munition getrennt voneinan<strong>de</strong>r auf. Unbefugte (insbeson<strong>de</strong>re<br />
Kin<strong>de</strong>r) dürfen keinen Zugriff darauf erhalten.<br />
• Gehen Sie auch mit <strong>de</strong>r ungela<strong>de</strong>nen Pistole so um, als ob sie gela<strong>de</strong>n wäre. Halten Sie die<br />
Pistole immer so, dass Sie sich und An<strong>de</strong>re nicht gefähr<strong>de</strong>n. Richten Sie die Pistole immer in<br />
eine sichere Richtung. Richten Sie die Pistole niemals auf Personen o<strong>de</strong>r Ziele, die Sie nicht<br />
treffen möchten, unabhängig davon, ob die Pistole gela<strong>de</strong>n ist o<strong>de</strong>r nicht. Gehen Sie davon<br />
aus, dass auch die sicherste Pistole durch unsachgemäßen Umgang für Sie und An<strong>de</strong>re<br />
gefährlich wer<strong>de</strong>n kann.<br />
• Beachten Sie: Keinen Finger am Abzug, außer zur gewollten Schussabgabe.<br />
Der Abzugsfinger ist grundsätzlich außen am Abzugsbügel anzulegen. Der Abzug darf nur<br />
betätigt wer<strong>de</strong>n, wenn die Pistole auf das Ziel gerichtet ist.<br />
• Wen<strong>de</strong>n Sie bei <strong>de</strong>r Bedienung, <strong>de</strong>r Überprüfung, beim Zerlegen, Reinigen und beim Zusammenbau<br />
nie Gewalt an. Unsachgemäße Handhabung kann die Funktion und die Sicherheit <strong>de</strong>r Pistole<br />
beeinträchtigen. Zerlegen Sie die Pistole nur so weit, wie in dieser Anleitung beschrieben.<br />
• Sicherheit und Funktion sind nur gewährleistet, solange sich Pistole und Munition in technisch<br />
einwandfreiem Zustand befin<strong>de</strong>n.<br />
• Beachten Sie, dass die Pistole nach Einwirkung von außen, z.B. Korrosion, Herunterfallen,<br />
usw., durch eine qualifizierte Fachkraft überprüft wer<strong>de</strong>n muss.<br />
• Tragen Sie beim Schießen immer Gehörschutz und Schutzbrille. Machen Sie Personen, die<br />
sich in Ihrer Nähe aufhalten, auf das Tragen von Gehörschutz und Schutzbrille aufmerksam.<br />
• Ihre Schusswaffe ist für Munition eines speziellen Kalibers ausgelegt. Die richtige Bezeichnung<br />
<strong>de</strong>r zu Ihrer Pistole passen<strong>de</strong>n Munition ist auf <strong>de</strong>r Waffe angegeben. Gebrauchen Sie<br />
nur Munition, die <strong>de</strong>n Vorgaben <strong>de</strong>r Commission Internationale Permanente pour l’Epreuve<br />
<strong>de</strong>s Armes à Feu portatives (C.I.P.) o<strong>de</strong>r <strong>de</strong>s Sporting Arms and Ammunition Manufacturers<br />
Institute (SAAMI) und <strong>de</strong>m Kaliber <strong>de</strong>r Schusswaffe entspricht. Beson<strong>de</strong>rs bei Verwendung<br />
6<br />
1. Sicherheitshinweise
2. Produktbeschreibung<br />
von wie<strong>de</strong>rgela<strong>de</strong>ner Munition ist darauf zu achten, dass <strong>de</strong>r nach Norm zulässige Gasdruck<br />
nicht überschritten wird. Überhöhter Druck kann eine Schusswaffe beschädigen o<strong>de</strong>r sie<br />
sogar sprengen. Munition, <strong>de</strong>ren Geschossgeschwindigkeit und Gasdruck höher sind als die<br />
Werte, für welche die Schusswaffe ausgelegt ist, setzt die Schusswaffe zusätzlicher Belastung<br />
aus, verursacht übermäßigen Verschleiß und kann zu schwerwiegen<strong>de</strong>n Beschädigungen<br />
an <strong>de</strong>r Schusswaffe führen.<br />
• Wischen Sie vor <strong>de</strong>m La<strong>de</strong>n immer jegliches überschüssiges Fett und Öl ab, und stellen Sie<br />
sicher, dass <strong>de</strong>r Lauf sauber und frei von Fremdkörpern ist.<br />
• Ersetzen, bearbeiten, verän<strong>de</strong>rn o<strong>de</strong>r verstellen Sie kein Teil an Ihrer Pistole über <strong>de</strong>n in<br />
dieser Anleitung beschriebenen Umfang hinaus. Instandsetzungs- und Servicearbeiten sind<br />
durch WALTHER o<strong>de</strong>r eine qualifizierte Werkstatt auszuführen.<br />
• Unsachgemäße Verän<strong>de</strong>rungen können die Sicherheit und Zuverlässigkeit <strong>de</strong>r Pistole beeinträchtigen<br />
und zu Verletzungen o<strong>de</strong>r zum To<strong>de</strong> führen.<br />
HAFTUNGSAUSSCHLUSS<br />
Beim Umgang mit Waffen ist stets beson<strong>de</strong>re Vorsicht geboten. Es besteht stets die Gefahr,<br />
gegebenenfalls auch unbeabsichtigt, Leib und Leben von Personen o<strong>de</strong>r Sachwerte zu beschädigen.<br />
WALTHER schließt jegliche Haftung für Schä<strong>de</strong>n aus, die auf eine unsachgemäße o<strong>de</strong>r<br />
gegen gelten<strong>de</strong> gesetzliche Vorschriften verstoßen<strong>de</strong> Verwendung <strong>de</strong>r Pistole zurückzuführen<br />
sind. Dasselbe gilt für Schä<strong>de</strong>n, die aus <strong>de</strong>r Nichtbeachtung dieser <strong>Bedienungsanleitung</strong>, unbefugten<br />
Austausch von Einzelteilen o<strong>de</strong>r sonstigen Eingriffen an <strong>de</strong>r Pistole resultieren, die<br />
durch diese <strong>Bedienungsanleitung</strong> nicht ausdrücklich vorgesehen sind.<br />
2. Produktbeschreibung<br />
2.1. Funktionsablauf<br />
Das Verschlusssystem <strong>de</strong>r PPQ nutzt das Prinzip <strong>de</strong>s verriegelten Rückstoßla<strong>de</strong>rs. Beim Zurückziehen<br />
<strong>de</strong>s Abzugs wird das Schlagbolzenschloss ausgelöst. Der Schlagbolzen schlägt auf<br />
das Zündhütchen <strong>de</strong>r Patrone und zün<strong>de</strong>t die Treibladung. Das Geschoss wird durch <strong>de</strong>n entstehen<strong>de</strong>n<br />
Gasdruck aus <strong>de</strong>m Lauf getrieben. Gleichzeitig überträgt sich ein Impuls auf die mit<br />
<strong>de</strong>m Lauf formschlüssig verriegelte Verschlussgruppe. Nach einem kurzen gemeinsamen<br />
Rücklauf von Lauf und Verschluss wird <strong>de</strong>r Lauf nach unten gesteuert und die Verriegelung<br />
gelöst. Der Lauf bleibt stehen, während <strong>de</strong>r Verschluss gegen die Kraft <strong>de</strong>r Schließfe<strong>de</strong>r bis<br />
zum Anschlag zurückgleitet und die Hülse nach rechts auswirft. Angetrieben durch die Schließfe<strong>de</strong>r<br />
führt <strong>de</strong>r Verschluss während <strong>de</strong>s dann folgen<strong>de</strong>n Vorlaufs die oberste Patrone aus <strong>de</strong>m<br />
Magazin in das Patronenlager zu. Kurz vor En<strong>de</strong> <strong>de</strong>s Verschlussvorlaufs wird <strong>de</strong>r abgekippte<br />
Lauf nach oben vorne gedrückt und im Auswurffenster <strong>de</strong>s Verschlusses verriegelt. Der Schütze<br />
nimmt <strong>de</strong>n Finger vom Abzug und die Pistole ist für <strong>de</strong>n nächsten Schuss bereit.<br />
7
2.2. Lieferumfang<br />
• Pistole in Kunststoffbox • Reservemagazin<br />
• Anschussbild • <strong>Bedienungsanleitung</strong><br />
• Griffrücken in <strong>de</strong>n Größen Small (S) und Large (L) • La<strong>de</strong>hilfe<br />
2.3. Munition<br />
Verwen<strong>de</strong>n Sie nur die für Ihre Pistole passen<strong>de</strong> Munition. Falsche Munition kann zu<br />
Funktionsstörungen, Zündversagern o<strong>de</strong>r durch zu hohen Gasdruck zur Beschädigung<br />
o<strong>de</strong>r Zerstörung Ihrer Pistole führen.<br />
Auf <strong>de</strong>r rechten <strong>Seite</strong> <strong>de</strong>s Laufs ist die Bezeichnung<br />
<strong>de</strong>r zu Ihrer PPQ passen<strong>de</strong>n Munition angegeben<br />
(siehe 2.3. Abbildung 1).<br />
Verwen<strong>de</strong>n Sie nur Patronen, die dieser Munitionsbezeichnung<br />
entsprechen und <strong>de</strong>ren Gasdruck<br />
<strong>de</strong>n Vorgaben von C.I.P. o<strong>de</strong>r SAAMI entspricht,<br />
o<strong>de</strong>r nach „Technische Richtlinie<br />
Patrone 9mm x 19 schadstoffreduziert“ für die<br />
Verwendung in Polizeiwaffen freigegeben ist.<br />
2.3. Abbildung 1<br />
Kontrollieren Sie die Munition vor Gebrauch.<br />
Verwen<strong>de</strong>n Sie nur einwandfreie Munition. Pistole und Munition bil<strong>de</strong>n ein System und müssen<br />
zueinan<strong>de</strong>r passen. Ihre Zuverlässigkeit hängt gegenseitig voneinan<strong>de</strong>r ab. Unterschiedliche<br />
Kombinationen aus Waffengewicht, Geschossgewicht und Geschossgeschwindigkeit wirken<br />
sich auf <strong>de</strong>n gefühlten Rückstoß aus. Ein zu starker Rückstoß <strong>de</strong>r Pistole kann sich für manche<br />
Schützen unangenehm anfühlen.<br />
Beispiele:<br />
• Waffengewicht: Bei geringerem Waffengewicht wird <strong>de</strong>r Rückstoß als »kräftiger« empfun<strong>de</strong>n.<br />
• Geschossgewicht: Je schwerer das Geschoss, <strong>de</strong>sto stärker <strong>de</strong>r Rückstoß.<br />
• Geschossgeschwindigkeit: Höhere Geschossgeschwindigkeit verstärkt <strong>de</strong>n Rückstoß.<br />
Um sich an einen stärkeren Rückstoß zu gewöhnen,<br />
können Sie folgen<strong>de</strong>rmaßen vorgehen:<br />
• Halten Sie die Pistole beim Schießen im beidhändigen Anschlag.<br />
• Beginnen Sie mit <strong>de</strong>r für Ihre Pistole passen<strong>de</strong>n Munition, mit geringem Geschossgewicht<br />
und niedriger Geschossgeschwindigkeit.<br />
• Lassen Sie sich von Ihrem Fachhändler bezüglich schwächerer Munition, geringer Geschossgeschwindigkeit<br />
und leichtem Geschossgewicht für Ihre Pistole beraten.<br />
• Passen Sie die Größe <strong>de</strong>s Griffs Ihrer Pistole an Ihre Erfor<strong>de</strong>rnisse an.<br />
8<br />
2. Produktbeschreibung
2. Produktbeschreibung<br />
2.4. Bedien- und Funktionselemente<br />
1<br />
17<br />
2<br />
16<br />
15<br />
1 Verschluss<br />
2 Korn<br />
3 Laufhalter<br />
4 Lauf<br />
5 Fanghebelraste<br />
6 Spannrillen<br />
7 Fanghebel<br />
8 Visier<br />
9 Griffrücken<br />
10 Fangriemenöse<br />
1 Schließfe<strong>de</strong>rstange<br />
2 Mündung<br />
3 Mo<strong>de</strong>llbezeichnung<br />
5<br />
4<br />
3<br />
4<br />
14<br />
13<br />
11 Magazin<br />
12 Griff<br />
13 Magazinhalter<br />
14 Abzug<br />
15 Abzugsbügel<br />
16 Griffstück<br />
17 Zubehörschiene<br />
6<br />
2<br />
1<br />
9<br />
7<br />
5 6<br />
12<br />
11<br />
3<br />
7<br />
4 Seriennummer<br />
5 Verschlusskappe<br />
6 Auswurffenster<br />
7 Auszieher<br />
(Gela<strong>de</strong>nanzeige)<br />
9<br />
8<br />
10
2.4.1. Gela<strong>de</strong>nanzeige<br />
Der Auszieher dient als La<strong>de</strong>zustandsanzeige. Eine Farbmarkierung<br />
ist sichtbar, wenn sich eine Patrone o<strong>de</strong>r Patronenhülse<br />
im Patronenlager befin<strong>de</strong>t (2.4.1. Abb. 1).<br />
ACHTUNG:<br />
Verlassen Sie sich bei <strong>de</strong>r Sicherheitskontrolle nicht ausschließlich auf die Gela<strong>de</strong>nanzeige.<br />
Die zuverlässigste Metho<strong>de</strong> zur Sicherheitskontrolle ist <strong>de</strong>r Blick in das Patronenlager.<br />
Dazu nehmen Sie das Magazin aus <strong>de</strong>r Pistole, ziehen <strong>de</strong>n Verschluss bis<br />
zum Anschlag zurück, arretieren ihn mit <strong>de</strong>m Verschlussfanghebel und blicken in das<br />
Patronenlager.<br />
ACHTUNG:<br />
Gehen Sie mit je<strong>de</strong>r Waffe so um, als ob sie gela<strong>de</strong>n wäre. Eine Gela<strong>de</strong>nanzeige kann<br />
zwar einen Hinweis darauf geben, ob sich eine Patrone im Patronenlager befin<strong>de</strong>t<br />
o<strong>de</strong>r nicht, jedoch können Faktoren wie Lichtverhältnisse, Verschmutzung <strong>de</strong>r Pistole<br />
o<strong>de</strong>r an<strong>de</strong>re Einflüsse das zuverlässige Erkennen einer Patrone erschweren.<br />
2.4.2. Magazinhalter<br />
Der Magazinhalter befin<strong>de</strong>t sich seitlich am Abzugsbügel,<br />
in <strong>de</strong>ssen Kontur integriert.<br />
Bedienung:<br />
Die Finger befin<strong>de</strong>n sich außerhalb <strong>de</strong>s Abzugsbügels<br />
und berühren <strong>de</strong>n Abzug nicht. Drücken Sie<br />
<strong>de</strong>n Magazinhalter nach unten und entfernen Sie<br />
das Magazin (2.4.2. Abb. 1). I<strong>de</strong>alerweise benutzen<br />
Sie dazu <strong>de</strong>n Schießfinger.<br />
2.4.3. Fanghebel<br />
Verschluss in geöffneter Stellung arretieren:<br />
Die Finger befin<strong>de</strong>n sich außerhalb <strong>de</strong>s Abzugsbügels<br />
und berühren <strong>de</strong>n Abzug nicht. Entfernen Sie<br />
das Magazin, dann greifen Sie <strong>de</strong>n Verschluss von<br />
hinten an <strong>de</strong>n Spannrillen und ziehen ihn kräftig bis<br />
zum Anschlag zurück. Falls sich eine Patrone im<br />
Patronenlager befin<strong>de</strong>t, wird diese dabei aus <strong>de</strong>m<br />
Patronenlager ausgezogen und ausgeworfen.<br />
Während Sie <strong>de</strong>n Verschluss in <strong>de</strong>r hintersten Stellung<br />
halten, schieben Sie <strong>de</strong>n Fanghebel nach oben<br />
und lassen <strong>de</strong>n Verschluss langsam vor, bis er vom<br />
Fanghebel gehalten wird (2.4.3. Abb. 1).<br />
10<br />
2. Produktbeschreibung<br />
2.4.1. Abbildung 1<br />
2.4.2. Abbildung 1<br />
2.4.3. Abbildung 1
2. Produktbeschreibung<br />
Fanghebel auslösen:<br />
Drücken Sie <strong>de</strong>n Fanghebel mit <strong>de</strong>m Daumen <strong>de</strong>r Schießhand nach unten, bis <strong>de</strong>r Verschluss<br />
nach vorne schnellt. Zur Erleichterung bei <strong>de</strong>r Bedienung <strong>de</strong>s Fanghebels mit <strong>de</strong>m Daumen<br />
kann <strong>de</strong>r Verschluss zurückgezogen wer<strong>de</strong>n, während gleichzeitig <strong>de</strong>r Fanghebel wie oben<br />
beschrieben betätigt wird.<br />
11
3. Bedienung<br />
3.1. Überprüfung <strong>de</strong>r Pistole<br />
• Vor <strong>de</strong>r Überprüfung Ihrer PPQ kontrollieren Sie,<br />
ob die Pistole entla<strong>de</strong>n ist: Zeigen Sie mit <strong>de</strong>r<br />
Mündung in eine sichere Richtung. Die Finger<br />
befin<strong>de</strong>n sich außerhalb <strong>de</strong>s Abzugsbügels und<br />
berühren <strong>de</strong>n Abzug nicht. Drücken Sie <strong>de</strong>n Magazinhalter<br />
nach unten und entfernen Sie das<br />
Magazin (3.1. Abb. 1).<br />
• Greifen Sie <strong>de</strong>n Verschluss von hinten an <strong>de</strong>n<br />
Spannrillen (3.1. Abb. 2) und ziehen Sie ihn kräftig<br />
bis zum Anschlag zurück. Falls sich eine Patrone<br />
im Patronenlager befin<strong>de</strong>t, wird diese dabei<br />
aus <strong>de</strong>m Patronenlager ausgezogen und ausgeworfen.<br />
Ver<strong>de</strong>cken Sie nicht das Auswurffenster,<br />
da die Patrone sonst nicht korrekt ausgeworfen<br />
wird.<br />
• Arretieren Sie <strong>de</strong>n Verschluss in <strong>de</strong>r geöffneten<br />
Stellung: Während Sie <strong>de</strong>n Verschluss in <strong>de</strong>r hintersten<br />
Stellung halten, schieben Sie <strong>de</strong>n Fanghebel<br />
nach oben und lassen <strong>de</strong>n Verschluss langsam<br />
vor, bis er vom Fanghebel gehalten wird<br />
(3.1. Abb. 3).<br />
• Stellen Sie sicher, dass Patronenlager (3.1. Abb.<br />
4) und Lauf frei, trocken und sauber sind. Führen<br />
Sie diese Überprüfung stets durch, bevor Sie Ihre<br />
PPQ aus <strong>de</strong>r Hand legen, reinigen, an eine an<strong>de</strong>re<br />
Person übergeben, transportieren o<strong>de</strong>r lagern.<br />
ACHTUNG:<br />
Verlassen Sie sich nicht ausschließlich auf die Technik. Tragen Sie durch umsichtigen<br />
Umgang mit Waffen zu Ihrer eigenen Sicherheit bei. Der sicherheitsbewusste Umgang<br />
mit Waffen liegt in Ihrer Verantwortung.<br />
12<br />
3.1. Abbildung 1<br />
3.1. Abbildung 2<br />
3.1. Abbildung 3<br />
3.1. Abbildung 4<br />
3. Bedienung
3. Bedienung<br />
3.2. La<strong>de</strong>n<br />
3.2.1. Magazin<br />
Anhand <strong>de</strong>r Öffnungen im Magazingehäuse kann <strong>de</strong>r La<strong>de</strong>stand <strong>de</strong>s Magazins<br />
erkannt wer<strong>de</strong>n (3.2.1. Abb. 1).<br />
HINWEIS:<br />
Verwen<strong>de</strong>n Sie ausschließlich die für Ihre Pistole vorgesehenen<br />
Magazine. An<strong>de</strong>re Magazine können zu Funktionsstörungen<br />
o<strong>de</strong>r Beschädigung von Pistole und Magazin führen.<br />
3.2.2. Magazin füllen<br />
ACHTUNG:<br />
Versuchen Sie nicht, mehr Patronen zu la<strong>de</strong>n, als auf <strong>de</strong>m Magazin angegeben. Dies<br />
könnte sonst zu Zuführstörungen führen. Wen<strong>de</strong>n Sie keine Gewalt an, da dies eine<br />
Beschädigung <strong>de</strong>s Magazins zur Folge haben könnte. Beschädigte o<strong>de</strong>r verformte<br />
Magazine und Magazinlippen verursachen Funktionsstörungen und damit <strong>de</strong>n Ausfall<br />
<strong>de</strong>r Pistole.<br />
La<strong>de</strong>n Sie das Magazin, in<strong>de</strong>m Sie <strong>de</strong>n vor<strong>de</strong>ren Teil <strong>de</strong>s Zubringers mit <strong>de</strong>m Patronenbo<strong>de</strong>n<br />
nach unten drücken und die Patrone unter die Magazinlippen schieben, bis <strong>de</strong>r Patronenbo<strong>de</strong>n<br />
die hintere Magazinwand berührt. Wie<strong>de</strong>rholen Sie diesen Vorgang, in<strong>de</strong>m Sie mit <strong>de</strong>m Bo<strong>de</strong>n<br />
<strong>de</strong>r jeweils nächsten Patrone und <strong>de</strong>m Daumen <strong>de</strong>r zweiten Hand die oberste Patrone im Magazin<br />
nach unten drücken und die neue Patrone dann unter die Magazinlippen schieben (3.2.2. Abb. 1).<br />
Zur Erleichterung kann die WALTHER-La<strong>de</strong>hilfe eingesetzt<br />
wer<strong>de</strong>n: Schieben Sie die La<strong>de</strong>hilfe von oben auf das<br />
Magazin (3.2.2. Abb. 2), drücken Sie die La<strong>de</strong>hilfe nach unten<br />
und führen Sie mit <strong>de</strong>r zweiten Hand eine Patrone unter die<br />
Magazinlippen (3.2.2. Abb. 3). Heben Sie die La<strong>de</strong>hilfe leicht<br />
an und schieben Sie die Patrone vollständig unter die Magazinlippen<br />
(3.2.2. Abb. 4).<br />
13<br />
3.2.1. Abbildung 1<br />
3.2.2. Abbildung 1<br />
3.2.2. Abbildung 2 3.2.2. Abbildung 3<br />
3.2.2. Abbildung 4
3.2.3. La<strong>de</strong>n <strong>de</strong>r Pistole<br />
• Überprüfen Sie die Pistole wie in Kapitel 3.1 beschrieben.<br />
• Halten Sie die PPQ mit <strong>de</strong>r Mündung in eine sichere Richtung gerichtet. Der Finger liegt außerhalb<br />
<strong>de</strong>s Abzugsbügels, berührt insbeson<strong>de</strong>re <strong>de</strong>n Abzug nicht. Führen Sie das Magazin<br />
in <strong>de</strong>n Magazinschacht ein, bis es einrastet. Vergewissern Sie sich, ob das Magazin eingerastet<br />
ist, in<strong>de</strong>m Sie das Magazin am Magazinbo<strong>de</strong>n nach unten ziehen. Das Magazin darf<br />
sich nicht lösen.<br />
• Ziehen Sie <strong>de</strong>n Verschluss zurück und lassen Sie ihn nach vorn schnellen.<br />
ACHTUNG:<br />
Führen Sie Patronen ausschließlich über das Magazin in das Patronenlager ein. Versuchen<br />
Sie nicht, eine Patrone einzeln durch das Auswurffenster in das Patronenlager<br />
einzuführen. Sie könnten sich o<strong>de</strong>r an<strong>de</strong>re dabei ernsthaft o<strong>de</strong>r gar tödlich verletzen.<br />
WARNUNG:<br />
Die Pistole ist nun schussbereit. Ihre Pistole und das Magazin sind gela<strong>de</strong>n und es<br />
wird ein Schuss ausgelöst, wenn <strong>de</strong>r Abzug betätigt wird. Richten Sie die Mündung<br />
<strong>de</strong>r Pistole unter allen Umstän<strong>de</strong>n in eine sichere Richtung und halten Sie Ihren Abzugsfinger<br />
und an<strong>de</strong>re Objekte vom Abzug entfernt und außerhalb <strong>de</strong>s Abzugsbügels.<br />
Geben Sie eine gela<strong>de</strong>ne Waffe nicht aus <strong>de</strong>r Hand.<br />
3.3. Schießen<br />
• Richten Sie die Mündung in eine sichere Richtung und halten Sie Ihren Abzugsfinger vom<br />
Abzug fern und außerhalb <strong>de</strong>s Abzugsbügels, bis Sie schießen möchten.<br />
• Nutzen Sie die günstige Form <strong>de</strong>s Griffs <strong>de</strong>r PPQ, in<strong>de</strong>m Sie ihn so hoch wie möglich greifen.<br />
Damit lässt sich die Pistole beim Schuss besser kontrollieren.<br />
• Während Sie <strong>de</strong>n Griff <strong>de</strong>r Pistole kräftig halten, gehen Sie mit Ihrem Finger frontal auf <strong>de</strong>n<br />
Abzug und ziehen ihn mit zunehmen<strong>de</strong>r Kraft durch, bis <strong>de</strong>r Schuss bricht.<br />
Während <strong>de</strong>r Schussabgabe fährt <strong>de</strong>r Verschluss nach hinten und wirft die Patronenhülse<br />
aus. Anschließend fährt <strong>de</strong>r Verschluss wie<strong>de</strong>r nach vorn und führt <strong>de</strong>m Patronenlager die<br />
nächste Patrone aus <strong>de</strong>m Magazin zu.<br />
• Nach <strong>de</strong>m Schuss nehmen Sie <strong>de</strong>n Finger vom Abzug und halten ihn außerhalb <strong>de</strong>s Abzugsbügels,<br />
bis Sie für <strong>de</strong>n nächsten Schuss bereit sind.<br />
Diesen Ablauf können Sie bis zum letzten Schuss wie<strong>de</strong>rholen.<br />
• Nach <strong>de</strong>m letzten Schuss betätigt <strong>de</strong>r Zubringer <strong>de</strong>s Magazins <strong>de</strong>n Fanghebel und <strong>de</strong>r Verschluss<br />
wird in offener Stellung gefangen.<br />
14<br />
3. Bedienung
3. Bedienung<br />
ACHTUNG:<br />
Tragen Sie beim Schießen Gehörschutz und Schutzbrille.<br />
Bei <strong>de</strong>r Schussabgabe o<strong>de</strong>r bei Betätigung <strong>de</strong>s Verschlussfanghebels bewegt sich<br />
<strong>de</strong>r Verschluss mit beträchtlicher Kraft und Geschwindigkeit in Längsrichtung. Halten<br />
Sie <strong>de</strong>shalb die Pistole so, dass sich kein Körperteil von Ihnen in <strong>de</strong>r Bewegungsbahn<br />
<strong>de</strong>s Verschlusses befin<strong>de</strong>t.<br />
3.4. Magazinwechsel<br />
Nach <strong>de</strong>m letzten Schuss betätigt <strong>de</strong>r Zubringer <strong>de</strong>s Magazins <strong>de</strong>n Fanghebel und <strong>de</strong>r Verschluss<br />
wird in geöffneter Stellung gefangen.<br />
• Betätigen Sie <strong>de</strong>n Magazinhalter und entfernen Sie das Magazin<br />
• La<strong>de</strong>n Sie ein neues Magazin<br />
• Ziehen Sie <strong>de</strong>n Verschluss zurück und lassen Sie ihn nach vorn schnellen<br />
WARNUNG:<br />
Die Pistole ist wie<strong>de</strong>r schussbereit. Richten Sie die Mündung <strong>de</strong>r Pistole in eine sichere<br />
Richtung, halten Sie Ihren Abzugsfinger vom Abzug entfernt und außerhalb <strong>de</strong>s<br />
Abzugsbügels, bis Sie für <strong>de</strong>n nächsten Schuss bereit sind.<br />
3.5. Entla<strong>de</strong>n<br />
• Richten Sie die Mündung in eine sichere Richtung.<br />
Die Finger befin<strong>de</strong>n sich außerhalb <strong>de</strong>s Abzugsbügels<br />
und berühren <strong>de</strong>n Abzug nicht. Drücken<br />
Sie <strong>de</strong>n Magazinhalter nach unten und<br />
entfernen Sie das Magazin (3.5. Abb. 1).<br />
• Greifen Sie <strong>de</strong>n Verschluss von hinten an <strong>de</strong>n<br />
Spannrillen (3.5. Abb. 2) und ziehen ihn kräftig<br />
bis zum Anschlag zurück. Falls sich eine Patrone<br />
im Patronenlager befin<strong>de</strong>t, wird diese dabei ausgezogen<br />
und ausgeworfen.<br />
Ver<strong>de</strong>cken Sie dabei nicht das Auswurffenster, da<br />
die Patrone sonst nicht zuverlässig ausgeworfen<br />
wird.<br />
• Arretieren Sie <strong>de</strong>n Verschluss in <strong>de</strong>r geöffneten<br />
Stellung: Während Sie <strong>de</strong>n Verschluss in <strong>de</strong>r hintersten<br />
Stellung halten, schieben Sie <strong>de</strong>n Fang- 3.5. Abbildung 2<br />
15<br />
3.5. Abbildung 1
hebel nach oben und lassen <strong>de</strong>n Verschluss langsam<br />
vor, bis er vom Fanghebel gehalten wird<br />
(3.5. Abb. 3).<br />
• Kontrollieren Sie das Patronenlager (3.5. Abb. 4).<br />
Das Patronenlager muss leer sein.<br />
Kontrollieren Sie <strong>de</strong>n Magazinschacht. Der Magazinschacht<br />
muss leer sein.<br />
• Zum Entla<strong>de</strong>n <strong>de</strong>s Magazins halten Sie das Magazin<br />
so, dass die Geschosse von Ihnen weg gerichtet<br />
sind. Schieben Sie die jeweils oberste<br />
Patrone nach vorn aus <strong>de</strong>m Magazin.<br />
WARNUNG:<br />
Immer wenn Sie <strong>de</strong>n Verschluss schließen, während ein gela<strong>de</strong>nes Magazin in <strong>de</strong>r<br />
Pistole ist, wird eine Patrone in das Patronenlager zugeführt und die Pistole ist wie<strong>de</strong>r<br />
schussbereit.<br />
3.6. Verhalten bei Versagern<br />
• Bei einem Versager warten Sie 60 Sekun<strong>de</strong>n und halten dabei die Mündung in eine sichere<br />
Richtung.<br />
• Entla<strong>de</strong>n Sie die Pistole wie in Kapitel „3.5. Entla<strong>de</strong>n“ beschrieben.<br />
• Nun können Sie durch Sichtkontrolle das Patronenlager und <strong>de</strong>n Lauf prüfen. Patronenlager<br />
und Lauf müssen frei sein.<br />
16<br />
3.5. Abbildung 3<br />
3.5. Abbildung 4<br />
3. Bedienung
4. Demontage, Reinigen, Ölen und Pflege<br />
4. Demontage, Reinigen, Ölen und Pflege<br />
ACHTUNG:<br />
Stellen Sie vor <strong>de</strong>n Arbeiten sicher, dass Pistole und Magazin entla<strong>de</strong>n sind.<br />
4.1. Hauptgruppen<br />
WARNUNG:<br />
Für das Zerlegen <strong>de</strong>r Pistole ist es erfor<strong>de</strong>rlich, <strong>de</strong>n Abzug zu betätigen. Wenn die<br />
Pistole nicht korrekt entla<strong>de</strong>n wur<strong>de</strong> und sich noch eine Patrone im Patronenlager<br />
befin<strong>de</strong>t, wird sich beim Abziehen ein Schuss lösen und Leib und Leben <strong>de</strong>s Bedieners<br />
o<strong>de</strong>r anwesen<strong>de</strong>r Personen kann gefähr<strong>de</strong>t wer<strong>de</strong>n, o<strong>de</strong>r Sachscha<strong>de</strong>n entstehen.<br />
Deshalb müssen Sie vor <strong>de</strong>m Betätigen <strong>de</strong>s Abzugs Patronenlager und Magazinschacht<br />
prüfen. Patronenlager und Magazinschacht müssen leer sein.<br />
4.1.1. Demontage<br />
• Entla<strong>de</strong>n Sie die Pistole: Entfernen Sie das Magazin<br />
und arretieren Sie <strong>de</strong>n Verschluss in geöffneter<br />
Stellung. Das Patronenlager und <strong>de</strong>r Magazinschacht<br />
müssen leer sein.<br />
• Schließen Sie <strong>de</strong>n Verschluss:<br />
Ziehen Sie <strong>de</strong>n Verschluss zurück und führen Sie<br />
ihn nach vorn.<br />
• Richten Sie die Mündung in eine sichere Richtung<br />
und entspannen Sie <strong>de</strong>n Schlagmechanismus,<br />
in<strong>de</strong>m Sie <strong>de</strong>n Abzug betätigen.<br />
• Greifen Sie von oben <strong>de</strong>n Laufhalter auf bei<strong>de</strong>n<br />
<strong>Seite</strong>n und schieben Sie ihn nach unten (4.1.1.<br />
Abb. 1).<br />
• Schieben Sie <strong>de</strong>n Verschluss vorwärts vom<br />
Griffstück.<br />
• Entfernen Sie die Schließfe<strong>de</strong>reinheit gegen <strong>de</strong>n<br />
Druck <strong>de</strong>r Schließfe<strong>de</strong>r (4.1.1. Abb. 2).<br />
• Nehmen Sie <strong>de</strong>n Lauf aus <strong>de</strong>m Verschluss.<br />
• 4.1.1. Abb. 3 zeigt die in ihre Hauptgruppen zerlegte<br />
Pistole.<br />
17<br />
4.1.1. Abbildung 1<br />
4.1.1. Abbildung 2<br />
4.1.1. Abbildung 3
4.1.2. Montage<br />
• Halten Sie <strong>de</strong>n Verschluss mit <strong>de</strong>r Unterseite<br />
nach oben gerichtet. Setzen Sie <strong>de</strong>n Lauf ein, vgl.<br />
4.1.2. Abb. 1.<br />
• Setzen Sie die Schließfe<strong>de</strong>reinheit ein: Setzen<br />
Sie die Schließfe<strong>de</strong>reinheit mit <strong>de</strong>m schwarzen,<br />
kleinen En<strong>de</strong> <strong>de</strong>r Fe<strong>de</strong>rführungsstange in Richtung<br />
Mündung gerichtet in das Fe<strong>de</strong>rlager <strong>de</strong>s<br />
Verschlusses und anschließend gegen <strong>de</strong>n Druck<br />
<strong>de</strong>r Schließfe<strong>de</strong>r mit <strong>de</strong>m hinteren En<strong>de</strong> in die<br />
Vertiefung am Lauf ein (4.1.2. Abb. 1 und 2).<br />
Hinweis:<br />
Eine leichte Krümmung <strong>de</strong>r Schließfe<strong>de</strong>reinheit<br />
in teilmontiertem Zustand ist normal.<br />
• Schieben Sie <strong>de</strong>n montierten Verschluss von vorn zunächst<br />
auf die vor<strong>de</strong>ren, dann auf die hinteren Schienen<br />
<strong>de</strong>s Griffstücks (4.1.2. Abb. 3). Ziehen Sie <strong>de</strong>n<br />
Verschluss bis zum Anschlag zurück und lassen Sie<br />
ihn dann nach vorn in die verriegelte Position gleiten.<br />
4.2. Schlagbolzeneinheit<br />
4.2.1. Ausbau <strong>de</strong>r Schlagbolzeneinheit<br />
• Nehmen Sie <strong>de</strong>n Verschluss vom Griffstück ab,<br />
entfernen Sie Schließfe<strong>de</strong>reinheit und Lauf. Stützen<br />
Sie <strong>de</strong>n Verschluss mit <strong>de</strong>m Mündungsen<strong>de</strong><br />
auf einer Unterlage auf. Halten Sie <strong>de</strong>n Verschluss<br />
an <strong>de</strong>n Spannrillen. Drücken Sie <strong>de</strong>n Stift in <strong>de</strong>r<br />
quadratischen Öffnung rechts oben in <strong>de</strong>r Verschlusskappe<br />
mit einem 2 mm Splintentreiber bis<br />
zum Anschlag hinein (4.2.1. Abb. 1) und schieben<br />
4.2.1. Abbildung 1<br />
Sie die Verschlusskappe etwas nach unten. Ziehen<br />
Sie die Verschlusskappe nach unten aus <strong>de</strong>m Verschluss (4.2.1. Abb. 2).<br />
• Ziehen Sie die Schlagbolzeneinheit aus <strong>de</strong>m Verschluss heraus (4.2.1. Abb. 3).<br />
4.2.1. Abbildung 2<br />
4. Demontage, Reinigen, Ölen und Pflege<br />
18<br />
4.1.2. Abbildung 1<br />
4.1.2. Abbildung 2<br />
4.1.2. Abbildung 3<br />
4.2.1. Abbildung 3 4.2.1. Abbildung 4
4. Demontage, Reinigen, Ölen und Pflege<br />
4.2.2. Einbau <strong>de</strong>r Schlagbolzeneinheit<br />
• Schlagbolzeneinheit einsetzen<br />
• Drücken Sie das hintere En<strong>de</strong> <strong>de</strong>r Schlagbolzeneinheit mit <strong>de</strong>r Verschlusskappe nach innen<br />
und schieben Sie die Verschlusskappe von unten in ihre Führung im Verschluss, bis sie einrastet<br />
(vgl. 4.2.1. Abb. 2).<br />
4.3. Auszieher<br />
4.3.1. Ausbau <strong>de</strong>s Ausziehers<br />
Vorsicht:<br />
Auszieherstift und Schlagbolzensicherung<br />
stehen unter Fe<strong>de</strong>rdruck. Beim Ausbau <strong>de</strong>s<br />
Ausziehers können diese Teile herausgeschleu<strong>de</strong>rt<br />
wer<strong>de</strong>n.<br />
Legen Sie das Verschlussstück mit <strong>de</strong>r Visierung<br />
nach unten und <strong>de</strong>r Mündung nach links vor sich.<br />
Drücken Sie mit einem 2 mm Splintentreiber <strong>de</strong>n<br />
Auszieherstift gegen die Fe<strong>de</strong>rkraft in <strong>de</strong>n Verschluss<br />
(4.3.1. Abb. 1). Während Sie Schlagbolzensicherung<br />
und Auszieherstift mit einem Finger ab<strong>de</strong>cken,<br />
entnehmen Sie <strong>de</strong>n Auszieher. Anschließend<br />
schütteln Sie Schlagbolzensicherung und Auszieherstift<br />
aus <strong>de</strong>m Verschluss.<br />
4.3.2. Einbau <strong>de</strong>s Ausziehers<br />
Legen Sie <strong>de</strong>n Verschluss mit <strong>de</strong>r Oberseite nach un-<br />
4.3.2. Abbildung 2<br />
ten und mit <strong>de</strong>r Mündung nach links vor sich. Setzen<br />
Sie Auszieherstift und Schlagbolzensicherung, jeweils<br />
mit <strong>de</strong>r Fe<strong>de</strong>r voraus, ein (4.3.2. Abb. 1). Die<br />
Druckfe<strong>de</strong>r <strong>de</strong>r Sicherung muss in die dafür vorgesehene<br />
Vertiefung im Verschluss fin<strong>de</strong>n. Bei korekter<br />
Positionierung steht die Sicherung minimal unterhalb<br />
<strong>de</strong>r Patronengleitfläche.<br />
4.3.2. Abbildung 3<br />
Legen Sie das lange En<strong>de</strong> <strong>de</strong>s Ausziehers hinten am<br />
Radius <strong>de</strong>s Auszieherschlitzes im Verschluss an und halten Sie <strong>de</strong>n Auszieher mit <strong>de</strong>m Daumen<br />
Ihrer zweiten Hand gegen <strong>de</strong>n Auszieherstift im Verschluss. Drücken Sie <strong>de</strong>n Auszieherstift mit<br />
einem 2 mm Splintentreiber nach innen, während gleichzeitig <strong>de</strong>r Auszieher zur Mitte <strong>de</strong>s Verschlusses<br />
geschoben wird. Das Auge am Auszieher sperrt nun <strong>de</strong>n Auszieherstift und <strong>de</strong>r Splintentreiber<br />
kann entfernt wer<strong>de</strong>n (4.3.2. Abb. 2). Drücken Sie die Schlagbolzensicherung nach innen,<br />
bis sie mit <strong>de</strong>r Oberfläche <strong>de</strong>s Verschlusses fluchtet. Gleichzeitig drücken Sie <strong>de</strong>n Auszieher mit<br />
<strong>de</strong>n Daumen hinein, bis <strong>de</strong>r Auszieherstift in die Bohrung am Auszieher einrastet (4.3.2. Abb. 3).<br />
19<br />
4.3.1. Abbildung 1<br />
4.3.2. Abbildung 1
4.4. Magazin<br />
4.4.1. Zerlegen<br />
Die Magazinfe<strong>de</strong>r steht unter Druck. Beim Zerlegen <strong>de</strong>s Magazins können Teile<br />
herausgeschleu<strong>de</strong>rt wer<strong>de</strong>n. Seien Sie vorsichtig beim Zerlegen <strong>de</strong>s Magazins.<br />
Halten Sie <strong>de</strong>n Bo<strong>de</strong>nhalter, während Sie <strong>de</strong>n Magazinbo<strong>de</strong>n abnehmen und entnehmen<br />
Sie <strong>de</strong>n Bo<strong>de</strong>nhalter inklusive Magazinfe<strong>de</strong>r vorsichtig aus <strong>de</strong>m Magazingehäuse.<br />
1. Drücken Sie <strong>de</strong>n Bo<strong>de</strong>nhalter mit einem 4 mm Splintentreiber<br />
durch die Bohrung im Magazinbo<strong>de</strong>n nach innen in<br />
das Magazingehäuse (4.4.1. Abb. 1).<br />
2. Schieben Sie <strong>de</strong>n Bo<strong>de</strong>n nach vorn und nehmen Sie ihn<br />
vom Magazingehäuse ab, während Sie <strong>de</strong>n Bo<strong>de</strong>nhalter<br />
gegen <strong>de</strong>n Druck <strong>de</strong>r Magazinfe<strong>de</strong>r halten.<br />
3. Entnehmen Sie Bo<strong>de</strong>nhalter und Magazinfe<strong>de</strong>r.<br />
4. Schütteln Sie <strong>de</strong>n Zubringer aus <strong>de</strong>m Magazingehäuse.<br />
4.4.2. Zusammenbau<br />
1. Führen Sie zunächst <strong>de</strong>n Zubringer und dann die Magazinfe<strong>de</strong>r<br />
mit Bo<strong>de</strong>nhalter in das Magazingehäuse ein.<br />
Achten Sie auf die richtige Ausrichtung <strong>de</strong>r Teile. Die Teile<br />
lassen sich ohne Gewaltanwendung einbauen (4.4.2. Abb.<br />
1 und 2).<br />
2. Während Sie <strong>de</strong>n Bo<strong>de</strong>nhalter in das Magazingehäuse<br />
drücken, schieben Sie <strong>de</strong>n Magazinbo<strong>de</strong>n von vorne auf,<br />
bis er hörbar einrastet.<br />
4. Demontage, Reinigen, Ölen und Pflege<br />
20<br />
4.4.1. Abbildung 1<br />
4.4.2. Abbildung 1<br />
4.4.2. Abbildung 2
4. Demontage, Reinigen, Ölen und Pflege<br />
4.5. Reinigen<br />
ACHTUNG:<br />
Stellen Sie vor <strong>de</strong>m Reinigen sicher, dass Pistole und Magazin entla<strong>de</strong>n sind.<br />
Reinigen Sie die fabrikneue Pistole vor <strong>de</strong>m ersten Schießen. Die Pistole wur<strong>de</strong> entwe<strong>de</strong>r mit<br />
Konservierungsmittel o<strong>de</strong>r Öl behan<strong>de</strong>lt, um sie vor Korrosion zu schützen. Vor <strong>de</strong>m ersten<br />
Gebrauch <strong>de</strong>r neuen Pistole entfernen Sie überschüssiges Öl aus Lauf und Patronenlager, sowie<br />
von <strong>de</strong>n außenliegen<strong>de</strong>n Flächen.<br />
Ihre Pistole ist ein Präzisionsinstrument. Pflegen Sie die Pistole regelmäßig, um eine zuverlässige<br />
Funktion zu gewährleisten.<br />
Nach je<strong>de</strong>m Einsatz <strong>de</strong>r Pistole o<strong>de</strong>r nach<strong>de</strong>m sie extremen Witterungsbedingungen ausgesetzt<br />
war, sollte sie gereinigt wer<strong>de</strong>n.<br />
Zerlegen Sie die Pistole in die Hauptgruppen (siehe Kap. 4.1.).<br />
Reinigen Sie <strong>de</strong>n Lauf mit Reinigungsbürste und Laufreiniger, vom Patronenlager her beginnend.<br />
Entfernen Sie Blei und Rückstän<strong>de</strong> mit einer Messingbürste aus <strong>de</strong>m Lauf. Lauf und<br />
Patronenlager müssen sauber sein.<br />
Säubern Sie die Außenflächen <strong>de</strong>s Laufs mit Lappen und Reinigungsstäbchen. Mit einer kleinen<br />
Bürste und ggf. Waffenöl entfernen Sie Rückstän<strong>de</strong> an Griffstück, Lauf, Verschluss, Auszieher,<br />
Stoßbo<strong>de</strong>n und an<strong>de</strong>ren verschmutzten Stellen. Nach <strong>de</strong>m Reinigen ölen Sie außenliegen<strong>de</strong><br />
Metalloberflächen dünn ein.<br />
Falls die Pistole in kalter Umgebung benutzt o<strong>de</strong>r gelagert wer<strong>de</strong>n soll, verwen<strong>de</strong>n Sie ein für<br />
<strong>de</strong>n Einsatz bei niedrigen Temperaturen empfohlenes Waffenöl.<br />
4.6. Ölen<br />
WARNUNG:<br />
Halten Sie sich an die <strong>Bedienungsanleitung</strong> <strong>de</strong>r verwen<strong>de</strong>ten Reinigungsmittel. Manche<br />
Reinigungsmittel können Ihrer Pistole scha<strong>de</strong>n. Vermei<strong>de</strong>n Sie lange Einwirkzeiten,<br />
zu langes Reinigen im Ultraschallbad und Ultraschallbad-Temperaturen über<br />
50° C. Verwen<strong>de</strong>n Sie ausschließlich für die Waffenpflege empfohlene, harz- und säurefreie<br />
Reinigungsmittel und Waffenöle. Ammoniakhaltige Lösungsmittel und alkalische<br />
Lösungsmittel dürfen nicht verwen<strong>de</strong>t wer<strong>de</strong>n.<br />
Nach <strong>de</strong>m Reinigen <strong>de</strong>r PPQ sollte ein dünner Ölfilm auf die Außenflächen <strong>de</strong>r Metallteile und<br />
die Funktionsteile aufgetragen wer<strong>de</strong>n (4.6. Abb. 1). Verwen<strong>de</strong>n Sie ausschließlich harz- und<br />
säurefreies Waffenöl.<br />
Achten Sie darauf, nicht zu kräftig zu ölen. Zu viel Öl wur<strong>de</strong> aufgetragen, wenn Öltropfen zu<br />
sehen sind o<strong>de</strong>r Öl aus <strong>de</strong>r Pistole rinnt. Durch zu viel Öl sammelt sich Schmutz und Schmauch<br />
in <strong>de</strong>r Pistole an. Dies beeinträchtigt die Funktion <strong>de</strong>r Pistole. Ölen Sie nicht die Schlagbolzenbohrung.<br />
21
• Lauf:<br />
Nach <strong>de</strong>m Reinigen <strong>de</strong>r Pistole ölen Sie die Laufoberflächen und die Kontaktfläche zwischen<br />
Lauf und Griffstück mit einem öligen Tuch.<br />
• Griffstück:<br />
Ölen Sie die Verschlussführungen und die Funktionsflächen <strong>de</strong>r Abzugsstange mit jeweils<br />
einem Tropfen Öl.<br />
• Verschluss:<br />
Ölen Sie die Schlagbolzensicherung und die Steuerkurve mit jeweils einem Tropfen Öl.<br />
• Magazin:<br />
Tragen Sie an <strong>de</strong>r Außenseite <strong>de</strong>s Magazingehäuses einen dünnen Ölfilm auf.<br />
4.7. Vorbereitung zur Lagerung<br />
4. Demontage, Reinigen, Ölen und Pflege<br />
4.6. Abbildung 1<br />
Bitte beachten Sie die waffenrechtlichen Bestimmungen hinsichtlich <strong>de</strong>r Aufbewahrung von<br />
Schusswaffen und Munition Ihres Lan<strong>de</strong>s.<br />
Bewahren Sie die Pistole nicht in einem Material auf, welches Feuchtigkeit anzieht o<strong>de</strong>r hält<br />
(z.B. Le<strong>de</strong>r o<strong>de</strong>r dicke Lappen). Falls die Pistole über einen längeren Zeitraum eingelagert<br />
wer<strong>de</strong>n soll, schützen Sie Lauf, Patronenlager und die innenliegen<strong>de</strong>n Teile mit Waffenöl o<strong>de</strong>r<br />
einem für Waffen vorgesehenen Konservierungsmittel. Außenliegen<strong>de</strong> Teile wie Verschluss,<br />
Lauf und Magazin sollten mit Korrosionsschutz behan<strong>de</strong>lt wer<strong>de</strong>n.<br />
22
4. Demontage, Reinigen, Ölen und Pflege<br />
Reinigen Sie die PPQ, bevor Sie die Pistole das nächste Mal verwen<strong>de</strong>n. Achten Sie bei je<strong>de</strong>m<br />
Reinigen auch darauf, ob Sie Abnutzungen erkennen. Bei ungewöhnlichen Abnutzungserscheinungen<br />
lassen Sie die Pistole von einem qualifizierten Büchsenmacher o<strong>de</strong>r durch WALTHER<br />
überprüfen.<br />
23
5. Anpassung <strong>de</strong>r Pistole an <strong>de</strong>n Bediener<br />
5.1. Griff<br />
Um <strong>de</strong>n Griff <strong>de</strong>r Pistole optimal an die Handgröße<br />
anpassen zu können, besteht die Möglichkeit unterschiedlich<br />
große Griffrücken zu montieren. Dazu<br />
wird <strong>de</strong>r Stift im unteren Teil <strong>de</strong>s Griffrückens mit<br />
einem 4 mm Splintentreiber nach links o<strong>de</strong>r rechts<br />
entfernt und nach Einbau <strong>de</strong>s gewünschten Griffrückens<br />
wie<strong>de</strong>r montiert (5.1. Abb. 1).<br />
Bei <strong>de</strong>r PPQ besteht die Wahl zwischen <strong>de</strong>n Größen<br />
Small, Medium und Large.<br />
5.2. Riemenöse<br />
Bei <strong>de</strong>r PPQ bil<strong>de</strong>t <strong>de</strong>r zur Befestigung <strong>de</strong>s Griffrückens verwen<strong>de</strong>te Stift, zusammen mit einer<br />
Aussparung im Griffrücken, eine Riemenöse zur Befestigung einer Fangschnur. Zur Montage<br />
wird <strong>de</strong>r Stift im unteren Teil <strong>de</strong>s Griffrückens mit einem 4 mm Splintentreiber nach links o<strong>de</strong>r<br />
rechts entfernt, die Fangschnur o<strong>de</strong>r ein Adapterstück eingelegt und anschließend <strong>de</strong>r Stift<br />
wie<strong>de</strong>r montiert.<br />
5.3. Visierung<br />
Visier und Korn sind austauschbar. Die Treffpunktlage lässt sich in <strong>Seite</strong> und Höhe korrigieren.<br />
ACHTUNG:<br />
Stellen Sie vor <strong>de</strong>n Arbeiten sicher, dass Pistole und Magazin entla<strong>de</strong>n sind.<br />
SEITENVERSTELLUNG<br />
Um die Treffpunktlage zu korrigieren, verschieben Sie das Visier<br />
in die Richtung, in welche die Treffer verlagert wer<strong>de</strong>n sollen.<br />
Beispiel: Wenn die Treffpunktlage nach rechts verschoben wer<strong>de</strong>n<br />
soll, verschieben Sie das Visier nach rechts.<br />
ACHTUNG:<br />
Das original WALTHER-Stahlvisier (5.3. Abb. 1) sitzt sehr fest<br />
auf <strong>de</strong>m Verschluss. Für das Justieren dieses Visiers wird<br />
<strong>de</strong>r als Son<strong>de</strong>rzubehör erhältliche Visiertreiber empfohlen.<br />
Entfernen Sie nicht die Spannhülse unter <strong>de</strong>m Visier.<br />
5. Anpassung <strong>de</strong>r Pistole an <strong>de</strong>n Bediener<br />
24<br />
5.1. Abbildung 1<br />
5.3. Abbildung 1
5. Anpassung <strong>de</strong>r Pistole an <strong>de</strong>n Bediener<br />
HÖHENVERSTELLUNG<br />
Zur Korrektur <strong>de</strong>r Höhe <strong>de</strong>r Treffpunktlage lässt sich<br />
das Korn tauschen. Stahl-Korne in unterschiedlichen<br />
Höhen sind als Son<strong>de</strong>rzubehör erhältlich.<br />
Bei Tiefschuss wird ein niedrigeres, bei Hochschuss<br />
ein höheres Korn benötigt.<br />
Die Korne sind nummeriert. Je höher die Nummer,<br />
5.3. Abbildung 2<br />
umso höher ist das Korn. Bei einer Anschussentfernung<br />
von 25 m ergibt sich pro Abstufung eine Treffpunktverlagerung von ca. 5 cm.<br />
Zum Auswechseln <strong>de</strong>s Korns wird <strong>de</strong>r Verschluss vom Griffstück abgenommen. Anschließend<br />
nehmen Sie die Schließfe<strong>de</strong>reinheit und <strong>de</strong>n Lauf aus <strong>de</strong>m Verschluss. Mit einem Schraubendreher<br />
wird die Kornschraube entfernt (5.3. Abb. 2) und anschließend das Korn abgenommen.<br />
Die Montage erfolgt in umgekehrter Reihenfolge:<br />
Entölen Sie die Kornschraube und das Gewin<strong>de</strong> im Korn. Sichern Sie die Kornschraube mit einem<br />
Industriekleber (z.B. Loctite 648). Ziehen Sie die Kornschraube mit einem Drehmoment<br />
von 1 Nm an.<br />
25
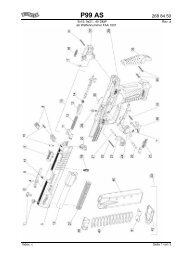
6. Explosionsdarstellung<br />
26<br />
6. Explosionsdarstellung
7. Teileliste<br />
7. Teileliste<br />
Nr. Benennung Nr. Benennung<br />
1.1 Kornschraube 24 Abzug, komplett<br />
1.2 Korn 26 Fanghebel<br />
3 Verschlussstück 27 Stift zum Laufhalter<br />
5 Auszieher 28.1 Druckfe<strong>de</strong>r zum Laufhalter<br />
6 Auszieherstift, komplett 28.2 Laufhalter<br />
7 Fe<strong>de</strong>r zum Auszieher <strong>29</strong> Griffstück, vollst.<br />
7.1 Fe<strong>de</strong>r zum Magazinhalter <strong>29</strong>.1 Einlage, geschliffen<br />
8 Visier 30 Fanghebelfe<strong>de</strong>r<br />
15 Schlagbolzen, komplett 31 Stift 3x24<br />
16 Abzugfe<strong>de</strong>r 32 Abzugsgehäuse, montiert<br />
18 Schlagbolzensicherung, komplett 32.8 Steuerstück<br />
19 Lauf 33 Magazin<br />
20 Verschlusskappe 35 Stift 4x16<br />
21 Schließfe<strong>de</strong>reinheit 36 Magazinhalter<br />
22 Stift 3x28 38 Griffrücken S, M o<strong>de</strong>r L<br />
23 Laufhalterbügel 48 Achse, Magazinhalter<br />
27
8. Technische Daten<br />
Kaliber 9 mm x 19 / 9mm x 21 .40 S&W<br />
Magazinkapazität 15 Patronen 12 Patronen<br />
Maße (L/B/H) 180 / 34 / 135 mm 184 / 34 / 135 mm<br />
Lauflänge 102 mm 106 mm<br />
Dralllänge<br />
250 mm<br />
rechtsdrall<br />
Laufprofil Feld und Zug, 6-fach<br />
28<br />
406 mm<br />
rechtsdrall<br />
Länge Visierlinie 156 mm 158 mm<br />
Breite, Kimme<br />
4,6 (Standard / Nr. 2)<br />
3,8 (Nr. 1)<br />
Breite, Korn 3,6 mm<br />
Gewicht, inkl. leerem Magazin 695 g 705 g<br />
Gewicht, Magazin, leer 80 g<br />
Geschossenergie E3,<br />
Geschossgewicht<br />
500 J<br />
8 g<br />
475 J<br />
11,7 g<br />
Verriegelungsart Browningsystem ohne Zwischenglied<br />
Schlossart Schlagbolzenschloss<br />
Abzugsystem Quick Defense Trigger, vorgespannt<br />
Abzugkraft / Abzugweg 25 N / 9 mm (bei je<strong>de</strong>m Schuss gleich)<br />
Verschluss-Stück und Lauf:<br />
Material<br />
Tenifer®-behan<strong>de</strong>lter, hochfester Vergütungsstahl.<br />
Griffstück: Faserverstärktes Polyamid<br />
Sicherungen Abzugs-, Schlagbolzen-, Fallsicherung<br />
Die Angaben sind Mittelwerte. Tatsächliche Werte können abweichen.<br />
8. Technische Daten
Español<br />
<strong>Instrucciones</strong> <strong>de</strong> <strong>uso</strong><br />
WALTHER PPQ<br />
<strong>29</strong>
NOTA<br />
En el presente manual se <strong>de</strong>tallan las instrucciones <strong>de</strong> <strong>uso</strong> <strong>de</strong> la pistola por parte <strong>de</strong><br />
civiles. Las instrucciones para los cuerpos <strong>de</strong> seguridad pue<strong>de</strong>n diferir <strong>de</strong> lo especificado<br />
aquí.<br />
A lo largo <strong>de</strong>l manual, las indicaciones <strong>de</strong> situación, como »izquierda«, »<strong>de</strong>recha«,<br />
»a<strong>de</strong>lante«, »atrás«, etc. hacen referencia a una pistola sostenida en una posición <strong>de</strong><br />
disparo normal, es <strong>de</strong>cir, apuntando en dirección opuesta al tirador, con el cañón en<br />
posición aproximadamente horizontal y con la empuñadura dirigida hacia abajo.<br />
Las explicaciones <strong>de</strong> este manual se basan en el <strong>uso</strong> <strong>de</strong>l arma con la mano <strong>de</strong>recha.<br />
Los usuarios zurdos <strong>de</strong>ben realizar los cambios correspondientes.<br />
30
INDICE<br />
1. <strong>Instrucciones</strong> <strong>de</strong> seguridad 32<br />
2. Descripción <strong>de</strong>l producto 33<br />
2.1. Descripción funcionamiento 33<br />
2.2. Contenido <strong>de</strong>l embalaje 34<br />
2.3. Munición 34<br />
2.4. Elementos funcionales 35<br />
3. Manipulación <strong>de</strong> la pistola 38<br />
3.1. Inspección <strong>de</strong> la pistola 38<br />
3.2. Carga 39<br />
3.3. Disparo 40<br />
3.4. Cambio <strong>de</strong> cargadores vacíos 41<br />
3.5. Descarga <strong>de</strong> la pistola 41<br />
3.6. Limpieza <strong>de</strong> disparos fallidos 42<br />
4. Desmontaje, limpieza, lubricación y mantenimiento 43<br />
4.1. Componentes principales 43<br />
4.2. Conjunto <strong>de</strong>l percutor 44<br />
4.3. Extractor 45<br />
4.4. Cargador 46<br />
4.5. Limpieza <strong>de</strong> la pistola 47<br />
4.6. Lubricación 47<br />
4.7. Mantenimiento antes <strong>de</strong>l almacenamiento 48<br />
5. Adaptación <strong>de</strong> la pistola al usuario 50<br />
5.1. Empuñadura 50<br />
5.2. Orificio para correa 50<br />
5.3. Miras 50<br />
6. Despiezado 52<br />
7. Lista <strong>de</strong> piezas 53<br />
8. Especificaciones técnicas 54<br />
31
1. <strong>Instrucciones</strong> <strong>de</strong> seguridad<br />
32<br />
1. <strong>Instrucciones</strong> <strong>de</strong> seguridad<br />
• Antes <strong>de</strong> utilizar la pistola, lea <strong>de</strong>tenidamente este manual <strong>de</strong> instrucciones para conocer<br />
con <strong>de</strong>talle sus funciones y procedimientos <strong>de</strong> manipulación. La mayor parte <strong>de</strong> las operaciones<br />
y piezas <strong>de</strong> la pistola se mencionan una sola vez en este manual. En las secciones<br />
correspondientes hallará indicaciones para consultar los capítulos anteriores a fin <strong>de</strong> obtener<br />
más información.<br />
• Antes <strong>de</strong> disparar, cuando se produzcan fallos <strong>de</strong> funcionamiento y antes <strong>de</strong> llevar a cabo<br />
una limpieza, compruebe siempre que el arma está <strong>de</strong>scargada (el cargador se ha extraído<br />
<strong>de</strong> la pistola y la recámara está vacía), el ánima <strong>de</strong>l cañón está limpia y no presenta obstrucciones<br />
y el cargador está vacío.<br />
• Nunca guar<strong>de</strong> la munición en el mismo lugar que el arma <strong>de</strong> fuego. Guar<strong>de</strong> el arma y la<br />
munición por separado y en lugares seguros, <strong>de</strong> modo que las personas no autorizadas,<br />
como los niños, no puedan tener acceso a ellas.<br />
• Trate siempre las armas <strong>de</strong> fuego como si estuviesen cargadas y pudiesen dispararse al<br />
apretar el gatillo. Sujete siempre la pistola <strong>de</strong> manera que no suponga ningún peligro para<br />
usted ni para las personas que se encuentran cerca. Mantenga siempre el arma apuntada en<br />
una dirección que resulte segura. No apunte nunca con un arma <strong>de</strong> fuego a una persona u<br />
objeto sobre el que no pretenda disparar, in<strong>de</strong>pendientemente <strong>de</strong> que esté cargada o no. No<br />
olvi<strong>de</strong> que incl<strong>uso</strong> la pistola más segura pue<strong>de</strong> suponer un peligro si no se maneja <strong>de</strong>bidamente.<br />
• Precaución: mantenga los <strong>de</strong>dos apartados <strong>de</strong>l guardamonte y <strong>de</strong>l gatillo hasta que alinee<br />
las miras <strong>de</strong> la pistola sobre un objetivo seguro y tome la <strong>de</strong>cisión <strong>de</strong> disparar. Preste siempre<br />
atención al objetivo y a lo que hay tras él.<br />
• No fuerce nunca las piezas <strong>de</strong> la pistola al utilizarla, examinarla, <strong>de</strong>smontarla, limpiarla o<br />
montarla. La manipulación in<strong>de</strong>bida <strong>de</strong>l arma pue<strong>de</strong> afectar a su funcionamiento y seguridad.<br />
La pistola no <strong>de</strong>be en ningún caso <strong>de</strong>smontarse más allá <strong>de</strong> lo especificado en el presente<br />
manual <strong>de</strong> instrucciones.<br />
• Sólo es posible garantizar la seguridad y el correcto funcionamiento <strong>de</strong> la pistola cuando<br />
tanto ésta como su munición se encuentran en perfecto estado.<br />
• Si sospecha que el arma pue<strong>de</strong> haber resultado afectada por factores externos como la<br />
corrosión, una caída, etc., llévela a revisar por un armero cualificado.<br />
• Utilice siempre protección auditiva y gafas <strong>de</strong> seguridad a<strong>de</strong>cuadas para armas <strong>de</strong> fuego y<br />
asegúrese <strong>de</strong> que todas las personas que se encuentran en las cercanías también las usan.<br />
• Este arma se ha diseñado para una munición <strong>de</strong> un tipo y calibre específicos, que se indican
2. Descripción <strong>de</strong>l producto<br />
en la propia arma. Utilice únicamente munición <strong>de</strong>l calibre indicado para el arma y que<br />
cumpla las especificaciones <strong>de</strong> la Comisión Internacional Permanente para la Prueba <strong>de</strong><br />
Armas <strong>de</strong> Fuego Portátiles (CIP) o el Instituto <strong>de</strong> Fabricantes <strong>de</strong> Armas y Municiones <strong>de</strong> Caza<br />
Deportiva (SAAMI). Cuando utilice munición recargada, no utilice una presión <strong>de</strong> gas mayor<br />
que permitida por CIP o SAAMI. Una presión excesiva pue<strong>de</strong> dañar o <strong>de</strong>struir el arma <strong>de</strong><br />
fuego. Las municiones con velocida<strong>de</strong>s y presiones superiores a aquellas para las que está<br />
diseñada el arma, la someterán a una mayor tensión, causarán un <strong>de</strong>sgaste excesivo y podrían<br />
llegar a ocasionar daños graves en ella.<br />
• Antes <strong>de</strong> cargar la munición, limpie siempre el exceso <strong>de</strong> grasa y aceite y compruebe que el<br />
ánima <strong>de</strong>l cañón está limpia y no presenta obstrucciones.<br />
• No altere, modifique o cambie ninguna pieza <strong>de</strong>l arma a menos que así se indique específicamente<br />
en este manual. Toda operación <strong>de</strong> mantenimiento o reparación no especificada en este<br />
manual <strong>de</strong>be ser realizada por un armero cualificado utilizando piezas originales WALTHER.<br />
• La manipulación ina<strong>de</strong>cuada o no autorizada <strong>de</strong> los componentes <strong>de</strong>l arma pue<strong>de</strong> afectar a<br />
su seguridad y fiabilidad, así como causar heridas graves o incl<strong>uso</strong> la muerte.<br />
CLÁUSULA DE EXCENSIÓN DE RESPONSABILIDAD<br />
Extreme siempre las precauciones cuando vaya a manejar un arma. Siempre persiste el peligro<br />
<strong>de</strong> causar, también involuntariamente, lesiones personales o incl<strong>uso</strong> la muerte y daños materiales.<br />
WALTHER se exime <strong>de</strong> toda responsabilidad por los daños <strong>de</strong>rivados <strong>de</strong> un <strong>uso</strong> inapropiado o<br />
contrario a la normativa legal <strong>de</strong> esta la pistola. Esto mismo es válido para daños <strong>de</strong>rivados <strong>de</strong> la<br />
no observancia <strong>de</strong> estas instrucciones <strong>de</strong> <strong>uso</strong>, <strong>de</strong>l cambio no autorizado <strong>de</strong> partes o cualquier<br />
otra modificación <strong>de</strong> la pistola que no esté prevista expresamente en estas instrucciones <strong>de</strong> <strong>uso</strong>.<br />
2. Descripción <strong>de</strong>l producto<br />
2.1. Descripción funcionamiento<br />
La pistola semiautomática WALTHER PPQ dispara a cerrojo cerrado, aprovechando el principio<br />
<strong>de</strong> retroceso corto. Al apretar el gatillo, se libera el percutor y se dispara el cartucho. La presión<br />
<strong>de</strong>l gas impulsa el proyectil y lo hace salir <strong>de</strong>l cañón. El impulso resultante provoca un movimiento<br />
hacia atrás <strong>de</strong>l cañón y la corre<strong>de</strong>ra, que retroce<strong>de</strong>n juntos unos centímetros, hasta que<br />
ambos se separan <strong>de</strong>bido un movimiento basculante que hace que la parte posterior <strong>de</strong>l primero<br />
<strong>de</strong>scienda y se <strong>de</strong>tenga. La corre<strong>de</strong>ra sigue su trayectoria hacia atrás y extrae el cartucho<br />
usado <strong>de</strong> la recámara, expulsándolo por el lado <strong>de</strong>recho <strong>de</strong>l arma. Una vez que la corre<strong>de</strong>ra alcanza<br />
el límite <strong>de</strong> su recorrido, el resorte recuperador la hace avanzar <strong>de</strong> nuevo, toma un cartucho<br />
nuevo <strong>de</strong>l cargador y lo introduce en la recámara. Este mismo movimiento hace avanzar y<br />
ascen<strong>de</strong>r la recámara y el cañón hasta encajar en la corre<strong>de</strong>ra. Suelte el gatillo para que recupere<br />
su posición inicial. En este momento, la pistola estará lista para realizar otro disparo.<br />
33
2.2. Contenido <strong>de</strong>l embalaje<br />
34<br />
2. Descripción <strong>de</strong>l producto<br />
• Pistola en estuche <strong>de</strong> plástico • Cargador <strong>de</strong> repuesto<br />
• Objetivo <strong>de</strong> prueba • Manual <strong>de</strong> instrucciones<br />
• Lomos <strong>de</strong> tamaños S y L • dispositivo <strong>de</strong> carga<br />
Nota: el contenido <strong>de</strong>l embalaje pue<strong>de</strong> variar.<br />
2.3. Munición<br />
ATENCIÓN:<br />
No utilice munición que no haya sido diseñada específicamente para ser usada en este<br />
arma. Si se utiliza una munición <strong>de</strong> un tipo o calibre incorrecto, es posible que el arma<br />
se encasquille, que no dispare o que se genere una presión excesiva capaz <strong>de</strong> dañar o<br />
<strong>de</strong>struir el arma, lo que podría causar daños materiales, lesiones e incl<strong>uso</strong> la muerte.<br />
Consulte la <strong>de</strong>signación <strong>de</strong> calibre indicada en<br />
el arma. Esta información muestra el calibre <strong>de</strong><br />
la munición que se <strong>de</strong>be usar en este arma <strong>de</strong><br />
fuego (2.3. Fig. 1). Utilice únicamente munición<br />
a<strong>de</strong>cuada para el calibre <strong>de</strong>l arma y que cumpla<br />
las especificaciones <strong>de</strong> CIP o SAAMI o que<br />
posea la certificación “Technische Richtlinie<br />
Patrone 9 mm x 19 schadstoffreduziert”.<br />
Compruebe la munición antes <strong>de</strong> dispararla y<br />
2.3. Fig. 1<br />
utilice únicamente aquella que se encuentre en<br />
perfecto estado. Un arma <strong>de</strong> fuego y su correspondiente munición son un sistema y, como tal,<br />
<strong>de</strong>ben trabajar conjuntamente. El rendimiento <strong>de</strong> ambos se encuentra estrechamente relacionado.<br />
El retroceso pue<strong>de</strong> verse afectado en gran medida por las distintas combinaciones <strong>de</strong><br />
velocidad y peso <strong>de</strong> la bala, así como por el peso <strong>de</strong>l arma. Una fuerza <strong>de</strong> retroceso elevada<br />
pue<strong>de</strong> resultar incómoda para algunos tiradores.<br />
Por ejemplo:<br />
• Peso <strong>de</strong>l arma: a menor peso <strong>de</strong>l arma, mayor retroceso.<br />
• Peso <strong>de</strong> la bala: a mayor peso <strong>de</strong> la bala, mayor retroceso.<br />
• Velocidad <strong>de</strong> la bala: a mayor velocidad <strong>de</strong> la bala, mayor retroceso.<br />
Para acostumbrarse a un retroceso mayor, pruebe lo siguiente:<br />
• Sujete firmemente el arma con las dos manos al disparar.<br />
• Empiece a disparar siempre con la menor velocidad y peso <strong>de</strong> bala disponibles para su arma.<br />
• Solicite en su armería la bala <strong>de</strong> menor potencia, velocidad y peso para su arma.<br />
• También pue<strong>de</strong> intentar cambiar la composición/configuración <strong>de</strong> la empuñadura <strong>de</strong>l arma<br />
para que se ajuste mejor a la forma y el tamaño <strong>de</strong> su mano.
2. Descripción <strong>de</strong>l producto<br />
2.4. Elementos funcionales<br />
1 Guía <strong>de</strong>l resorte<br />
<strong>de</strong> recuperación<br />
2 Boca<br />
3 El mo<strong>de</strong>lo<br />
5<br />
1<br />
4<br />
2<br />
3<br />
6<br />
2<br />
1<br />
4<br />
35<br />
7<br />
5 6<br />
17<br />
16<br />
1 Corre<strong>de</strong>ra<br />
2 Punto <strong>de</strong> mira<br />
15<br />
14<br />
3 Retén <strong>de</strong> <strong>de</strong>smontaje<br />
13<br />
4 Cañón<br />
10 Orificio para correa<br />
5 Muesca <strong>de</strong> la<br />
palanca <strong>de</strong> retención<br />
11 Cargador<br />
12 Empuñadura<br />
12<br />
6 Lateral aserrado 13 Retén <strong>de</strong>l cargador<br />
<strong>de</strong> la corre<strong>de</strong>ra 14 Gatillo<br />
7 Palanca <strong>de</strong> retención 15 Guardamonte<br />
8 Alza<br />
16 Armazón<br />
9 Lomo<br />
17 Riel para accesorios<br />
11<br />
3<br />
7<br />
4 Número <strong>de</strong> serie<br />
5 Tapa <strong>de</strong> extremo<br />
<strong>de</strong> corre<strong>de</strong>ra<br />
6 Ventana <strong>de</strong> expulsión<br />
7 Extractor (indicador <strong>de</strong><br />
carga <strong>de</strong> la recámara)<br />
9<br />
8<br />
10
2.4.1. Indicador <strong>de</strong> carga <strong>de</strong> la recámara<br />
Cuando la parte posterior <strong>de</strong>l extractor aparece hundida, es<br />
señal <strong>de</strong> que hay un cartucho o casquillo en la recámara. El<br />
indicador tiene forma <strong>de</strong> marca <strong>de</strong> color rojo (2.4.1. Fig. 1).<br />
36<br />
2. Descripción <strong>de</strong>l producto<br />
ATENCIÓN:<br />
No confíe exclusivamente en el indicador <strong>de</strong> carga <strong>de</strong> la recámara para verificar la<br />
presencia <strong>de</strong> un cartucho en ella. El método más seguro para <strong>de</strong>terminar la presencia<br />
o ausencia <strong>de</strong> un cartucho en la recámara consiste en inspeccionar visualmente la<br />
recámara <strong>de</strong>l arma extrayendo el cargador y tirando <strong>de</strong> la corre<strong>de</strong>ra hasta <strong>de</strong>jarla en<br />
posición abierta y bloqueada.<br />
ATENCIÓN:<br />
Trate siempre las armas <strong>de</strong> fuego como si estuviesen cargadas y pudiesen dispararse<br />
al apretar el gatillo. El indicador <strong>de</strong> carga <strong>de</strong> la recámara pue<strong>de</strong> ayudarle a <strong>de</strong>terminar<br />
si ésta se encuentra cargada o no, pero la cantidad <strong>de</strong> luz, la limpieza <strong>de</strong> la<br />
pistola, la <strong>de</strong>coloración <strong>de</strong> la munición y otros factores pue<strong>de</strong>n limitar la efectividad<br />
<strong>de</strong> este indicador.<br />
2.4.2. Retén <strong>de</strong>l cargador<br />
El retén <strong>de</strong>l cargador se encuentra a ambos lados<br />
<strong>de</strong>l guardamonte. Sujete la pistola con el <strong>de</strong>do fuera<br />
<strong>de</strong>l guardamonte y sin apoyarlo en el gatillo. Presione<br />
el retén <strong>de</strong>l cargador y extraiga este último.<br />
Si le resulta difícil o engorroso manipular el retén<br />
<strong>de</strong>l cargador con el pulgar <strong>de</strong> la mano <strong>de</strong> disparo,<br />
pruebe a usar el <strong>de</strong>do índice <strong>de</strong> esa misma mano<br />
(2.4.2. Fig. 1).<br />
2.4.3. Palanca <strong>de</strong> retención<br />
Bloqueo <strong>de</strong> la corre<strong>de</strong>ra en posición abierta:<br />
Sujete la pistola con el <strong>de</strong>do fuera <strong>de</strong>l guardamonte<br />
y sin apoyarlo en el gatillo. Presione el retén <strong>de</strong>l<br />
cargador y extraiga este último.<br />
Sujete la corre<strong>de</strong>ra <strong>de</strong>s<strong>de</strong> <strong>de</strong>trás, por los laterales<br />
aserrados, con el pulgar y los <strong>de</strong>dos mientras sostiene<br />
la pistola y tire completamente hacia atrás con firmeza<br />
para extraer cualquier cartucho que pudiera<br />
encontrarse en la recámara y vaciar la pistola.<br />
Para bloquear la corre<strong>de</strong>ra en posición abierta, <strong>de</strong>je<br />
que ésta avance ligeramente <strong>de</strong>s<strong>de</strong> la posición totalmente<br />
retrasada mientras presiona hacia arriba<br />
la palanca <strong>de</strong> retención (2.4.3. Fig. 1).<br />
2.4.1. Fig. 1<br />
2.4.2. Fig. 1<br />
2.4.3. Fig. 1
2. Descripción <strong>de</strong>l producto<br />
Liberación <strong>de</strong> corre<strong>de</strong>ra mediante la palanca <strong>de</strong> retención:<br />
Empuje la palanca <strong>de</strong> retención <strong>de</strong> la corre<strong>de</strong>ra hacia abajo con el pulgar <strong>de</strong> la mano <strong>de</strong> disparo<br />
para liberar la corre<strong>de</strong>ra y <strong>de</strong>jar que vuelva a moverse totalmente hacia a<strong>de</strong>lante.<br />
Para manejar con mayor facilidad la corre<strong>de</strong>ra, sujete los laterales aserrados <strong>de</strong> ésta <strong>de</strong>s<strong>de</strong><br />
<strong>de</strong>trás y tire <strong>de</strong> ella hacia atrás mientras mantiene presionada la palanca <strong>de</strong> retención a fin <strong>de</strong><br />
liberar la corre<strong>de</strong>ra y permitir que avance hasta la posición totalmente a<strong>de</strong>lantada.<br />
37
3. Manipulación <strong>de</strong> la pistola<br />
3.1. Inspección <strong>de</strong> la pistola<br />
• Al examinar la pistola, <strong>de</strong>be comprobarse en primer<br />
lugar que se encuentra <strong>de</strong>scargada. Para<br />
ello, sujétela manteniendo siempre el <strong>de</strong>do fuera<br />
<strong>de</strong>l guardamonte y apartado <strong>de</strong>l gatillo, apunte<br />
en una dirección segura, presione el retén <strong>de</strong>l<br />
cargador y extraiga este último (3.1. Fig. 1).<br />
• Sujete la corre<strong>de</strong>ra <strong>de</strong>s<strong>de</strong> <strong>de</strong>trás por los laterales<br />
aserrados con el pulgar y los <strong>de</strong>dos, según se<br />
muestra en 3.1. Fig. 2, y tire completamente hacia<br />
atrás con firmeza para extraer cualquier cartucho<br />
que pudiera encontrarse en la recámara y<br />
vaciar la pistola. No obstruya la ventana <strong>de</strong><br />
expulsión, ya que podría impedir la salida <strong>de</strong>l<br />
cartucho.<br />
• Bloquee la corre<strong>de</strong>ra en posición abierta. Para<br />
ello, <strong>de</strong>je que ésta avance un poco <strong>de</strong>s<strong>de</strong> la posición<br />
totalmente retrasada mientras presiona hacia<br />
arriba la palanca <strong>de</strong> retención (3.1. Fig. 3).<br />
• Examine la recámara para asegurarse <strong>de</strong> que<br />
está <strong>de</strong>scargada e inspeccione visualmente el<br />
ánima a fin <strong>de</strong> comprobar <strong>de</strong> que está limpia,<br />
seca y libre <strong>de</strong> obstrucciones (3.1. Fig. 4).<br />
Es necesario llevar a cabo este procedimiento cada<br />
vez que se <strong>de</strong>smonta, se limpia, se recibe o entrega<br />
a otra persona, se transporta o se almacena.<br />
38<br />
3. Manipulación <strong>de</strong> la pistola<br />
3.1. Fig. 1<br />
3.1. Fig. 2<br />
3.1. Fig. 3<br />
3.1. Fig. 4<br />
ATENCIÓN:<br />
Nunca confíe exclusivamente en las características mecánicas. Sólo la manipulación<br />
segura <strong>de</strong>l arma pue<strong>de</strong> garantizar un <strong>uso</strong> seguro <strong>de</strong> la misma. Recuer<strong>de</strong>, es su responsabilidad.
3. Manipulación <strong>de</strong> la pistola<br />
3.2. Carga<br />
3.2.1. Cargador<br />
Una vez extraído el cargador <strong>de</strong> su alojamiento, es posible ver el número<br />
<strong>de</strong> cartuchos restantes en el mismo a través <strong>de</strong> los orificios (3.2.1. Fig. 1).<br />
AVISO:<br />
Utilice únicamente los cargadores <strong>de</strong> esta pistola. Si se utilizan<br />
otros cargadores se pue<strong>de</strong>n producir interrupciones y daños a<br />
la pistola y al cargador.<br />
3.2.2. Carga <strong>de</strong>l cargador<br />
ATENCIÓN:<br />
No intente introducir en el cargador un número <strong>de</strong> cartuchos superior al especificado,<br />
ya que esto podría dar lugar a un fallo <strong>de</strong> alimentación.<br />
No aplique una fuerza excesiva para evitar dañar el cargador. Los cargadores <strong>de</strong>fectuosos<br />
pue<strong>de</strong>n dar lugar a fallos <strong>de</strong> funcionamiento e inutilizar la pistola.<br />
Para llenar el cargador, presione el culote <strong>de</strong> un cartucho (su<br />
parte trasera) hacia abajo sobre la parte <strong>de</strong>lantera <strong>de</strong>l elevador<br />
(o sobre el cartucho en caso <strong>de</strong> que haya uno previamente cargado)<br />
y <strong>de</strong>slícelo completamente bajo los labios <strong>de</strong>l cargador<br />
hasta que el culote <strong>de</strong>l cartucho se encuentre apoyado contra la<br />
parte posterior <strong>de</strong>l cargador. Repita el procedimiento tantas veces<br />
como cartuchos <strong>de</strong>see cargar, respetando siempre el límite<br />
<strong>de</strong> capacidad <strong>de</strong>l cargador (3.2.2. Fig. 1).<br />
El proceso <strong>de</strong> carga pue<strong>de</strong> simplificarse gracias al dispositivo <strong>de</strong> ayuda <strong>de</strong> carga para<br />
cargadores <strong>de</strong> WALTHER: Coloque el dispositivo <strong>de</strong> carga sobre el cargador, con su lateral<br />
más largo hacia atrás (3.2.2. Fig. 2). Presione hacia abajo el dispositivo <strong>de</strong> carga e introduzca un<br />
cartucho con la otra mano (3.2.2. Fig. 3). Deje que el dispositivo <strong>de</strong> carga vuelva a subir. Empuje<br />
el cartucho totalmente hacia a<strong>de</strong>ntro con la mano (3.2.2. Fig. 4). Repita el procedimiento tantas<br />
veces como cartuchos <strong>de</strong>see cargar, respetando siempre el límite <strong>de</strong> capacidad <strong>de</strong>l cargador.<br />
3.2.2. Fig. 2 3.2.2. Fig. 3<br />
3.2.2. Fig. 4<br />
39<br />
3.2.2. Fig. 1<br />
3.2.1. Fig. 1
40<br />
3. Manipulación <strong>de</strong> la pistola<br />
3.2.3. Carga <strong>de</strong> la pistola<br />
• Examine la pistola, tal y como se <strong>de</strong>scribe en la sección 3.1.<br />
• Sujete la pistola con el <strong>de</strong>do fuera <strong>de</strong>l guardamonte y apartado <strong>de</strong>l gatillo, apuntando el arma<br />
en una dirección segura. Introduzca el cargador cargado en su alojamiento hasta que que<strong>de</strong><br />
sujeto en su posición. Para asegurarse <strong>de</strong> que el cargador está introducido por completo y<br />
<strong>de</strong> forma segura, tire hacia abajo <strong>de</strong> la parte visible <strong>de</strong> la tapa inferior <strong>de</strong>l cargador. Si está<br />
<strong>de</strong>bidamente introducido, no <strong>de</strong>be moverse.<br />
• Tire <strong>de</strong> la corre<strong>de</strong>ra completamente hacia atrás y suéltela para que se <strong>de</strong>splace totalmente<br />
hacia a<strong>de</strong>lante.<br />
3.3. Disparo<br />
ATENCIÓN:<br />
Cargue siempre un cartucho en la recámara trasladándolo <strong>de</strong>s<strong>de</strong> el cargador. En caso<br />
contrario, el usuario <strong>de</strong>l arma o las personas que se encuentran cerca podrían resultar<br />
heridas <strong>de</strong> gravedad o incl<strong>uso</strong> muertas. Nunca intente cargar la pistola introduciendo<br />
un cartucho por la ventana <strong>de</strong> expulsión abierta.<br />
PRECAUCIÓN:<br />
En este momento, la pistola está cargada y lista para disparar. La pistola está cargada con<br />
un cartucho y se disparará si se aprieta el gatillo. No olvi<strong>de</strong> que la pistola <strong>de</strong>be apuntar<br />
siempre en una dirección segura y que ha <strong>de</strong> mantener en todo momento los <strong>de</strong>dos y cualquier<br />
otro objeto alejados <strong>de</strong>l gatillo y fuera <strong>de</strong>l guardamonte hasta que <strong>de</strong>cida disparar el<br />
arma. Nunca permita que el arma <strong>de</strong> fuego cargada que<strong>de</strong> fuera <strong>de</strong> su control directo.<br />
• Apunte siempre con el arma en una dirección segura y mantenga el <strong>de</strong>do fuera <strong>de</strong>l guardamonte<br />
hasta que esté listo para disparar.<br />
• La forma <strong>de</strong> sujetar el arma afecta al control <strong>de</strong>l retroceso y <strong>de</strong>l gatillo. El armazón <strong>de</strong> la PPQ<br />
ofrece un gran nivel <strong>de</strong> control, que permite al tirador disponer <strong>de</strong> un agarre elevado, muy<br />
cercano al eje <strong>de</strong>l ánima <strong>de</strong>l arma.<br />
• Mientras sujeta con firmeza el arma por la empuñadura, coloque el <strong>de</strong>do sobre la superficie<br />
frontal <strong>de</strong>l gatillo y muévalo lentamente. Apriete el gatillo hasta que éste alcance su límite <strong>de</strong><br />
recorrido. Cuando el gatillo llega atrás, el percutor se libera y golpea al fulminante. Al disparar,<br />
la corre<strong>de</strong>ra se mueve hacia atrás para extraer y expulsar la vaina <strong>de</strong>l cartucho usado. A<br />
continuación, la corre<strong>de</strong>ra vuelve hacia a<strong>de</strong>lante e introduce el siguiente cartucho <strong>de</strong>l cargador<br />
en la recámara <strong>de</strong>l cañón.<br />
• Tras disparar, <strong>de</strong>be <strong>de</strong>jar que el gatillo regrese a su posición original antes <strong>de</strong> disparar <strong>de</strong><br />
nuevo. Mantenga el <strong>de</strong>do apartado <strong>de</strong>l gatillo y fuera <strong>de</strong>l guardamonte hasta que esté listo<br />
para disparar <strong>de</strong> nuevo. Pue<strong>de</strong> repetir esta secuencia <strong>de</strong> pasos hasta disparar todos los<br />
cartuchos.
3. Manipulación <strong>de</strong> la pistola<br />
• En ese momento, el elevador presiona hacia arriba la palanca <strong>de</strong> retención para mantener la<br />
corre<strong>de</strong>ra bloqueada en posición abierta.<br />
PRECAUCIÓN:<br />
Utilice siempre protección auditiva y gafas <strong>de</strong> seguridad a<strong>de</strong>cuadas para armas <strong>de</strong><br />
fuego. Al disparar la pistola o soltar la palanca <strong>de</strong> retención para liberar la corre<strong>de</strong>ra,<br />
ésta se moverá con una fuerza y velocidad consi<strong>de</strong>rables. A fin <strong>de</strong> evitar lesiones,<br />
asegúrese <strong>de</strong> que ninguna parte <strong>de</strong> su cuerpo se encuentra en la trayectoria <strong>de</strong> la<br />
corre<strong>de</strong>ra.<br />
3.4. Cambio <strong>de</strong> cargadores vacíos<br />
Tras disparar el último cartucho, el elevador presiona hacia arriba la palanca <strong>de</strong> retención para<br />
mantener la corre<strong>de</strong>ra bloqueada en posición abierta.<br />
• Presione el retén <strong>de</strong>l cargador y extraiga este último.<br />
• Para seguir disparando, introduzca otro cargador con munición.<br />
• Tire <strong>de</strong> la corre<strong>de</strong>ra completamente hacia atrás y suéltela para que se <strong>de</strong>splace totalmente<br />
hacia a<strong>de</strong>lante.<br />
PRECAUCIÓN:<br />
la pistola quedará lista para disparar.<br />
Apunte siempre en una dirección segura, y no olvi<strong>de</strong> mantener el <strong>de</strong>do fuera <strong>de</strong>l<br />
guardamonte y apartado <strong>de</strong>l gatillo hasta que esté listo para disparar.<br />
3.5. Descarga <strong>de</strong> la pistola<br />
• Apunte el arma en una dirección segura. Mantenga<br />
el <strong>de</strong>do apartado <strong>de</strong>l gatillo y fuera <strong>de</strong>l<br />
guardamonte. Presione el retén <strong>de</strong>l cargador y<br />
extraiga este último (3.5. Fig. 1).<br />
• Sujete la corre<strong>de</strong>ra <strong>de</strong>s<strong>de</strong> <strong>de</strong>trás por los laterales<br />
aserrados con el pulgar y los <strong>de</strong>dos (3.5. Fig. 2) y<br />
tire completamente hacia atrás con firmeza para<br />
extraer cualquier cartucho que pudiera encontrarse<br />
en la recámara y vaciar la pistola. No obstruya<br />
la ventana <strong>de</strong> expulsión, ya que podría impedir<br />
la salida <strong>de</strong>l cartucho.<br />
• Bloquee la corre<strong>de</strong>ra en posición abierta. Para ello,<br />
<strong>de</strong>je que la corre<strong>de</strong>ra avance un poco <strong>de</strong>s<strong>de</strong> la 3.5. Fig. 2<br />
41<br />
3.5. Fig. 1
posición totalmente retrasada mientras presiona<br />
hacia arriba la palanca <strong>de</strong> retención (3.5. Fig. 3).<br />
• Examine visualmente la recámara para asegurarse<br />
<strong>de</strong> que está vacía (3.5. Fig. 4). Mire en la<br />
recámara y en el alojamiento <strong>de</strong>l cargador. Compruebe<br />
que no queda munición en la pistola.<br />
• Descargue el cargador. Para ello, sujételo <strong>de</strong> modo<br />
que el extremo a través <strong>de</strong>l que se cargan los cartuchos<br />
no apunte hacia usted y presione cada<br />
cartucho hacia a<strong>de</strong>lante y afuera <strong>de</strong>l cargador.<br />
42<br />
3. Manipulación <strong>de</strong> la pistola<br />
ATENCIÓN:<br />
Recuer<strong>de</strong> también que cada vez que libera la corre<strong>de</strong>ra mientras la pistola contiene<br />
un cargador con cartuchos, el arma se recarga.<br />
3.6. Limpieza <strong>de</strong> disparos fallidos<br />
3.5. Fig. 3<br />
3.5. Fig. 4<br />
• Si un cartucho no se dispara, espere sesenta segundos mientras apunta en una dirección<br />
segura.<br />
• Siga el procedimiento especificado en la sección 3.5, “Descarga <strong>de</strong> la pistola”.<br />
• Transcurrido ese tiempo, pue<strong>de</strong> examinar con seguridad la recámara <strong>de</strong>l cañón e inspeccionar<br />
visualmente el ánima en busca <strong>de</strong> obstrucciones. Asegúrese <strong>de</strong> que no haya cartuchos<br />
en la recámara ni obstrucciones en el cañón.
4. Desmontaje, limpieza, lubricación y mantenimiento<br />
4. Desmontaje, limpieza, lubricación y mantenimiento<br />
ATENCIÓN:<br />
Asegúrese <strong>de</strong> que el arma está <strong>de</strong>scargada (el cargador se ha extraído <strong>de</strong> la pistola<br />
y la recámara está vacía) y el cargador está vacío.<br />
4.1. Componentes principales<br />
ATENCIÓN:<br />
Para <strong>de</strong>smontar, se <strong>de</strong>be apretar el gatillo. Por lo tanto si usted no ha <strong>de</strong>scargado la<br />
pistola correctamente y ha quedado algún cartucho en la recámara, la pistola podría<br />
dispararse causándole a usted o a otras personas graves lesiones e incl<strong>uso</strong> la muerte,<br />
a<strong>de</strong>más <strong>de</strong> daños materiales Por ello, usted <strong>de</strong>be la recámara y el cargador para<br />
revisarlos minuciosamente y asegurarse <strong>de</strong> que están vacíos antes <strong>de</strong> apretar el<br />
gatillo.<br />
4.1.1. Desmontaje<br />
• Extraiga el cargador y <strong>de</strong>scargue la pistola. Bloquee<br />
la corre<strong>de</strong>ra en posición abierta. Mire en la<br />
recámara y en el alojamiento <strong>de</strong>l cargador. Compruebe<br />
que no queda munición en la pistola.<br />
• Cierre la corre<strong>de</strong>ra. Para ello, tire ligeramente<br />
hacia atrás <strong>de</strong> la corre<strong>de</strong>ra y suéltela para que<br />
regrese a la posición a<strong>de</strong>lantada.<br />
• Oriente la boca <strong>de</strong>l cañón en una dirección segura<br />
y <strong>de</strong>samartille el mecanismo percutor accionando<br />
el gatillo.<br />
• Sujete el retén <strong>de</strong> <strong>de</strong>smontaje <strong>de</strong>s<strong>de</strong> arriba por los<br />
dos lados y presione hacia abajo (4.1.1. Fig. 1).<br />
• Lleve la corre<strong>de</strong>ra hacia a<strong>de</strong>lante y extráigala <strong>de</strong>l<br />
armazón.<br />
• Extraiga el conjunto <strong>de</strong> guía <strong>de</strong>l resorte recuperador<br />
<strong>de</strong> <strong>de</strong>bajo <strong>de</strong>l cañón mientras aprieta el resorte<br />
(4.1.1. Fig. 2).<br />
• Quite el cañón <strong>de</strong> la corre<strong>de</strong>ra.<br />
• Los componentes principales <strong>de</strong> la pistola se<br />
muestran en 4.1.1. Fig. 3.<br />
43<br />
4.1.1. Fig. 1<br />
4.1.1. Fig. 2<br />
4.1.1. Fig. 3
4. Desmontaje, limpieza, lubricación y mantenimiento<br />
4.1.2. Montaje<br />
• Sujete la corre<strong>de</strong>ra en posición invertida. Coloque<br />
el cañón en su interior, con los tetones en la<br />
posición que se indica en 4.1.2. Fig. 1.<br />
• Introduzca el conjunto <strong>de</strong> guía <strong>de</strong>l resorte recuperador:<br />
Coloque el extremo pequeño (negro) <strong>de</strong><br />
la guía <strong>de</strong>l resorte recuperador en la montura <strong>de</strong>l<br />
muelle que hay en el frontal <strong>de</strong> la corre<strong>de</strong>ra y, a<br />
continuación, inserte el extremo gran<strong>de</strong> <strong>de</strong> polímero<br />
<strong>de</strong>l resorte recuperador en el hueco inferior<br />
<strong>de</strong>l cañón mientras mantiene presionado el muelle<br />
(4.1.2. Fig. 1 y 2).<br />
NOTA:<br />
Es normal que el conjunto <strong>de</strong> guía <strong>de</strong>l resorte<br />
recuperador se doble al instalarse parcialmente.<br />
• Empuje la corre<strong>de</strong>ra <strong>de</strong>s<strong>de</strong> el frontal e introdúzcala<br />
en las guías que a tal fin presenta el armazón (4.1.2.<br />
Fig. 3), haciendo que entre lo bastante como para<br />
que el retén <strong>de</strong> <strong>de</strong>smontaje que<strong>de</strong> encajado en su<br />
posición y sin olvidar que la corre<strong>de</strong>ra también <strong>de</strong>be<br />
entrar en las guías traseras <strong>de</strong>l armazón. Suelte la<br />
corre<strong>de</strong>ra y <strong>de</strong>je que se mueva totalmente hacia<br />
a<strong>de</strong>lante hasta quedar bloqueada en su posición.<br />
4.2. Conjunto <strong>de</strong>l percutor<br />
4.2.1. Fig. 1<br />
4.2.1. Extracción <strong>de</strong>l conjunto <strong>de</strong>l percutor<br />
• Desmonte la pistola. Apoye el extremo <strong>de</strong> la boca <strong>de</strong> la corre<strong>de</strong>ra sobre una superficie lisa y<br />
plana. Sujete la corre<strong>de</strong>ra por los laterales aserrados, introduzca el saliente <strong>de</strong>l percutor que<br />
sobresale por la abertura cuadrada que se encuentra en la parte superior <strong>de</strong>recha <strong>de</strong> la tapa<br />
<strong>de</strong>l extremo <strong>de</strong> la corre<strong>de</strong>ra con un punzón <strong>de</strong> 2 mm (4.2.1. Fig. 1) y extraiga dicha tapa <strong>de</strong>slizándola<br />
hacia abajo (4.2.1. Fig. 2).<br />
• Saque el conjunto <strong>de</strong>l percutor <strong>de</strong> la corre<strong>de</strong>ra (4.2.1. Fig. 3).<br />
4.2.1. Fig. 2<br />
44<br />
4.1.2. Fig. 1<br />
4.1.2. Fig. 2<br />
4.1.2. Fig. 3<br />
4.2.1. Fig. 3 4.2.1. Fig. 4
4. Desmontaje, limpieza, lubricación y mantenimiento<br />
4.2.2. Instalación <strong>de</strong>l conjunto <strong>de</strong>l percutor<br />
• Inserte el conjunto <strong>de</strong>l percutor<br />
• Utilice la tapa <strong>de</strong>l extremo <strong>de</strong> la corre<strong>de</strong>ra para empujar el conjunto <strong>de</strong>l percutor hacia el<br />
interior <strong>de</strong> la corre<strong>de</strong>ra y vuelva a introducir la tapa <strong>de</strong>l extremo <strong>de</strong> la corre<strong>de</strong>ra <strong>de</strong>s<strong>de</strong> la<br />
parte inferior <strong>de</strong> ésta hasta que encaje en su lugar (consulte 4.2.1. Fig. 2).<br />
4.3. Extractor<br />
4.3.1. Desmontaje <strong>de</strong>l extractor<br />
ATENCIÓN:<br />
Al quitar el extractor, vigile siempre el seguro<br />
<strong>de</strong>l percutor y el émbolo <strong>de</strong>l extractor<br />
para que no salgan <strong>de</strong>spedidos.<br />
Coloque la corre<strong>de</strong>ra en posición invertida con la<br />
boca apuntando hacia la izquierda. Presione el émbolo<br />
<strong>de</strong>l extractor con un punzón <strong>de</strong> 2 mm (4.3.1.<br />
Fig. 1). Cubra el seguro <strong>de</strong>l percutor y el émbolo <strong>de</strong>l<br />
extractor con un <strong>de</strong>do mientras hace girar el extractor<br />
para sacarlo. Saque el conjunto <strong>de</strong>l seguro <strong>de</strong>l<br />
percutor y el conjunto <strong>de</strong>l émbolo <strong>de</strong>l extractor <strong>de</strong> la<br />
corre<strong>de</strong>ra.<br />
4.3.2. Instalación <strong>de</strong>l extractor<br />
Coloque la corre<strong>de</strong>ra en posición invertida con la<br />
boca apuntando hacia la izquierda. Introduzca el<br />
conjunto <strong>de</strong>l seguro <strong>de</strong>l percutor y el conjunto <strong>de</strong>l<br />
4.3.2. Fig. 2<br />
émbolo <strong>de</strong>l extractor en la corre<strong>de</strong>ra (4.3.2. Fig. 1). El<br />
resorte <strong>de</strong> presión <strong>de</strong>l seguro <strong>de</strong>berá entrar en la cavidad<br />
prevista para ello en la corre<strong>de</strong>ra. La posición<br />
será correcta si el seguro se encuentra ahora ligeramente<br />
<strong>de</strong>bajo <strong>de</strong> la superficie <strong>de</strong> <strong>de</strong>slizamiento <strong>de</strong>l<br />
cartucho.<br />
Alinee el extremo posterior <strong>de</strong>l extractor con la ranu-<br />
4.3.2. Fig. 3<br />
ra correspondiente y presiónelo en dirección a la<br />
corre<strong>de</strong>ra con el pulgar <strong>de</strong> la otra mano. Empuje hacia abajo el émbolo <strong>de</strong>l extractor con un punzón<br />
<strong>de</strong> 2 mm y presione el extractor hasta unirlos, pero sin introducir <strong>de</strong>l todo el extractor. Quite<br />
el punzón <strong>de</strong> 2 mm mientras el orificio <strong>de</strong>l extractor sujeta el émbolo <strong>de</strong>l extractor (4.3.2. Fig. 2).<br />
Mantenga el émbolo <strong>de</strong>l seguro al mismo nivel que la superficie <strong>de</strong> la corre<strong>de</strong>ra. Introduzca por<br />
completo el extractor hasta que el émbolo encaje en el orificio <strong>de</strong>l extractor (4.3.2. Fig. 3).<br />
45<br />
4.3.1. Fig. 1<br />
4.3.2. Fig. 1
4.4. Cargador<br />
4.4.1. Desmontaje<br />
4. Desmontaje, limpieza, lubricación y mantenimiento<br />
ATENCIÓN:<br />
Utilice siempre protección ocular a<strong>de</strong>cuada al <strong>de</strong>smontar el cargador. Proceda con<br />
mucho cuidado al <strong>de</strong>smontar el cargador. El muelle <strong>de</strong>l cargador está sometido a<br />
una elevada presión. Vigile el retén <strong>de</strong> la tapa inferior y el muelle mientras <strong>de</strong>smonta<br />
esta última, ya que pue<strong>de</strong>n salir <strong>de</strong>spedidos y causar lesiones.<br />
1. Utilice un punzón <strong>de</strong> 4 mm para presionar el retén <strong>de</strong> la<br />
tapa inferior a través <strong>de</strong>l orificio <strong>de</strong> ésta (4.4.1. Fig. 1).<br />
2. Deslice la tapa inferior hacia a<strong>de</strong>lante y extráigala <strong>de</strong>l<br />
cuerpo <strong>de</strong>l cargador mientras mantiene presionado el retén<br />
<strong>de</strong> la tapa.<br />
3. Saque el retén <strong>de</strong> la tapa y el muelle <strong>de</strong>l cuerpo <strong>de</strong>l cargador<br />
con mucho cuidado a través <strong>de</strong> la parte inferior <strong>de</strong>l<br />
cargador.<br />
4. Coloque el cuerpo con la parte <strong>de</strong>recha hacia arriba y extraiga<br />
el elevador a través <strong>de</strong> la parte inferior <strong>de</strong>l cuerpo.<br />
4.4.2. Montaje<br />
1. Monte <strong>de</strong> nuevo el elevador, el muelle <strong>de</strong>l cargador y el<br />
retén <strong>de</strong> la tapa inferior en or<strong>de</strong>n inverso en el cuerpo con<br />
la misma orientación que tenían antes <strong>de</strong> ser <strong>de</strong>smontados<br />
(4.4.2. Fig. 1 y 2). No aplique una fuerza excesiva al<br />
montar el cargador.<br />
2. Mientras presiona el retén <strong>de</strong> la tapa inferior en el cuerpo,<br />
<strong>de</strong>slice la tapa en el cuerpo <strong>de</strong> modo que la prominencia<br />
redon<strong>de</strong>ada <strong>de</strong> ésta encaje en el orificio <strong>de</strong> la tapa. En ese<br />
momento podrá oír un clic característico.<br />
46<br />
4.4.1. Fig. 1<br />
4.4.2. Fig. 1<br />
4.4.2. Fig. 2
4. Desmontaje, limpieza, lubricación y mantenimiento<br />
4.5. Limpieza <strong>de</strong> la pistola<br />
ATENCIÓN:<br />
Esta arma <strong>de</strong> fuego es un instrumento <strong>de</strong> precisión. Para garantizar un funcionamiento<br />
óptimo es necesario seguir un procedimiento <strong>de</strong> mantenimiento rutinario.<br />
Asegúrese <strong>de</strong> que el arma está <strong>de</strong>scargada (el cargador se ha extraído <strong>de</strong> la pistola<br />
y la recámara está vacía) y el cargador está vacío.<br />
Es conveniente limpiar la pistola tras cada <strong>uso</strong> o en aquellos casos en los que haya quedado<br />
expuesta a condiciones climáticas extremas. A<strong>de</strong>más, antes <strong>de</strong> usarla por primera vez, es recomendable<br />
limpiar el arma. A fin <strong>de</strong> protegerla contra la corrosión, el arma ha sido tratada con<br />
un conservante o aceite. Antes <strong>de</strong> utilizarla, es necesario eliminar todo el exceso <strong>de</strong> aceite <strong>de</strong>l<br />
ánima, la recámara y las áreas expuestas usando un paño limpio.<br />
Desmonte la pistola. Partiendo <strong>de</strong>l extremo <strong>de</strong> la recámara, cepille el ánima <strong>de</strong>l cañón y la recámara<br />
con un disolvente para pólvora y un cepillo a<strong>de</strong>cuado. Elimine el plomo y los residuos<br />
<strong>de</strong> los disparos <strong>de</strong>l interior <strong>de</strong>l cañón con un cepillo <strong>de</strong> latón hasta que el ánima y la recámara<br />
que<strong>de</strong>n completamente limpios. Limpie el arma con un paño.<br />
Utilizando un cepillo pequeño mojado en disolvente, elimine todos los restos <strong>de</strong> los alre<strong>de</strong>dores<br />
<strong>de</strong>l cañón, la recámara, el extractor y las zonas adyacentes que hayan estado expuestas a la<br />
acción <strong>de</strong> la pólvora o al residuo <strong>de</strong>l fulminante. Elimine todos los residuos <strong>de</strong>l armazón con un<br />
cepillado ligero y disolvente. Una vez finalizada la limpieza, aplique una ligera capa <strong>de</strong> aceite<br />
para armas <strong>de</strong> gran calidad a todas las superficies metálicas externas y frote bien hasta limpiarlas.<br />
Si tiene previsto usar o guardar el arma en un clima frío, recuer<strong>de</strong> que <strong>de</strong>be utilizar un<br />
aceite que no se congele a bajas temperaturas.<br />
PRECAUCIÓN:<br />
Siga siempre las instrucciones incluidas con el limpiador y el lubricante <strong>de</strong> armas.<br />
Algunos limpiadores pue<strong>de</strong>n causar daños a la pistola. No introduzca la pistola en<br />
disolvente ni la limpie por medios ultrasónicos durante periodos <strong>de</strong> tiempo prolongados<br />
(la temperatura máxima para limpiezas ultrasónicas es <strong>de</strong> 50 °C).<br />
Utilice únicamente disolventes diseñados específicamente para el mantenimiento <strong>de</strong><br />
armas <strong>de</strong> fuego. Si no se tienen en cuenta estas precauciones, el acabado <strong>de</strong>l arma<br />
pue<strong>de</strong> resultar dañado. No se <strong>de</strong>ben usar disolventes amoniacados ni otros disolventes<br />
alcalinos fuertes con armas WALTHER.<br />
4.6. Lubricación<br />
Tras limpiar toda la pistola, utilice un paño para aplicar una capa fina <strong>de</strong> aceite <strong>de</strong> gran calidad<br />
para armas a todas las superficies metálicas externas y frote hasta limpiarlas.<br />
No lubrique la pistola hasta el extremo <strong>de</strong> que el aceite llegue a gotear o chorrear, ya que en el<br />
exceso <strong>de</strong> lubricante pue<strong>de</strong>n quedar atrapadas gran<strong>de</strong>s cantida<strong>de</strong>s <strong>de</strong> suciedad, pólvora no<br />
quemada y residuos que pue<strong>de</strong>n entorpecer el correcto funcionamiento <strong>de</strong>l arma. Recuer<strong>de</strong><br />
que en ningún caso <strong>de</strong>be entrar aceite en el canal <strong>de</strong>l percutor (4.6. Fig. 1).<br />
47
4. Desmontaje, limpieza, lubricación y mantenimiento<br />
• Cañón:<br />
Aplique con un paño una capa ligera <strong>de</strong> aceite <strong>de</strong> alta calidad a todas las superficies externas<br />
y a la pendiente don<strong>de</strong> el conjunto <strong>de</strong> bloqueo eleva el cañón.<br />
• Armazón:<br />
Es conveniente aplicar una capa fina <strong>de</strong> aceite <strong>de</strong> gran calidad para armas al mecanismo.<br />
Ponga sólo una gota <strong>de</strong> aceite en las guías <strong>de</strong> la corre<strong>de</strong>ra y en la barra <strong>de</strong>l gatillo.<br />
• Corre<strong>de</strong>ra:<br />
Ponga sólo una gota <strong>de</strong> aceite en los puntos marcados en la figura.<br />
• Cargador:<br />
Aplique una capa ligera <strong>de</strong> aceite <strong>de</strong> alta calidad para armas a todas las superficies metálicas<br />
externas.<br />
4.6. Fig. 1<br />
4.7. Mantenimiento antes <strong>de</strong>l almacenamiento<br />
Debe cumplir en todo momento la normativa referente al almacenamiento <strong>de</strong> armas <strong>de</strong> fuego.<br />
Por ello, es obligatorio que conozca toda la legislación local, regional y nacional relativa al almacenamiento<br />
seguro <strong>de</strong> armas <strong>de</strong> fuego y munición. Al almacenar el arma, no la guar<strong>de</strong> en<br />
un lugar que pueda atraer o retener la humedad como, por ejemplo, cuero o tejidos gruesos. Si<br />
48
4. Desmontaje, limpieza, lubricación y mantenimiento<br />
va a almacenar el arma durante un periodo prolongado, es recomendable engrasar el ánima, la<br />
recámara y el mecanismo interno con un aceite lubricante <strong>de</strong> alta calidad o un conservante<br />
para armas <strong>de</strong> fuego.<br />
Debe aplicarse una capa <strong>de</strong> aceite anticorrosión a los mecanismos externos, la corre<strong>de</strong>ra, el<br />
cañón y el cargador.<br />
Antes <strong>de</strong> usar el arma <strong>de</strong> nuevo, no olvi<strong>de</strong> limpiarla. Cada vez que limpie el arma compruebe si<br />
hay señales <strong>de</strong> <strong>de</strong>sgaste. De ser así, no utilice el arma. Envíela a WALTHER para que sea reparada<br />
o llévela a un armero cualificado para que la revise.<br />
49
5. Adaptación <strong>de</strong> la pistola al usuario<br />
5.1. Empuñadura<br />
Si el lomo <strong>de</strong> la empuñadura montado en la pistola<br />
no se adapta con comodidad a su mano, pue<strong>de</strong> instalar<br />
otro <strong>de</strong> forma y tamaño distintos.<br />
Para ello, extraiga el pasador <strong>de</strong> la parte inferior <strong>de</strong>l<br />
lomo utilizando un punzón (4 mm), cambie el lomo<br />
por uno que le resulte más cómodo y vuelva a colocar<br />
el pasador (5.1. Fig. 1).<br />
5.2. Orificio para correa<br />
5. Adaptación <strong>de</strong> la pistola al usuario<br />
La parte inferior <strong>de</strong>l lomo presenta un orificio para insertar una correa. El pasador que se utiliza<br />
para sujetar el lomo forma, junto con el hueco <strong>de</strong>l mismo, un orificio <strong>de</strong>stinado a una correa.<br />
Para colocar la correa, saque el pasador <strong>de</strong> la parte inferior <strong>de</strong>l lomo con un punzón <strong>de</strong> 4 mm,<br />
introduzca la correa y, a continuación, vuelva a colocar el pasador.<br />
5.3. Miras<br />
Es posible cambiar tanto el punto <strong>de</strong> mira como el alza y a<strong>de</strong>más, se pue<strong>de</strong> ajustar la lateralidad<br />
y la altura <strong>de</strong>l punto <strong>de</strong> impacto.<br />
ATENCIÓN:<br />
Asegúrese <strong>de</strong> que el arma está <strong>de</strong>scargada (el cargador se ha extraído <strong>de</strong> la pistola<br />
y la recámara está vacía) y el cargador está vacío.<br />
AJUSTE LATERAL<br />
Los ajustes <strong>de</strong> lateralidad se llevan a cabo <strong>de</strong>splazando el alza<br />
<strong>de</strong> acero <strong>de</strong> lado a lado con la herramienta <strong>de</strong> ajuste <strong>de</strong>l alza. Si<br />
los disparos se agrupan a la <strong>de</strong>recha, mueva el alza hacia la izquierda<br />
y, si se agrupan a la izquierda, <strong>de</strong>splace el alza hacia la<br />
<strong>de</strong>recha.<br />
ATENCIÓN:<br />
La mira estándar <strong>de</strong> acero WALTHER (5.3. Fig. 1) encaja con<br />
una precisión absoluta. La herramienta <strong>de</strong> ajuste <strong>de</strong>l alza, que<br />
se ofrece como accesorio opcional, es muy recomendable<br />
para ajustar la lateralidad <strong>de</strong>l arma. No <strong>de</strong>smonte el manguito<br />
que hay bajo el alza <strong>de</strong> acero.<br />
50<br />
5.1. Fig. 1<br />
5.3. Fig. 1
5. Adaptación <strong>de</strong> la pistola al usuario<br />
AJUSTE EN ALTURA<br />
Los ajustes en altura se llevan a cabo utilizando<br />
puntos <strong>de</strong> mira <strong>de</strong> distintas alturas. Se ofrecen puntos<br />
<strong>de</strong> mira <strong>de</strong> acero <strong>de</strong> diferentes alturas como<br />
accesorio opcional.<br />
Si los disparos se agrupan <strong>de</strong>masiado abajo, utilice<br />
un punto <strong>de</strong> mira más bajo. En cambio, si se agru-<br />
5.3. Fig. 2<br />
pan <strong>de</strong>masiado arriba, use uno más alto. Los puntos<br />
<strong>de</strong> mira cuentan con una numeración, <strong>de</strong> manera que, cuanto mayor es el número, más alto es<br />
el punto <strong>de</strong> mira. Cada nivel ofrece una corrección <strong>de</strong> impactos <strong>de</strong> aproximadamente 5 cm a<br />
una distancia <strong>de</strong> 25 m <strong>de</strong>l objetivo.<br />
Para cambiar el punto <strong>de</strong> mira, <strong>de</strong>smonte la pistola como se indica en las secciones anteriores.<br />
Extraiga el tornillo <strong>de</strong>l punto <strong>de</strong> mira utilizando un <strong>de</strong>stornillador y presione el punto <strong>de</strong> mira<br />
hacia arriba hasta sacarlo.<br />
El montaje se realiza invirtiendo el proceso (5.3. Fig. 2). Recuer<strong>de</strong> que es necesario comprobar<br />
que el tornillo y la rosca <strong>de</strong>l interior <strong>de</strong>l punto <strong>de</strong> mira <strong>de</strong> acero están libres <strong>de</strong> aceite o grasa.<br />
La rosca <strong>de</strong>l tornillo <strong>de</strong>l punto <strong>de</strong> mira <strong>de</strong>be asegurarse utilizando un adhesivo industrial (como,<br />
por ejemplo, Loctite 648). Apriete el tornillo <strong>de</strong>l punto <strong>de</strong> mira aplicando un par <strong>de</strong> 1 Nm.<br />
51
6. Despiezado<br />
52<br />
6. Despiezado
7. Lista <strong>de</strong> piezas<br />
7. Lista <strong>de</strong> piezas<br />
Nº Designación Nº Designación<br />
1.1 Tornillo, punto <strong>de</strong> mira 24 Gatillo completo<br />
1.2 Punto <strong>de</strong> mira 26 Conjunto <strong>de</strong> palanca <strong>de</strong> retención<br />
3 Corre<strong>de</strong>ra 27 Pasador, palanca <strong>de</strong> <strong>de</strong>smontaje<br />
5 Extractor 28.1 Resorte, Bloqueo <strong>de</strong>l cañón<br />
6 Conjunto <strong>de</strong> émbolo <strong>de</strong> extractor 28.2 Bloqueo <strong>de</strong>l cañón<br />
7 Resorte, retén <strong>de</strong>l extractor <strong>29</strong> Armazón, con conjunto <strong>de</strong> bloqueo<br />
7.1 Resorte, retén <strong>de</strong>l cargador <strong>29</strong>.1 Grupo <strong>de</strong> bloqueo<br />
8 Alza 30 Resorte, palanca <strong>de</strong> retención<br />
15 Conjunto <strong>de</strong>l percutor 31 Pasador 3x24<br />
16 Resorte <strong>de</strong> retorno <strong>de</strong>l gatillo 32 Conjunto <strong>de</strong> alojamiento <strong>de</strong>l fiador<br />
18 Conjunto <strong>de</strong> seguro <strong>de</strong>l percutor 32.8 Retenida <strong>de</strong>l percutor<br />
19 Cañón 33 Cargador<br />
20 Tapa <strong>de</strong>l extremo <strong>de</strong> la corre<strong>de</strong>ra 35 Pasador 4x16<br />
21 Conjunto <strong>de</strong> guía <strong>de</strong>l resorte recuperador 36 Retén <strong>de</strong>l cargador<br />
22 Pasador 3x28 38 Lomo S, M, L<br />
23 Retén <strong>de</strong> <strong>de</strong>smontaje 48 Pasador, retén <strong>de</strong>l cargador<br />
53
8. Especificaciones técnicas<br />
54<br />
8. Especificaciones técnicas<br />
Calibre 9 mm x19 / 9mm x 21 .40 S&W<br />
Capacidad <strong>de</strong>l cargador 15 cartuchos 12 cartuchos<br />
Dimensiones totales,<br />
(largo/anchura/alto)<br />
180 / 34 / 135 mm 184 / 34 / 135 mm<br />
Longitud <strong>de</strong>l cañón 102 mm 106 mm<br />
Estriado<br />
250 mm<br />
estriado a la <strong>de</strong>recha<br />
Perfil <strong>de</strong>l cañón 6 campos y estrías<br />
406 mm<br />
estriado a la <strong>de</strong>recha<br />
Radio <strong>de</strong> miras 156 mm 158 mm<br />
Anchura,<br />
muestra <strong>de</strong>l alza<br />
4,6 (estándar, #2)<br />
3,8 (#1)<br />
Anchura, punto <strong>de</strong> mira 3,6 mm<br />
Peso, pistola con cargador<br />
vacío<br />
695 g 705 g<br />
Peso, cargador vacío 80 g<br />
Energía en la boca <strong>de</strong>l cañón<br />
500 J<br />
475 J<br />
E3 [J]. Peso <strong>de</strong> la bala [g]<br />
8 g<br />
11,7 g<br />
Mecanismo <strong>de</strong> operación Disparo a cerrojo cerrado con principio <strong>de</strong> retroceso corto<br />
Sistema<br />
Pistola semiautomática disparada por percutor<br />
(sin martillo)<br />
Acción <strong>de</strong>l gatillo Quick Defense Trigger<br />
Fuerza/Recorrido <strong>de</strong>l gatillo 25 N / 9 mm (idéntico para todos los disparos)<br />
Materiales<br />
Corre<strong>de</strong>ra y cañón: acero al carbono tratado con<br />
Tenifer® Armazón: polímero <strong>de</strong> alta resistencia<br />
Dispositivos <strong>de</strong> seguridad Seguros <strong>de</strong> gatillo y percutor, seguro contra caídas<br />
Datos basados en cifras promedio. Los valores reales pue<strong>de</strong>n variar.
Français<br />
Mo<strong>de</strong> d'emploi<br />
WALTHER PPQ<br />
55
REMARQUE<br />
Ce mo<strong>de</strong> d’emploi se réfère à l'utilisation du pistolet par <strong>de</strong>s civils. Les prescriptions<br />
relatives à l’utilisation en service / professionnelle du pistolet peuvent être différentes<br />
<strong>de</strong>s indications figurant dans le présent mo<strong>de</strong> d’emploi.<br />
Dans ce mo<strong>de</strong> d’emploi, la position considérée du pistolet est celle correspondant à<br />
la position <strong>de</strong> tir normale, c’est-à-dire le canon à l’horizontale, la bouche orientée<br />
vers l’avant, et la poignée dirigée vers le bas. Les indications telles que «en haut», «en<br />
bas», «à droite», «à gauche» ainsi que «à l’arrière» et «à l’avant» se réfèrent au point<br />
<strong>de</strong> vue du tireur tenant l’arme dans une position normale <strong>de</strong> tir.<br />
Les explications données se basent sur l'utilisation par <strong>de</strong>s droitiers. Les gauchers<br />
sont priés d’adapter <strong>de</strong> manière adéquate leur utilisation avec la main gauche.<br />
56
TABLE DES MATIÈRES<br />
1. Consignes <strong>de</strong> sécurité 58<br />
2. Description du produit 59<br />
2.1. Mo<strong>de</strong> opératoire 59<br />
2.2. Contenu <strong>de</strong> la livraison 60<br />
2.3. Munitions 60<br />
2.4. Éléments fonctionnels 61<br />
3. Utilisation 64<br />
3.1. Contrôle du pistolet 64<br />
3.2. Chargement 65<br />
3.3. Tir avec 66<br />
3.4. Changement <strong>de</strong> chargeur 67<br />
3.5. Déchargement 67<br />
3.6. Consignes en cas <strong>de</strong> dysfonctionnement 68<br />
4. Démontage, nettoyage, graissage et entretien 69<br />
4.1. Éléments principaux 69<br />
4.2. Bloc percuteur 70<br />
4.3. Extracteur 71<br />
4.4. Chargeur 72<br />
4.5. Nettoyage 73<br />
4.6. Graissage 73<br />
4.7. Préparation au rangement / stockage 74<br />
5. Adaptation du pistolet à l’utilisateur 76<br />
5.1. Poignée 76<br />
5.2. Œillet pour dragonne 76<br />
5.3. Dispositif <strong>de</strong> visée 76<br />
6. Vue éclatée 78<br />
7. Liste <strong>de</strong>s pièces 79<br />
8. Caractéristiques techniques 80<br />
57
1. Consignes <strong>de</strong> sécurité<br />
58<br />
1. Consignes <strong>de</strong> sécurité<br />
• Lisez attentivement et entièrement le présent mo<strong>de</strong> d’emploi avant d’utiliser le pistolet. Assurezvous<br />
d’avoir parfaitement compris le mo<strong>de</strong> d’emploi avant d’utiliser le pistolet. Chacune <strong>de</strong>s <strong>de</strong>scriptions<br />
relatives aux parties du pistolet et chaque procédé ne sont généralement présentés<br />
qu’une seule fois dans le présent mo<strong>de</strong> d’emploi. Pour cette raison, certaines parties contiennent<br />
le cas échéant <strong>de</strong>s renvois vers <strong>de</strong>s explications déjà disponibles dans d’autres chapitres.<br />
• Il est impératif <strong>de</strong> vérifier que le pistolet est déchargé (chargeur retiré du pistolet et boîte <strong>de</strong><br />
culasse vi<strong>de</strong>), que le canon est exempt <strong>de</strong> tout corps étranger et le chargeur vi<strong>de</strong> avant <strong>de</strong><br />
réaliser le contrôle <strong>de</strong> sécurité, avant toute utilisation, en cas <strong>de</strong> dysfonctionnement et avant<br />
le nettoyage.<br />
• Rangez le pistolet et les munitions séparément. Les personnes non autorisées (en particulier<br />
les enfants) ne doivent pas y avoir accès.<br />
• Maniez le pistolet non chargé comme s’il était chargé. Tenez toujours le pistolet <strong>de</strong> sorte à<br />
ne mettre en danger ni vous-même ni d’autres personnes. Pointez toujours le pistolet dans<br />
une direction sûre ! Ne pointez jamais le pistolet en direction <strong>de</strong> personnes ou d’objectifs sur<br />
lesquels vous ne voulez pas tirer, que le pistolet soit chargé ou non. Ne jamais oublier que<br />
même l’arme la plus sûre peut <strong>de</strong>venir dangereuse pour vous et d’autres personnes, si elle<br />
n’est pas maniée correctement.<br />
• À observer constamment: ne laissez jamais le doigt sur la détente, sauf pour tirer volontairement.<br />
Le doigt actionnant la détente doit <strong>de</strong> manière générale se trouver à l’extérieur du<br />
pontet. La détente ne doit être actionnée qu’une fois que le pistolet est pointé vers la cible.<br />
• Ne faites jamais usage <strong>de</strong> la force lors que vous utilisez, contrôlez, démontez, nettoyez ou<br />
remontez le pistolet. Un maniement incorrect peut nuire au fonctionnement et à la sécurité<br />
du pistolet. Ne démontez pas davantage le pistolet que ce qui est indiqué dans le présent<br />
mo<strong>de</strong> d’emploi.<br />
• La sécurité n’est garantie que tant que le pistolet et les munitions se trouvent en parfait état<br />
technique.<br />
• Si le pistolet a subi <strong>de</strong>s influences extérieures, telles que corrosion, chute, etc., il doit être<br />
impérativement examiné par un armurier qualifié.<br />
• Lors <strong>de</strong>s séances <strong>de</strong> tir, veillez à porter une protection auditive et <strong>de</strong>s lunettes <strong>de</strong> tir. Signalez<br />
aux personnes se trouvant à proximité qu’elles doivent porter un système <strong>de</strong> protection auditive<br />
et <strong>de</strong>s lunettes <strong>de</strong> tir.<br />
• Votre arme est conçue pour fonctionner avec <strong>de</strong>s munitions d’un calibre déterminé. La bonne désignation<br />
<strong>de</strong>s munitions adaptées à votre pistolet est indiquée sur l’arme. N’utilisez que <strong>de</strong>s muni-
2. Description du produit<br />
tions conformes aux prescriptions <strong>de</strong> la Commission Internationale Permanente pour l’Epreuve <strong>de</strong>s<br />
Armes à Feu portatives (C.I.P.) ou du SAAMI (Sporting Arms and Ammunition Manufacturers’ Institute)<br />
et au calibre <strong>de</strong> votre arme à feu. Il est impératif <strong>de</strong> veiller, en particulier lors <strong>de</strong> l’utilisation <strong>de</strong><br />
munitions rechargées, à ce que la pression <strong>de</strong> gaz ne soit pas supérieure à celle autorisée par la<br />
norme. Une pression trop importante peut endommager l’arme voire provoquer son explosion. Les<br />
munitions dont la vitesse <strong>de</strong> projection et la pression <strong>de</strong> gaz sont supérieures à la vitesse <strong>de</strong> projection<br />
et pression <strong>de</strong> gaz pour lesquelles l’arme est conçue, soumettent l’arme à une charge supplémentaire,<br />
entraînent une usure plus importante et peuvent gravement endommager l’arme.<br />
• Essuyez tout excé<strong>de</strong>nt <strong>de</strong> graisse ou d’huile avant le chargement et assurez-vous que le<br />
canon est propre et exempt <strong>de</strong> tout corps étranger.<br />
• Ne remplacez, traitez, modifiez ou déréglez aucune pièce <strong>de</strong> votre pistolet au-<strong>de</strong>là <strong>de</strong>s indications<br />
portées dans le présent mo<strong>de</strong> d’emploi. Les travaux d’entretien et <strong>de</strong> service doivent<br />
être réalisés par un personnel qualifié.<br />
• Toute modification non appropriée peut avoir <strong>de</strong>s conséquences sur la sécurité et la fiabilité<br />
du pistolet et entraîner <strong>de</strong>s blessures voire la mort.<br />
EXCLUSION DE RESPONSABILITÉ<br />
La plus gran<strong>de</strong> pru<strong>de</strong>nce est nécessaire lors <strong>de</strong> l’utilisation d’armes. Celles-ci peuvent entraîner,<br />
même involontairement, d’importants dommages et provoquer <strong>de</strong> graves blessures voire<br />
la mort. WALTHER exclut expressément toute responsabilité pour <strong>de</strong>s dommages et inci<strong>de</strong>nts<br />
liés à l’utilisation impropre <strong>de</strong> ce pistolet ou allant à l’encontre <strong>de</strong>s règlements et lois. Cela<br />
s’applique également pour les dommages dus au non-respect du présent mo<strong>de</strong> d’emploi, à un<br />
échange <strong>de</strong> pièces non autorisé ou à toute intervention sur le pistolet non expressément prévue<br />
dans le présent mo<strong>de</strong> d'emploi.<br />
2. Description du produit<br />
2.1. Mo<strong>de</strong> opératoire<br />
Le système <strong>de</strong> culasse du PPQ utilise le principe du recul à verrouillement. En tirant la détente, le percuteur<br />
interne est armé et déclenché. Le percuteur frappe l’amorce <strong>de</strong> la balle et met la charge à feu. Le<br />
projectile est expulsé du canon par la pression <strong>de</strong> gaz générée et une impulsion est transmise simultanément<br />
au groupe canon/culasse verrouillé mécaniquement. Après un léger recul simultané du canon<br />
et <strong>de</strong> la culasse, le canon est dirigé vers le bas et le verrou s’enclenche. Tandis que le canon s’arrête, la<br />
culasse recule jusqu’en butée en faisant pression sur le ressort <strong>de</strong> recul et éjecte ainsi la douille vers la<br />
droite. Actionnée par le ressort <strong>de</strong> recul, la culasse entraîne la balle se trouvant tout en haut du chargeur<br />
dans la boîte <strong>de</strong> culasse lors du mouvement avant. Peu avant la fin du mouvement avant <strong>de</strong> la culasse,<br />
le canon incliné est poussé vers le haut et l’avant et verrouillé dans la fenêtre d’expulsion <strong>de</strong> la culasse.<br />
Le tireur enlève le doigt <strong>de</strong> la détente et le pistolet est prêt pour le prochain tir.<br />
59
2.2. Contenu <strong>de</strong> la livraison<br />
60<br />
2. Description du produit<br />
• Pistolet dans un coffret en plastique • Chargeur <strong>de</strong> réserve<br />
• Cible d’épreuve • Mo<strong>de</strong> d’emploi<br />
• Dos <strong>de</strong> poignée, tailles Small et • la chargette<br />
Remarque: le contenu <strong>de</strong> la livraison peut varier en fonction du modèle<br />
2.3. Munitions<br />
Utilisez seulement les munitions prévues pour ce pistolet. De mauvaises munitions<br />
peuvent entraîner <strong>de</strong>s dysfonctionnements, empêcher la mise à feu ou, en raison<br />
d’une pression trop importante <strong>de</strong> gaz, endommager voire détruire votre pistolet.<br />
La désignation <strong>de</strong>s munitions adaptées à votre pistolet PPQ apparaît sur le côté droit du canon<br />
(voir 2.3. illustr. 1). Utilisez exclusivement <strong>de</strong>s munitions correspondant à cette désignation et<br />
dont la pression <strong>de</strong> gaz est conforme aux prescriptions <strong>de</strong> la C.I.P. ou du SAAMI ou autorisée<br />
pour l’utilisation avec <strong>de</strong>s armes <strong>de</strong> la police conformément à la «directive technique pour les<br />
balles 9 mm x 19 à substances nocives réduites». Vérifiez les munitions avant <strong>de</strong> les utiliser.<br />
Utilisez seulement <strong>de</strong>s munitions dont l’état est<br />
irréprochable. Le pistolet et les munitions forment<br />
un ensemble et doivent être adaptés l’un<br />
à l’autre. Leur fiabilité dépend mutuellement <strong>de</strong><br />
chacun <strong>de</strong>s éléments. La vitesse <strong>de</strong> projection,<br />
le poids <strong>de</strong>s projectiles et le poids <strong>de</strong> l’arme<br />
forment différentes combinaisons agissant sur<br />
le recul ressenti lors du tir. Un recul trop important<br />
du pistolet peut sembler désagréable à<br />
2.3. illustr. 1<br />
certains tireurs.<br />
Exemples:<br />
• Poids <strong>de</strong> l’arme: un poids plus faible <strong>de</strong> l’arme entraîne un recul trop important.<br />
• Poids du projectile: plus le projectile est lourd, plus le recul est important.<br />
• Vitesse du projectile: une plus gran<strong>de</strong> vitesse <strong>de</strong> projection amplifie le recul.<br />
Vous pouvez procé<strong>de</strong>r <strong>de</strong> la manière suivante pour vous habituer à un recul plus important:<br />
• Lors du tir, tenez le pistolet bien calé dans les <strong>de</strong>ux mains.<br />
• Commencez par tirer, parmi les munitions adaptées à votre pistolet, avec celles caractérisées<br />
par une vitesse <strong>de</strong> projection et un poids moins importants.<br />
• Deman<strong>de</strong>z conseil à votre reven<strong>de</strong>ur spécialisé pour le choix <strong>de</strong> munitions plus faibles, d’une<br />
vitesse <strong>de</strong> projection moins élevés et d’un poids moins important adaptées à votre pistolet.<br />
• Adaptez la taille <strong>de</strong> la poignée <strong>de</strong> votre pistolet à vos besoins.
2. Description du produit<br />
2.4. Éléments fonctionnels<br />
1<br />
17<br />
2<br />
16<br />
1 Culasse<br />
15<br />
2 Guidon<br />
3 Arrêtoir <strong>de</strong> canon<br />
4 Canon<br />
5 Cran <strong>de</strong> levier<br />
d’arrêt<br />
6 Cannelures<br />
7 Levier d’arrêt<br />
8 Hausse<br />
9 Dos <strong>de</strong> poignée<br />
10 Œillet pour bretelle<br />
1 Tige du ressort <strong>de</strong> recul<br />
2 Bouche<br />
3 Appellation<br />
5<br />
4<br />
3<br />
4<br />
14<br />
13<br />
11 Chargeur<br />
12<br />
12 Poignée<br />
13 Arrêtoir <strong>de</strong> chargeur<br />
14 Détente<br />
15 Pontet<br />
16 Carcasse<br />
17 Rail pour accessoires<br />
6<br />
2<br />
1<br />
61<br />
7<br />
5 6<br />
11<br />
3<br />
7<br />
4 Numéro <strong>de</strong> Série<br />
5 Plaque <strong>de</strong> culasse<br />
6 Fenêtre d’extraction<br />
7 Extracteur<br />
(indicateur <strong>de</strong> charge)<br />
9<br />
8<br />
10
2.4.1. Indicateur <strong>de</strong> charge<br />
L’extracteur sert d’indicateur <strong>de</strong> charge. Une marque colorée<br />
est visible lorsqu’une balle/douille se trouve dans le boîtier <strong>de</strong><br />
culasse.(2.4.1. illustr. 1).<br />
62<br />
2. Description du produit<br />
ATTENTION:<br />
ne vous fiez pas exclusivement au système <strong>de</strong> visualisation <strong>de</strong> l’état <strong>de</strong> charge lors<br />
du contrôle <strong>de</strong> sécurité. La métho<strong>de</strong> <strong>de</strong> contrôle la plus fiable reste <strong>de</strong> regar<strong>de</strong>r dans<br />
le boîtier <strong>de</strong> culasse. Pour ce faire, retirez le chargeur du pistolet, tirez la culasse vers<br />
l’arrière jusqu’à la butée, bloquezla avec le levier d’arrêt <strong>de</strong> culasse et regar<strong>de</strong>z dans<br />
le boîtier <strong>de</strong> culasse.<br />
ATTENTION:<br />
maniez toute arme comme si elle était chargée. Un système <strong>de</strong> visualisation <strong>de</strong> l’état<br />
<strong>de</strong> charge peut certes vous permettre <strong>de</strong> savoir si une balle se trouve ou non dans la<br />
boîte <strong>de</strong> culasse, mais certains facteurs, tels que la lumière, l’encrassement du pistolet<br />
et d’autres influences, peuvent rendre plus difficile la visualisation fiable d’une balle.<br />
2.4.2. Arrêtoir <strong>de</strong> chargeur<br />
L’arrêtoir <strong>de</strong> chargeur se trouve latéralement sur le<br />
pontet, intégré dans son contour.<br />
Utilisation:<br />
Les doigts doivent être en <strong>de</strong>hors du pontet et ne pas<br />
toucher la détente. Poussez l’arrêtoir <strong>de</strong> chargeur<br />
vers le bas et retirez le chargeur (2.4.2. illustr. 1). Utilisez<br />
pour cela <strong>de</strong> préférence le doigt qui tire.<br />
2.4.3. Levier d’arrêt<br />
Bloquer la culasse en position ouverte:<br />
Les doigts doivent être en <strong>de</strong>hors du pontet et ne<br />
pas toucher la détente. Retirez le chargeur puis saisissez<br />
la culasse par l’arrière au niveau <strong>de</strong>s cannelures<br />
et tirez-la énergiquement vers l’arrière jusqu’à<br />
la butée. Si une balle se trouve dans la boîte <strong>de</strong> culasse,<br />
celleci est alors dégagée et éjectée du boîtier<br />
<strong>de</strong> culasse. Tout en maintenant la culasse le plus en<br />
arrière possible, poussez le levier d’arrêt vers le<br />
haut et faites glisser lentement la culasse vers<br />
l’avant jusqu’à ce qu’elle soit tenue par le levier<br />
d’arrêt. (2.4.3. illustr. 1).<br />
2.4.1. illustr. 1<br />
2.4.2. illustr. 1<br />
2.4.3. illustr. 1
2. Description du produit<br />
Libérer le levier d’arrêt:<br />
À l’ai<strong>de</strong> du pouce <strong>de</strong> la main qui tire, poussez le levier d’arrêt vers le bas. La culasse glisse<br />
alors vers l’avant.<br />
Pour faciliter l’actionnement du levier d’arrêt avec le pouce, la culasse peut être tirée vers<br />
l’arrière pendant que le levier d’arrêt est actionné comme décrit ci-<strong>de</strong>ssus.<br />
63
3. Utilisation<br />
3.1. Contrôle du pistolet<br />
• Avant tout contrôle, vérifiez que votre PPQ est<br />
déchargé. Pointez le pistolet dans une direction<br />
sûre. Les doigts doivent être en <strong>de</strong>hors du pontet<br />
et ne pas toucher la détente. Poussez l’arrêtoir <strong>de</strong><br />
chargeur vers le bas et retirez le chargeur. (3.1.<br />
illustr. 1)<br />
• Saisissez la culasse par l’arrière au niveau <strong>de</strong>s<br />
cannelures (3.1. illustr. 2) et tirez-la énergiquement<br />
vers l’arrière jusqu’à la butée. Si une balle<br />
se trouve dans le boîtier <strong>de</strong> culasse, celle-ci est<br />
alors dégagée et éjectée <strong>de</strong> la boîte <strong>de</strong> culasse.<br />
Ne couvrez pas la fenêtre d’extraction car la balle<br />
ne pourrait être expulsée comme il se doit.<br />
• Bloquez la culasse en position ouverte: Tout en<br />
maintenant la culasse le plus en arrière possible,<br />
poussez le levier d’arrêt vers le haut et faites<br />
glisser lentement la culasse vers l’avant jusqu’à<br />
ce qu’elle soit tenue par le levier d’arrêt. (3.1. illustr.<br />
3)<br />
• Assurez-vous que le boîtier <strong>de</strong> culasse et le canon<br />
sont bien dégagés, secs et propres. (3.1.<br />
illustr. 4)<br />
Effectuez toujours ce contrôle avant <strong>de</strong> poser votre<br />
PPQ, <strong>de</strong> le nettoyer, <strong>de</strong> le transmettre à une autre<br />
personne, <strong>de</strong> le transporter ou <strong>de</strong> le ranger.<br />
64<br />
3.1. illustr. 1<br />
3.1. illustr. 2<br />
3.1. illustr. 3<br />
3.1. illustr. 4<br />
3. Utilisation<br />
ATTENTION:<br />
Ne vous fiez pas exclusivement à la technique. Assurez votre propre sécurité en<br />
maniant toute arme avec pru<strong>de</strong>nce. Il est <strong>de</strong> votre responsabilité <strong>de</strong> respecter toutes<br />
les règles <strong>de</strong> sécurité lorsque vous utilisez <strong>de</strong>s armes.
3. Utilisation<br />
3.2. Chargement<br />
3.2.1. Chargeur<br />
Il est possible <strong>de</strong> voir l’état <strong>de</strong> charge du chargeur à l’ai<strong>de</strong> <strong>de</strong>s orifices<br />
présents dans le boîtier du chargeur (3.2.1. illustr. 1).<br />
ATTENTION:<br />
N'utilisez que les chargeurs d'origine pour votre arme.<br />
L'utilisation d'autres chargeurs peuvent provoquer <strong>de</strong>s inci<strong>de</strong>nts<br />
<strong>de</strong> tir et entraîner <strong>de</strong>s dommages sur votre arme.<br />
3.2.2. Remplissage du chargeur<br />
ATTENTION:<br />
N’essayez pas d’insérer plus <strong>de</strong> balles que ce qui est indiqué sur le chargeur. Cela<br />
pourrait provoquer <strong>de</strong>s dysfonctionnements dans l’alimentation. Ne faites pas usage<br />
<strong>de</strong> la force car cela pourrait endommager le chargeur. Des chargeurs/lèvres <strong>de</strong> chargeur<br />
défectueux provoquent <strong>de</strong>s dysfonctionne-ments et donc la défaillance du pistolet.<br />
Pour insérer les balles dans le chargeur, poussez vers le bas la partie avant du dispositif<br />
d’alimentation avec le fond <strong>de</strong> la balle et poussez la balle sous les lèvres du chargeur jusqu’à ce<br />
que le fond <strong>de</strong> la balle touche la paroi arrière du chargeur. (3.2.2. illustr. 1)<br />
Répétez cette procédure en poussant la balle la plus haute dans le chargeur vers le bas avec<br />
le fond <strong>de</strong> la prochaine balle et le pouce <strong>de</strong> la secon<strong>de</strong> main et en poussant ensuite la balle<br />
suivante sous les lèvres du chargeur.<br />
Pour effectuer cette opération plus facilement, vous pouvez<br />
utiliser la chargette Walther:<br />
Insérez par le haut la chargette sur le chargeur (3.2.2. illustr.<br />
2), poussez la chargette vers le bas et insérez avec l’autre<br />
main une balle sous les lèvres du chargeur (3.2.2. illustr. 3).<br />
Soulevez légèrement la chargette et poussez complètement<br />
la balle sous les lèvres du chargeur (3.2.2. illustr. 4).<br />
3.2.2. illustr. 2 3.2.2. illustr. 3<br />
3.2.2. illustr. 4<br />
65<br />
3.2.1. illustr. 1<br />
3.2.2. illustr. 1
66<br />
3. Utilisation<br />
3.2.3. Chargement du pistolet<br />
• Contrôlez le pistolet comme indiqué dans le chapitre 3.1.<br />
• Pointez le PPQ dans une direction sûre et tenez vos doigts éloignés <strong>de</strong> la détente, en <strong>de</strong>hors<br />
du pontet. Insérez le chargeur dans son logement jusqu’à ce qu’il s’enclenche. Assurez-vous<br />
que le chargeur est bien enclenché en tirant le chargeur vers le bas par le fond. Le chargeur<br />
ne doit pas se détacher.<br />
• Tirez la culasse vers l’arrière et laissez-la repartir vers l’avant.<br />
3.3. Tir avec<br />
ATTENTION:<br />
n’insérez les balles dans le boîtier <strong>de</strong> culasse que par l’intermédiaire du chargeur.<br />
N’essayez pas d’insérer individuellement <strong>de</strong>s balles dans la boîte <strong>de</strong> culasse par la<br />
fenêtre d’extraction. Ce faisant, vous pourriez vous blesser gravement voire mortellement<br />
ou encore entraîner la mort d’autres personnes.<br />
AVERTISSEMENT:<br />
Le pistolet est désormais prêt à tirer. Votre pistolet et le chargeur sont chargés et un<br />
tir sera déclenché lors <strong>de</strong> l’actionnement <strong>de</strong> la détente. Dirigez toujours la bouche du<br />
pistolet dans une direction sûre et maintenez votre doigt et tout objet éloigné <strong>de</strong> la<br />
détente et en <strong>de</strong>hors du pontet. Ne déposez jamais une arme chargée.<br />
• Dirigez la bouche dans une direction sûre et maintenez votre doigt éloigné <strong>de</strong> la détente et<br />
en <strong>de</strong>hors du pontet jusqu’à ce que vous souhaitiez tirer.<br />
• Profitez <strong>de</strong> la forme avantageuse <strong>de</strong> la poignée du PPQ et saisissez-la le plus haut possible.<br />
Cela permet un meilleur maintien <strong>de</strong> l’arme lors du tir.<br />
• Tout en tenant fermement la poignée du pistolet dans la main, appuyez, à l’ai<strong>de</strong> <strong>de</strong> votre<br />
doigt, frontalement et avec une force croissante, sur la détente jusqu’à ce que le coup parte.<br />
Pendant le tir, la culasse recule et expulse la douille. Enfin, la culasse revient vers l’avant et<br />
introduit la balle suivante du chargeur dans la boîte <strong>de</strong> culasse.<br />
• Après le tir, éloignez votre doigt <strong>de</strong> la détente et maintenez-le en <strong>de</strong>hors du pontet jusqu’à<br />
ce que vous soyez prêt pour le prochain tir. Vous pouvez répéter cette procédure jusqu’au<br />
<strong>de</strong>rnier tir.<br />
• Après le <strong>de</strong>rnier tir, le dispositif d’alimentation du chargeur actionne le levier d’arrêt et la<br />
culasse est arrêtée en position ouverte.
3. Utilisation<br />
ATTENTION:<br />
Lors <strong>de</strong>s séances <strong>de</strong> tir, veillez à porter une protection auditive et <strong>de</strong>s lunettes <strong>de</strong> tir.<br />
Lors du tir ou <strong>de</strong> l’actionnement du levier d’arrêt <strong>de</strong> culasse, la culasse se déplace à<br />
gran<strong>de</strong> vitesse et avec une force considérable dans le sens longitudinal. Pour cette<br />
raison, veillez à tenir le pistolet <strong>de</strong> telle manière qu’aucune partie <strong>de</strong> votre corps ne<br />
se trouve sur la trajectoire <strong>de</strong> la culasse.<br />
3.4. Changement <strong>de</strong> chargeur<br />
Après le <strong>de</strong>rnier tir, le dispositif d’alimentation du chargeur actionne le levier d’arrêt et la culasse<br />
est arrêtée en position ouverte.<br />
• Actionnez l’arrêtoir <strong>de</strong> chargeur et retirez le chargeur.<br />
• Placez un nouveau chargeur<br />
• Tirez la culasse vers l’arrière et laissez-la repartir vers l’avant.<br />
ATTENTION:<br />
Le pistolet est à nouveau prêt à tirer. Dirigez toujours la bouche du pistolet dans une<br />
direction sûre et maintenez votre doigt et tout objet éloigné <strong>de</strong> la détente et en <strong>de</strong>hors<br />
du pontet, jusqu’à ce que vous soyez prêt à tirer à nouveau.<br />
3.5. Déchargement<br />
• Pointez le pistolet dans une direction sûre. Les<br />
doigts doivent être en <strong>de</strong>hors du pontet et ne pas<br />
toucher la détente. Poussez l’arrêtoir <strong>de</strong> chargeur<br />
vers le bas et retirez le chargeur (3.5. illustr. 1).<br />
• Saisissez la culasse par l’arrière au niveau <strong>de</strong>s<br />
cannelures (3.5. illustr. 2) et tirez-la énergiquement<br />
vers l’arrière jusqu’à la butée. Si une balle<br />
se trouve dans la boîte <strong>de</strong> culasse, celle-ci est<br />
alors dégagée et éjectée. Ce faisant, ne couvrez<br />
pas la fenêtre d’extraction, car la balle ne pourrait<br />
être expulsée comme il se doit.<br />
• Bloquez la culasse en position ouverte: Tout en<br />
maintenant la culasse le plus en arrière possible,<br />
poussez le levier d’arrêt vers le haut et faites 3.5. illustr. 2<br />
67<br />
3.5. illustr. 1
glisser lentement la culasse vers l’avant jusqu’à<br />
ce qu’elle soit tenue par le levier d’arrêt. (3.5. illustr.<br />
3)<br />
• Regar<strong>de</strong>z dans la boîte <strong>de</strong> culasse (3.5. illustr. 4).<br />
La boîte <strong>de</strong> culasse doit être vi<strong>de</strong>. Regar<strong>de</strong>z dans<br />
le logement du chargeur. Plus aucune munition<br />
ne doit se trouver dans le pistolet.<br />
• Pour décharger le chargeur, tenez-le <strong>de</strong> telle manière<br />
que les projectiles soient dirigés dans la<br />
direction opposée à vous. Poussez les balles les<br />
unes après les autres vers l’avant pour les faire<br />
sortir du chargeur.<br />
68<br />
3. Utilisation<br />
ATTENTION:<br />
à chaque fois que vous fermez la culasse alors qu’un chargeur chargé se trouve dans<br />
le pistolet, une balle est introduite dans la boîte <strong>de</strong> culasse et le pistolet est à nouveau<br />
prêt à tirer.<br />
3.6. Consignes en cas <strong>de</strong> dysfonctionnement<br />
3.5. illustr. 3<br />
3.5. illustr. 4<br />
• En cas <strong>de</strong> dysfonctionnement, atten<strong>de</strong>z 60 secon<strong>de</strong>s tout en maintenant la bouche du pistolet<br />
dans une direction sûre.<br />
• Déchargez le pistolet comme indiqué dans le chapitre «3.5. Déchargement».<br />
• À présent, vous pouvez effectuer un contrôle visuel <strong>de</strong> la boîte <strong>de</strong> culasse et du canon. La<br />
boîte <strong>de</strong> culasse et le canon doivent être vi<strong>de</strong>s.
4. Démontage, nettoyage, graissage et entretien<br />
4. Démontage, nettoyage, graissage et entretien<br />
ATTENTION:<br />
Avant toute intervention sur le pistolet, assurez-vous que le pistolet et le chargeur<br />
sont déchargés.<br />
4.1. Éléments principaux<br />
ATTENTION:<br />
Pour un démontage complet, vous <strong>de</strong>vrez appuyer sur la détente. Si vous n’avez pas déchargé<br />
correctement votre arme et si vous avez laissé une balle réelle dans la boîte <strong>de</strong><br />
culasse, le pistolet déclenchera un tir et pourrait provoquer <strong>de</strong>s blessures graves voire<br />
mortelles à vous et aux personnes vous entourant, ou encore entraîner <strong>de</strong>s dommages<br />
matériels. Par conséquent, vous <strong>de</strong>vez bien contrôler la boîte <strong>de</strong> culasse et le chargeur<br />
(en les ouvrant) pour vous assurer qu’ils sont vi<strong>de</strong>s avant d’appuyer sur la détente.<br />
4.1.1. Démontage<br />
• Déchargez le pistolet: retirez le chargeur et bloquez<br />
la culasse en position ouverte. La boîte <strong>de</strong><br />
culasse et le logement du chargeur doivent être<br />
vi<strong>de</strong>s.<br />
• Fermez la culasse: tirez la culasse vers l’arrière<br />
et ramenez-la vers l’avant.<br />
• Pointez le pistolet dans une direction sûre et désarmez<br />
le mécanisme <strong>de</strong> percussion en actionnant<br />
la détente.<br />
• Saisissez par le haut l’arrêtoir <strong>de</strong> canon <strong>de</strong>s <strong>de</strong>ux<br />
côtés et poussez-le vers le bas. (4.1.1. illustr. 1)<br />
• Poussez la culasse vers l’avant <strong>de</strong> la carcasse.<br />
• Retirez le bloc ressort <strong>de</strong> recul dans le sens inverse<br />
à la pression du ressort <strong>de</strong> recul. (4.1.1. illustr.<br />
2)<br />
• Retirez le canon <strong>de</strong> la culasse.<br />
• 4.1.1. illustr. 3 montre les éléments principaux du<br />
pistolet démonté.<br />
69<br />
4.1.1. illustr. 1<br />
4.1.1. illustr. 2<br />
4.1.1. illustr. 3
4.1.2. Montage<br />
• Tenez la culasse face inférieure vers le haut.<br />
Insérez le canon comme indiqué sur 4.1.2. illustr.<br />
1.<br />
• Insérez le bloc ressort <strong>de</strong> recul: Placez le bloc<br />
ressort <strong>de</strong> recul dans le logement <strong>de</strong> la culasse<br />
avec la petite extrémité noire <strong>de</strong> la tige <strong>de</strong> guidage<br />
du ressort en direction <strong>de</strong> la bouche puis, contre<br />
la pression du ressort <strong>de</strong> recul, dans le renfoncement<br />
sur le canon avec l’extrémité arrière.<br />
(4.1.2. illustr. 1 et 2)<br />
Remarque:<br />
il est normal que le bloc ressort <strong>de</strong> recul se<br />
courbe légèrement à l’état partiellement<br />
monté.<br />
• Insérez les gui<strong>de</strong>s <strong>de</strong> la culasse montée par l’avant,<br />
sur les rails avant <strong>de</strong> la carcasse tout d’abord, puis<br />
sur les rails arrière (4.1.2. illustr. 3). Tirez la culasse<br />
vers l’arrière jusqu’à la butée puis laissez-la glisser<br />
vers l’avant dans la position verrouillée.<br />
4.2. Bloc percuteur<br />
4.2.1. Démontage du bloc percuteur<br />
• Retirez le canon. Appuyez la culasse côté bouche<br />
contre un support. Tenez la culasse par les cannelures.<br />
Poussez la goupille dans l’ouverture rectangulaire<br />
située en haut à droite dans la plaque <strong>de</strong><br />
culasse à l’ai<strong>de</strong> d’un chasse-goupille <strong>de</strong> 2 mm<br />
jusqu’à la butée (4.2.1. illustr. 1) et poussez légèrement<br />
la plaque <strong>de</strong> culasse vers le bas. Tirez la<br />
plaque <strong>de</strong> culasse vers le bas pour l’extraire <strong>de</strong> la<br />
culasse (4.2.1. illustr. 2).<br />
• Retirez le bloc percuteur <strong>de</strong> la culasse (4.2.1. illustr. 3).<br />
4. Démontage, nettoyage, graissage et entretien<br />
70<br />
4.1.2. illustr. 1<br />
4.1.2. illustr. 2<br />
4.1.2. illustr. 3<br />
4.2.1. illustr. 1<br />
4.2.1. illustr. 2 4.2.1. illustr. 3<br />
4.2.1. illustr. 4
4. Démontage, nettoyage, graissage et entretien<br />
4.2.2. Montage du bloc percuteur<br />
• Mettre en place le bloc percuteur<br />
• Poussez à l’ai<strong>de</strong> <strong>de</strong> la plaque <strong>de</strong> culasse l’extrémité arrière du bloc percuteur vers l’intérieur<br />
et poussez la plaque <strong>de</strong> culasse par le bas dans les gui<strong>de</strong>s <strong>de</strong> la culasse jusqu’à ce qu’elle<br />
s’enclenche. (cf. 4.2.1. illustr. 2)<br />
4.3. Extracteur<br />
4.3.1. Démontage <strong>de</strong> l’extracteur<br />
Attention:<br />
la goupille d’extracteur et la sûreté <strong>de</strong> percuteur<br />
sont soumises à la pression du ressort.<br />
Ces pièces peuvent être éjectées lors<br />
du démontage <strong>de</strong> l’extracteur.<br />
Placez le bloc <strong>de</strong> culasse <strong>de</strong>vant vous, viseur vers le<br />
bas et bouche vers la gauche. À l’ai<strong>de</strong> d’un chassegoupille<br />
<strong>de</strong> 2 mm, poussez la goupille d’extracteur<br />
dans la culasse contre la force du ressort (4.3.1. illustr.<br />
1). Retirez l’extracteur tout en couvrant avec<br />
un doigt la sûreté <strong>de</strong> percuteur et la goupille<br />
d’extracteur. Ensuite, faites sortir <strong>de</strong> la culasse la<br />
sûreté <strong>de</strong> percuteur et la goupille d’extracteur en<br />
secouant légèrement la culasse.<br />
4.3.2. Montage <strong>de</strong> l’extracteur<br />
Placez la culasse <strong>de</strong>vant vous, face supérieure vers le<br />
4.3.2. illustr. 2<br />
bas et bouche vers la gauche. Insérez la goupille<br />
d’extracteur et la sûreté <strong>de</strong> percuteur avec leurs ressorts<br />
respectifs vers l’avant (4.3.2. illustr. 1). Le ressort<br />
<strong>de</strong> pression <strong>de</strong> la sûreté doit entrer dans l’évi<strong>de</strong>ment<br />
prévu à cet effet dans la culasse. Lorsqu’elle est correctement<br />
positionnée, la sûreté se trouve légèrement au<strong>de</strong>ssous<br />
<strong>de</strong> la surface <strong>de</strong> glissement <strong>de</strong> la balle. Placez<br />
4.3.2. illustr. 3<br />
l’extrémité longue <strong>de</strong> l’extracteur à l’arrière sur le rayon<br />
<strong>de</strong> la fente <strong>de</strong> l’extracteur dans la culasse et, à l’ai<strong>de</strong> du pouce <strong>de</strong> votre secon<strong>de</strong> main, maintenez<br />
l’extracteur contre la goupille d’extracteur dans la culasse. À l’ai<strong>de</strong> d’un chasse-goupille <strong>de</strong> 2 mm,<br />
poussez la goupille d’extracteur vers l’intérieur tout en poussant l’extracteur vers le milieu <strong>de</strong> la culasse.<br />
L’orifice situé sur l’extracteur bloque à présente la goupille d’extracteur et le chasse-goupille peut<br />
être retiré (4.3.2. illustr. 2). Poussez la sûreté contre la chute vers l’intérieur jusqu’à ce qu’elle s’aligne<br />
sur la surface <strong>de</strong> la culasse. En même temps, poussez l’extracteur vers l’intérieur avec le pouce<br />
jusqu’à ce que la goupille d’extracteur s’enclenche dans l’orifice situé sur l’extracteur (4.3.2. illustr. 3).<br />
71<br />
4.3.1. illustr. 1<br />
4.3.2. illustr. 1
4.4. Chargeur<br />
4.4.1. Démontage<br />
4. Démontage, nettoyage, graissage et entretien<br />
Le ressort du chargeur est comprimé. Des pièces peuvent être éjectées lors du<br />
démontage du chargeur.<br />
Soyez donc pru<strong>de</strong>nt lors du démontage du chargeur. Tenez le support du fond<br />
lorsque vous enlevez le fond du chargeur puis retirez avec pru<strong>de</strong>nce le support <strong>de</strong><br />
fond et le ressort du chargeur du boîtier.<br />
1. Appuyez sur le support <strong>de</strong> fond, par exemple avec un<br />
chasse-goupille <strong>de</strong> 4 mm, à travers l’orifice prévu dans le<br />
fond du chargeur. (4.4.1. illustr. 1)<br />
2. Poussez le fond vers l’avant et retirez-le du boîtier <strong>de</strong><br />
chargeur tout en maintenant le support <strong>de</strong> fond contre la<br />
pression du ressort <strong>de</strong> chargeur.<br />
3. Retirez le support <strong>de</strong> fond et le ressort <strong>de</strong> chargeur.<br />
4. Secouez légèrement l’arme pour faire sortir le dispositif<br />
d’alimentation du boîtier <strong>de</strong> chargeur.<br />
4.4.2. Montage<br />
1. Introduisez tout d’abord le dispositif d’alimentation puis le<br />
ressort du chargeur avec le support <strong>de</strong> fond dans le boîtier<br />
<strong>de</strong> chargeur. Ce faisant, prêtez attention à la bonne<br />
orientation <strong>de</strong>s pièces. Les pièces doivent être montées<br />
sans faire usage <strong>de</strong> la force. (4.4.2. illustr. 1 et 2)<br />
2. Tout en appuyant le support <strong>de</strong> fond dans le boîtier <strong>de</strong><br />
chargeur, poussez, <strong>de</strong> l’avant, le fond du chargeur jusqu’à<br />
ce qu’il s’enclenche <strong>de</strong> manière audible.<br />
72<br />
4.4.1. illustr. 1<br />
4.4.2. illustr. 1<br />
4.4.2. illustr. 2
4. Démontage, nettoyage, graissage et entretien<br />
4.5. Nettoyage<br />
ATTENTION:<br />
Votre pistolet est un instrument <strong>de</strong> précision. Entretenez-le régulièrement pour garantir<br />
son bon fonctionnement.<br />
Avant toute intervention sur le pistolet, assurez-vous que le pistolet et le chargeur<br />
sont déchargés.<br />
Le pistolet doit être nettoyé après chaque utilisation ou après avoir été soumis à <strong>de</strong>s conditions<br />
climatiques extrêmes. Vous <strong>de</strong>vez également nettoyer le PPQ lorsque vous tirez pour la première<br />
fois avec ce pistolet.<br />
Pour protéger votre PPQ <strong>de</strong> la corrosion, celui-ci a été traité soit avec un produit <strong>de</strong> conservation,<br />
soit avec un lubrifiant. Avant d’utiliser le pistolet, essuyez tout excé<strong>de</strong>nt d’huile provenant<br />
du canon et <strong>de</strong> la boîte <strong>de</strong> culasse ainsi que sur les surfaces extérieures.<br />
Démontez le pistolet en ses éléments principaux. Nettoyez le canon à l’ai<strong>de</strong> d’une brosse <strong>de</strong><br />
nettoyage et d’un écouvillon en commençant par la boîte <strong>de</strong> culasse. Enlevez du canon le<br />
plomb et les résidus à l’ai<strong>de</strong> d’une brosse en laiton. Le canon et la boîte <strong>de</strong> culasse doivent être<br />
propres. Essuyez les surfaces avec un chiffon et <strong>de</strong>s tiges <strong>de</strong> nettoyage.<br />
Supprimez les résidus se trouvant sur la carcasse, le canon, l’extracteur, le fond du percuteur<br />
et sur tous les endroits encrassés à l’ai<strong>de</strong> d’une petite brosse et, le cas échéant, d’un peu<br />
d’huile. Après le nettoyage, huilez légèrement le PPQ.<br />
Si le pistolet doit être utilisé ou rangé dans un environnement froid, utilisez une huile pour armes<br />
recommandée pour les utilisations par basses températures.<br />
ATTENTION:<br />
Suivez le mo<strong>de</strong> d’emploi du produit nettoyant utilisé. Certains produits nettoyants<br />
peuvent endommager votre pistolet. Évitez les nettoyages trop longs au bain à ultrasons<br />
et à <strong>de</strong>s températures <strong>de</strong> bain supérieures à 50 °C et ne laissez pas agir les<br />
produits trop longtemps. Utilisez exclusivement les huiles pour armes et les produits<br />
nettoyants exempts <strong>de</strong> résine et <strong>de</strong> substances aci<strong>de</strong>s recommandés pour l’entretien<br />
<strong>de</strong>s armes. Les solutions ammoniacales et alcalines ne doivent pas être utilisées.<br />
4.6. Graissage<br />
Après le nettoyage du PPQ, appliquez une fine couche d’huile sur les surfaces extérieures et<br />
les pièces fonctionnelles. Utilisez exclusivement une huile pour armes exempte <strong>de</strong> résine et<br />
d’aci<strong>de</strong>.<br />
Veillez à ne pas huiler plus qu’il ne faut. Si <strong>de</strong>s gouttes d’huile se forment ou si <strong>de</strong> l’huile coule<br />
à travers le pistolet, cela signifie que vous avez appliqué trop d’huile.<br />
Un excé<strong>de</strong>nt d’huile favorise la concentration <strong>de</strong>s salissures et <strong>de</strong>s restes <strong>de</strong> fumée dans le<br />
pistolet. Cela nuit au bon fonctionnement. Ne pas huiler l’orifice du percuteur (4.6. illustr. 1).<br />
73
4. Démontage, nettoyage, graissage et entretien<br />
• Canon:<br />
Après le nettoyage du pistolet, huilez les surfaces du canon et la surface <strong>de</strong> contact entre le<br />
canon et la carcasse avec un chiffon imbibé d’huile.<br />
• Carcasse:<br />
Huilez les gui<strong>de</strong>s <strong>de</strong> culasse et la tige <strong>de</strong> détente avec respectivement une goutte d’huile.<br />
• Culasse:<br />
Huilez la sûreté <strong>de</strong> percuteur et la came <strong>de</strong> comman<strong>de</strong> avec respectivement une goutte<br />
d’huile.<br />
• Chargeur:<br />
Le chargeur doit également être légèrement huilé à l’extérieur.<br />
4.6. illustr. 1<br />
4.7. Préparation au rangement / stockage<br />
Veuillez prendre en compte les dispositions légales en matière <strong>de</strong> rangement et <strong>de</strong> stockage<br />
d’armes à feu et <strong>de</strong> munitions en vigueur dans votre région/pays.<br />
Ne conservez pas le pistolet dans quelque chose attirant ou retenant l’humidité (du cuir ou <strong>de</strong>s<br />
chiffons épais par exemple).<br />
Si le pistolet doit être stocké pendant une longue pério<strong>de</strong>, protégez le canon, la boîte <strong>de</strong> culasse<br />
et les pièces internes avec <strong>de</strong> l’huile pour armes ou un agent conservateur prévu pour les<br />
armes.<br />
74
4. Démontage, nettoyage, graissage et entretien<br />
Les pièces extérieures, la culasse, le canon et le chargeur doivent être traités avec un produit<br />
anticorrosion.<br />
Nettoyez le PPQ avant <strong>de</strong> le réutiliser. Lors <strong>de</strong> chaque nettoyage, prêtez également attention<br />
aux marques d’usure. En cas <strong>de</strong> marques d’usure inhabituelles, faites vérifier votre pistolet par<br />
un armurier qualifié ou par WALTHER.<br />
75
5. Adaptation du pistolet à l’utilisateur<br />
5.1. Poignée<br />
Il est possible <strong>de</strong> monter <strong>de</strong>s dos <strong>de</strong> poignée <strong>de</strong><br />
différentes tailles afin d’adapter <strong>de</strong> façon optimale<br />
la poignée à la taille <strong>de</strong> la main. Retirez pour cela la<br />
goupille se trouvant dans la partie inférieure <strong>de</strong> la<br />
poignée en la poussant vers la droite ou la gauche<br />
à l’ai<strong>de</strong> d’un chasse-goupille <strong>de</strong> 4 mm puis réinsérez-la<br />
après avoir mis en place le dos <strong>de</strong> poignée<br />
souhaité. (5.1. illustr. 1)<br />
Les tailles Small, Medium et Large sont disponibles.<br />
5.2. Œillet pour dragonne<br />
5. Adaptation du pistolet à l’utilisateur<br />
La goupille utilisée pour fixer le dos <strong>de</strong> la poignée forme avec un évi<strong>de</strong>ment dans le dos <strong>de</strong> la poignée<br />
un œillet <strong>de</strong>stiné à fixer une dragonne. Pour la mettre en place, retirez la goupille se trouvant dans la<br />
partie inférieure <strong>de</strong> la poignée en la poussant vers la droite ou la gauche à l’ai<strong>de</strong> d’un chasse-goupille<br />
<strong>de</strong> 4 mm, introduisez la dragonne ou un adaptateur puis réinsérez la goupille.<br />
5.3. Dispositif <strong>de</strong> visée<br />
La hausse et le guidon peuvent être remplacés. La position du point d’impact peut être ajustée<br />
en hauteur et latéralement.<br />
Avant toute intervention sur le pistolet, assurez-vous que le pistolet et le chargeur<br />
sont déchargés<br />
RÉGLAGE LATÉRAL<br />
Pour corriger la position du point d’impact, déplacez la hausse<br />
dans la direction dans laquelle le point d’impact doit être déplacé.<br />
Exemple: si la position du point d’impact doit être déplacée<br />
vers la droite, déplacez la hausse vers la droite.<br />
ACHTUNG:<br />
La hausse en acier originale WALTHER (5.3. illustr. 1) est<br />
fixée très fermement sur la culasse. Il est conseillé<br />
d’utiliser l’amplificateur <strong>de</strong> visée disponible en tant<br />
qu’accessoire spécial pour ajuster cette hausse. Ne retirez<br />
pas la douille <strong>de</strong> blocage se trouvant sous la hausse.<br />
76<br />
5.1. illustr. 1<br />
5.3. illustr. 1
5. Adaptation du pistolet à l’utilisateur<br />
RÉGLAGE EN HAUTEUR<br />
Il est possible <strong>de</strong> changer le guidon pour corriger la<br />
hauteur du point d’impact. Des guidons en acier <strong>de</strong><br />
différentes hauteurs sont disponibles en tant<br />
qu’accessoires spéciaux.<br />
Un guidon plus bas est nécessaire pour un tir trop<br />
bas, un guidon plus haut pour un tir trop haut. Les<br />
5.3. illustr. 2<br />
guidons sont numérotés. Plus le numéro est grand,<br />
plus le guidon est haut. Sur une distance <strong>de</strong> tir <strong>de</strong> 25 m, le déplacement du point d’impact est<br />
d’environ 5 cm par chiffre.<br />
Pour changer le guidon, le système <strong>de</strong> culasse est détaché <strong>de</strong> la carcasse et le bloc ressort <strong>de</strong><br />
recul et le canon sont retirés.<br />
La vis se trouvant sur le guidon est dévissée à l’ai<strong>de</strong> d’un tournevis puis le guidon est retiré.<br />
Le montage s’effectue dans l’ordre inverse (5.3. illustr. 2). Essuyez l’huile se trouvant sur la vis<br />
du guidon et sur le filet dans le guidon. Sécurisez la vis du guidon à l’ai<strong>de</strong> d’une colle industrielle<br />
(Loctite 648 p. ex.). Vissez la vis du guidon à un couple <strong>de</strong> 1 Nm.<br />
77
6. Vue éclatée<br />
78<br />
6. Vue éclatée
7. Liste <strong>de</strong>s pièces<br />
7. Liste <strong>de</strong>s pièces<br />
N° Désignation N° Désignation<br />
1.1 Vis <strong>de</strong> guidon 24 Détente, complète<br />
1.2 Guidon 26 Goupille <strong>de</strong> levier d’arrêt<br />
3 Bloc <strong>de</strong> culasse 27 Goupille d’arrêtoir <strong>de</strong> canon<br />
5 Extracteur 28.1 Ressort <strong>de</strong> pression d’arrêtoir <strong>de</strong> canon<br />
6 Goupille d’extracteur, complète 28.2 Arrêtoir <strong>de</strong> canon<br />
7 Ressort d’arrêtoir <strong>de</strong> extracteur <strong>29</strong> Carcasse, complète<br />
7.1 Ressort d’arrêtoir <strong>de</strong> chargeur <strong>29</strong>.1 Dispositif <strong>de</strong> blocage poli<br />
8 Hausse 30 Ressort <strong>de</strong> levier d’arrêt<br />
15 Percuteur, complet 31 Goupille 3x24<br />
16 Ressort <strong>de</strong> détente 32 Boîtier <strong>de</strong> détente, monté<br />
18 Sûreté <strong>de</strong> percuteur, complète 32.8 Gui<strong>de</strong><br />
19 Canon 33 Chargeur<br />
20 Plaque <strong>de</strong> culasse 35 Goupille 4x16<br />
21 Bloc ressort <strong>de</strong> recul 36 Arrêtoir <strong>de</strong> chargeur<br />
22 Goupille 3x28 38 Dos <strong>de</strong> poignée S, M, L<br />
23 Étrier <strong>de</strong> retenue <strong>de</strong> canon 48 Goupille, Arrêtoir <strong>de</strong> chargeur<br />
79
8. Caractéristiques techniques<br />
80<br />
8. Caractéristiques techniques<br />
Calibre 9 mm x19 / 9mm x 21 .40 S&W<br />
Capacité du chargeur 15 balles CDN 12 balles CDN<br />
Dimensions (Lo/La/H) 180 / 34 / 135 mm CDN 184 / 34 / 135 mm<br />
Longueur du canon 102 mm CDN 106 mm<br />
Longueur <strong>de</strong> rayure<br />
250 mm<br />
avec pas à droite<br />
Profilé du canon 6 rayures et champs<br />
406 mm<br />
avec pas à droite<br />
Longueur <strong>de</strong> la ligne <strong>de</strong> mire 156 mm 158 mm<br />
Largeur <strong>de</strong> la hausse<br />
4,6 (standard, n° 2)<br />
3,8 (n° 1)<br />
Largeur du guidon 3,6 mm<br />
Poids,<br />
chargeur vi<strong>de</strong> compris<br />
695 g 705 g<br />
Poids du chargeur, vi<strong>de</strong> 80 g<br />
Énergie du projectile E3,<br />
Poids du projectile<br />
500 J<br />
8 g<br />
475 J<br />
11,7 g<br />
Type <strong>de</strong> verrouillage Système browning sans élément intermédiaire<br />
Système Percuteur interne<br />
Principe <strong>de</strong> détente Quick Defense Trigger<br />
Force/course <strong>de</strong> détente 25 N / 9 mm (i<strong>de</strong>ntiques à chaque tir)<br />
Bloc <strong>de</strong> culasse et canon:<br />
Matériaux<br />
acier amélioré haute résistance traité Tenifer®.<br />
Carcasse: polyami<strong>de</strong> 12 renforcé par <strong>de</strong>s fibres<br />
Sûretés Sûreté <strong>de</strong> détente, <strong>de</strong> percuteur, contre la chute<br />
Ces indications sont <strong>de</strong>s moyennes. Les valeurs réelles peuvent s’en écarter.<br />
CDN Canada: Capacité du chargeur 10 balles, longueur du canon 106 mm, longueur totale 184 mm
English<br />
Instruction Manual<br />
WALTHER PPQ<br />
81
NOTE<br />
This manual refers to the use of the pistol by civilian users. Instructions for law<br />
enforcement use may differ from what is <strong>de</strong>scribed in this manual.<br />
Throughout this instruction manual, position <strong>de</strong>signations such as »left,« »right,«<br />
»forward,« »rear,« and so on, are referenced to a pistol held in a normal firing position.<br />
In other words, pointed away from the shooter, barrel in a generally horizontal direction,<br />
and with the grip of the pistol pointing downwards.<br />
Explanations in this manual are based on right hand operation. Left-han<strong>de</strong>d users<br />
should operate vice versa.<br />
82
TABLE OF CONTENTS<br />
1. Safety Instructions 84<br />
2. Product Description 85<br />
2.1. Functional Description 85<br />
2.2. Package Contents 86<br />
2.3. Ammunition 86<br />
2.4. Functional Elements 87<br />
3. Handling the Pistol 90<br />
3.1. Inspecting the Pistol 90<br />
3.2. Loading 91<br />
3.3. Firing 92<br />
3.4. Exchanging empty Magazines 93<br />
3.5. Unloading the Pistol 93<br />
3.6. Clearing Misfires 94<br />
4. Field-Stripping, Cleaning, Lubrication, and Maintenance 95<br />
4.1. Main Components 95<br />
4.2. Striker Assembly 96<br />
4.3. Extractor 97<br />
4.4. Magazine 98<br />
4.5. Cleaning the Pistol 99<br />
4.6. Lubrication 99<br />
4.7. Maintenance before Storing 100<br />
5. Adjusting the Pistol to its User 102<br />
5.1. Grip 102<br />
5.2. Lanyard Loop 102<br />
5.3. Sights 102<br />
6. Explo<strong>de</strong>d Diagram 104<br />
7. Parts List 105<br />
8. Technical Specifications 106<br />
83
1. Safety Instructions<br />
84<br />
1. Safety Instructions<br />
• Before handling the pistol, thoroughly familiarize yourself with all of its functions and handling<br />
characteristics by carefully reading the entire instruction manual.<br />
• When performing a safety check, before cleaning the pistol, prior to shooting, or when accessing<br />
a malfunction, always check that the firearm is unloa<strong>de</strong>d (magazine removed from<br />
pistol and chamber clear). Visually check that the bore of the barrel is clear of any obstruction<br />
and the magazine is empty.<br />
• When not shooting, keep ammunition stored separately from the pistol. Store each in separate<br />
and secure locations. Unauthorized persons, such as children, must not have access to<br />
either the ammunition or the pistol.<br />
• Always treat every firearm as if it were loa<strong>de</strong>d and would fire if the trigger is squeezed.<br />
Handle the pistol in a conscientious and professional manner so as to not endanger yourself<br />
or bystan<strong>de</strong>rs. Always keep the muzzle of the firearm pointed in a safe direction. Never point<br />
a firearm at anyone or anything you do not intend to shoot, whether or not it is loa<strong>de</strong>d.<br />
• Caution: Keep your finger off the trigger and outsi<strong>de</strong> of the pistol’s trigger guard until you<br />
have aligned the pistol’s sights on a safe target and you have ma<strong>de</strong> the <strong>de</strong>cision to fire. Always<br />
be sure of your target and what is beyond it.<br />
• Never use force when operating, checking, field-stripping, cleaning, or assembling the pistol.<br />
Incorrect handling will impair the functioning and safety of the pistol. The pistol must not be<br />
disassembled further than shown in this instruction manual.<br />
• Safety and correct functioning are assured only when the pistol and ammunition are in prime<br />
condition.<br />
• Always have the pistol inspected by a qualified gunsmith if you suspect it is not functioning<br />
properly or has been damaged, such as by corrosion, being dropped, and so on.<br />
• Always wear a<strong>de</strong>quate and proper hearing protection and safety glasses specified for firearm<br />
use. Also make sure others in the vicinity of where you will be shooting are also wearing<br />
a<strong>de</strong>quate and proper hearing protection and safety glasses.<br />
• Your firearm has been <strong>de</strong>signed for use with a specific type and caliber of ammunition. The<br />
correct caliber inten<strong>de</strong>d for use in the pistol is marked on the pistol. Use only ammunition<br />
corresponding to the caliber of the weapon and which conforms to the provisions of the<br />
Commission Internationale Permanente pour l’Epreuve <strong>de</strong>s Armes à Feu portatives (International<br />
Proof Commission/C.I.P.) or Sporting Arms and Ammunition Manufacturers' Institute<br />
(SAAMI). When using reloa<strong>de</strong>d ammunition do not exceed the permitted gas/chamber pressure<br />
according to C.I.P or SAAMI. Excessive pressure can damage or even <strong>de</strong>stroy any fire-
2. Product Description<br />
arm. Ammunition with velocities and pressures higher than those for which the weapon was<br />
<strong>de</strong>signed will subject the weapon to additional stress, cause excessive wear, and may cause<br />
serious damage to the pistol.<br />
• Before loading, always wipe off any excess grease and oil and make sure that the bore of the<br />
barrel is clean and clear of any obstruction.<br />
• Do not alter, modify or replace any of the parts of the firearm unless specifically directed to<br />
do so in this manual. Any maintenance or service not specified in this manual must be performed<br />
by a qualified gunsmith using genuine WALTHER parts.<br />
• Improper or unauthorized adjustment of any component may affect the safety and reliability<br />
of the firearm and may cause serious injury or <strong>de</strong>ath.<br />
DISCLAIMER OF LIABILITY<br />
The first concern when handling any firearm is safety. There is always a risk of inadvertent<br />
property damage, serious bodily injury or even <strong>de</strong>ath. WALTHER disclaims any and all liability<br />
for damage arising from use of this firearm that is improper and contravenes statutory regulations.<br />
The same applies for damage arising from failure to follow the instructions in this manual,<br />
unauthorized replacement of parts or any other modification to the pistol not expressly<br />
provi<strong>de</strong>d for in this manual.<br />
2. Product Description<br />
2.1. Functional Description<br />
The WALTHER PPQ semi-automatic pistol operates on the short recoil, locked-breech system.<br />
When the trigger is squeezed, the striker is released and the cartridge is fired. The cumulative<br />
gas pressure propels the projectile down the bore of the barrel and out of the barrel. The resulting<br />
impulse causes a rearward movement of the barrel and sli<strong>de</strong>. The barrel and sli<strong>de</strong> recoil<br />
together for a short distance, until the barrel is unlocked from the sli<strong>de</strong> by the camming action<br />
at the lower rear of the barrel. The breech end of the barrel is drawn downward and the rearward<br />
movement of the barrel it is stopped. The sli<strong>de</strong> continues rearward, extracting the fired<br />
cartridge case from the chamber and ejecting it to the right.<br />
After the sli<strong>de</strong> reaches the limit of its rearward travel, the recoil spring brings the sli<strong>de</strong> forward<br />
again, stripping a new round from the magazine and pushing it into the chamber. The cycle of<br />
fire is completed with the locking of the barrel to the sli<strong>de</strong>. The trigger must be released and<br />
squeezed again in or<strong>de</strong>r to fire the next shot.<br />
85
2.2. Package Contents<br />
86<br />
2. Product Description<br />
• Pistol in plastic case • Spare Magazine<br />
• Test Target • Instruction Manual<br />
• Backstraps in sizes S and L • Magazine Loa<strong>de</strong>r<br />
NOTE: Actual package contents may differ from <strong>de</strong>scription in Instruction Manual<br />
2.3. Ammunition<br />
WARNING:<br />
Never use ammunition not specifically <strong>de</strong>signated for use in your weapon. Failure to<br />
use the specific cartridge inten<strong>de</strong>d for use in the PPQ pistol may cause the pistol to<br />
jam, fail to fire or even generate excessive gas pressure which can damage or <strong>de</strong>stroy<br />
the pistol, cause personal injury, <strong>de</strong>ath or property damage.<br />
Locate the caliber <strong>de</strong>signation marked on the<br />
pistol. This information indicates the ammunition<br />
specifically inten<strong>de</strong>d for use in the pistol<br />
(see 2.3. Figure 1). Use only ammunition corresponding<br />
to the caliber of the weapon and<br />
which conforms to the provisions of C.I.P. or<br />
SAAMI (or certified according to “Technische<br />
Richtlinie Patrone 9mm x 19 schadstoffreduziert“).<br />
Check your ammunition before shooting<br />
2.3. Figure 1<br />
it. Use ammunition in prime condition. A firearm<br />
and ammunition are a system and must work together. Their performance is closely related.<br />
Different combinations of bullet velocity, bullet weight and firearm weight can have major impact<br />
on felt recoil; high felt recoil can be uncomfortable to some shooters.<br />
For example:<br />
• Gun Weight: lower gun weight increases felt recoil.<br />
• Bullet Weight: higher bullet weight increases felt recoil.<br />
• Bullet Velocity: higher bullet velocity increases felt recoil.<br />
To adjust yourself to higher levels of felt recoil, consi<strong>de</strong>r the following:<br />
• Use a firm two-hand hold on the grip when firing.<br />
• Always begin your shooting experience with the lowest bullet velocity and lowest bullet<br />
weight available for your firearm.<br />
• Ask your firearm <strong>de</strong>aler to suggest the lowest power, lowest velocity, lightest bullet weight<br />
for your firearm.<br />
• You can also consi<strong>de</strong>r changing your firearm’s grip configuration/composition to better fit<br />
your hand’s specific size and shape.
2. Product Description<br />
2.4. Functional Elements<br />
1<br />
17<br />
2<br />
16<br />
15<br />
1 Sli<strong>de</strong><br />
2 Front Sight<br />
3 Take Down Catch<br />
4 Barrel<br />
5 Sli<strong>de</strong> Stop Notch<br />
6 Sli<strong>de</strong> Serrations<br />
7 Sli<strong>de</strong> Stop Lever<br />
8 Rear Sight<br />
9 Backstrap<br />
10 Lanyard Loop<br />
1 Recoil Gui<strong>de</strong> Rod<br />
2 Muzzle<br />
3 Mo<strong>de</strong>l<br />
5<br />
4<br />
3<br />
14<br />
13<br />
11 Magazine<br />
12 Grip<br />
13 Magazine Release<br />
14 Trigger<br />
15 Trigger Guard<br />
16 Frame<br />
17 Accessory Rail<br />
6<br />
2<br />
1<br />
4<br />
87<br />
7<br />
5 6<br />
12<br />
11<br />
3<br />
7<br />
4 Serial Number<br />
5 Sli<strong>de</strong> End Cap<br />
6 Ejection Port<br />
7 Extractor (Loa<strong>de</strong>d<br />
Chamber Indicator)<br />
9<br />
8<br />
10
2.4.1. Loa<strong>de</strong>d Chamber Indicator<br />
The loa<strong>de</strong>d chamber indicator is on the right si<strong>de</strong> of the sli<strong>de</strong>.<br />
The loa<strong>de</strong>d chamber indicator can be observed when the rear<br />
of the extractor is recessed, revealing a red colored marking<br />
(2.4.1. Fig. 1).<br />
88<br />
2. Product Description<br />
WARNING:<br />
Allways treat every firearm as if it were loa<strong>de</strong>d and ready to fire if the trigger is<br />
squeezed. Do not rely upon the loa<strong>de</strong>d chamber indicator to verify the presence or<br />
absence of a round in the chamber. The surest method to <strong>de</strong>termine the presence or<br />
absence of ammunition is to check the chamber of the firearm by removing the<br />
magazine and locking the sli<strong>de</strong> in the open position.<br />
WARNING:<br />
The amount of light, cleanliness of the pistol, and other factors may limit the effectiveness<br />
of the loa<strong>de</strong>d chamber indicator. Cleaning solvents or wear may darken or<br />
remove the red color, or pow<strong>de</strong>r residue or dirt may cover it up. If you do not see the<br />
red dot, do not assume the chamber is empty. After first checking that the magazine<br />
has been removed, pull the sli<strong>de</strong> back until you can look into the chamber and verify<br />
whether it is empty or not.<br />
2.4.2. Magazine Release<br />
The magazine release is positioned on both si<strong>de</strong>s of<br />
the trigger guard. The magazine release can be manipulated<br />
with either your thumb or opposing in<strong>de</strong>x<br />
finger. Grasp the pistol with your finger off the trigger<br />
and outsi<strong>de</strong> the trigger guard. Depress the<br />
magazine release and remove the magazine.<br />
If you find that manipulating the magazine release<br />
with your shooting thumb is cumbersome or difficult,<br />
try using the in<strong>de</strong>x finger of your shooting hand<br />
instead (2.4.2. Fig. 1).<br />
2.4.3. Sli<strong>de</strong> Stop<br />
Locking the sli<strong>de</strong> in the “open” position:<br />
Grasping the grip of the frame and with your finger<br />
off the trigger and outsi<strong>de</strong> the trigger guard, <strong>de</strong>press<br />
the magazine release, and completely remove<br />
the magazine. Firmly grasp the serrated si<strong>de</strong>s<br />
of the sli<strong>de</strong> from the rear with the thumb and fingers.<br />
While steadily holding the grip, briskly pull the<br />
sli<strong>de</strong> fully rearward to extract any cartridge from the<br />
chamber and clear it from the pistol.<br />
2.4.1. Figure 1<br />
2.4.2. Figure 1<br />
2.4.3. Figure 1
2. Product Description<br />
To lock the sli<strong>de</strong> in the open position, allow the sli<strong>de</strong> to move slightly forward from the rearmost<br />
position while pressing upward on the sli<strong>de</strong> stop (2.4.3. Fig. 1).<br />
Releasing the sli<strong>de</strong> from the sli<strong>de</strong> stop:<br />
Press down on the sli<strong>de</strong> stop with the thumb of your shooting hand to release the sli<strong>de</strong> and<br />
allow it to move fully forward.<br />
For easier operation of the sli<strong>de</strong> stop grasp the serrated si<strong>de</strong>s of the sli<strong>de</strong> from the rear and pull<br />
the sli<strong>de</strong> to the rear while pressing down on the sli<strong>de</strong> stop to release the sli<strong>de</strong> and allow it to<br />
move fully forward.<br />
89
3. Handling the Pistol<br />
3.1. Inspecting the Pistol<br />
• When you inspect the pistol, you should first<br />
check to ensure that it is unloa<strong>de</strong>d. To do this,<br />
grasp the grip of the frame with your finger off the<br />
trigger and outsi<strong>de</strong> the trigger guard, point the<br />
muzzle in a safe direction, <strong>de</strong>press the magazine<br />
release and remove the magazine (3.1. Fig. 1).<br />
• Grasp the serrated si<strong>de</strong>s of the sli<strong>de</strong> from the<br />
rear with the thumb and fingers as shown in 3.1.<br />
Fig. 2, and briskly draw the sli<strong>de</strong> fully rearward in<br />
or<strong>de</strong>r to extract any cartridge from the chamber<br />
and clear it from the pistol. Do not obstruct the<br />
ejection port because doing so can interfere with<br />
the proper ejection of a cartridge.<br />
• Lock the sli<strong>de</strong> in the open position by allowing<br />
the sli<strong>de</strong> to move slightly forward from the rearmost<br />
position while pressing upward on the sli<strong>de</strong><br />
stop (3.1. Fig. 3).<br />
• Check the chamber to verify that it is unloa<strong>de</strong>d<br />
and check the bore visually that it is clean, dry,<br />
and free from any obstructions (3.1. Fig. 4).<br />
You must follow this procedure every time the PPQ<br />
leaves your hand, is cleaned, han<strong>de</strong>d to you or another<br />
person, transported or stored.<br />
90<br />
3. Handling the Pistol<br />
3.1. Figure 1<br />
3.1. Figure 2<br />
3.1. Figure 3<br />
3.1. Figure 4<br />
WARNING:<br />
Never rely on mechanical features alone. Your proper handling of the pistol will ensure<br />
the safety or your firearm. Firearm Safety is always your responsibility.
3. Handling the Pistol<br />
3.2. Loading<br />
3.2.1. Magazine<br />
When the magazine is removed from the magazine well in the<br />
grip, the number of rounds can be seen in the witness holes<br />
(3.2.1. Fig. 1).<br />
CAUTION:<br />
WALTHER has provi<strong>de</strong>d you with a magazine <strong>de</strong>signed to<br />
operate in your specified mo<strong>de</strong>l of pistol. While your magazine<br />
may be able to be inserted into another mo<strong>de</strong>l pistol, it<br />
will only function properly in the specific mo<strong>de</strong>l for which it<br />
was <strong>de</strong>signed. Do not interchange magazines form one<br />
mo<strong>de</strong>l pistol to another mo<strong>de</strong>l pistol. Failure to use the particular<br />
type of WALTHER magazine specified for your mo<strong>de</strong>l<br />
and caliber of pistol may result in a malfunction or may damage<br />
your pistol and magazine.<br />
3.2.2. Loading the Magazine<br />
WARNING:<br />
Do not attempt to load the magazine with more than the specified number of cartridges<br />
because doing so may cause a failure to feed a round of ammunition into the<br />
chamber. Do not use excessive force when loading the magazine, as this may damage<br />
the magazine. Damaged or <strong>de</strong>fective magazines cause malfunctions and may<br />
cause improper functioning of the pistol.<br />
Load the magazine by pressing a cartridge base<br />
(rear of cartridge) downward on the forward portion<br />
of the magazine follower (or downward on the case<br />
of a previously loa<strong>de</strong>d cartridge) and sliding the cartridge<br />
fully un<strong>de</strong>r the lips of the magazine until the<br />
cartridge base is against the rear wall of the magazine.<br />
Repeat the procedure for the number of cartridges<br />
you wish to load, up to the magazine capacity<br />
(3.2.2. Fig. 1).<br />
Loading may be ma<strong>de</strong> easier with the aid of the WALTHER Magazine Loa<strong>de</strong>r:<br />
Put the magazine loa<strong>de</strong>r with its long wall oriented to the rear on top of the magazine<br />
(3.2.2. Fig. 2). Press down the magazine loa<strong>de</strong>r and insert a cartridge with your other hand<br />
(3.2.2. Fig. 3). Let the magazine loa<strong>de</strong>r go up again. Push in the cartridge completely with<br />
91<br />
3.2.2. Figure 1<br />
3.2.1. Figure 1
92<br />
3. Handling the Pistol<br />
your hand (3.2.2. Fig. 4). Repeat the procedure for the number of cartridges you wish to load,<br />
up to the magazine capacity.<br />
3.2.3. Loading the Pistol<br />
• Inspect the pistol as shown in section 3.1.<br />
• Grasp the pistol with your finger off the trigger and outsi<strong>de</strong> the trigger guard, point the muzzle<br />
in a safe direction. Insert the loa<strong>de</strong>d magazine into the magazine well of the pistol until it<br />
is locked in place. To make sure that the magazine is fully and securely inserted, try pulling<br />
down on the exposed portion of the magazine floorplate. It should not move.<br />
• Pull the sli<strong>de</strong> fully to the rear and let go allowing it to move fully forward.<br />
3.3. Firing<br />
3.2.2. Figure 2 3.2.2. Figure 3<br />
3.2.2. Figure 4<br />
WARNING:<br />
Always load a round into the chamber by feeding it from the magazine. Never attempt<br />
to load the pistol by inserting a round into the chamber via the open ejection port.<br />
Failure to follow this warning may result in severe injury or <strong>de</strong>ath to you or others.<br />
CAUTION:<br />
THE PISTOL IS NOW LOADED AND READY TO FIRE. The pistol and its magazine are<br />
now loa<strong>de</strong>d and will fire when the trigger is squeezed. Remember to keep the muzzle<br />
pointed in a safe direction un<strong>de</strong>r all conditions and always keep your finger or any<br />
other object off the trigger and outsi<strong>de</strong> the trigger guard until you <strong>de</strong>ci<strong>de</strong> to fire the<br />
pistol. Never leave a loa<strong>de</strong>d firearm unatten<strong>de</strong>d or out of your direct control.<br />
• Keep the muzzle pointed in a safe direction and your finger off the trigger and outsi<strong>de</strong> the<br />
trigger guard until you are ready to fire.<br />
• How a handgun is gripped affects recoil and trigger control. Always ensure that you maintain<br />
a firm grip and proper alignment of the pistol. The <strong>de</strong>sign of the PPQ frame offers a high <strong>de</strong>gree<br />
of control permitting the shooter to obtain an elevated grip closer to the pistol’s bore axis.<br />
• With a firm grip, allow your finger to be placed squarely across the face of the trigger.
3. Handling the Pistol<br />
Squeeze the trigger fully to the rear. As the trigger is drawn fully to the rear, the striker is<br />
released, striking the cartridge primer. Upon firing, the sli<strong>de</strong> moves rearward thereby extracting<br />
and ejecting the spent cartridge case. The sli<strong>de</strong> then returns forward feeding the next<br />
cartridge from the magazine into the chamber.<br />
• After firing you must allow the trigger to move fully forward before you can fire the next shot.<br />
Keep your finger off the trigger and outsi<strong>de</strong> the trigger guard until you are ready to fire again.<br />
This sequence can be repeated until the last round has been fired.<br />
• Once the last round has been fired, the magazine follower exerts upward pressure on the<br />
sli<strong>de</strong> stop causing it to engage the sli<strong>de</strong> and to hold it in the “open” position.<br />
CAUTION:<br />
Wear a<strong>de</strong>quate and proper hearing protection and safety glasses specified for firearm<br />
use. Upon firing the pistol or releasing the sli<strong>de</strong> from its stop, the sli<strong>de</strong> moves with<br />
significant force and speed. To avoid injury, be attentive to the moving sli<strong>de</strong> so as to<br />
not make contact with any part of your body.<br />
3.4. Exchanging empty Magazines<br />
Once the last round has been fired, the magazine follower exerts upward pressure on the sli<strong>de</strong><br />
stop causing it to engage the sli<strong>de</strong> stop notch thereby holding it in the “open” position.<br />
• Depress the magazine release and remove the magazine.<br />
• To continue shooting, insert another loa<strong>de</strong>d magazine.<br />
• Pull the sli<strong>de</strong> fully to the rear, let it go and allow it to run fully forward.<br />
CAUTION:<br />
The pistol is ready to fire.<br />
With the muzzle still pointing in a safe direction, keep your trigger finger off the trigger<br />
and outsi<strong>de</strong> the trigger guard until ready to fire.<br />
3.5. Unloading the Pistol<br />
• Point the muzzle in a safe direction. Make sure<br />
your finger is off the trigger and out of the trigger<br />
guard. Depress the magazine release and remove<br />
the magazine (3.5. Fig. 1).<br />
• Grasp the serrated si<strong>de</strong>s of the sli<strong>de</strong> from the<br />
rear with the thumb and fingers (3.5. Fig. 2), and<br />
briskly draw the sli<strong>de</strong> fully rearward in or<strong>de</strong>r to 3.5. Figure 1<br />
93
extract any cartridge from the chamber and clear<br />
it from the pistol. Do not obstruct the ejection port<br />
because doing so can interfere with proper ejection<br />
of a cartridge.<br />
• Lock the sli<strong>de</strong> in the open position by allowing<br />
the sli<strong>de</strong> to move slightly forward from the rearmost<br />
position while pressing upward on the sli<strong>de</strong><br />
stop (3.5. Fig. 3).<br />
• Visually check the barrel chamber to be sure it is<br />
empty (3.5. Fig. 4). Look into the chamber and<br />
down through the magazine well. Verify that no<br />
ammunition remains in the pistol.<br />
• Unload the magazine by holding it with the bullet<br />
end of the cartridge pointing away from you and<br />
pressing each cartridge forward and out of the<br />
magazine.<br />
WARNING:<br />
Also remember that any time you release<br />
the sli<strong>de</strong> while a magazine containing cartridges<br />
is in the pistol, you will have chambered<br />
a new round in the pistol. The pistol<br />
will be ready to fire.<br />
3.6. Clearing Misfires<br />
94<br />
3. Handling the Pistol<br />
3.5. Figure 2<br />
3.5. Figure 3<br />
3.5. Figure 4<br />
• If a cartridge fails to fire, wait sixty seconds while keeping the muzzle pointed in a safe direction.<br />
• Follow the procedure as <strong>de</strong>scribed in section 3.5. “Unloading the Pistol”.<br />
• Check the barrel chamber and bore visually for any obstructions. You must be certain there<br />
are no cartridges in the chamber or obstructions in the barrel. If there are any obstructions<br />
in the bore of the barrel have the pistol further examined and repaired by a qualified gunsmith<br />
before using again.
4. Field-Stripping, Cleaning, Lubrication, and Maintenance<br />
4. Field-Stripping, Cleaning, Lubrication, and Maintenance<br />
WARNING:<br />
Check that the pistol is unloa<strong>de</strong>d (magazine removed from pistol and chamber clear).<br />
Also ensure that the magazine is unloa<strong>de</strong>d.<br />
4.1. Main Components<br />
WARNING:<br />
To complete disassembly, you will be required to pull the trigger. If you have failed to<br />
properly unload your pistol and a live round is left in the chamber, the pistol will discharge<br />
and may cause serious injury or <strong>de</strong>ath to yourself or others and damage to<br />
property. Therefore, you must visually inspect the chamber and magazine well (opening)<br />
to ensure that they are empty before pulling the trigger.<br />
4.1.1. Field-Stripping Disassembly<br />
• Remove the magazine and unload the pistol.<br />
Lock the sli<strong>de</strong> in the open position. Look into the<br />
chamber and down through the magazine well.<br />
Verify that no ammunition remains in the pistol.<br />
• Close the sli<strong>de</strong>: Pull the sli<strong>de</strong> slightly to the rear.<br />
Slowly release the sli<strong>de</strong>, allowing it to return to<br />
forward position.<br />
• Point the pistol in a safe direction. Squeeze the<br />
trigger fully to the rear.<br />
• Grip the take down catch from above on both<br />
si<strong>de</strong>s and press downwards (4.1.1. Fig. 1).<br />
• Move the sli<strong>de</strong> forward, and remove it from the<br />
frame.<br />
• Remove the recoil gui<strong>de</strong> rod assembly from below<br />
the barrel while taking up the spring pressure<br />
(4.1.1. Fig. 2).<br />
• Remove the barrel from the sli<strong>de</strong>.<br />
• The main components of the pistol are shown in<br />
4.1.1. Fig. 3<br />
95<br />
4.1.1. Figure 1<br />
4.1.1. Figure 2<br />
4.1.1. Figure 3
4. Field-Stripping, Cleaning, Lubrication, and Maintenance<br />
4.1.2. Field-Stripping Reassembly<br />
• Hold the sli<strong>de</strong> upsi<strong>de</strong>-down. Place the barrel insi<strong>de</strong><br />
the sli<strong>de</strong> with the locking lugs oriented as<br />
shown in 4.1.2. Fig. 1.<br />
• Insert the recoil gui<strong>de</strong> rod assembly: Place the<br />
smaller (black) end of the recoil rod into the<br />
spring mounting at the front of the sli<strong>de</strong>, and then<br />
insert the large polymer end of the recoil spring<br />
into the lower barrel recess, while taking up the<br />
spring pressure (4.1.2. Fig. 1 and 2).<br />
NOTE:<br />
It is normal for the recoil gui<strong>de</strong> rod assembly<br />
to flex when it is installed.<br />
• Push the sli<strong>de</strong> from the front into the sli<strong>de</strong> gui<strong>de</strong>s<br />
of the frame (4.1.2. Fig. 3), far enough for the<br />
take down catch to engage, making sure that the<br />
sli<strong>de</strong> also engages the rear sli<strong>de</strong> gui<strong>de</strong>s of the<br />
frame. Release the sli<strong>de</strong> and allow it to move<br />
fully forward into the locked position.<br />
4.2. Striker Assembly<br />
4.2.1. Remove Striker Assembly<br />
• Field-strip the pistol. Place the muzzle end of the<br />
sli<strong>de</strong> on a smooth, flat surface. Grasp the sli<strong>de</strong> at<br />
the sli<strong>de</strong> serrations, push in the pin through the<br />
square opening located at the top right si<strong>de</strong> of the<br />
sli<strong>de</strong> end cap using a 2 mm punch (4.2.1. Fig. 1)<br />
and remove the sli<strong>de</strong> end cap by sliding it downwards<br />
(4.2.1. Fig. 2).<br />
• Remove the striker assembly from the sli<strong>de</strong><br />
(4.2.1. Fig. 3).<br />
4.2.1. Figure 2<br />
96<br />
4.1.2. Figure 1<br />
4.1.2. Figure 2<br />
4.1.2. Figure 3<br />
4.2.1. Figure 1<br />
4.2.1. Figure 3 4.2.1. Figure 4
4. Field-Stripping, Cleaning, Lubrication, and Maintenance<br />
4.2.2. Install Striker Assembly<br />
• Insert Striker Assembly<br />
• Using the sli<strong>de</strong> end cap, press the striker assembly into the sli<strong>de</strong> and reinsert the sli<strong>de</strong> end<br />
cap from the bottom of the sli<strong>de</strong> until it snaps in place (see 4.2.1. Fig. 2).<br />
4.3. Extractor<br />
4.3.1. Remove Extractor<br />
WARNING:<br />
While you remove the extractor, be sure to<br />
control the striker safety and the extractor<br />
plunger so that they do not fly out.<br />
Place the sli<strong>de</strong> upsi<strong>de</strong> down with the muzzle facing<br />
to the left. Push in the extractor plunger with a 2<br />
mm punch (4.3.1. Fig. 1).<br />
Cover the striker safety and the extractor plunger<br />
with a finger while you pivot the extractor out. Remove<br />
the striker safety assembly and the extractor<br />
plunger assembly from the sli<strong>de</strong>.<br />
4.3.2. Install Extractor<br />
Place the sli<strong>de</strong> upsi<strong>de</strong> down with the muzzle facing<br />
to the left. Insert the striker safety assembly<br />
and the extractor plunger assembly into the sli<strong>de</strong><br />
(4.3.2. Fig. 1). Ensure the striker safety spring enters<br />
the <strong>de</strong>epest part of its recess. When assem-<br />
4.3.2. Figure 2<br />
bled correctly, the safety should be slightly below<br />
the feed rib next to it.<br />
Align the rear end of the extractor to the extractor<br />
slot and press it towards the sli<strong>de</strong> with the thumb of<br />
your other hand. Push down the extractor plunger<br />
with the 2 mm punch and press in the extractor until<br />
they hold each other without pressing in the ex-<br />
4.3.2. Figure 3<br />
tractor completely in. Remove the 2 mm punch,<br />
while the eyelet of the extractor holds down the extractor plunger (4.3.2. Fig. 2). Hold the<br />
safety plunger down flush with the surface of the sli<strong>de</strong>. Press in the extractor completely until<br />
the plunger snaps into the hole of the extractor (4.3.2. Fig. 3).<br />
97<br />
4.3.1. Figure 1<br />
4.3.2. Figure 1
4.4. Magazine<br />
4. Field-Stripping, Cleaning, Lubrication, and Maintenance<br />
WARNING:<br />
Wear safety glasses when disassembling or assembling the magazine.<br />
4.4.1. Disassembly<br />
WARNING:<br />
The magazine spring is un<strong>de</strong>r pressure. Use caution when stripping down the<br />
magazine. Control the floorplate catch and the magazine spring while you remove<br />
the floorplate so that they do not fly out and cause injury.<br />
1. Using a 4 mm punch, <strong>de</strong>press the floorplate catch through<br />
the hole in the floorplate (4.4.1. Fig. 1).<br />
2. Sli<strong>de</strong> the floorplate forward off of the magazine tube while<br />
continuing to <strong>de</strong>press the floorplate catch in the tube.<br />
3. Remove the floorplate catch and spring carefully from the<br />
magazine tube through the bottom of the tube.<br />
4. Turn the tube right si<strong>de</strong> up and remove the follower<br />
through the bottom of the tube.<br />
4.4.2. Assembly<br />
1. Install the follower and magazine spring plus floorplate<br />
catch in reverse or<strong>de</strong>r back into the tube in exactly the<br />
same orientation as they were in when they were first<br />
removed during disassembly (4.4.2. Fig. 1 and 2). Never<br />
use excessive force when assembling the magazine.<br />
2. While holding the floorplate catch in the tube, sli<strong>de</strong> the<br />
floorplate onto the tube so that the round projection of the<br />
floorplate catch engages the hole in the floorplate. There<br />
will be an audible “snap” heard.<br />
98<br />
4.4.1. Figure 1<br />
4.4.2. Figure 1<br />
4.4.2. Figure 2
4. Field-Stripping, Cleaning, Lubrication, and Maintenance<br />
4.5. Cleaning the Pistol<br />
Your firearm is a precision instrument. To ensure the reliable function of the pistol, it is necessary<br />
to establish routine maintenance procedures.<br />
WARNING:<br />
Check that the pistol is unloa<strong>de</strong>d (magazine removed from pistol and chamber clear).<br />
Also ensure that the magazine is unloa<strong>de</strong>d.<br />
After each use of the pistol or after being subjected to extreme weather conditions, the pistol<br />
should be cleaned and lubricated. Also, before using the pistol for the first time, it should be<br />
examined and cleaned. The pistol has been treated with either a preservative or oil to protect it<br />
against corrosion. Before using it, all excess oil should be wiped from the bore, chamber, and<br />
exposed areas using a clean swab or patch.<br />
Field-strip the pistol as previously <strong>de</strong>scribed. Starting with the barrel and from chamber end,<br />
insert a brush through the bore of the barrel until the bristles completely exit at muzzle end. Pull<br />
the brush back until the bristles completely exit at chamber end. Use a good pow<strong>de</strong>r-removing<br />
solvent and brass bristle bore brush to remove lead and firing residue from the interior of the<br />
barrel. Wipe the areas clean with patches or a swab.<br />
Using a small brush dipped in solvent, remove all <strong>de</strong>posits from around the breech face, chamber<br />
end of the barrel, extractor and adjacent areas which have been exposed to pow<strong>de</strong>r or<br />
primer residue. Remove any residue on the frame with light brushing and a solvent. After cleaning,<br />
apply a light film of high quality gun lubricant to all external metal surfaces and wipe clean.<br />
If the pistol will be used or stored in a cold climate, be sure to use appropriate lubricant that<br />
will not congeal at low temperatures.<br />
CAUTION:<br />
Always follow the instructions provi<strong>de</strong>d with the gun cleaner and gun lubricant. Some<br />
cleaners can cause damage to the pistol. You should avoid prolonged solvent immersion<br />
and prolonged ultrasonic cleaning of the pistol (maximum temperature for ultrasonic<br />
cleaning: 50 °C (122 °F)).<br />
Choice of solvent should be restricted to those products specifically <strong>de</strong>veloped for<br />
firearms maintenance. Damage to a firearm’s finish may occur if these warnings are<br />
ignored.<br />
Ammonia based solvents or other strong alkaline solvents, should not be used on any<br />
WALTHER firearm.<br />
4.6. Lubrication<br />
After cleaning the entire pistol, use a cloth to apply a light film of high quality gun lubricant to<br />
all external metal surfaces and wipe clean.<br />
Do not over-lubricate the pistol to the extent where lubricant will be dripping or running down<br />
the handgun. Excess lubricant can attract dirt, unburned pow<strong>de</strong>r and carbon residue, which<br />
99
4. Field-Stripping, Cleaning, Lubrication, and Maintenance<br />
can interfere with proper functioning of the pistol. Do not put any gun lubricant into the striker<br />
channel (4.6. Fig. 1).<br />
• Barrel:<br />
Use a cloth to apply a light film of high quality gun lubricant to all external surfaces and the<br />
ramp where the locking block cams the barrel.<br />
• Frame:<br />
Put only one drop of lubricant on the sli<strong>de</strong> gui<strong>de</strong>s, and on the trigger bar.<br />
• Sli<strong>de</strong>:<br />
Put only one drop of lubricant on the safety plunger and the disconnector cut.<br />
• Magazine:<br />
Apply a light film of high quality gun lubricant to all external metal surfaces.<br />
4.7. Maintenance before Storing<br />
4.6. Figure 1<br />
Obey all laws and regulations relating to the storage of firearms. You must familiarize yourself<br />
with all local, state, and fe<strong>de</strong>ral laws regarding the safe storage of firearms and ammunition.<br />
When storing the pistol, do not encase the firearm in anything that will attract or hold moisture,<br />
100
4. Field-Stripping, Cleaning, Lubrication, and Maintenance<br />
such as leather or heavy cloth. If the firearm is to be stored for an exten<strong>de</strong>d period, the bore,<br />
chamber and internal working mechanism should be lubricated with a high quality lubricant or<br />
preservative inten<strong>de</strong>d for firearms. The external working mechanisms, sli<strong>de</strong>, barrel, and magazine<br />
should be coated with anti-corrosion lubrication.<br />
Before using the pistol again, be sure to clean it. Every time you clean the firearm, check it for<br />
signs of wear. If wear is noted, do not use the firearm. Return it to WALTHER for service or have<br />
it checked by a qualified gunsmith.<br />
101
5. Adjusting the Pistol to its User<br />
5.1. Grip<br />
If the grip of the pistol does not fit your hand comfortably,<br />
the backstrap can be replaced with another<br />
size to better suit your hand.<br />
To do so, push the pin in the bottom part of the<br />
backstrap out using a 4 mm punch, exchange the<br />
backstrap for one with a better fit and replace the<br />
pin (5.1. Fig. 1).<br />
5.2. Lanyard Loop<br />
102<br />
5. Adjusting the Pistol to its User<br />
A lanyard loop for attachment of a lanyard is found at the lower end of the backstrap. The pin<br />
used to fasten the backstrap forms, together with a recess in the backstrap, an eyelet for attachment<br />
of a lanyard.<br />
To attach a lanyard, push the pin in the bottom part of the backstrap out using a 4 mm punch,<br />
insert the lanyard, then replace the pin.<br />
5.3. Sights<br />
The front and rear sight are replaceable. The point of impact is adjustable for windage and elevation.<br />
WARNING:<br />
Check that the pistol is unloa<strong>de</strong>d (magazine removed from pistol and chamber clear).<br />
Also ensure that the magazine is unloa<strong>de</strong>d.<br />
WINDAGE<br />
Windage adjustments are ma<strong>de</strong> by drifting the steel rear sight<br />
from si<strong>de</strong> to si<strong>de</strong> with the rear sight adjustment tool. If shots<br />
group to the right, move the rear sight to the left, if they group to<br />
the left, move the rear sight to the right.<br />
WARNING:<br />
The standard WALTHER Steel Rear Sight (5.3. Fig. 1) will<br />
fit very tightly into the slot cut in the sli<strong>de</strong>. The rear sight<br />
adjustment tool is available as an accessory and highly<br />
recommen<strong>de</strong>d when adjusting for windage. Do not remove<br />
the sleeve below the steel rear sight.<br />
5.1. Figure 1<br />
5.3. Figure 1
5. Adjusting the Pistol to its User<br />
ELEVATION<br />
Elevation adjustments are ma<strong>de</strong> by using front<br />
sights of varying height. Steel Front Sights of varying<br />
height are an accessory item.<br />
If the shots group low, use a lower front sight. For<br />
high grouping, use a higher one. The front sights are<br />
numbered. The higher the number, the higher the<br />
5.3. Figure 2<br />
front sight. Each stage results in a correction of the<br />
impact by about 5 cm (2”) over a 25 m (25 yards) distance from target. To change the front<br />
sight, field-strip the pistol as <strong>de</strong>scribed in section 4.1. Remove the front sight screw using a<br />
screwdriver and press the front sight upwards and out.<br />
Assembly is in reverse or<strong>de</strong>r (5.3. Fig. 2). Remember to make sure the screw and the thread<br />
insi<strong>de</strong> the steel front sight are free of oil or grease. The thread of the front sight screw should<br />
be secured using an industrial adhesive (for example Loctite 648). To tighten the front sight<br />
screw, apply a torque of 1 Nm (8.8 inch lbs).<br />
103
6. Explo<strong>de</strong>d Diagram<br />
104<br />
6. Explo<strong>de</strong>d Diagram
7. Parts List<br />
7. Parts List<br />
No. Designation No. Designation<br />
1.1 Front Sight Screw 24 Trigger Assembly<br />
1.2 Front Sight 26 Sli<strong>de</strong> Stop Lever Assembly<br />
3 Sli<strong>de</strong> 27 Pin, Take Down Lever<br />
5 Extractor 28.1 Spring, Barrel Lock<br />
6 Extractor Plunger Assembly 28.2 Barrel Lock<br />
7 Spring, Extractor <strong>29</strong> Frame, with Locking Block<br />
7.1 Spring, Magazine Release <strong>29</strong>.1 Locking Block, ground<br />
8 Rear Sight 30 Spring, Sli<strong>de</strong> Stop Lever<br />
15 Striker Assembly 31 Pin 3x24<br />
16 Trigger Return Spring 32 Sear Housing Assembly<br />
18 Striker Safety Assembly 32.8 Trigger Bar Gui<strong>de</strong><br />
19 Barrel 33 Magazine<br />
20 Sli<strong>de</strong> End Cap 35 Pin 4x16<br />
21 Recoil Gui<strong>de</strong> Rod Assembly 36 Magazine Release<br />
22 Pin 3x28 38 Backstrap S, M or L<br />
23 Take Down Catch 48 Pin, Magazine Release<br />
105
8. Technical Specifications<br />
106<br />
8. Technical Specifications<br />
Caliber 9 mm x19 / 9mm x 21 .40 S&W<br />
Magazine Capacity 15 rounds CDN 12 rounds CDN<br />
Overall Dimensions (L/W/H) 180 / 34 / 135 mm CDN 184 / 34 / 135 mm<br />
Barrel Length 102 mm CDN 106 mm<br />
Twist Rate 250 mm (1:10”) 406 mm (1:16”)<br />
Rifling<br />
six-groove,<br />
right hand twist<br />
Sight Radius 156 mm 158 mm<br />
Width, Rear Sight Notch<br />
4,6 (Standard / No. 2)<br />
3,8 (No. 1)<br />
Width, Front Sight 3,6 mm<br />
Weight, Pistol<br />
with empty Magazine<br />
695 g 705 g<br />
Weight, empty Magazine 80 g<br />
Muzzle Energy E3,<br />
Bullet Weight<br />
500 J<br />
8 g<br />
475 J<br />
11,7 g<br />
Action Short recoil operated, locked-breech<br />
System Semi-automatic, striker fired pistol<br />
Trigger Action Quick Defense Trigger, pre-cocked<br />
Trigger Pull / Travel 25 N / 9 mm (i<strong>de</strong>ntical for every round)<br />
Materials<br />
Sli<strong>de</strong> and barrel: Tenifer®-treated carbon steel<br />
Frame: High-strength polymer<br />
Safety Devices Trigger-, Striker-, Drop-Safety<br />
Data based on average numbers. Actual numbers may vary.<br />
CDN Canada: Magazine capacity 10 rounds, Barrel Length 106 mm, OL 184 mm
Italiano<br />
Istruzioni per l’<strong>uso</strong><br />
WALTHER PPQ<br />
107
NOTA<br />
Il presente manuale si riferisce all’utilizzo <strong>de</strong>lla pistola da parte di civili. Le istruzioni<br />
per l’<strong>uso</strong> da parte <strong>de</strong>lle forze <strong>de</strong>ll’ordine possono differire da quanto <strong>de</strong>scritto nel<br />
presente manuale.<br />
Nel presente manuale, le <strong>de</strong>signazioni di posizioni quali »sinistra«, »<strong>de</strong>stra«, »avanti«,<br />
»dietro«, ecc., sono riferite alla pistola tenuta in posizione di sparo normale. In altre<br />
parole, puntata lontano dal tiratore, con la canna generalmente in direzione orizzontale<br />
e con l’impugnatura <strong>de</strong>lla pistola rivolta verso il basso.<br />
Le spiegazioni contenute nel presente manuale si basano sull’utilizzo <strong>de</strong>lla pistola<br />
con la mano <strong>de</strong>stra. Gli utilizzatori mancini dovranno operare al contrario.<br />
108
Indice<br />
1. Norme di sicurezza 110<br />
2. Descrizione <strong>de</strong>l prodotto 111<br />
2.1. Descrizione funzionale 111<br />
2.2. Contenuto <strong>de</strong>lla confezione 112<br />
2.3. Munizioni 112<br />
2.4. Elementi funzionali 113<br />
3. Uso <strong>de</strong>lla pistola 116<br />
3.1. Controllo <strong>de</strong>lla pistola 116<br />
3.2. Caricamento 117<br />
3.3. Sparare 118<br />
3.4. Sostituzione <strong>de</strong>l caricatore 119<br />
3.5. Scaricamento <strong>de</strong>lla pistola 119<br />
3.6. Procedura in caso di sparo fallito 120<br />
4. Smontaggio, pulizia, lubrificazione e manutenzione 121<br />
4.1. Componenti principali 121<br />
4.2. Gruppo percussore 122<br />
4.3. Estrattore 123<br />
4.4. Caricatore 124<br />
4.5. Pulizia 125<br />
4.6. Lubrificazione 125<br />
4.7. Preparazione per la conservazione 126<br />
5. Regolazione <strong>de</strong>lla pistola secondo le esigenze<br />
<strong>de</strong>ll’utilizzatore 128<br />
5.1. Impugnatura 128<br />
5.2. Anello portacorreggiolo 128<br />
5.3. Mirini 128<br />
6. Vista esplosa 130<br />
7. Distinta <strong>de</strong>i componenti 131<br />
8. Specifiche tecniche 132<br />
109
1. Norme di sicurezza<br />
110<br />
1. Norme di sicurezza<br />
• Prima di utilizzare la pistola, leggere attentamente le presenti istruzioni, che ne <strong>de</strong>scrivono il<br />
funzionamento e le modalità d’<strong>uso</strong>. Ogni spiegazione relativa alle parti componenti <strong>de</strong>lla pistola<br />
e al suo funzionamento normalmente, nel presente manuale, è menzionata una sola<br />
volta. Per maggiori <strong>de</strong>ttagli, sono comunque riportate indicazioni di riferimento a capitoli<br />
prece<strong>de</strong>nti.<br />
• Prima di fare il controllo di sicurezza e prima di sparare, come pure in caso di malfunzionamenti<br />
e prima di proce<strong>de</strong>re alla pulizia, bisogna accertarsi sempre che l’arma sia scarica<br />
(caricatore rimosso dalla pistola e camera di cartuccia libera), che la canna sia pulita e non<br />
presenti ostruzioni di alcun genere, e che il caricatore sia vuoto.<br />
• Conservare la pistola e munizioni in luoghi separati e sicuri ai quali non <strong>de</strong>vono avere accesso<br />
le persone non autorizzate, in particolare i bambini.<br />
• Anche se è scarica, trattare sempre l’arma come se fosse carica. Maneggiare sempre la<br />
pistola in modo da non creare pericolo per sé e per le persone vicine. Puntare sempre la<br />
pistola in una direzione sicura. Non puntare mai l’arma contro persone od oggetti se non si<br />
inten<strong>de</strong> sparare, indipen<strong>de</strong>ntemente dal fatto che sia carica o meno.<br />
• Attenzione: tenere sempre il dito lontano dal grilletto finché non si è pronti a sparare. In generale,<br />
il dito <strong>de</strong>ve essere mantenuto all’esterno <strong>de</strong>l guardavano. Il grilletto <strong>de</strong>ve essere<br />
azionato se la pistola è puntata su un bersaglio.<br />
• Non esercitare mai forza durante l’utilizzo, il controllo, lo smontaggio, la pulizia o il montaggio<br />
<strong>de</strong>lla pistola. Il maneggio non corretto pregiudicherà la funzionalità e la sicurezza <strong>de</strong>lla pistola.<br />
Non smontare mai l’arma in misura superiore a quanto <strong>de</strong>scritto nel presente manuale.<br />
• La sicurezza ed il corretto funzionamento sono garantiti soltanto se la pistola e le munizioni<br />
sono in perfette condizioni d'esercizio.<br />
• Far controllare la pistola da un armaiolo qualificato se si sospetta che possa essere stata<br />
danneggiata, ad esempio se è caduta, oppure se presenta <strong>de</strong>lle tracce di corrosione, ecc.<br />
• Indossare sempre occhiali e cuffie di protezione a<strong>de</strong>guati e specifici per l’<strong>uso</strong> con armi da<br />
fuoco. Accertarsi che anche le persone che si trovano nelle vicinanze indossino gli stessi<br />
dispositivi di protezione.<br />
• L’arma è stata progettata per l’<strong>uso</strong> con munizioni di tipo e calibro specifico. Il calibro corretto<br />
è indicato sull’arma. Usare esclusivamente le munizioni corrispon<strong>de</strong>nti al calibro <strong>de</strong>ll’arma<br />
e alle prescrizioni <strong>de</strong>lla Commission Internationale Permanente pour l’Epreuve <strong>de</strong>s Armes à<br />
Feu portatives (C.I.P.) o <strong>de</strong>llo Sporting Arms and Ammunition Manufacturers’ Institute (SAA-<br />
MI). Se vengono utilizzate <strong>de</strong>lle munizioni ricaricate, non superare la pressione <strong>de</strong>l gas/<strong>de</strong>lla
2. Descrizione <strong>de</strong>l prodotto<br />
camera di cartuccia ammessa secondo le norme C.I.P. o SAAMI. Una pressione eccessiva<br />
può danneggiare l’arma e persino causare un’esplosione. Le munizioni con velocità di espulsione<br />
e pressioni superiori a quelle per le quali la pistola è stata progettata espongono l’arma<br />
a una sollecitazione supplementare che può danneggiarla gravemente.<br />
• Prima di caricare la pistola, eliminare sempre il grasso od olio in eccesso e accertarsi che la<br />
canna sia pulita e non presenti ostruzioni di alcun genere.<br />
• Non alterare, modificare o sostituire alcuna parte <strong>de</strong>ll’arma in misura superiore a quanto <strong>de</strong>scritto<br />
nel presente manuale. Gli interventi di manutenzione o assistenza non specificati <strong>de</strong>vono<br />
essere eseguiti da un armaiolo qualificato utilizzando componenti WALTHER originali.<br />
• Interventi non appropriati o non autorizzati sui componenti possono pregiudicare la sicurezza<br />
e l’affidabilità <strong>de</strong>lla pistola, causando ferite gravi e addirittura la morte.<br />
ESCLUSIONE DELLA RESPONSABILITÀ<br />
Durante l'<strong>uso</strong> di un’arma da fuoco la massima precauzione è indispensabile. La mancata precauzione<br />
può causare, pur involontariamente, danni materiali gravi, lesioni personali o anche il<br />
<strong>de</strong>cesso. WALTHER <strong>de</strong>clina qualsiasi responsabilità a fronte di danni imputabili all'<strong>uso</strong> improprio<br />
<strong>de</strong>lla pistola o all'inosservanza <strong>de</strong>lle vigenti norme di legge. Quanto pre<strong>de</strong>tto vale anche a<br />
fronte di danni imputabili alla mancata osservanza <strong>de</strong>lle presenti istruzioni per l'<strong>uso</strong>, alla sostituzione<br />
non autorizzata di componenti, o a qualsiasi intervento sulla pistola non espressamente<br />
previsto dalle presenti istruzioni per l'<strong>uso</strong>.<br />
2. Descrizione <strong>de</strong>l prodotto<br />
2.1. Descrizione funzionale<br />
La pistola semi-automatica WALTHER PPQ con sistema di chiusura geometrica a blocco utilizza<br />
il funzionamento a corto rinculo di canna. Tirando il grilletto, il percussore viene rilasciato e<br />
viene sparato il colpo. La pressione <strong>de</strong>l gas spinge il proiettile fuori dalla canna. L’impulso risultante<br />
provoca un movimento all’indietro <strong>de</strong>lla canna e <strong>de</strong>ll'otturatore. La canna e l’otturatore<br />
arretrano assieme per un breve tratto, finché la canna non viene sbloccata dall’otturatore mediante<br />
l’azione a camme in cui la parte posteriore <strong>de</strong>lla canna viene tirata verso il basso e<br />
bloccata. L’otturatore continua il movimento all’indietro, estraendo il bossolo dalla camera di<br />
cartuccia ed espellendolo verso <strong>de</strong>stra. Quando ha raggiunto il suo limite di corsa, l’otturatore<br />
viene spinto nuovamente in avanti dalla molla di recupero, sfila dal caricatore una nuova cartuccia<br />
e la introduce nella camera. Questo spinge la camera di cartuccia e la canna in avanti e<br />
verso l’alto, dove si blocca carrello-otturatore. Lasciare che il grilletto si muova in avanti. A<strong>de</strong>sso<br />
la pistola è pronta per sparare un altro colpo.<br />
111
2.2. Contenuto <strong>de</strong>lla confezione<br />
112<br />
2. Descrizione <strong>de</strong>l prodotto<br />
• Pistola in custodia di plastica • Caricatore di riserva<br />
• Bersaglio di prova • Istruzioni per l’<strong>uso</strong><br />
• Parti posteriori <strong>de</strong>ll’impugnatura nelle misure S e L • carica-caricatore<br />
Nota: Il contenuto effettivo <strong>de</strong>lla confezione può essere diverso<br />
2.3. Munizioni<br />
Utilizzare esclusivamente le munizioni specificamente previste per questa pistola. Il<br />
mancato utilizzo <strong>de</strong>l tipo o calibro corretto di munizioni può causare malfunzionamenti,<br />
impossibilità di sparare oppure, a causa di una pressione eccessiva <strong>de</strong>l gas, danneggiare<br />
o distruggere la pistola, provocando lesioni personali, morte oppure danni materiali.<br />
Individuare l’indicazione <strong>de</strong>l calibro marcata sulla<br />
pistola. Questa informazione indica il calibro<br />
<strong>de</strong>lle munizioni che <strong>de</strong>vono essere utilizzate in<br />
quest’arma (ve<strong>de</strong>re 2.3. figura 1). Usare soltanto<br />
munizioni corrispon<strong>de</strong>nti al calibro <strong>de</strong>lla pistola e<br />
che siano conformi alle disposizioni di C.I.P. o<br />
SAAMI, oppure certificate secondo la “Technische<br />
Richtlinie Patrone 9mm x 19 schadstoffreduziert“<br />
(direttiva tecnica per cartucce 9mm x<br />
2.3. Fig. 1<br />
19 con impatto ambientale ridotto). Controllare le<br />
munizioni prima <strong>de</strong>ll’utilizzo. Usare soltanto munizioni in condizione perfetta. La pistola e le munizioni<br />
costituiscono un insieme e <strong>de</strong>vono adattarsi reciproca-mente. La loro affidabilità dipen<strong>de</strong> da<br />
ciascuno <strong>de</strong>i componenti. Le diverse combinazioni formate dalla velocità di espulsione, dal peso<br />
<strong>de</strong>l proiettile e dal peso <strong>de</strong>ll’arma influiscono sul rinculo avvertito al momento <strong>de</strong>llo sparo. Un rinculo<br />
eccessivo <strong>de</strong>lla pistola potrebbe risultare fastidioso per alcuni tiratori.<br />
Esempi:<br />
• Peso <strong>de</strong>ll’arma: un peso ridotto produce un rinculo più intenso.<br />
• Peso <strong>de</strong>i proiettili: più il proiettile è pesante, più il rinculo è intenso.<br />
• Velocità di espulsione: una maggiore velocità di espulsione amplifica il rinculo.<br />
Per abituarsi a un rinculo più intenso, si possono adottare i seguenti accorgimenti:<br />
• Tenere la pistola con due mani al momento <strong>de</strong>l tiro.<br />
• Cominciare a sparare con le munizioni caratterizzate da velocità di espulsione inferiore e da<br />
un peso più basso, fra quelle adatte per la pistola.<br />
• Farsi consigliare da uno specialista sulle munizioni più <strong>de</strong>boli, la velocità di espulsione inferiore<br />
e il peso <strong>de</strong>l proiettile più leggero adatti per la pistola.<br />
• Modificare eventualmente la configurazione/composizione <strong>de</strong>ll’impugnatura <strong>de</strong>lla pistola<br />
per adattarla alle proprie esigenze specifiche.
2. Descrizione <strong>de</strong>l prodotto<br />
2.4. Bedien- und Funktionselemente<br />
1 Asta guidamolla di recupero<br />
2 Vivo di volata<br />
3 Designazione <strong>de</strong>l mo<strong>de</strong>llo<br />
5<br />
1<br />
4<br />
2<br />
17<br />
16<br />
15<br />
1 Carrello-otturatore<br />
2 Mirino<br />
3 Sicura <strong>de</strong>l carrello<br />
4 Canna<br />
5 Fermo leva arresto<br />
carrello-otturatore<br />
6 Scanalature trasversali<br />
7 Leva arresto<br />
carrello-otturatore<br />
8 Tacca di mira<br />
9 Dorsalino<br />
<strong>de</strong>ll'impugnatura<br />
3<br />
6<br />
2<br />
1<br />
14<br />
4<br />
113<br />
7<br />
5 6<br />
13<br />
10 Anello<br />
portacorreggiolo<br />
11 Caricatore<br />
12<br />
12 Impugnatura<br />
13 Ritegno <strong>de</strong>l caricatore<br />
14 Grilletto<br />
15 Guardia <strong>de</strong>l grilletto<br />
16 Fusto<br />
17 Guida di montaggio<br />
11<br />
3<br />
7<br />
4 Numero di seria<br />
5 Tappo carrello-otturatore<br />
6 Finestra di espulsione<br />
7 Estrattore<br />
(indicatore di carica)<br />
9<br />
8<br />
10
2.4.1. Indicatore di carica<br />
Se la parte posteriore <strong>de</strong>ll’estrattore è incassata, ciò significa<br />
che una cartuccia/un bossolo si trova nella camera di cartuccia.<br />
L’indicatore assume la forma di una marcatura rossa<br />
(2.4.1. Fig. 1).<br />
114<br />
2. Descrizione <strong>de</strong>l prodotto<br />
ATTENZIONE:<br />
Non fidarsi esclusivamente <strong>de</strong>l sistema d’indicazione <strong>de</strong>lla carica per verificare la<br />
presenza o meno di un colpo nella camera. Il metodo di controllo più affidabile è<br />
guardare <strong>de</strong>ntro la camera. A questo scopo, togliere il caricatore, estrarre il carrellootturatore<br />
fino all’arresto e bloccarlo nella posizione “aperta”.<br />
ATTENZIONE:<br />
Maneggiare sempre l’arma come se fosse carica.<br />
L’indicatore di carica permette di sapere se nella camera di cartuccia è alloggiata una<br />
cartuccia o meno, ma vi sono alcuni fattori, come la luce, l’imbrattamento <strong>de</strong>lla pistola,<br />
macchie <strong>de</strong>lla munizione e altri fattori che possono limitare l’efficacia <strong>de</strong>ll’indicatore<br />
di carica.<br />
2.4.2. Ritegno <strong>de</strong>l caricatore<br />
Il ritegno <strong>de</strong>l caricatore collocato su entrambi i lati<br />
<strong>de</strong>lla guardia <strong>de</strong>l grilletto è integrato all'interno <strong>de</strong>l<br />
contorno <strong>de</strong>lla guardia. Afferrare la pistola tenendo<br />
le dita lontane dal grilletto e all’esterno <strong>de</strong>lla guardia.<br />
Premere il ritegno all'ingiù e rimuovere il caricatore.<br />
Se risulta difficoltoso agire sul ritegno <strong>de</strong>l<br />
caricatore con il pollice <strong>de</strong>lla mano che impugna la<br />
pistola, si provi a usare il dito indice (2.4.2. Fig. 1).<br />
2.4.3. Leva arresto carrello-otturatore<br />
Blocco <strong>de</strong>l carrello-otturatore in posizione<br />
“aperta”: Afferrare la pistola tenendo le dita lontane<br />
dal grilletto e all’esterno <strong>de</strong>lla guardia. Premere<br />
il ritegno <strong>de</strong>l caricatore e rimuovere il caricatore.<br />
Tenendo ferma la pistola, afferrare l’otturatore da<br />
dietro sulle scanalature e arretrarlo completamente<br />
con un movimento rapido per estrarre un’eventuale<br />
cartuccia dalla camera di cartuccia ed espellerla<br />
dalla pistola. Per bloccare il carrello-otturatore in<br />
posizione aperta, far avanzare leggermente l’otturatore<br />
dalla posizione più arretrata premendo contemporaneamente<br />
verso l’alto la leva arresto carrello-otturatore<br />
(2.4.3. Fig. 1).<br />
2.4.1. Fig. 1<br />
2.4.2. Fig. 1<br />
2.4.3. Fig. 1
2. Descrizione <strong>de</strong>l prodotto<br />
Rilascio <strong>de</strong>lla leva arresto carrello-otturatore:<br />
Premere la leva arresto carrello-otturatore con il pollice <strong>de</strong>lla mano che impugna l’arma per<br />
rilasciare l’otturatore e farlo avanzare completamente.<br />
Per un funzionamento più agevole <strong>de</strong>lla leva arresto carrello-otturatore, afferrare da dietro i lati<br />
scanalati e tirare l’otturatore all’indietro premendo contemporaneamente la leva arresto carrello-otturatore<br />
per rilasciare l’otturatore e farlo avanzare completamente.<br />
115
3. Uso <strong>de</strong>lla pistola<br />
3.1. Controllo <strong>de</strong>lla pistola<br />
• Prima <strong>de</strong>l controllo è necessario accertarsi che la<br />
pistola sia scarica. A questo scopo, puntare la canna<br />
verso una direzione sicura, allontanare le dita<br />
dal grilletto e dalla guardia, premere il ritegno <strong>de</strong>l<br />
caricatore e togliere il caricatore (3.1. Fig. 1).<br />
• Afferrare con le dita il carrello-otturatore nella<br />
parte posteriore sulle scanalature trasversali<br />
come illustrato in 3.1. Fig. 2, e tirarlo indietro<br />
energicamente fino all’arresto. Se nella camera<br />
c’è una cartuccia, essa verrà estratta dalla camera<br />
ed espulsa. Non coprire la finestra di espulsione,<br />
altrimenti la cartuccia non può essere<br />
espulsa come previsto.<br />
• Bloccare il carrello-otturatore in posizione aperta.<br />
Mantenendo l’otturatore nella posizione più<br />
arretrata, spingere la leva di arresto carrello-otturatore<br />
verso l’alto e far avanzare lentamente<br />
l’otturatore finché non viene trattenuto dalla leva<br />
(3.1. Fig. 3).<br />
• Accertarsi che la camera di cartuccia sia scarica<br />
e controllare visivamente la canna per verificare<br />
che sia pulita, asciutta e priva di ostruzioni (3.1.<br />
Fig. 4).<br />
Effettuare sempre questo controllo prima di <strong>de</strong>porre<br />
la PPQ, di pulirla, di consegnarla a un’altra persona,<br />
di trasportarla o di riporla.<br />
116<br />
3. Uso <strong>de</strong>lla pistola<br />
3.1. Fig. 1<br />
3.1. Fig. 2<br />
3.1. Fig. 3<br />
3.1. Fig. 4<br />
ATTENZIONE:<br />
Non fidarsi mai esclusivamente <strong>de</strong>lla tecnica. È responsabilità <strong>de</strong>ll’utilizzatore maneggiare<br />
sempre l’arma con la massima cautela, per garantire la propria e altrui sicurezza.
3. Uso <strong>de</strong>lla pistola<br />
3.2. Caricamento<br />
3.2.1. Caricatore<br />
Quando il caricatore viene rimosso dal suo alloggiamento all’interno<br />
<strong>de</strong>ll’impugnatura <strong>de</strong>lla pistola, attraverso i fori è possibile verificare il<br />
numero di colpi.<br />
Nota:<br />
Usa solo caricatori adatti per la sua pistola. Altri caricatori possono<br />
causare malfunzionamento oppure danneggiamenti alla<br />
pistola e al caricatore.<br />
3.2.2. Caricamento <strong>de</strong>l caricatore<br />
ATTENZIONE:<br />
Non tentare mai di inserire più cartucce di quanto specificato, perché ciò potrebbe<br />
causare malfunzionamenti nell’alimenta zione. Non esercitare forza, per non danneggiare<br />
il caricatore. Un caricatore/i labbri <strong>de</strong>l caricatore difettosi causano malfunzionamenti,<br />
ren<strong>de</strong>ndo inutilizzabile la pistola.<br />
Per inserire <strong>de</strong>lle cartucce nel caricatore, spingere verso il basso<br />
la parte anteriore <strong>de</strong>ll’alimentatore con il fondo <strong>de</strong>lla cartuccia<br />
e far scivolare la cartuccia sotto i labbri <strong>de</strong>l caricatore finché<br />
il fondo <strong>de</strong>lla cartuccia non tocca la parete posteriore <strong>de</strong>l caricatore<br />
(3.2.2. Fig. 1). Ripetere questa procedura per il numero<br />
di cartucce che si <strong>de</strong>si<strong>de</strong>rano caricare.<br />
Il caricamento può essere facilitato dal carica-caricatore WALTHER.<br />
Inserire il carica-caricatore con la parete lunga orientata all’indietro nella parte supe-riore <strong>de</strong>l<br />
caricatore (3.2.2. Fig. 2). Premere il carica-caricatore verso il basso e inserire una cartuccia<br />
con l’altra mano, facendola scivolare sotto i labbri <strong>de</strong>l caricatore (3.2.2. Fig. 3). Sollevare lievemente<br />
il carica-caricatore e inserire completamente la cartuccia al di sotto <strong>de</strong>i labbri <strong>de</strong>l caricatore<br />
(3.2.2. Fig. 4).<br />
3.2.2. Fig. 2 3.2.2. Fig. 3<br />
3.2.2. Fig. 4<br />
117<br />
3.2.2. Fig. 1<br />
3.2.1. Fig. 1
118<br />
3. Uso <strong>de</strong>lla pistola<br />
3.2.3. Caricamento <strong>de</strong>lla pistola<br />
• Controllare la pistola come <strong>de</strong>scritto nella sezione 3.1.<br />
• Afferrare la pistola con le dita lontane dal grilletto e all’esterno <strong>de</strong>lla guardia, con il vivo di<br />
volata rivolto in una direzione sicura. Inserire il caricatore nel suo alloggiamento finché non<br />
si innesta. Per verificare che il caricatore sia innestato in modo sicuro, tirare verso il basso<br />
la parte esposta <strong>de</strong>l fondo <strong>de</strong>l caricatore: non <strong>de</strong>ve muoversi.<br />
• Tirare completamente all’indietro il carrello-otturatore; poi lasciare libero il carrello-otturatore<br />
che si sposterà velocemente in avanti.<br />
3.3. Sparare<br />
ATTENZIONE:<br />
Introdurre le cartucce nella camera di cartuccia soltanto con l’ausilio <strong>de</strong>l caricatore.<br />
Non tentare mai di introdurre individualmente <strong>de</strong>lle cartucce nella camera di cartuccia<br />
attraverso la finestra di espulsione: ciò potrebbe causare gravi ferite o persino la<br />
morte <strong>de</strong>ll’utilizzatore <strong>de</strong>lla pistola o di altre persone.<br />
AVVERTENZA:<br />
A<strong>de</strong>sso la pistola è carica e pronta per sparare. La pistola e il caricatore sono caricati,<br />
e se viene premuto il grilletto l’arma sparerà. Rivolgere sempre il vivo di volata <strong>de</strong>lla<br />
pistola in una direzione sicura e tenere le dita lontane dal grilletto e all’esterno <strong>de</strong>lla<br />
guardia finché non si è pronti a sparare. Non lasciare mai incustodita un’arma carica.<br />
• Rivolgere il vivo di volata <strong>de</strong>lla pistola in una direzione sicura e tenere le dita lontane dal<br />
grilletto e all’esterno <strong>de</strong>lla guardia finché non si è pronti a sparare.<br />
• Il modo in cui si impugna un’arma influisce sul controllo <strong>de</strong>l grilletto e sul controllo <strong>de</strong>l rinculo.<br />
La forma vantaggiosa <strong>de</strong>ll'impugnatura <strong>de</strong>lla PPQ offre un elevato livello di controllo<br />
che permette all’utilizzatore una presa estremamente alta.<br />
• Afferrando saldamente l’impugnatura <strong>de</strong>lla pistola, sistemare le dita ad angolo retto sulla<br />
faccia <strong>de</strong>l grilletto e muoverle lentamente, tirando il grilletto con forza crescente fino a far<br />
partire il colpo. Durante lo sparo, l’otturatore rincula ed espelle il bossolo. Infine, l’otturatore<br />
ritorna in avanti e introduce nella camera di cartuccia la cartuccia successiva <strong>de</strong>l caricatore.<br />
• Dopo lo sparo, lasciare tornare il grilletto completamente in avanti prima <strong>de</strong>llo sparo successivo.<br />
Allontanare il dito dal grilletto e tenerlo all’esterno <strong>de</strong>lla guardia finché non si è pronti<br />
nuovamente a sparare. Questa procedura può essere ripetuta fino all’ultimo colpo.<br />
• Dopo l’ultimo colpo, l'alimentatore <strong>de</strong>l caricatore aziona la leva di arresto e il carrello-otturatore<br />
viene bloccato in posizione “aperta”.
3. Uso <strong>de</strong>lla pistola<br />
AVVERTENZA:<br />
Indossare cuffie antirumore e occhiali di protezione specifici per l’impiego con armi<br />
da fuoco. Al momento <strong>de</strong>llo sparo o <strong>de</strong>ll’azionamento <strong>de</strong>lla leva di arresto <strong>de</strong>l carrellootturatore,<br />
l’otturatore si sposta con gran<strong>de</strong> velocità ed esercitando una forza consi<strong>de</strong>revole.<br />
Per evitare lesioni, fare attenzione che nessuna parte <strong>de</strong>l corpo si trovi<br />
sulla traiettoria <strong>de</strong>ll’otturatore.<br />
3.4. Sostituzione <strong>de</strong>l caricatore<br />
Una volta sparato l’ultimo colpo,l'alimentatore <strong>de</strong>l caricatore esercita una pressione verso l’alto<br />
sulla leva arresto carrello-otturatore innestandola nell'apposito fermo e bloccando il carrello-otturatore<br />
in posizione “aperta”.<br />
• Premere il ritegno <strong>de</strong>l caricatore e togliere il caricatore.<br />
• Per continuare a sparare, inserire un altro caricatore.<br />
• Tirare completamente indietro il carrello-otturatore, rilasciarlo e farlo tornare completamente<br />
in avanti.<br />
AVVERTENZA:<br />
La pistola è nuovamente pronta per sparare.<br />
Con la canna sempre rivolta in una direzione sicura, tenere il dito lontano dal grilletto<br />
e all’esterno <strong>de</strong>lla guardia finché non si è pronti a sparare.<br />
3.5. Scaricamento <strong>de</strong>lla pistola<br />
• Puntare la pistola in una direzione sicura. Le dita<br />
<strong>de</strong>vono essere lontane dal grilletto e all’esterno<br />
<strong>de</strong>lla guardia. Premere all'ingiù il ritegno <strong>de</strong>l caricatore<br />
e togliere il caricatore (3.5. Fig. 1).<br />
• Afferrare con le dita il carrello-otturatore sulle<br />
scanalature trasversali (3.5. Fig. 2) e tirarlo energicamente<br />
all’indietro fino all’arresto. Se nella<br />
camera di cartuccia è alloggiata una cartuccia,<br />
essa verrà espulsa. Non coprire la finestra di<br />
espulsione, altrimenti la cartuccia non può essere<br />
espulsa come previsto.<br />
• Bloccare il carrello-otturatore in posizione “aper- 3.5. Fig. 2<br />
119<br />
3.5. Fig. 1
ta” in maniera che scivoli lentamente in avanti<br />
dalla sua posizione più arretrata spingendo verso<br />
l’alto la leva di arresto. (3.5. Fig. 3)<br />
• Ispezionare la camera di cartuccia per verificare<br />
che sia vuota (3.5. Fig. 4). Ispezionare l’alloggiamento<br />
<strong>de</strong>l caricatore: nella pistola non <strong>de</strong>vono<br />
più esserci munizioni.<br />
• Per scaricare il caricatore, tenerlo in modo che i<br />
proiettili siano rivolti in direzione opposta. Spingere<br />
in avanti ogni cartuccia per farla uscire dal<br />
caricatore.<br />
120<br />
3. Uso <strong>de</strong>lla pistola<br />
AVVERTENZA:<br />
Ogni qualvolta il carrello-otturatore viene chi<strong>uso</strong> mentre nella pistola c’è un caricatore<br />
carico, la pistola è di nuovo pronta a sparare.<br />
3.6. Procedura in caso di sparo fallito<br />
3.5. Fig. 3<br />
3.5. Fig. 4<br />
• In caso di sparo fallito, atten<strong>de</strong>re 60 secondi sempre mantenendo il vivo di volata <strong>de</strong>lla pistola<br />
rivolto in una direzione sicura.<br />
• Scaricare la pistola come <strong>de</strong>scritto nella sezione 3.5. “Scaricamento <strong>de</strong>lla pistola”.<br />
• A questo punto è possibile effettuare un controllo visivo <strong>de</strong>lla camera di cartuccia e <strong>de</strong>lla<br />
canna. La camera non <strong>de</strong>ve contenere cartucce e la canna non <strong>de</strong>ve presentare ostruzioni.
4. Smontaggio, pulizia, lubrificazione e manutenzione<br />
4. Smontaggio, pulizia, lubrificazione e manutenzione<br />
AVVERTENZA:<br />
Prima di ogni intervento occorre accertarsi che la pistola ed il caricatore siano scarichi.<br />
4.1. Componenti principali<br />
ATTENZIONE:<br />
Per completare lo smontaggio è necessario azionare il grilletto. Se non avete scaricato<br />
completamente la vostra pistola e se un proiettile è rimasto in camera, il colpo<br />
potrebbe partire e causare gravi ferite ovvero la morte a voi e ad altri, oltre a provocare<br />
danni materiali. Per questo motivo è indispensabile ispezionare attentamente la<br />
camera e il magazzino (aprendo entrambi) per assicurarvi che siano vuoti prima di<br />
azionare il grilletto.<br />
4.1.1. Smontaggio<br />
• Togliere il caricatore e scaricare la pistola. Bloccare<br />
il carrello-otturatore in posizione aperta.<br />
Ispezionare la camera di cartuccia e l’alloggiamento<br />
<strong>de</strong>l caricatore per verificare che non siano<br />
rimaste munizioni nella pistola.<br />
• Chiu<strong>de</strong>re il carrello-otturatore, tirandolo leggermente<br />
indietro e rilasciandolo poi lentamente per<br />
farlo tornare in posizione avanzata.<br />
• Puntate la volata in una direzione sicura e disarmate<br />
il meccanismo percussore azionando il grilletto.<br />
• Afferrare la sicura <strong>de</strong>l carrello da sopra, su entrambi<br />
i lati, e premerlo verso il basso (4.1.1.<br />
Fig. 1).<br />
• Avanzare il carrello-otturatore e toglierlo dal fusto.<br />
• Rimuovere il gruppo guidamolla di recupero da<br />
sotto la canna, mantenendo la pressione <strong>de</strong>lla<br />
molla (4.1.1. Fig. 2).<br />
• Togliere la canna dal carrello-otturatore.<br />
• In 4.1.1. Fig. 3 sono illustrati i componenti principali<br />
<strong>de</strong>lla pistola.<br />
121<br />
4.1.1. Fig. 1<br />
4.1.1. Fig. 2<br />
4.1.1. Fig. 3
4. Smontaggio, pulizia, lubrificazione e manutenzione<br />
4.1.2. Rimontaggio<br />
• Capovolgere il carrello-otturatore. Porre la canna<br />
all’interno <strong>de</strong>ll’otturatore come illustrato in 4.1.2.<br />
Fig. 1.<br />
• Inserire il gruppo guidamolla di recupero: Collocare<br />
l’estremità piccola (nera) <strong>de</strong>ll’asta di guida<br />
nell’alloggiamento<br />
• <strong>de</strong>lla molla davanti all’otturatore, poi inserire<br />
l’estremità gran<strong>de</strong> in polimero <strong>de</strong>lla molla di recupero<br />
nella cavità inferiore <strong>de</strong>lla canna, mantenendo<br />
la pressione <strong>de</strong>lla molla (4.1.2. Fig. 1 e 2).<br />
Nota:<br />
È normale che il gruppo guidamolla di recupero<br />
si pieghi quando viene installato.<br />
• Spingere l’otturatore dal davanti nelle gui<strong>de</strong> <strong>de</strong>l<br />
fusto (4.1.2. Fig. 3), in misura sufficiente ad innestare<br />
la sicura <strong>de</strong>l carrello, accertandosi che l’otturatore<br />
si innesti anche nelle gui<strong>de</strong> <strong>de</strong>l fusto.<br />
Rilasciare l’otturatore e lasciarlo avanzare comple-tamente<br />
in posizione bloccata.<br />
4.2. Gruppo percussore<br />
4.2.1. Rimozione <strong>de</strong>l gruppo percussore<br />
• Rimuovere la canna. Collocare l’estremità <strong>de</strong>l vivo<br />
di volata <strong>de</strong>l carrello-otturatore su una superficie<br />
liscia e piana. Afferrare il carrello-otturatore sulle<br />
4.2.1. Fig. 1<br />
scanalature trasversali, premere il pulsante di<br />
sgancio <strong>de</strong>l percussore (P99 AS) o l’ausilio di smontaggio (P99 QA) nell’apertura quadrata situata<br />
in alto a <strong>de</strong>stra <strong>de</strong>l tappo <strong>de</strong>ll’otturatore usando un punzone da 2 mm (4.2.1. Fig. 1) e<br />
togliere il tappo <strong>de</strong>ll’otturatore facendolo scorrere verso il basso (4.2.1. Fig. 2).<br />
• Togliere il gruppo percussore dal carrello-otturatore (4.2.1. Fig. 3).<br />
4.2.1. Fig. 2<br />
122<br />
4.1.2. Fig. 1<br />
4.1.2. Fig. 2<br />
4.1.2. Fig. 3<br />
4.2.1. Fig. 3 4.2.1. Fig. 4
4. Smontaggio, pulizia, lubrificazione e manutenzione<br />
4.2.2. Montaggio <strong>de</strong>l gruppo percussore<br />
• Inserimento <strong>de</strong>l gruppo percussore<br />
• Usando il tappo <strong>de</strong>ll’otturatore, premere il gruppo percussore nel carrello-otturatore e reinserire<br />
il tappo <strong>de</strong>ll’otturatore da sotto finché non si innesta in posizione (ve<strong>de</strong>re 4.2.1. Fig. 2).<br />
4.3. Estrattore<br />
4.3.1. Rimozione <strong>de</strong>ll’estrattore<br />
ATTENZIONE:<br />
Durante la rimozione <strong>de</strong>ll’estrattore, tenere<br />
sotto controllo la sicura <strong>de</strong>l percussore e<br />
l’asse estrattore perché non fuoriescano<br />
sotto l’azione <strong>de</strong>lle molle.<br />
Capovolgere il carrello-otturatore con i mirini rivolti<br />
verso il basso e il vivo di volata orientato verso sinistra.<br />
Premere l’asse estrattore con un punzone da 2<br />
mm (4.3.1. Fig. 1). Coprire la sicura <strong>de</strong>l percussore<br />
e l’asse estrattore con un dito e ruotare l’estrattore<br />
per estrarlo. Rimuovere la sicura <strong>de</strong>l percussore e il<br />
gruppo asse estrattore dal carrello-otturatore.<br />
4.3.2. Installazione <strong>de</strong>ll’estrattore<br />
Capovolgere il carrello-otturatore con i mirini rivolti<br />
verso il basso e il vivo di volata orientato verso sinistra.<br />
Inserire la sicura <strong>de</strong>l percussore e l’asse estrattore<br />
nel carrello-otturatore (4.3.2. Fig. 1). La molla di<br />
4.3.2. Fig. 2<br />
pressione <strong>de</strong>lla sicura <strong>de</strong>ve entrare a fondo nella cavità<br />
appositamente praticata nell’otturatore. La sicura<br />
correttamente posizionata viene quindi a trovarsi<br />
leggermente al di sotto <strong>de</strong>lla superficie di scorrimento<br />
<strong>de</strong>lla cartuccia.<br />
Allineare la parte posteriore <strong>de</strong>ll’estrattore alla guida<br />
<strong>de</strong>ll’estrattore e premere verso l’otturatore con il pol-<br />
4.3.2. Fig. 3<br />
lice <strong>de</strong>ll’altra mano. Spingere l’asse estrattore verso<br />
il basso con il punzone da 2 mm e premere l’estrattore finché non sono saldamente agganciati,<br />
senza premere completamente l’estrattore. Togliere il punzone da 2 mm, mentre l’occhiello<br />
<strong>de</strong>ll’estrattore tiene fermo l’asse estrattore (4.3.2. Fig. 2).<br />
Tenere l’asse <strong>de</strong>lla sicura a filo con la superficie <strong>de</strong>l carrello-otturatore. Premere completamente<br />
l’estrattore finché l’asse non si innesta nel foro <strong>de</strong>ll’estrattore (4.3.2. Fig. 3).<br />
123<br />
4.3.1. Fig. 1<br />
4.3.2. Fig. 1
4.4. Caricatore<br />
4.4.1. Smontaggio<br />
4. Smontaggio, pulizia, lubrificazione e manutenzione<br />
ATTENZIONE:<br />
Usare una protezione a<strong>de</strong>guata per gli occhi durante lo smontaggio <strong>de</strong>l caricatore.<br />
Proce<strong>de</strong>re con cautela allo smontaggio <strong>de</strong>l caricatore, perché la molla <strong>de</strong>l caricatore<br />
è sotto pressione. Durante la rimozione <strong>de</strong>l fon<strong>de</strong>llo, controllare che il supporto<br />
<strong>de</strong>l fon<strong>de</strong>llo e la molla non fuoriescano causando lesioni.<br />
1. Usando un punzone da 4 mm, premere il supporto <strong>de</strong>l<br />
fon<strong>de</strong>llo attraverso l’apertura prevista sul fon<strong>de</strong>llo (4.4.1.<br />
Fig. 1).<br />
2. Spingere in avanti il fon<strong>de</strong>llo e toglierlo dal corpo <strong>de</strong>l caricatore,<br />
continuando a premere il supporto <strong>de</strong>l fon<strong>de</strong>llo nel<br />
corpo.<br />
3. Rimuovere con attenzione il supporto <strong>de</strong>l fon<strong>de</strong>llo e la<br />
molla dal corpo <strong>de</strong>l caricatore attraverso la parte inferiore<br />
<strong>de</strong>l corpo.<br />
4. Scuotere leggermente l’alimentatore per far uscire il corpo<br />
<strong>de</strong>l caricatore.<br />
4.4.2. Montaggio<br />
1. Proce<strong>de</strong>ndo in ordine inverso, reinstallare l’alimentatore e<br />
la molla <strong>de</strong>l caricatore con il supporto <strong>de</strong>l fon<strong>de</strong>llo nel corpo<br />
<strong>de</strong>l caricatore, facendo attenzione al corretto allineamento<br />
<strong>de</strong>i pezzi (4.4.2. Fig. 1 e 2). I pezzi <strong>de</strong>vono essere<br />
montati senza esercitare forza.<br />
2. Premendo il supporto <strong>de</strong>l fon<strong>de</strong>llo nel corpo <strong>de</strong>l caricatore,<br />
spingere il fon<strong>de</strong>llo sul corpo in modo che la sporgenza<br />
rotonda <strong>de</strong>l supporto <strong>de</strong>l fon<strong>de</strong>llo si innesti nel foro <strong>de</strong>l<br />
fon<strong>de</strong>llo con un clic udibile.<br />
124<br />
4.4.1. Fig. 1<br />
4.4.2. Fig. 1<br />
4.4.2. Fig. 2
4. Smontaggio, pulizia, lubrificazione e manutenzione<br />
4.5. Pulizia<br />
La pistola è uno strumento di precisione. Occorre sottoporla a una manutenzione regolare per<br />
garantirne un funzionamento affidabile.<br />
ATTENZIONE:<br />
Prima di ogni intervento occorre accertarsi che la pistola ed il caricatore siano scarichi.<br />
Pulire la pistola dopo ogni utilizzo e se è stata esposta a condizioni climatiche estreme. La pistola<br />
<strong>de</strong>ve essere pulita prima di essere utilizzata per la prima volta. Per proteggere l’arma<br />
dalla corrosione è stato utilizzato <strong>de</strong>ll’olio oppure un mezzo protettivo. Prima di usare la pistola,<br />
rimuovere con un panno morbido ogni eccesso di olio fuoriuscito dalla canna, dalla camera di<br />
cartuccia e sulle superfici esterne. Smontare i componenti principali <strong>de</strong>lla pistola. Partendo<br />
dalla camera di cartuccia, pulire la canna e la camera con un buon solvente e uno scovolo.<br />
Rimuovere i residui di fumo dall’interno <strong>de</strong>lla canna utilizzando una spazzola di pulitura finché<br />
canna e camera di cartuccia sono completamente pulite. Strofinare le superfici pulite con un<br />
panno e con <strong>de</strong>lle bacchette di cotone. Con una spazzolina immersa in solvente, rimuovere<br />
tutti i <strong>de</strong>positi attorno alla canna, alla camera di cartuccia, all’estrattore e nelle aree adiacenti<br />
che risultassero sporche. Pulire ogni residuo dal fusto spazzolando <strong>de</strong>licatamente e utilizzando<br />
un solvente. Dopo la pulizia, sulle superfici metalliche esterne <strong>de</strong>ve essere applicato un leggero<br />
strato di olio di buona qualità per armi. Se la pistola <strong>de</strong>ve essere utilizzata o conservata in un<br />
ambiente freddo, usare un olio per armi raccomandato per l’impiego a basse temperature.<br />
AVVERTENZA:<br />
Seguire sempre le istruzioni fornite con il <strong>de</strong>tergente e il lubrificante per armi. Alcuni<br />
prodotti <strong>de</strong>tergenti possono danneggiare la pistola. Non lasciare agire troppo a lungo<br />
i solventi ed evitare una pulizia prolungata in un bagno a ultrasuoni (temperatura<br />
massima per la pulitura a ultrasuoni: 50°C).Utilizzare esclusivamente i prodotti raccomandati<br />
specificamente per la manutenzione <strong>de</strong>lle armi. La mancata osservanza di<br />
queste avvertenze può provocare un danneggiamento <strong>de</strong>lla finitura <strong>de</strong>lla pistola.<br />
Per la pulizia <strong>de</strong>lle pistole WALTHER non <strong>de</strong>vono essere utilizzate soluzioni alcaline e<br />
contenenti ammoniaca.<br />
4.6. Lubrificazione<br />
Dopo avere pulito tutta la pistola, con un panno applicare un leggero strato di olio di buona<br />
qualità per armi su tutte le superfici metalliche esterne.<br />
Fare attenzione a non lubrificare più <strong>de</strong>l necessario. Se si formano <strong>de</strong>lle gocce d’olio oppure se<br />
<strong>de</strong>ll’olio cola attraverso la pistola, significa che è stata applicata una quantità eccessiva di olio.<br />
Un eccesso di olio favorisce la concentrazione <strong>de</strong>llo sporco e <strong>de</strong>i residui di fumo nella pistola e<br />
nuoce al suo buon funzionamento.<br />
Non introdurre olio nel canale <strong>de</strong>l percussore (4.6. Fig. 1).<br />
125
4. Smontaggio, pulizia, lubrificazione e manutenzione<br />
• Canna:<br />
Con un panno applicare un leggero strato di olio di buona qualità per armi su tutte le superfici<br />
metalliche esterne e sulla rampa in cui il blocco oscillante si innesta sulla canna.<br />
• Fusto:<br />
Oliare le gui<strong>de</strong> <strong>de</strong>l carrello-otturatore e il gruppo <strong>de</strong>l grilletto con una goccia di olio.<br />
• Carrello-otturatore:<br />
Applicare una sola goccia di olio sul sull’asse <strong>de</strong>lla sicura e la superfice come sulla figura.<br />
• Caricatore:<br />
Applicare un leggero strato di olio di buona qualità per armi su tutte le superfici metalliche<br />
esterne.<br />
4.7. Preparazione per la conservazione<br />
4.6. Fig. 1<br />
Rispettare tutte le leggi che regolamentano la conservazione di armi da fuoco. È necessario<br />
conoscere tutte le leggi locali, regionali e statali riguardanti la conservazione sicura di armi e<br />
munizioni. Non conservare la pistola in qualcosa che attiri o trattenga l’umidità (ad esempio<br />
cuoio o stracci spessi).<br />
Se la pistola <strong>de</strong>ve essere conservata per un periodo prolungato, proteggere la canna, la camera<br />
di cartuccia e i pezzi interni con olio di alta qualità per armi o un agente protettivo previsto<br />
126
4. Smontaggio, pulizia, lubrificazione e manutenzione<br />
per le armi. I pezzi esterni, il carrello-otturatore, la canna e il caricatore, <strong>de</strong>vono essere trattati<br />
con un prodotto anticorrosione.<br />
Pulire la pistola prima di riutilizzarla. Durante ogni operazione di pulizia, prestare attenzione<br />
anche ai segni di usura. Qualora si rilevi la presenza di segni di usura inconsueti, far controllare<br />
la pistola da un armaiolo qualificato o da WALTHER.<br />
127
5. Regolazione <strong>de</strong>lla pistola secondo le esigenze <strong>de</strong>ll’utilizzatore<br />
5. Regolazione <strong>de</strong>lla pistola secondo le esigenze <strong>de</strong>ll’utilizzatore<br />
5.1. Impugnatura<br />
La PPQ offre la possibilità di adattare la dimensione<br />
<strong>de</strong>ll’impugnatura alle proprie esigenze scegliendo<br />
la misura e la forma <strong>de</strong>l dorsalino, per una maggiore<br />
comodità. Premere il perno sotto la parte posteriore<br />
<strong>de</strong>l dorsalino con un punzone (4mm), e proce<strong>de</strong>re<br />
alla sostituzione <strong>de</strong>l dorsalino <strong>de</strong>ll’impugnatura<br />
con uno più comodo, poi rimontare il perno (5.1. Fig.<br />
1). La PPQ offre la scelta fra dorsi di misura Small,<br />
Medium e Large.<br />
5.2. Anello portacorreggiolo<br />
All’estremità inferiore <strong>de</strong>l dorsalino <strong>de</strong>ll’impugnatura si trova un anello per l’aggancio di un<br />
portacorreggiolo. Il perno usato per fissare il dorsalino <strong>de</strong>ll’impugnatura forma, assieme a una<br />
cavità prevista in quest’ultima, un occhiello per l’aggancio di un portacorreggiolo.<br />
Per agganciare un portacorreggiolo, espellere il perno nella parte inferiore <strong>de</strong>l dorsalino con<br />
l’ausilio di un punzone da 4 mm, inserire il portacorreggiolo, poi riposizionare il perno.<br />
5.3. Mirini<br />
Il mirino e la tacca di mira sono intercambiabili. Il punto d’impatto può essere regolato lateralmente<br />
e in altezza.<br />
ATTENZIONE:<br />
Prima di ogni intervento occorre accertarsi che la pistola ed il caricatore siano scarichi.<br />
REGOLAZIONE LATERALE<br />
Le regolazioni laterali vengono effettuate spostando la tacca di mira in acciaio da parte a parte<br />
con l’apposito utensile di regolazione. In caso di <strong>de</strong>rivazione verso <strong>de</strong>stra, spostare la tacca di<br />
mira verso sinistra; in caso di <strong>de</strong>rivazione verso sinistra, spostare la tacca di mira verso <strong>de</strong>stra.<br />
128<br />
5.1. Fig. 1
5. Regolazione <strong>de</strong>lla pistola secondo le esigenze <strong>de</strong>ll’utilizzatore<br />
ATTENZIONE:<br />
La tacca di mira in acciaio standard di WALTHER (5.3. Fig. 1)<br />
ha un accoppiamento estremamente stretto. L’utensile di<br />
regolazione <strong>de</strong>lla tacca di mira è un accessorio vivamente<br />
raccomandato per la regolazione laterale. Non togliere il<br />
manicotto sotto la tacca di mira in acciaio.<br />
REGOLAZIONE IN ALTEZZA<br />
Le regolazioni in altezza vengono effettuate utilizzando mirini<br />
5.3. Fig. 1<br />
con altezze diverse. Mirini in acciaio con altezze diverse sono<br />
disponibili come accessori. Usare un mirino più basso in caso di <strong>de</strong>rivazione verso il basso.<br />
Usare invece un mirino più alto in caso di <strong>de</strong>rivazione verso l’alto. I mirini sono numerati. Più la<br />
cifra è alta, più è alto il mirino. Per una distanza di tiro di 25m, lo spostamento <strong>de</strong>l punto d’impatto<br />
è di circa 5cm per cifra.<br />
ATTENZIONE:<br />
Per sostituire il mirino, smontare la pistola come sopra <strong>de</strong>scritto.<br />
Svitare la vite che si trova sul mirino utilizzando un cacciavite, poi spingere il mirino<br />
verso l’alto per estrarlo.<br />
Per il montaggio, eseguire le operazioni in ordine<br />
inverso (5.3. Fig. 2). Accertarsi che la vite e la filettatura<br />
all’interno <strong>de</strong>l mirino di acciaio siano prive di<br />
olio e grasso. Fissare la vite <strong>de</strong>l mirino con <strong>de</strong>lla<br />
colla industriale (per es. Loctite 648). Per serrare la<br />
vite sul mirino, applicare una coppia di 1 Nm.<br />
1<strong>29</strong><br />
5.3. Fig. 2
6. Vista esplosa<br />
130<br />
6. Vista esplosa
7. Distinta <strong>de</strong>i componenti<br />
7. Distinta <strong>de</strong>i componenti<br />
n. Descrizione n. Descrizione<br />
1.1 Vite <strong>de</strong>l mirino 24 Gruppo grilletto<br />
1.2 Mirino 26 Perno<br />
3 Carrello-otturatore 27 Perno, sicura <strong>de</strong>l carrello<br />
5 Estrattore 28.1 Molla, sicura <strong>de</strong>l carrello<br />
6 Gruppo estrattore, completo 28.2 Sicura <strong>de</strong>l carrello<br />
7 Molla, ritegno <strong>de</strong>l estrattore <strong>29</strong> Fusto, completo<br />
7.1 Molla, ritegno <strong>de</strong>l caricatore <strong>29</strong>.1 Inserto rettificato<br />
8 Tacca di mira 30 Molla, leva arresto carrello-otturatore<br />
15 Gruppo percussore 31 Perno 3x24<br />
16 Molla di ritorno grilletto 32 Corpo <strong>de</strong>l grilletto, assemblato<br />
18 Gruppo sicura sul percussore 32.8 Guida grilletto<br />
19 Canna 33 Caricatore<br />
20 Tappo otturatore 35 Perno 4x16<br />
21 Gruppo guidamolla di recupero 36 Leva sgancio caricatore<br />
22 Perno 3x28 38 Dorsalini <strong>de</strong>ll'impugnatura S, M, L<br />
23 Staffa, sicura <strong>de</strong>l carrello 48 Perno, leva sgancio caricatore<br />
131
8. Specifiche tecniche<br />
132<br />
8. Specifiche tecniche<br />
Calibro 9 mm x19 / 9mm x 21 .40 S&W<br />
Capacità caricatore 15 colpi 12 colpi<br />
Dimensioni totali,<br />
(L/L/A)<br />
180 / 34 / 135 mm 184 / 34 / 135 mm<br />
Lunghezza canna 102 mm 106 mm<br />
Passo rigatura<br />
250 mm<br />
rigatura <strong>de</strong>strorsa<br />
Profilo canna 6 rigature e scanalature<br />
406 mm<br />
rigatura <strong>de</strong>strorsa<br />
Larghezza linea di mira 156 mm 158 mm<br />
Larghezza,<br />
gancio tacca di mira<br />
4,6 (standard, n.2)<br />
3,8 (n.1)<br />
Larghezza, mirino 3,6 mm<br />
Peso, pistola con caricatore<br />
vuoto<br />
695 g 705 g<br />
Peso, caricatore vuoto 80 g<br />
Energia di espulsione E3,<br />
500 J<br />
475 J<br />
peso proiettile<br />
8 g<br />
11,7 g<br />
Funzionamento a corto rinculo di canna, tipo Browning<br />
Sistema di chiusura arma semiautomatica, a percussore interno (senza cane)<br />
Configurazione Quick Defense Trigger<br />
Forza/corsa grilletto 25 N / 9 mm (i<strong>de</strong>ntica per ogni sparo)<br />
Materiali<br />
carrello-otturatore e canna: acciaio al carbonio con<br />
trattamento Tenifer®, fusto: polimero ad alta resistenza<br />
Dispositivi di sicurezza sicura sul grilletto, sul percussore, sicura anticaduta<br />
Dati basati su cifre medie. I valori effettivi possono variare.
Turkçe<br />
Kullanım Kılavuzu<br />
WALTHER PPQ<br />
133
NOT:<br />
Bu kullanım kılavuzu tabancanın sivil kullanıcılar tarafından kullanımına ilişkindir.<br />
Tabancanın resmi görevlilerce kullanımına ait şartlar, bu kullanım kılavuzunda belirtilen<br />
bilgiler<strong>de</strong>n farklılık gösterebilir.<br />
Bu kullanım kılavuzunda tabancanın normal atışa hazır vaziyette, yani namlunun yatay,<br />
kabzanın aşağıya bakan ve namlu ağzının öne doğru bakan bir konumda olduğu<br />
öngörülmüştür. “Yukarı”, “aşağı”, “sağ”, “sol” ile “ön” ve “arka” gibi ifa<strong>de</strong>ler<strong>de</strong>, tabancayı<br />
atışa hazır vaziyette elin<strong>de</strong> tutan bir atıcının bakış açısı temel alınmıştır.<br />
Açıklamalar sağ elini kullananlar tarafından kullanıma ilişkindir. Solakların ise kendileri<br />
için uygun şekil<strong>de</strong> hareket etmeleri rica olunur.<br />
134
İÇİNDEKİLER<br />
1. Güvenlik uyarıları 136<br />
2. Ürün tanımı 137<br />
2.1. İşlev sırası 137<br />
2.2. Teslimat iceriği 138<br />
2.3. Mühimmat 138<br />
2.4. Kumanda ve fonksiyon birimleri 139<br />
3. Kullanım 141<br />
3.1. Tabancanızın kontrol edilmesi 141<br />
3.2. Doldurma 142<br />
3.3. Tetik ile atış 143<br />
3.4. Şarjör <strong>de</strong>ğiştirme 144<br />
3.5. Boşaltma 144<br />
3.6. Patlamayan mermiler 145<br />
4. Sökme, temizlik, yağlama ve bakım 146<br />
4.1. Ana gruplar 146<br />
4.2. Ateşleme iğnesi birimi 147<br />
4.3. Tırnak 148<br />
4.4. Şarjör 149<br />
4.5. Temizleme 150<br />
4.6. Yağlama 150<br />
4.7. Depolamaya hazırlık 151<br />
5. Tabancanın kullanıcıya uyumlu hale getirilmesi 152<br />
5.1. Kabza 152<br />
5.2. Kordon ipi <strong>de</strong>liği 152<br />
5.3. Nişangah 152<br />
6. Parça şeması 154<br />
7. Parça listesi 155<br />
8. Teknik veriler 156<br />
135
1. Güvenlik uyarıları<br />
136<br />
1. Güvenlik uyarıları<br />
• Tabancanın kullanımından önce bu kullanım kılavuzunu dikkatlice okuyunuz. Tabancayı ancak<br />
kılavuzu iyice anladıktan sonra kullanınız. Tabanca parçalarıyla ilgili her anlatım ve her işlem<br />
genel olarak bu kullanım kılavuzunda sa<strong>de</strong>ce bir <strong>de</strong>fa verilmiştir. Bu yüz<strong>de</strong>n kapsamına bağlı<br />
olarak, varsa başka bölümler<strong>de</strong> mevcut açıklamalara atıf yapılır.<br />
• Emniyet kontrolü için ve kullanımdan önce, arızalarda ve temizleme<strong>de</strong>n önce tabancanın boş<br />
olduğundan (şarjörün tabanca dışında ve mermi yatağının boş olduğundan), namluda yabancı<br />
cisimlerin bulunmadığından ve şarjörün boş olduğundan emin olunmalıdır.<br />
• Tabancayı ve mühimmatını birbirin<strong>de</strong>n ayrı olarak muhafaza ediniz. Özellikle çocuklar olmak<br />
üzere, yetkisiz kişilerin bunlara erişebilmesini önleyiniz.<br />
• Tabanca boş bile olsa sanki doluymuş gibi davranınız. Tabancayı kendinizi ve başkalarını tehdit<br />
etmeyecek şekil<strong>de</strong> tutunuz. Tabancayı daima emniyetli bir yöne doğru tutunuz. Tabanca<br />
boş olsun veya dolu olsun asla şahıslara veya atış yapmak istemediğiniz he<strong>de</strong>flere doğrultmayınız.<br />
Unutmayınız ki en güvenli tabanca bile, hatalı veya uygun olmayan şekil<strong>de</strong> kullanılması<br />
durumunda kendiniz ve diğer insanlar için tehlikeli olabilir.<br />
• Dikkat! Atış yapmak istemediğiniz müd<strong>de</strong>tçe parmağınız tetikte olmamalıdır. Tetik parmağınız<br />
tetik muhafazasının dışında olmalıdır. Tetik sa<strong>de</strong>ce tabanca he<strong>de</strong>fe doğrultulmuş ise çekilmelidir.<br />
• Kullanım, kontrol, sökme, temizleme ve birleştirme esnasında asla zor kullanmayınız. Hatalı<br />
kullanım, tabancanın işlevselliğini ve güvenilirliğini tehlikeye atar. Tabancayı sa<strong>de</strong>ce bu kılavuzda<br />
anlatılan kapsam ve sınırlar dahilin<strong>de</strong> sökünüz.<br />
• Tabancanın güvenliği ve işlevselliği ancak tabanca ve mühimmatının teknik açıdan kusursuz<br />
durumda olduğu sürece sağlanmıştır.<br />
• Tabanca dış etkilere (örn. paslanma, yere düşme vs.) maruz kaldıktan sonra kalifiye bir silah<br />
ustası tarafından kontrol edilmelidir.<br />
• Atış yaparken daima koruyucu kulaklık ve gözlük kullanınız. Yakınınızda bulunan kişileri <strong>de</strong><br />
koruyucu kulaklık ve gözlük kullanmaları konusunda uyarınız.<br />
• Silahınız belirli bir kalibrenin mühimmatına uygun olarak tasarlanmıştır. Tabancanıza uygun<br />
mühimmat tanımı silahın üzerin<strong>de</strong> belirtilmiştir. Sa<strong>de</strong>ce C.I.P. (Commission Internationale Permanente<br />
pour l’Epreuve <strong>de</strong>s Armes à Feu Portatives) veya S.A.A.M.I. (Sporting Arms and Ammunition<br />
Manufacturers‘ Institute) adlı kuruluşların standartlarına ve silahın kalibresine uygun<br />
mühimmat kullanınız. Özellikle tekrar doldurulmuş mühimmat kullanımında normların izin verdiği<br />
gaz basıncı <strong>de</strong>ğerlerinin aşılmamasına özen gösteriniz. Aşırı basınç bir silaha zarar verebilir<br />
hatta silahı parçalayabilir. Silah için öngörülen <strong>de</strong>ğerler<strong>de</strong>n daha yüksek bir mermi hızına
2. Ürün tanımı<br />
ve gaz basıncına sahip mühimmat, silaha ek yük bindirir, aşırı aşınmaya ne<strong>de</strong>n olur ve silahın<br />
ciddi hasar görmesine sebebiyet verebilir.<br />
• Silahı doldurmadan önce daima fazla olan gresi ve yağı temizleyiniz ve namlunun temiz, yabancı<br />
cisimler<strong>de</strong>n arınmış olduğundan emin olunuz.<br />
• Bu kılavuzda anlatılanlar dışında tabancanızda parça <strong>de</strong>ğiştirmeyiniz, üzerin<strong>de</strong> herhangi bir<br />
işlem ya da <strong>de</strong>ğişiklik yapmayınız veya ayarıyla oynamayınız. Onarım ve bakım işlemleri<br />
WALTHER veya kalifiye bir servis tarafından gerçekleştirilmelidir.<br />
• Bilinçsiz veya hatalı olarak yapılan <strong>de</strong>ğişiklikler tabancanın güvenlik ve güvenirliliğini tehdit<br />
e<strong>de</strong>bilir, hatta yaralanmalara ya da ölümlere sebep olabilir.<br />
YASAL SORUMLULUK UYARISI<br />
Silahların kullanımı daima özel bir dikkat gerektirir. Her zaman, isteme<strong>de</strong>n <strong>de</strong> olsa, insan hayatına<br />
ya da mala zarar verme riski vardır. WALTHER, tabancanın hatalı veya yürürlükteki mevzuata<br />
aykırı kullanımından kaynaklanan hasarlar için herhangi bir sorumluluk kabul etmez. Aynı husus,<br />
bu kullanım kılavuzuna uyulmaması, yetkisiz parça <strong>de</strong>ğişimi veya bu kullanım kılavuzunda<br />
açıkça öngörülmediği hal<strong>de</strong> tabancaya yapılan diğer müdahaleler ne<strong>de</strong>niyle ortaya çıkabilecek<br />
hasarlar için <strong>de</strong> geçerlidir.<br />
2. Ürün tanımı<br />
2.1. İşlev sırası<br />
PPQ’un kapak sistemi, kilitli sürgülü otomatik doldurma prensibine göre çalışır.<br />
Tetiğin çekilmesi esnasında ateşleme iğnesi kilidi kurulur ve tetiklenir. Ateşleme iğnesi merminin<br />
kapsülüne vurur ve sevk barutunu ateşler. Mermi oluşan gaz basıncı vasıtasıyla namludan dışarı<br />
itilir, aynı anda namlu ile aynı hizada kilitli vaziyetteki kapak takımına bir basınç etkisi oluşur.<br />
Namlunun ve kapağın kısa bir birlikte geri hareketten sonra namlu aşağıya yönlendirilir ve kapak<br />
açılır. Kapak yerine getiren yayın kuvvetine karşı sonuna kadar geriye kayarken ve kovanı sağdan<br />
dışarı atarken namlu hareketsiz kalır.<br />
Yayın itmesi ile kapak tekrar öne doğru hareket e<strong>de</strong>rken en üstteki mermiyi şarjör<strong>de</strong>n mermi yatağına<br />
sürer. Kapağın öne doğru hareketi tamamlanmasına kısa süre kala namlu üst ön tarafa<br />
doğru itilir ve kapağın kovan fırlatma penceresin<strong>de</strong> kilitlenir. Atış parmağını tetikten çekilir ve tabanca<br />
bir sonraki atışa hazırdır.<br />
137
2.2. Teslimat iceriği<br />
• Plastik kutu için<strong>de</strong> tabanca • Ye<strong>de</strong>k şarjör<br />
• Atış resmi • Kullanım kılavuzu<br />
• Small’ ve ’Large’ boy kabza sırtı • doldurma yardımcısı<br />
Not: Mo<strong>de</strong>le bağlı olarak ambalaj içeriğin<strong>de</strong> farklılıklar olabilir.<br />
2.3. Mühimmat<br />
138<br />
2. Ürün tanımı<br />
Sa<strong>de</strong>ce tabancanıza uygun mühimmat kullanınız. Yanlış mühimmat işlev arızalarına,<br />
ateşleme hatalarına veya yüksek gaz basıncından dolayı tabancanın arızalanmasına<br />
veya kullanılamaz hale gelmesine sebep olabilir.<br />
Namlunun sağ tarafında sizin PPQ’unuza uygun<br />
olan mühimmat belirtilmiştir (bkz. 2.3. Şekil 1).<br />
Sa<strong>de</strong>ce bu mühimmat tanımına uygun ve gaz<br />
basıncı C.I.P veya SAAMI’nın verilerine uygun<br />
ya da “Düşük oranda zararlı mad<strong>de</strong> içeren 9 mm<br />
x 19 mermiler için Teknik Yönerge“ye göre polis<br />
silahlarında kullanımı için onaylanmış olan mermiler<br />
kullanınız. Kullanımdan önce mühimmattı<br />
kontrol ediniz. Sa<strong>de</strong>ce kusursuz mühimmat kullanınız.<br />
2.3. Şekil 1<br />
Tabanca ve mühimmat birlikte bir sistemi oluşturduğu için birbirlerine uygun olmalıdırlar. Güvenilirlikleri<br />
karşılıklı olarak birbirlerine bağlıdır.<br />
Mermi hızı, mermi ağırlığı ve silah ağırlığının farklı kombinasyonları, atıcı tarafından hissedilen<br />
geri tepmeyi belirler. Tabancanın çok fazla geri tepmesi, bazı atıcıları rahatsız e<strong>de</strong>bilir.<br />
Örnekler:<br />
• Silah ağırlığı: Silah ağırlığının daha düşük olması, geri tepmenin daha şid<strong>de</strong>tli olmasına yol<br />
açar.<br />
• Mermi ağırlığı: Mermi ne kadar ağır olursa, geri tepme <strong>de</strong> o kadar şid<strong>de</strong>tli olur.<br />
• Mermi hızı: Mermi hızının yüksek olması, daha şid<strong>de</strong>tli bir geri tepmeye ne<strong>de</strong>n olur.<br />
Daha şid<strong>de</strong>tli bir geri tepmeye alışmak için şu şekil<strong>de</strong> hareket e<strong>de</strong>bilirsiniz:<br />
• Atış yaparken tabancayı iki elinizle tutunuz.<br />
• Tabancanıza uygun mühimmatla, düşük mermi ağırlığı ve düşük mermi hızı ile başlayınız.<br />
• Tabancanıza uygun daha hafif mühimmat, daha düşük mermi hızı ve daha düşük mermi ağırlığı<br />
için yetkili bayinize başvurunuz.<br />
• Tabancanızın kabza boyunu ihtiyaçlarınıza göre seçiniz.
2. Ürün tanımı<br />
2.4. Kumanda ve fonksiyon birimleri<br />
1 Yerine getiren ray kılavuzu<br />
2 Namlu ağzı<br />
3 Mo<strong>de</strong>l<br />
5<br />
1<br />
4<br />
2<br />
17<br />
16<br />
1 Kapak<br />
15<br />
2 Arpacık<br />
3 Namlu tutucu askısı<br />
4 Namlu<br />
5 Mekanizma tespit<br />
mandalı yuvası<br />
6 Kavrama çentikleri<br />
7 Mekanizma tespit<br />
mandalı<br />
8 Gez<br />
9 Kabza sırtı<br />
3<br />
6<br />
2<br />
1<br />
14<br />
4<br />
139<br />
7<br />
5 6<br />
13<br />
10 Kordon ipi <strong>de</strong>liği<br />
11 Şarjör<br />
12<br />
12 Kabza<br />
13 Şarjör çıkartma mandalı<br />
14 Tetik<br />
15 Tetik muhafazası<br />
16 Göv<strong>de</strong><br />
17 Aksesuar rayı 11<br />
3<br />
7<br />
4 Serinumarası<br />
5 Kapak takımı arka kapağı<br />
6 Boş kovan fırlatma<br />
penceresi<br />
7 Tırnak (“dolu” göstergesi)<br />
9<br />
8<br />
10
2.4.1. “Dolu” Göstergesi<br />
Tırnak bir doluluk durum göstergesidir. Eğer mermi yatağında<br />
bir mermi ya da mermi kovanı varsa renkli işaret görülür (2.4.1.<br />
Şekil 1).<br />
140<br />
2. Ürün tanımı<br />
DİKKAT:<br />
Emniyet kontrolü esnasında sa<strong>de</strong>ce doluluk göstergesine güvenmeyiniz.<br />
Emniyet kontrolün<strong>de</strong> en güvenli yöntem, mermi yatağına bakmaktır. Bunun için şarjörü<br />
tabancadan çıkartınız, kapağı sonuna kadar geriye doğru çekiniz ve mekanizma tespit<br />
mandalı ile sabitleyiniz. Son olarak mermi yatağına bakınız.<br />
DİKKAT:<br />
Bir silahı elinize alırken daima doluymuş gibi hareket ediniz. Doluluk göstergesi her ne<br />
kadar mermi yatağında bir merminin bulunup bulunmadığı hakkında bilgi verse <strong>de</strong> ışık<br />
şartları, silahın kirli olması ya da başka faktörler merminin kesin olarak tespitini zorlaştırabilir.<br />
2.4.2. Şarjör çıkartma mandalı<br />
Şarjör mandalı tetik muhafazasının yan kısmında tetik<br />
muhafazasına entegre şekil<strong>de</strong> bulunmaktadır.<br />
Kullanım:<br />
Parmak tetik muhafazasının dışındadır ve tetiğe dokunmaz.<br />
Şarjör mandalını aşağı doğru bastırınız<br />
ve şarjörü çıkartınız (2.4.2. Şekil 1).<br />
Bu işlem için en iyisi tetik parmağınızı kullanınız.<br />
2.4.3. Mekanizma tespit mandalı<br />
Kapağın açık konumda iken sabitlenmesi:<br />
Parmaklar tetik muhafazasının dışındadır ve tetiğe<br />
dokunmazlar. Şarjörü çıkarttıktan sonra kapağı arka<br />
bölümün<strong>de</strong>ki çentikli kısımdan kavrayarak kuvvetlice<br />
sonuna kadar geri çekiniz. Mermi yatağında mermi<br />
varsa bu mermi, mermi yatağından çıkartılacak ve<br />
dışarı fırlatılacaktır. Kapağı en geri konumda tutarken<br />
mekanizma tespit mandalını yukarı doğru itiniz<br />
ve kapak tespit mandalı tarafından durdurulana kadar<br />
öne doğru yavaşça bırakınız (2.4.3. Şekil 1).<br />
2.4.1. Şekil 1<br />
2.4.2. Şekil 1<br />
2.4.3. Şekil 1<br />
Mekanizma tespit mandalının indirilmesi (çözülmesi):<br />
Atış yaptığınız elinizin başparmağı ile mekanizma tespit mandalını, kapak hızla öne doğru hareket<br />
e<strong>de</strong>ne kadar aşağı doğru itiniz. Bu işlemin kolaylaşması için, mekanizma tespit mandalını yukarıda<br />
tarif edildiği gibi ittiğiniz sırada kapağı hafifçe geri çekebilirsiniz.
3. Kullanım<br />
3. Kullanım<br />
3.1. Tabancanızın kontrol edilmesi<br />
• Tabancanızı kontrol etme<strong>de</strong>n önce boş olduğundan<br />
emin olunuz. Namlu ağzını emniyetli bir yöne<br />
doğru tutunuz. Parmaklar tetik muhafazasının dışındadır<br />
ve tetiğe dokunmazlar. Şarjör mandalını<br />
aşağıya doğru itiniz ve şarjörü çıkartınız (3.1. Şekil<br />
1).<br />
• Kapağın arka kısmındaki çentikli bölge<strong>de</strong>n kavrayarak<br />
kuvvetlice sonuna kadar geri çekiniz (3.1.<br />
Şekil 2). Eğer mermi yatağında bir mermi varsa<br />
mermi bu işlem esnasında mermi yatağından çıkartılacak<br />
ve boş kovan fırlatma penceresin<strong>de</strong>n<br />
dışarı atılacaktır.Fırlatma penceresinin önünü engellemeyiniz,<br />
aksi takdir<strong>de</strong> mermi düzgün bir şekil<strong>de</strong><br />
dışarı atılamaz.<br />
• Kapağı açık konumda sabitleyiniz: Kapağı en geri<br />
konumda tutarken mekanizma tespit mandalını<br />
yukarı doğru itiniz ve kapak tespit mandalı tarafından<br />
durdurulana kadar öne doğru yavaşça bırakınız<br />
(3.1. Şekil 3).<br />
• Mermi yatağının ve namlunun boş, kuru ve temiz<br />
olduğundan emin olunuz (3.1. Şekil 4).<br />
Bu kontrol işlemini daima PPQ tabancanızı eliniz<strong>de</strong>n<br />
bırakmadan, temizlik yapmaya başlamadan, tabancayı<br />
başka bir kimseye verme<strong>de</strong>n, nakliye veya <strong>de</strong>polamadan<br />
önce gerçekleştiriniz.<br />
DİKKAT:<br />
Sa<strong>de</strong>ce teknolojiye güvenmeyiniz. Dikkatli bir şekil<strong>de</strong> davranarak siz <strong>de</strong> kendi güvenliğinize<br />
katkıda bulununuz. Silahlara muamele e<strong>de</strong>rken güvenlik bilinci için<strong>de</strong> olmanız<br />
kendi sorumluluğunuzdadır.<br />
141<br />
3.1. Şekil 1<br />
3.1. Şekil 2<br />
3.1. Şekil 3<br />
3.1. Şekil 4
3.2. Doldurma<br />
3.2.1. Şarjör<br />
Şarjör muhafazasının <strong>de</strong>likleri sayesin<strong>de</strong> şarjörün doluluk durumu görünebilir<br />
(3.2.1. Şekil 1).<br />
UYARI:<br />
Sa<strong>de</strong>ce tabancanız için gecerli şärjörleri kullanınız. Yalnış şarjörler<br />
işlev arızanalarına tabancanın ve şarjörün hasar görmesine<br />
sebeb olabilir.<br />
3.2.2. Şarjörün doldurulması<br />
142<br />
3. Kullanım<br />
3.2.1. Şekil 1<br />
DİKKAT:<br />
Şarjörün üzerin<strong>de</strong> belirtilen daha fazla sayıda mermiyi şarjöre doldurmaya çalışmayınız.<br />
Bu, besleme arızalarına sebep olabilir. Zor kullanmayınız, çünkü bu da şarjörün<br />
hasar görmesine sebep olabilir. Hasar görmüş veya <strong>de</strong>forme olmuş şarjör ve şarjör dudakları<br />
işlev arızalarına ve tabancanızın işlemez duruma gelmesine sebep olabilirler.<br />
Mermi tabanı ile mermi sürücü tablanın ön kısmını<br />
aşağıya doğru bastırıp mermiyi şarjör dudaklarının<br />
altına, şarjörün arka duvarına temas e<strong>de</strong>ne kadar<br />
iterek şarjörü doldurunuz (3.2.2. Şekil 1).<br />
Bu işlemi daima bir sonraki merminin tabanı ve diğer<br />
elinizin başparmağı ile en üstteki mermiyi aşağıya<br />
doğru bastırıp yeni mermiyi şarjör dudaklarının altına<br />
sürerek tekrarlayınız.<br />
3.2.2. Şekil 1<br />
Doldurma işlemin<strong>de</strong> kolaylık sağlamak için tedarik<br />
edilebilen Walther doldurma yardımcısı kullanılabilir:<br />
Bu yardımcı birimi üstten şarjöre takınız (3.2.2. Şekil 2), birimi aşağıya doğru bastırınız ve diğer<br />
elinizle bir mermiyi şarjör dudaklarının altına yerleştiriniz (3.2.2. Şekil 3). Yardımcı birimi hafifçe<br />
kaldırınız ve mermiyi tamamen şarjör dudaklarının altına itiniz (3.2.2. Şekil 4).<br />
3.2.2. Şekil 2 3.2.2. Şekil 3<br />
3.2.2. Şekil 4
3. Kullanım<br />
3.2.3. Tabancanın doldurulması<br />
• Bölüm 3.1’<strong>de</strong> tarif edildiği gibi tabanca kontrol işlemini yapınız.<br />
• PPQ’un namlu ağzını emniyetli bir yöne doğru tutunuz. Parmağınız tetik muhafazasının dışında<br />
olmalı, özellikle <strong>de</strong> tetiğe dokunmamalısınız. Şarjörü tam olarak oturana kadar şarjör kaldıracına<br />
yerleştiriniz. Şarjör tabanını aşağıya doğru çekerek şarjörün tam olarak yerine oturduğundan<br />
emin olunuz. Şarjör yerin<strong>de</strong>n çıkmıyorsa doğru oturmuştur.<br />
• Kapağı geri çekiniz ve hızlı bir şekil<strong>de</strong> öne doğru bırakınız.<br />
DİKKAT:<br />
Mermileri sa<strong>de</strong>ce arjör vasıtasıyla mermi yata ına yerle tiriniz. Asla tek bir mermiyi<br />
kovan fırlatma penceresin<strong>de</strong>n içeri sokarak mermi yata ına sürmeyi <strong>de</strong>nemeyiniz.<br />
Böyle bir <strong>de</strong>neme<strong>de</strong> ciddi olarak yaralanabilirsiniz, hatta kendinizin veya bir ba kasının<br />
ölümüne sebep olabilirsiniz.<br />
UYARI:<br />
Tabanca şimdi atışa hazır durumdadır. Tabancanız ve şarjör doludur, tetik çekildiğin<strong>de</strong><br />
atış gerçekleşecektir. Namlu ağzını mutlaka emniyetli bir yöne doğru tutunuz, parmağınızı<br />
veya başka herhangi bir nesneyi tetikten uzak ve tetik muhafazasının dışında tutunuz.<br />
Dolu bir silahı asla eliniz<strong>de</strong>n bırakmayınız.<br />
3.3. Tetik ile atış<br />
• Namlu ağzını emniyetli bir yöne doğru tutunuz ve atış yapmak istediğiniz ana kadar tetik parmağınızı<br />
tetikten uzakta ve tetik muhafazasının dışında tutunuz.<br />
• PPQ’un kabzasının avantajlı tasarımından faydalanmak için kabzayı mümkün olduğunca yüksekten<br />
kavrayınız. Bu saye<strong>de</strong> tabanca atışta daha iyi kavranmış olur.<br />
• Tabancanın kabzasını sıkıca tutarken, parmağınız ön tarafta tetiğin üzerine gelir ve atış gerçekleşene<br />
kadar gittikçe artan bir kuvvetle tetiği çeker. Atış gerçekleşirken kapak geriye doğru<br />
hareket e<strong>de</strong>r ve boş kovanı dışarı atar. Sonrasında kapak tekrar öne doğru hareket e<strong>de</strong>rken<br />
şarjör<strong>de</strong>n bir sonraki mermiyi alıp mermi yatağına sürer.<br />
• Atıştan sonra parmağınızı tetikten çekersiniz ve bir sonraki atışa hazır olana kadar parmağınızı<br />
tetik muhafazasının dışında tutarsınız. Bu işlemleri son atışa kadar tekrarlayabilirsiniz.<br />
• Son atıştan sonra şarjörün mermi sürücü tablası mekanizma tespit mandalını hareket ettirir ve<br />
kapak açık konumda sabit kalır.<br />
143
144<br />
3. Kullanım<br />
DİKKAT:<br />
Atış sırasında koruyucu kulaklık ve gözlük kullanınız. Atış esnasında veya mekanizma<br />
tespit mandalının hareket ettirilmesi durumunda kapak son <strong>de</strong>rece yüksek bir kuvvet ve<br />
hız ile boylamasına hareket e<strong>de</strong>r. Bu sebeple vücudunuzun herhangi bir bölümünün<br />
kapağın hareket hattı üzerin<strong>de</strong> bulunmamasına dikkat ediniz ve tabancayı böyle bir<br />
şeyi önleyecek şekil<strong>de</strong> tutunuz.<br />
3.4. Şarjör <strong>de</strong>ğiştirme<br />
Son atıştan sonra şarjörün mermi sürücü tablası mekanizma tespit mandalını hareket ettirir ve<br />
kapak açık konumda kalır.<br />
• Şarjör çıkartma mandalını aşağıya itiniz ve şarjörü çıkartınız.<br />
• Yeni bir şarjör takınız.<br />
• Kapağı geri çekiniz ve hızlı bir şekil<strong>de</strong> öne doğru bırakınız.<br />
UYARI:<br />
Tabanca tekrar atışa hazırdır. Tabancanın namlu ağzını emniyetli bir yöne doğru tutunuz<br />
ve bir sonraki atışa hazır olana kadar tetik parmağınızı tetikten uzakta ve tetik muhafazasının<br />
dışında tutunuz.<br />
3.5. Boşaltma<br />
• Namlu ağzını emniyetli bir yöne doğru tutunuz.<br />
Parmağınız tetik muhafazasının dışında olmalı<br />
ve tetiğe dokunmamalısınız. Şarjör çıkartma<br />
mandalını aşağıya itiniz ve şarjörü çıkartınız (3.5.<br />
Şekil 1).<br />
• Kapağın arka kısmındaki çentikli kavrama yerin<strong>de</strong>n<br />
tutunuz (3.5. Şekil 2) ve sonuna kadar kuvvetlice<br />
geri çekiniz. Eğer mermi yatağında bir mermi<br />
varsa bu mermi, mermi yatağından çekilecek ve<br />
dışarı fırlatacaktır.<br />
Boş kovan fırlatma penceresinin önünü engellemeyiniz,<br />
aksi takdir<strong>de</strong> mermi emniyetli bir şekil<strong>de</strong><br />
fırlatılamaz.<br />
3.5. Şekil 1<br />
• Kapağı açık durumda sabitleyiniz:<br />
Kapağı en geri konumda tutarken, mekanizma 3.5. Şekil 2
3. Kullanım<br />
tespit mandalını yukarı doğru itiniz ve kapak,<br />
mandal tarafından yakalanana kadar yavaşça öne<br />
doğru bırakınız (3.5. Şekil 3).<br />
• Mermi yatağını kontrol ediniz (3.5. Şekil 4). Mermi<br />
yatağı boş olmalıdır. Şarjör kaldıracını kontrol ediniz.<br />
İçi boş olmalıdır.<br />
• Şarjörü boşaltmak için mermilerin ucu size bakmayacak<br />
şekil<strong>de</strong> tutunuz. Mermileri her <strong>de</strong>fasında<br />
en üsttekini dışa doğru iterek şarjör<strong>de</strong>n boşaltınız.<br />
UYARI:<br />
Tabancada dolu bir şarjör varken kapağı kapattığınızda daima bir mermi, mermi yatağına<br />
sürülür ve tabanca atışa hazır hale gelir.<br />
3.6. Patlamayan mermiler<br />
• Bir merminin patlamaması durumunda 60 saniye bekleyiniz ve bu arada namlu ağzını emniyetli<br />
bir yöne doğru tutunuz.<br />
• Tabancayı “3.5. Boşaltma” bölümün<strong>de</strong> anlatıldığı şekil<strong>de</strong> boşaltınız.<br />
• Şimdi mermi yatağını ve namluyu gözle muayene e<strong>de</strong>bilirsiniz. Mermi yatağı ve namlu boş olmalıdır.<br />
145<br />
3.5. Şekil 3<br />
3.5. Şekil 4
4. Sökme, temizlik, yağlama ve bakım<br />
4. Sökme, temizlik, yağlama ve bakım<br />
DİKKAT:<br />
Çalışmalara başlamadan önce tabancanın ve şarjörün boş olduğundan emin olunuz.<br />
4.1. Ana gruplar<br />
UYARI:<br />
Sökme işlemini tamamlayabilmek için tetiği çekmeniz gerekecektir. Tabancanızı gerektiği<br />
gibi boşaltmadığınız takdir<strong>de</strong> mermi yatağında gerçek mermi kalmış olabilir. Bu durumda<br />
tabanca ateş alarak sizin ya da başkasının ciddi şekil<strong>de</strong> yaralanmasına veya<br />
ölümüne ve <strong>de</strong> mala zarar gelmesine sebep olabilir. Bu ne<strong>de</strong>nle, tetiği çekme<strong>de</strong>n önce<br />
mutlaka mermi yatağını ve şarjör kaldıracını (açıklığı) gözle muayene e<strong>de</strong>rek boş olduklarından<br />
emin olmak zorundasınız.<br />
4.1.1. Sökme<br />
• Tabancayı boşaltınız. Şarjörü çıkartınız ve kapağı<br />
açık konumda sabitleyiniz. Mermi yatağı ve şarjör<br />
kaldıracı boş olmalıdır.<br />
• Kapağı kapatınız: Kapağı geriye doğru çekiniz ve<br />
öne hareket ettiriniz.<br />
• Namluyu güvenli bir yöne doğrultun ve tetiği çekerek<br />
kurulu iğne mekanizmasını boşa alın.<br />
• Namlu tutucu askısını yukarıdan her iki tarafından<br />
tutunuz ve aşağıya doğru itiniz (4.1.1. Şekil 1).<br />
• Kapağı göv<strong>de</strong><strong>de</strong>n ileri doğru itiniz.<br />
• Yerine getiren yay birimini yay kuvvetine karşı<br />
yöne bastırarak çıkartınız (4.1.1. Şekil 2).<br />
• Namluyu kapaktan çıkartınız.<br />
• 4.1.1. Şekil 3 ana gruplarına bölünmüş (sökülmüş)<br />
tabancayı göstermektedir.<br />
146<br />
4.1.1. Şekil 1<br />
4.1.1. Şekil 2<br />
4.1.1. Şekil 3
4. Sökme, temizlik, yağlama ve bakım<br />
4.1.2. Parçaların birleştirilmesi (montaj)<br />
• Kapak alt kısmı yukarıya bakacak şekil<strong>de</strong> tutunuz.<br />
Namluyu yerleştiriniz, bkz. ayrıca 4.1.2. Şekil 1.<br />
• Yerine getiren yay birimini yerleştiriniz; Yerine getiren<br />
yay birimini yay kılavuzu çubuğunun siyah<br />
küçük yay namlu ağzı yönüne bakacak şekil<strong>de</strong> kapağın<br />
yay yatağına yerleştiriniz ve sonra yerine<br />
getiren yay basıncına karşı arka ucunu namludaki<br />
çukura (girintiye) yerleştiriniz (4.1.2. Şekil 1-2).<br />
Not:<br />
Yarı monte edilmiş durumdayken yerine getiren<br />
yay birimin<strong>de</strong> görünebilecek bir eğrilik<br />
normaldir.<br />
• Monte edilmiş olan kapağın kanallarını ilk önce ön<br />
daha sonra arka göv<strong>de</strong> raylarına geçiriniz (4.1.2.<br />
Şekil 3). Kapağı sonuna kadar geriye doğru çekiniz<br />
ve sonra öne doğru kilitli pozisyona hareket etmek<br />
üzere bırakınız.<br />
4.2. Ateşleme iğnesi birimi<br />
4.2.1. Ateşleme iğnesi biriminin sökülmesi<br />
• Namluyu çıkartınız. Kapağı, namlu ağzının ucu<br />
uygun bir yere gelecek şekil<strong>de</strong> dayayınız. Kapağı<br />
kavrama çentikleri olan kısımdan tutunuz. Kapak<br />
takımı arka kapağının sağ üst bölümün<strong>de</strong>ki kare<br />
şeklin<strong>de</strong> <strong>de</strong>likteki pimi 2 mm’lik bir pim zımbası<br />
kullanarak sonuna kadar içeri doğru bastırınız<br />
(4.2.1. Şekil 1) ve kapak takımı arka kapağını biraz<br />
aşağıya itiniz.<br />
Kapak takımı arka kapağını aşağıya doğru kapaktan<br />
çıkartınız (4.2.1. Şekil 2).<br />
• Ateşleme iğne birimini kapaktan çıkartınız (4.2.1 Şekil 3).<br />
4.2.1. Şekil 2<br />
147<br />
4.1.2. Şekil 1<br />
4.1.2. Şekil 2<br />
4.1.2. Şekil 3<br />
4.2.1. Şekil 1<br />
4.2.1. Şekil 3 4.2.1. Şekil 4
4. Sökme, temizlik, yağlama ve bakım<br />
4.2.2. Ateşleme iğnesi biriminin takılması<br />
• Ateşleme iğnesi birimin yerleştiriniz.<br />
• Ateşleme iğnesinin arka ucunu kapak takımı arka kapağı ile içeri doğru bastırınız ve kapak takımı,<br />
arka kapağını alt kısımdan kılavuzuna tam yerine oturana kadar itiniz (bkz. ayrıca 4.2.1.<br />
Şekil 2).<br />
4.3. Tırnak<br />
4.3.1. Tırnağın sökülmesi<br />
DİKKAT:<br />
Tırnak birimi ve ateşleme iğnesi emniyeti yay basıncı altındadır. Tırnağın çıkarılması<br />
esnasında bu parçalar fırlayabilir.<br />
Kapak parçasını nişangah aşağıya, ağız kısmı da<br />
sola bakacak şekil<strong>de</strong> önünüze koyunuz. 2 mm’lik bir<br />
pim zımbası kullanarak tırnak birimini yay kuvvetine<br />
karşı kapağın içine doğru bastırınız (4.3.1. Şekil 1).<br />
Ateşle iğnesi emniyeti ve tırnak piminin dışarı fırlamalarını<br />
bir parmağınız ile önleyerek tırnağı çıkartınız.<br />
Daha sonra iğne emniyetini ve tırnak pimini kapağı<br />
biraz sallayarak çıkartınız.<br />
4.3.2. Tırnağın takılması<br />
Kapağı, üst kısmı aşağıya, ağız kısmı da sola bakacak<br />
şekil<strong>de</strong> kapağı önünüze koyunuz. Tırnak pimi ve<br />
ateşleme iğnesini, ilgili yay öne bakacak şekil<strong>de</strong> yerleştiriniz<br />
(4.3.2. Şekil 1). Emniyetin baskı yayının kapakta<br />
öngörülen girintinin dibine oturması gerekmektedir.<br />
Doğru yere oturduğunda emniyet, mermi kovanı<br />
oturma yivinin biraz altında bulunur.<br />
Tırnağın uzun olan ucunu kapaktaki tırnak aralığına<br />
koyunuz ve tırnağı öbür elinizin başparmağı ile kapakta<br />
tırnak pimine karşı tutunuz. Tırnak kapağın<br />
ortasına doğru itilirken aynı anda tırnak pimini 2<br />
mm’lik bir pim zımbası kullanarak içeri doğru bastırınız.<br />
Tırnaktaki göz şimdi tırnak pimini per<strong>de</strong>lemektedir<br />
ve pim zımbası çıkartılabilir (4.3.2. Şekil 2).<br />
Ateşleme iğnesi emniyetini kapak dış yüzeyi ile aynı<br />
hizaya gelene kadar içeriye doğru bastırınız. Aynı<br />
zamanda tırnak pimi tırnaktaki <strong>de</strong>liğe oturana kadar<br />
tırnağı başparmağınızla içeriye doğru bastırınız<br />
(4.3.2. Şekil 3).<br />
148<br />
4.3.1. Şekil 1<br />
4.3.2. Şekil 1<br />
4.3.2. Şekil 2<br />
4.3.2. Şekil 3
4. Sökme, temizlik, yağlama ve bakım<br />
4.4. Şarjör<br />
4.4.1. Şarjörün sökülmesi<br />
DİKKAT:<br />
Şarjör yayı basınç altındadır. Şarjörün sökülmesi sırasında parçalar dışarı fırlayabilir.<br />
Şarjörü sökerken dikkatli olunuz. Şarjör tabanını çıkartırken taban kapağını tutunuz ve<br />
taban kapağını şarjör yayı ile birlikte şarjör muhafazasından çıkartınız.<br />
1. 4 mm’lik bir pim zımbası kullanarak taban kapağını şarjör<br />
tabanındaki bir <strong>de</strong>likten şarjör muhafazası içine doğru bastırınız<br />
(4.4.1. Şekil 1).<br />
2. Taban kapağını şarjör yayı kuvvetine karşı tutarken tabanı<br />
öne doğru itiniz ve şarjör muhafazasından çıkartınız.<br />
3. Taban kapağı ve şarjör yayını çıkartınız.<br />
4. Mermi sürücü tablasını şarjör muhafazasını silkeleyerek<br />
çıkartınız.<br />
4.4.2. Şarjör parçalarının birleştirilmesi<br />
• Önce mermi sürücü tablasını ve sonra şarjör yayı ile taban<br />
kapağını şarjör muhafazasına yerleştiriniz. Parçaların düzgün<br />
ve doğru yerleşmesine dikkat ediniz. Parçalar zor kullanılmadan<br />
monte edilebilirler (4.4.2. Şekil 1 ve 2).<br />
• Tabanca kapağını şarjör yuvasının içine bastırırken şarjör<br />
tabanını tam olarak oturana kadar ön<strong>de</strong>n itiniz (oturduğunu<br />
sesli olarak da duyabilirsiniz).<br />
149<br />
4.4.1. Şekil 1<br />
4.4.2. Şekil 1<br />
4.4.2. Şekil 2
4.5. Temizleme<br />
4. Sökme, temizlik, yağlama ve bakım<br />
DİKKAT:<br />
Temizleme işlemin<strong>de</strong>n önce tabanca ve şarjörün boş olduğundan emin olunuz.<br />
Yeni tabancanızı ilk atışı yapmadan önce temizleyiniz. Tabanca fabrikadan çıkmadan önce paslanmaya<br />
karşı korunmak amacıyla kimyasal mad<strong>de</strong>lerle veya yağla işlem görmüştür. Yeni tabancanızı<br />
ilk kullanımdan önce, namluyu, mermi yatağını ve dış yüzeylerini kapsayacak şekil<strong>de</strong> fazla<br />
yağdan temizleyiniz. Tabancanız hassas bir alettir. Tabancanın işlevlerini güvenilir bir şekil<strong>de</strong><br />
yerine getirebilmesi için düzenli bakıma ihtiyacı vardır.<br />
Tabancanız her kullanımdan sonra veya aşırı zor hava şartlarına maruz kaldıktan sonra temizlenmelidir.<br />
Tabancayı ana parça gruplarına ayırınız (sökünüz) (bkz. Bölüm 4.1.).<br />
Mermi yatağından başlayarak namluyu temizleme fırçası ve namlu temizleyici ile temizleyiniz.<br />
Namlu ve mermi yatağı temiz olmalıdır.<br />
Namlunun dış yüzeylerini bez ve temizleme çubukları ile temizleyiniz.<br />
Küçük bir fırça ve gerekirse yağ ile göv<strong>de</strong>, namlu, kapak, tırnak vs. gibi yerler<strong>de</strong>ki kir kalıntılarını<br />
temizleyiniz. Temizlikten sonra metal dış yüzeyleri hafifçe yağlayınız.<br />
Tabanca soğuk bir ortamda kullanılacak veya <strong>de</strong>polanacak ise soğuk havalar için tavsiye edilen<br />
bir silah yağı kullanınız.<br />
4.6. Yağlama<br />
UYARI:<br />
Kullanacağınız temizleme mad<strong>de</strong>lerinin kullanım talimatlarına mutlaka uyunuz. Bazı<br />
temizleme mad<strong>de</strong>leri tabancanıza zarar verebilir. Bu tür mad<strong>de</strong>lerin uzun süre tabancaya<br />
nüfuz etmelerin<strong>de</strong>n, ultrasonik banyoda uzun süreli temizlikten ve 50°C’nin üzerin<strong>de</strong>ki<br />
ısılarda ultrasonik banyodan kaçınınız.<br />
Yalnızca tabanca bakımı için tavsiye edilen reçinesiz ve asitsiz temizlik mad<strong>de</strong>leri ve silah<br />
yağları kullanınız. Amonyak içeren ve alkalik çözücü mad<strong>de</strong>ler kullanılmamalıdır.<br />
Temizlikten sonra PPQ’un metal kısımlarının dış düzeyleri ve işlev parçaları hafifçe yağlanmalıdır<br />
(4.6. Şekil 1). Yalnızca reçine ve asitsiz silah yağı kullanınız.<br />
Aşırı miktarda yağ kullanmayınız. Fazla yağ kullanmışsanız bunu yağ damlalarından ve silahtan<br />
yağ sızmasından anlarsınız. Fazla yağ sebebiyle tabanca için<strong>de</strong> kir ve nem oluşur. Bu da tabancanın<br />
işlevselliğini tehdit e<strong>de</strong>r. Ateşleme iğnesi <strong>de</strong>liğini yağlamayınız.<br />
• Namlu:<br />
Tabancayı temizledikten sonra namlu yüzeylerini ve namlu ile göv<strong>de</strong> arasındaki temas alanlarını<br />
yağlı bir bezle yağlayınız.<br />
• Göv<strong>de</strong>:<br />
Kapak kanallarını ve tetik çubuğu tevziat tertibatını muhafazasının birer damla yağ ile yağlayınız.<br />
150
4. Sökme, temizlik, yağlama ve bakım<br />
• Kapak takımı:<br />
Resim<strong>de</strong>ki işaretli yerleri hafif yağlayınız.<br />
• Şarjör:<br />
Şarjör muhafazasının dışını hafifçe yağlayınız.<br />
4.7. Depolamaya hazırlık<br />
4.6. Şekil 1<br />
Lütfen ülkenizin ateşli silahlar ve mühimmatla ilgili mevzuat hükümlerine dikkat ediniz.<br />
Tabancanızı nemi çeken ve tutan bir malzeme (örn. <strong>de</strong>ri veya kalın bezler vs.) içerisin<strong>de</strong> muhafaza<br />
etmeyiniz.<br />
Eğer tabanca uzun bir süre için<strong>de</strong> <strong>de</strong>polanacak ise namluyu, mermi yatağını ve dahili parçaları<br />
silah yağı veya silahlar için öngörülen bir kimyasal mad<strong>de</strong> ile koruyunuz. Kapak namlu ve şarjör<br />
gibi harici kısımlar paslanmaya karşı korunmalıdır.<br />
Bir sonraki kullanımdan önce PPQ’unuzu temizleyiniz. Her temizleme işlemi sırasında tabancanızda<br />
herhangi bir aşınma olup olmadığına dikkat ediniz. Alışılmışın dışında aşınmalar tespit ettiğiniz<strong>de</strong><br />
tabancanızı kalifiye bir silah ustası veya Walther firmasına kontrol ettiriniz.<br />
151
5. Tabancanın kullanıcıya uyumlu hale getirilmesi<br />
5. Tabancanın kullanıcıya uyumlu hale getirilmesi<br />
5.1. Kabza<br />
Tabancanın kabzasını el büyüklüğüne uydurmak için<br />
farklı büyüklükteki kabza sırtları monte edilebilir.<br />
Montaj için kabza sırtının alt kısmındaki pim, bir pim<br />
zımbası ile (tabancada 4 mm) sağa veya sola iterek<br />
çıkartılır ve tercih edilen kabza sırtı monte edildikten<br />
sonra tekrara yerine takılır (5.1. Şekil 1).<br />
5.2. Kordon ipi <strong>de</strong>liği<br />
PPQ tabancada kabza sırtının sabitlenmesi için kullanılan pim kabza sırtındaki bir girinti ile birlikte<br />
bir kordon ipinin takılabilmesine yönelik bir <strong>de</strong>lik oluşturur. Montaj için kabza sırtının alt kısmındaki<br />
pim 4 mm’lik bir pim zımbası ile sağa doğru veya sola doğru bastırıp çıkartılır kordon ipi veya<br />
bir adaptör parça takılır ve pim tekrar monte edilir.<br />
5.3. Nişangah<br />
Gez ve arpacık <strong>de</strong>ğiştirilebilmektedir. İsabet noktası durumu için yan ve yükseklik ayarı yapılabilir.<br />
DİKKAT:<br />
Çalışmalara başlamadan önce tabancanın ve şarjörün boş olduğundan emin olunuz.<br />
YAN (SAĞ-SOL) AYARI<br />
İsabet noktası durumunu düzeltmek için gezi isabetlerin toplanmasını istediğiniz yöne itiniz.<br />
Örneğin: İsabet noktasının sağa kayması gerekiyorsa gezi sağa kaydırınız.<br />
DİKKAT:<br />
Orijinal WALTHER çelik gez (5.3. Şekil 1) kapağın üzerin<strong>de</strong><br />
sabit olarak yerleştirilmiştir. Bu gezin ayarlanması için<br />
özel aksesuar olarak temin edilebilen gez sürücü tavsiye<br />
edilir. Gezin altındaki sıkma ron<strong>de</strong>lasını çıkartmayınız.<br />
YÜKSEKLİK AYARI<br />
Zİsabet noktasının yükseklik ayarını düzeltmek için arpacık <strong>de</strong>ğiştirilebilir.<br />
Özel aksesuar olarak farklı yüksekliklere sahip çelik arpacıklar<br />
temin edilebilir.<br />
152<br />
5.1. Şekil 1<br />
5.3. Şekil 1
5. Tabancanın kullanıcıya uyumlu hale getirilmesi<br />
İsabet noktası alçak ise alçak (kısa), yüksek ise<br />
daha yüksek bir arpacık gerekir. Arpacıklar numaralandırılmıştır.<br />
Numarası ne kadar yüksekse arpacık<br />
da o kadar yüksektir. 25 m’lik bir atış mesafesin<strong>de</strong> bir<br />
sonraki (veya bir önceki) ka<strong>de</strong>me<strong>de</strong>ki gez kullanımında<br />
isabet noktasının yaklaşık 5 cm kaymasına<br />
ne<strong>de</strong>n olur.<br />
5.3. Şekil 2<br />
Arpacığın <strong>de</strong>ğiştirilmesi için kapak göv<strong>de</strong><strong>de</strong>n ayrılır<br />
ve yerine getiren yay birimi ile namlu kapaktan çıkartılır.<br />
Bir tornavida yardımıyla arpacık vidası çıkartılır ve sonrasında arpacık sökülür.<br />
Montaj, ters sırayla işlem yaparak gerçekleştirilir (5.3. Şekil 2).<br />
Arpacık vidası ve gezin için<strong>de</strong>ki vida yuvasındaki yağı temizleyiniz. Arpacık vidasını endüstriyel<br />
bir yapıştırıcı (örn. Loctite 648) ile emniyete alınız. Arpacık vidasını 1 NM’lik bir torkla sıkıştırınız.<br />
153
6. Parça şeması<br />
154<br />
6. Parça şeması
7. Parça listesi<br />
7. Parça listesi<br />
No. Tanımlama No. Tanımlama<br />
1.1 Arpacık vidası 24 Komple tetik tertibatı<br />
1.2 Arpacık 26 Mekanizma tespit mandalı<br />
3 Kapak parçası 27 Namlu tutucu pimi<br />
5 Tırnak 28.1 Namlu tutucu yayı<br />
6 Tırnak pimi, komple 28.2 Namlu tutucu<br />
7 Şarjör çıkartma mandal yayı <strong>29</strong> Komple göv<strong>de</strong><br />
7.1 Şarjör çıkartma tırnak yayı <strong>29</strong>.1 Tutucu yatağı<br />
8 Gez 30 Tespit mandalı yayı<br />
15 Ateşleme iğnesi, komple 31 Pim, 3 x 24<br />
16 Tetik yayı 32 Tetik muhafazası, monteli<br />
18 Ateşleme iğnesi emniyeti, komple 32.8 Tevzi parçası<br />
19 Namlu 33 Şarjör<br />
20 Kapak takımı arka kapağı 35 Pim 4 x 16<br />
21 Yerine getiren yay birimi 36 Şarjör mandalı<br />
22 Pim 3 x 28 38 Kabza sırtı S, M, L<br />
23 Namlu tutucu askısı 48 Pim, Şarjör mandalı<br />
155
8. Teknik veriler<br />
Kalibreler 9 mm x19 / 9mm x 21 .40 S&W<br />
Şarjör kapasitesi 15 mermi 12 mermi<br />
Ebatlar<br />
(uzunluk/genişlik/yükseklik)<br />
156<br />
8. Teknik veriler<br />
180 / 34 / 135 mm 184 / 34 / 135 mm<br />
Namlu uzunluğu 102 mm 106 mm<br />
Oluk uzunluğu<br />
250 mm<br />
sağ<br />
Namlu profili Alan ve çekiş, 6’lı<br />
406 mm<br />
sağ<br />
Nişangah hattı uzunluğu 156 mm 158 mm<br />
Gez genişliği<br />
4,6 mm (Standart / No. 2)<br />
3,8 mm (No. 1)<br />
Arpacık genişliği 3,6 mm<br />
Ağırlık (boş şarjör dahil) 695 g 705 g<br />
Boş şarjör ağırlığı 80 g<br />
Mermi enerjisi E3,<br />
mermi ağırlığı<br />
500 J<br />
8 g<br />
475 J<br />
11,7 g<br />
Kilitleme çeşidi Browning sistemi, ara elemansız<br />
Kilit çeşidi Ateşleme iğnesi kilidi<br />
Tetik prensibi Quick Defense Trigger<br />
Tetik kuvveti/yolu 25 N / 9 mm (her atışta eşit)<br />
Malzeme<br />
Kapak ve namlu: Tenifer® işlemi görmüş<br />
son <strong>de</strong>rece dayanıklı silah çeliği.<br />
Göv<strong>de</strong>: Elyafla güçlendirilmiş Polyamid 12<br />
Emniyetler Tetik, ateşleme iğnesi, düşme emniyeti<br />
Veriler ortalama <strong>de</strong>ğerlerdir. Gerçek <strong>de</strong>ğerler<strong>de</strong> sapmalar olabilir.
Carl Walther GmbH<br />
Im Lehrer Feld 1 · 89081 Ulm · Germany<br />
Phone: +49 (0) 7 31 / 15 39 - 0<br />
Fax: +49 (0) 7 31 / 15 39 - 109<br />
www.carl-walther.com<br />
TM<br />
278 32 15.CW.01-11.0,5.21 Rev. a<br />
Technische Än<strong>de</strong>rungen vorbehalten<br />
Sujeto a cambios sin previo aviso<br />
Sous réserve <strong>de</strong> modifications techniques<br />
Subject to change without further notice<br />
Con riserva di modifiche tecniche<br />
Teknik <strong>de</strong>ğişiklik yapma hakkımız saklıdır