CAT - Came UK
CAT - Came UK
CAT - Came UK

Create successful ePaper yourself
Turn your PDF publications into a flip-book with our unique Google optimized e-Paper software.
CANCELLI AUTOMATICI<br />
SERIE <strong>CAT</strong> / <strong>CAT</strong> SERIES / SÉRIE <strong>CAT</strong> / BAUREIHE <strong>CAT</strong> | SERIE <strong>CAT</strong><br />
<strong>CAT</strong><br />
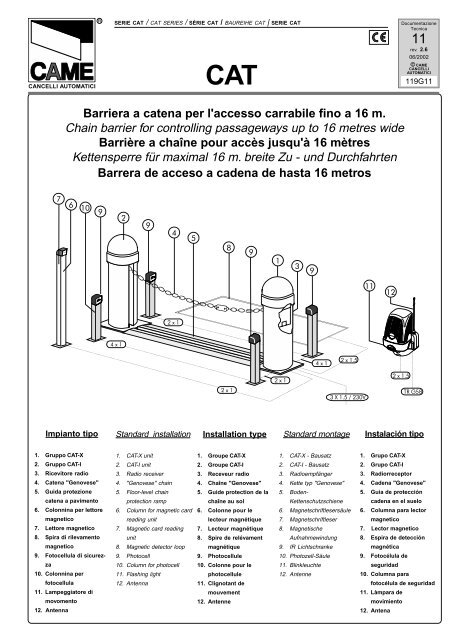
Barriera a catena per l'accesso carrabile fino a 16 m.<br />
Chain barrier for controlling passageways up to 16 metres wide<br />
Barrière a chaîne pour accès jusqu'à 16 mètres<br />
Kettensperre für maximal 16 m. breite Zu - und Durchfahrten<br />
Barrera de acceso a cadena de hasta 16 metros<br />
7 6<br />
10<br />
Impianto tipo<br />
9<br />
1. Gruppo <strong>CAT</strong>-X<br />
2. Gruppo <strong>CAT</strong>-I<br />
3. Ricevitore radio<br />
4. Catena "Genovese"<br />
5. Guida protezione<br />
catena a pavimento<br />
6. Colonnina per lettore<br />
magnetico<br />
7. Lettore magnetico<br />
8. Spira di rilevamento<br />
magnetico<br />
9. Fotocellula di sicurezza<br />
10. Colonnina per<br />
fotocellula<br />
11. Lampeggiatore di<br />
movomento<br />
12. Antenna<br />
4 x 1<br />
2<br />
9<br />
4<br />
2 x 1<br />
Standard installation<br />
Installation type<br />
1. <strong>CAT</strong>-X unit<br />
1. Groupe <strong>CAT</strong>-X<br />
2. <strong>CAT</strong>-I unit<br />
2. Groupe <strong>CAT</strong>-I<br />
3. Radio receiver<br />
3. Receveur radio<br />
4. "Genovese" chain 4. Chaîne "Genovese"<br />
5. Floor-level chain<br />
5. Guide protection de la<br />
protection ramp<br />
chaîne au sol<br />
6. Column for magnetic card 6. Colonne pour le<br />
reading unit<br />
lecteur magnétique<br />
7. Magnetic card reading 7. Lecteur magnétique<br />
unit<br />
8. Spire de relévament<br />
8. Magnetic detector loop magnétique<br />
9. Photocell<br />
9. Photocellule<br />
10. Column for photocell 10. Colonne pour le<br />
11. Flashing light<br />
photocellule<br />
12. Antenna<br />
11. Clignotant de<br />
mouvement<br />
12. Antenne<br />
5<br />
8<br />
2 x 1<br />
9<br />
1<br />
2 x 1<br />
3<br />
9<br />
4 x 1<br />
2 x 1.5<br />
3 X 1.5 / 230V<br />
Standard montage<br />
1. <strong>CAT</strong>-X - Bausatz<br />
2. <strong>CAT</strong>-I - Bausatz<br />
3. Radioempfänger<br />
4. Kette typ "Genovese"<br />
5. Boden-<br />
Kettenschutzschiene<br />
6. Magnetschriftlesersäule<br />
7. Magnetschriftleser<br />
8. Magnetische<br />
Aufnahmewindung<br />
9. IR Lichtschranke<br />
10. Photozell-Säule<br />
11. Blinkleuchte<br />
12. Antenne<br />
11<br />
12<br />
Documentazione<br />
Tecnica<br />
11<br />
rev. 2.6<br />
06/2002<br />
© CAME<br />
CANCELLI<br />
AUTOMATICI<br />
119G11<br />
2 x 1.5<br />
TR G58<br />
Instalación tipo<br />
1. Grupo <strong>CAT</strong>-X<br />
2. Grupo <strong>CAT</strong>-I<br />
3. Radiorreceptor<br />
4. Cadena "Genovese"<br />
5. Guia de protección<br />
cadena en el suelo<br />
6. Columna para lector<br />
magnetico<br />
7. Lector magnetico<br />
8. Espira de detección<br />
magnética<br />
9. Fotocélula de<br />
seguridad<br />
10. Columna para<br />
fotocélula de seguridad<br />
11. Làmpara de<br />
movimiento<br />
12. Antena
ITALIANO<br />
Descrizione:<br />
- Barriera a catena per l'accesso carrabile fino a 16 metri.<br />
- Progettato e costruito interamente dalla CAME S.p.A., risponde<br />
alle vigenti norme di sicurezza, con grado di protezione<br />
IP 54.<br />
- Garantito 24 mesi salvo manomissioni.<br />
Composizione:<br />
<strong>CAT</strong> - X<br />
Pilastro zincato con finitura di verniciatura RAL 7035, con<br />
motoriduttore a 230V a.c. e quadro comando incorporato.<br />
<strong>CAT</strong> - I<br />
Pilastro zincato con finitura di verniciatura RAL 7035, con contrappeso<br />
e aggancio catena.<br />
Limiti d'impiego:<br />
- 8 m. max. con catena "genovese" da 9 mm. (<strong>CAT</strong> 5);<br />
- 16 m. max. con catena "genovese" da 5 mm. (<strong>CAT</strong> 15).<br />
Attenzione! Controllate che le apparecchiature di comando, di sicurezza e gli accessori siano originali CAME; ciò garantisce e rende<br />
l'impianto di facile esecuzione e manutenzione.<br />
ENGLISH<br />
Description:<br />
- Chain barrier for controlling passageways up to 16 metres wide<br />
- Designed and constructed entirely by CAME in compliance<br />
with current safety standards, and with an IP 54<br />
protecting rating.<br />
- Guaranteed for 24 months, unless tampered with by<br />
unauthorized personnel.<br />
Composition:<br />
<strong>CAT</strong> - X<br />
Galvanised post with 230V a.c. gear motor and built-in control<br />
panel. RAL 7035 painted.<br />
<strong>CAT</strong> - I<br />
Galvanised post with 7037 enamel finish, equipped with counterweight<br />
and chain connection.<br />
Limits of use:<br />
- 8 metres max., with 9 mm. "genovese" chain <strong>CAT</strong> 5.<br />
- 16 metres max., with 5 mm. "genovese" chain <strong>CAT</strong> 15.<br />
CARATTERISTICHE GENERALI<br />
GENERAL SPECIFI<strong>CAT</strong>IONS<br />
- 2 -<br />
Accessori:<br />
<strong>CAT</strong> 5<br />
Catena tipo "genovese" da 9 mm. zincata, con finitura di<br />
verniciatura RAL 2004 (spezzoni m. 7,5).<br />
<strong>CAT</strong> 15<br />
Catena tipo "genovese" da 5 mm. zincata, con finitura di<br />
verniciatura RAL 2004 (spezzoni m. 15,5).<br />
CAR 2<br />
Guida zincata di protezione catena a pavimento (spezzoni<br />
da 2 m.).<br />
CAR 4<br />
Guida zincata di protezione per catena interrata (spezzoni da<br />
2 m.).<br />
N.B.: per tutte le parti verniciate sono usate vernici<br />
termoindurenti a base di resine poliesteri.<br />
Accessories:<br />
<strong>CAT</strong> 5<br />
9 mm. “genovese” galvanised chain, RAL 2004 painted (7.5m.<br />
Iengths)<br />
<strong>CAT</strong> 15<br />
5 mm. ‘’genovese’’ galvanised chain, RAL 2004 painted<br />
(15.5 m. Iengths)<br />
CAR 2<br />
Floor-level galvanised chain protection ramp (2m. lengths).<br />
CAR 4<br />
Underground galvanised protective casing for chain (2m.<br />
lengths).<br />
N.B.: used thermosetting polyester-resin paint on all<br />
painted surfaces.<br />
Attention! to insure easy installation and conformance with current safety norms, we raccomend installation of CAME safety and control<br />
accessories.
FRANÇAIS<br />
Description:<br />
- Barrière a chaîne pour accès jusqu'à 16 mètres<br />
- Il a été entièrement concu et construit par la Société CAME,<br />
conformément aux normes de sécurité en vigueur<br />
avec degré de protection IP 54.<br />
- Il est garanti 24 mois sauf en cas d'altérations.<br />
Composition:<br />
<strong>CAT</strong> - X<br />
Pilier galvanisé verní avec finition RAL 7035, avec motoréducteur<br />
en 230V a. c. et armoire de commande incorporée.<br />
<strong>CAT</strong> - I<br />
Pilier galvanisé verní avec finition RAL 7035 avec contrepoids<br />
et élément d'accrocage pour chaîne.<br />
Limites d'utilisation:<br />
- 8 mètres max., avec chaîne "genovese" de 9 mm. <strong>CAT</strong> 5.<br />
- 16 mètres max., avec chaîne "genovese" de 5 mm. <strong>CAT</strong> 15.<br />
Attention ! Vérifiez que l’appareillage de commande, de sécurité et les accessoires sont des produits originaux CAME afin de garantir<br />
l’installation et d’en faciliter le montage et l’entretien.<br />
DEUTSCH<br />
Beschreibung:<br />
- Kettensperre für maximal 16 m. breite Zu - und Durchfahrten<br />
- Vollkommen von der CAME S.p.A. den geltenden<br />
Sicherheitsnormen entsprechend entwickelt und<br />
hergestellt. Schutzklasse IP 54.<br />
- Garantie: 24 Monate, vorbehaltlich unsachgemäßer<br />
Handhabung und Montage.<br />
Ausrüstung:<br />
<strong>CAT</strong> - X<br />
Verzinkter und lackiert (RAL 7035) Pfeiler mit 230V<br />
Wechselstrom Motor und Eingebaute Steuereinheit.<br />
<strong>CAT</strong> - I<br />
Verzinkter und lackiert (RAL 7035) Pfeiler mit Gegengewicht und<br />
Kettenkupplung.<br />
Einsatzgrenze:<br />
- Bei Ausrüstung mit 9 mm. Kette typ "genovese", erlaubt das<br />
<strong>CAT</strong>-System den Antrieb von bis zu 8 m. breiten Durchgängen;<br />
- Bei 5 mm. Kette typ "genovese" bis zu 16 m. breiten<br />
Durchgängen.<br />
CARACTÉRISTIQUES GÉNÉRALÉS<br />
ALLGEMEINE MERKMALE<br />
- 3 -<br />
Accessoires:<br />
<strong>CAT</strong> 5<br />
Chaîne type "genovese" de 9 mm., galvanisé verní avec<br />
finition RAL 2004 (7,5 m.).<br />
<strong>CAT</strong> 15<br />
Chaîne type "genovese" de 5 mm., galvanisé verní avec<br />
finition RAL 2004 (15,5 m.).<br />
CAR 2<br />
Guide de protection de la chaîne au sol (piéces de 2 m.).<br />
CAR 4<br />
Guide de protection de la chaîne enterré (piéces de 2 m.).<br />
N.B.: des vernis thermodurcissables à base de résines<br />
polyesters sont utilisés pour toutes les pièces vernies.<br />
Zubehör:<br />
<strong>CAT</strong> 5<br />
Kette typ "genovese", 9 mm., verzinkt und Lackierter (RAL<br />
2004 - Länge 7,5 m.).<br />
<strong>CAT</strong> 15<br />
Kette typ "genovese", 5 mm., verzinkt und Lackierter (RAL<br />
2004 - Länge 15,5 m.).<br />
CAR 2<br />
Verzinkter Boden-Kettenschultzschiene (2 m. Stuck).<br />
CAR 4<br />
Verzinkter Bodenlaufschiene für die Kette je (2 m. Stuck).<br />
Hinweis: für alle lackierten Teile sind wärmehärtende<br />
Polyesterharzlacke verwendet worden.<br />
Achtung! Wir empfehlen original CAME-Schalt- und -Sicherheitsvorrichtungen mit entsprechendem Zubehör zu montieren, um die<br />
einwandfreie Montage und die problemlose Wartung der Anlage zu gewährleisten.
ESPAÑOL<br />
Descripción:<br />
- Barrera de acceso a cadena de hasta 16 metros.<br />
- Diseñado y fabricado enteramente por CAME S.p.A., cumple<br />
con las normas de seguridad vigentes, con grado de<br />
protección IP54.<br />
- Garantizado 24 meses, salvo manipulaciones.<br />
Composción:<br />
<strong>CAT</strong> - X<br />
Pilar con motorreductor a 230V a.c. y cuadro de mandos<br />
incorporado.<br />
<strong>CAT</strong> - I<br />
Pilar de complemento con gancho, cadena y dispositivo de<br />
desbloqueo.<br />
Limites de empleo:<br />
- 8 m. con el uso de la cadena "genovese" de 9 mm.;<br />
- 16 m. con el uso de la cadena "genovese" de 5 mm.;<br />
Atención! Comprobar que los equipos de mando, de seguridad y los acesorios sean originales CAME; lo cual garantiza y facilita el uso<br />
y el mantenimiento del aparato.<br />
Caratteristiche tecniche - Technical features - Caractéristiques technique - Technische Daten - Descripción técnica<br />
TIPO<br />
TYPE<br />
TYPE<br />
TYP<br />
TIPO<br />
PESO<br />
WEIGHT<br />
POIDS<br />
GEWICHT<br />
PESO<br />
ALIMENTAZIONE<br />
POWER SUPPLY<br />
ALIMENTATION<br />
STROMVERSORGUNG<br />
ALIMENTACIÓN<br />
Misure di ingombro - External dimensions - Mesures d'encombrement - Außenabmessungen - Dimensiones máximas<br />
780<br />
CARACTERÍSTICAS GENERALES<br />
ASSORBIMENTO<br />
CURRENT DRAW<br />
ABSORPTION<br />
STROMAUFNAHME<br />
ABSORBENCIA<br />
520<br />
POTENZA<br />
MOTORE<br />
MOTOR POWER<br />
PUISSANCE<br />
MOTEUR<br />
WIRKLEISTUNG<br />
MOTOR<br />
POTENCIA<br />
MOTOR<br />
280<br />
- 4 -<br />
Accesorios:<br />
<strong>CAT</strong> 5<br />
Cadena de tipo "genovese" de 9 mm., cincada con acabado<br />
por barniz (pedazos de m. 7,5).<br />
<strong>CAT</strong> 15<br />
Cadena de tipo "genovese" de 5 mm., cincada con acabado<br />
por barniz (pedazos de m. 15,5).<br />
CAR 2<br />
Guia de protección de la cedena en el suelo.<br />
CAR 4<br />
Guia protectora subterránea para cadena (trozos de 2 m.).<br />
Nota: para todas las partes pintadas se utilizan pinturas<br />
termoendurecedoras a base de resinas poliésteres.<br />
INTERMIT. LAVORO<br />
DUTY CYCLE<br />
INTERM. TRAVAIL<br />
EINSCHALTDAUER<br />
INTERM. TRABAJO<br />
FORZA DI<br />
TRAZIONE<br />
TRACTIVE FORCE<br />
FORCE DE<br />
TRACTION<br />
ANTRIEBSKRAFT<br />
FUERZA DE<br />
TRACCIÓN<br />
CONDENSATORE<br />
CAPACITOR<br />
CONDENSATEUR<br />
KONDENSATOR<br />
CONDENSADOR<br />
TEMPO DI<br />
MANOVRA<br />
MANOEUVRE TIME<br />
TEMPS DE<br />
MANOEUVRE<br />
SCHALTZEIT<br />
TIEMPO DE<br />
MANIOBRA<br />
<strong>CAT</strong> - X 43 230V a.c. 2,7 A max. 300 W 30 % 50 KG 20 µF 11 s
A<br />
B<br />
C<br />
ENGLISH<br />
Technical description<br />
<strong>CAT</strong> X<br />
A - Cover fixer screw.<br />
B - Removable casing in galvanised steel with painted finish.<br />
C - Removable carter.<br />
D - Built-in control panel.<br />
E - Galvanised steel frame with painted finish.<br />
F - 24V d.c. gear motor armoured motor with cover in die<br />
cast aluminium and built in thermal circuit-breaker.<br />
G - Floor-level anchor plate in galvanised steel.<br />
H - Anchor bolts in galvanised steel nuts.<br />
I - Nylon pulley for chain.<br />
L - Service chain and clasp in galvanised steel.<br />
M - Nylon guide pulley.<br />
N - Key-operated release.<br />
<strong>CAT</strong> I - Post with counterweight<br />
O - Balancing counterweight.<br />
P - Fixed chain element.<br />
DEUTSCH<br />
<strong>CAT</strong> - X <strong>CAT</strong> - I<br />
D L<br />
E<br />
F<br />
N<br />
G<br />
H<br />
Technische Beschreibung<br />
<strong>CAT</strong> X<br />
A - Schraube für die Befestigung der Kappe.<br />
B - Abnehmbare Pfeilerkappe aus verzinktem Stahl mit Lack<br />
berzug.<br />
C - Entfernbare Seitenteile.<br />
D - Eingebaute Steuereinheit.<br />
E - Gestell aus verzinktem Stahl mit Lacküberzug.<br />
F - 24V-Gleichstrom Getriebemotor<br />
G - Bodenfestigungsplatte aud verzinktem Stahl.<br />
H - Fundamentanker mit verzinkten Stahlschrauben.<br />
I - Kettenführungsrolle aus nylon.<br />
L - Bedienungskette und kettenverbindungsglied aus verzink<br />
tem Stahl.<br />
M - Kettenaufrollscheibe aus Nylon.<br />
N - Schlüsselentriegelung.<br />
<strong>CAT</strong> I - Pfeiler mit Gegenweicht<br />
O - Ausgleichsgewicht.<br />
P - Festsehender Kettenteil.<br />
I<br />
M<br />
O<br />
P<br />
- 5 -<br />
ITALIANO<br />
<strong>CAT</strong> X<br />
A - Vite fissaggio calotta.<br />
B - Calotta asportabile in acciaio zincato con finitura di verni -<br />
ciatura.<br />
C - Fianchi asportabili.<br />
D - Quadro comando incorporato.<br />
E - Telaio in acciaio zincato con finitura di verniciatura.<br />
F - Motoriduttore 24V d.c. in esecuzione corazzata con calotta<br />
in alluminio pressofuso e protettore termico<br />
incorporato.<br />
G - Piastra di fissaggio a pavimento in acciaio zincato.<br />
H - Zanche di ancoraggio più bulloneria in acciaio zincato.<br />
I - Puleggia in nylon per scorrimento catena.<br />
L - Catena di servizio e morsetto di aggancio in acciaio zincato.<br />
M - Puleggia avvolgente in nylon.<br />
N - Sblocco a chiave.<br />
<strong>CAT</strong> I - Pilastro con contrappeso<br />
O - Contrappeso di bilanciamento.<br />
P - Elemento fisso catena.<br />
FRANÇAIS<br />
ESPAÑOL<br />
Descrizione tecnica<br />
Description technique<br />
<strong>CAT</strong> X<br />
A - Vis de fixation calotte.<br />
B - Calotte amovible en acier zinguè avec vernissage de finition.<br />
C - Carter amovibles.<br />
D - Armoire de commande incorporée.<br />
E - Coffre en acier zingué avec vernissage de finition.<br />
F - Motoréducteur en 24V d.c., protégé par une calotte en<br />
aluminium moulé sous pression, protecteur thermique incorporé.<br />
G - Plaque de fixation au sol en acier zingué.<br />
H - Agrafes de fixation avec boulonnerie en acier zingué.<br />
I - Poulie en nylon pour coulissement chaîne,<br />
L - Chaîne de service et crochet en acier zingué.<br />
M - Poulie d'enroulement en nylon.<br />
N - Déblocage à clé.<br />
<strong>CAT</strong> I - Pilier avec contrepoids<br />
O - Contrepoids d'equilibrage.<br />
P - Morceau de chaîne fixe.<br />
Déscripcion técnica<br />
<strong>CAT</strong> X<br />
A - Tornillo sujeción casquette.<br />
B - Casquete retirable de acero cincado con acabado por barniz.<br />
C - Lados extirpables.<br />
D - Cuadro de mandos incorporado.<br />
E - Estructura metálica en forma de pilar con acabado por barniz.<br />
F - Motorreductor a 24V d.c. en instalación blindada con casquete<br />
de aluminio fundido y protector termico incorporado.<br />
G - Placa de sujeción en el suelo de acero cincado.<br />
H - Grapas de sujeción con tornillos de acero cincado.<br />
I - Polea para el deslizamiento de la cadena de nylon.<br />
L - Cadena de servicio y gancho de acero cincado.<br />
M - Polea de envolver de nylon.<br />
N - Desbloqueo con llave.<br />
<strong>CAT</strong> I - Poste con contrapeso<br />
O - Contrapeso de equilibrado.<br />
P - Elemento fijo cadena.
Piastra di fissaggio<br />
Fixing plate<br />
Plaque de fixation<br />
Gleitachse<br />
Placa de fijación<br />
Piazzola in cemento<br />
Concrete base<br />
Plate-forme en ciment<br />
Plattenachse<br />
Plataforma de cemento 280<br />
Cavi elettrici<br />
Electrical cables<br />
Câbles électriques<br />
Elektrische kabel<br />
Cables eléctricos<br />
280<br />
230<br />
40<br />
Descrizione di montaggio<br />
Il montaggio è estremamente<br />
semplificato dagli<br />
accorgimenti tecnici<br />
propri del gruppo.<br />
-Predisporre, dimensionandola<br />
in base alle<br />
misure del gruppo, una<br />
piazzola in cemento<br />
con annegate le piastre<br />
di fissaggio e relative<br />
zanche.<br />
- Le piastre di fissaggio<br />
dovranno essere perfettamente<br />
in bolla, pulite<br />
e con il filetto delle<br />
viti completamente in<br />
superficie.<br />
- Dal centro della piastra<br />
di fissaggio relativa<br />
a <strong>CAT</strong>-X dovranno<br />
emergere i cavi per il<br />
collegamento elettrico.<br />
- E’ consigliata l’applicazione<br />
della guida di<br />
protezione catena a<br />
pavimento CAR 2 o la<br />
guida di protezione<br />
interrata CAR 4.<br />
- Effettuata la posa<br />
delle piastre di fissaggio<br />
e della guida a pavimento,<br />
si proceda<br />
all’installazione del<br />
gruppo.<br />
Preparazione - Before Installing... - Avant d'installer l'automatisme... -<br />
Vor den installation überprüfen... Antes de instalar el automatismo...<br />
280<br />
230<br />
Assembly<br />
The simple technical design<br />
of this system<br />
makes it extremely easy<br />
to assemble.<br />
- Prepare a concrete<br />
base of a width which is<br />
suitable for the system to<br />
be installed. The metal<br />
anchor brackets should<br />
be embedded in the concrete<br />
in the correct positions.<br />
- The anchor plates must<br />
be perfectly clean and<br />
level, and the screw<br />
threads must be completely<br />
exposed on the<br />
surface.<br />
- The power cables<br />
should be passed<br />
through the hole in the<br />
centre of the <strong>CAT</strong>-X anchor<br />
plate.<br />
- It is good practice to install<br />
the CAR 2 pavement-mounted<br />
chain protection<br />
guide or the CAR<br />
4 underground chain protection<br />
guide.<br />
- After installing the anchor<br />
plates and<br />
floor-level chain protection<br />
ramp, the pillars<br />
themselves can be installed.<br />
Luce netta - Opening space - Espace net - Abstand - Luz neta<br />
Description de montage<br />
Le montage est<br />
extrêmement simpliflé<br />
par les astuces<br />
techniques propres au<br />
groupe.<br />
- Préparer, en tenant<br />
compte des<br />
dimensions du groupe,<br />
une base en ciment en<br />
y noyant les plaqes de<br />
fixation qui permettront<br />
la fixation du groupe.<br />
- Les plaques<br />
d’ancrage devront être<br />
parfaitement de niveau,<br />
propres et avec le filet<br />
des vis complètement<br />
en surface.<br />
- Les câbles devront<br />
sortir de la base pour le<br />
branchement<br />
électrique.<br />
- Il est conseillé<br />
d’appliquer la glissière<br />
de protection chaîne au<br />
sol CAR 2 ou la<br />
glissière de protection<br />
enterrée CAR 4.<br />
- Après avoir effectué la<br />
pause au sol des<br />
attaches et de la guide,<br />
on procède à<br />
l'installation du groupe.<br />
- 6 -<br />
Guida di protezione catena a pavimento CAR 2<br />
CAR 2 floor-level chain protection ramp<br />
Guide de protection de la chaîne au sol CAR 2<br />
CAR 2 Boden-Kettenschutzschiene<br />
Guia de protección de la cedena en el suelo CAR 2<br />
Montageanweisung<br />
Die Montage der<br />
Elemente ist dank der<br />
technisch in allen<br />
Einzelheiten durchdachten<br />
Bauweise<br />
hochst einfach.<br />
- Die Befestigungsplatten<br />
müssen perfekt<br />
waagerecht ausgerichtet<br />
und völlig sauber sein.<br />
Die Ankerschraubengewinde<br />
sollten ganz aus<br />
den Platten<br />
herausragen.<br />
- Die Bodenbefestigunsplatte<br />
muB eben, sauber<br />
und livelliert sein; das<br />
Gewinde der FundamentanVerschrauben<br />
muB<br />
vollLommen aus dem<br />
Boden ragen und mittig<br />
zur Auflageflache der<br />
Elemente liegen.<br />
- Zum Schutz der Kette<br />
empfiehlt sich, die<br />
Bodenlaufschiene CAR<br />
2 oder die erdverlegte<br />
Schutzschiene CAR 4 zu<br />
verwenden.<br />
- Nach Einbau der<br />
Fundamentanker und<br />
derBoden-Kettenschuizschiene<br />
konnen die<br />
Pfeilerele-mente<br />
montiert werden.<br />
Zanche<br />
Anchor stays<br />
Agrafes<br />
Verankerung<br />
Barras de hierro<br />
de fijacion<br />
Descripción del montaje<br />
El montaje resulta muy<br />
simple por los<br />
dispositivos técnicos<br />
proprios del grupo.<br />
- Predisponer, con la<br />
dimensiones en<br />
función de las medidas<br />
del grupo, una<br />
plataforma de cemento<br />
insertando los placas<br />
de sujeción que<br />
consentirán fijar el<br />
grupo.<br />
- Las placas de fijación<br />
deberán estar<br />
perfectamente<br />
niveladas, limpias y<br />
con la rosca de los<br />
tornillos totalmente en<br />
superficie.<br />
- De dichia base<br />
deberán sobresalir los<br />
cables para la conexion<br />
eléctrica.<br />
- Se aconseja la<br />
aplicación de la guía de<br />
protección de cadena<br />
en el suelo CAR 2 o la<br />
guía de protección<br />
subterránea CAR 4.<br />
- Una vez colocados los<br />
ganchos y la guia en el<br />
suelo, se empieza a<br />
instalar el grupo.
Posa del gruppo - Unit installation - Installation du groupe - Aufstellung des aggregats - Colocación del grupo<br />
<strong>CAT</strong> X<br />
1 ) Allentare le viti di fissaggio<br />
e togliere la calotta.<br />
2) Togliere i fianchi.<br />
3) Procedere alla posa<br />
e al fissaggio del gruppo.<br />
4) Calcolata l’esatta misura<br />
(la misura esatta<br />
della catena da utilizzare<br />
è data dalla misura<br />
della luce netta diminuita<br />
di 500 mm.), tagliare<br />
la parte eccedente.<br />
5) Fissare un capo della<br />
catena di sbarramento<br />
alla catena di servizio<br />
con l’ausilio dell’apposito<br />
morsetto.<br />
6) Sempre con il gruppo<br />
in posizione aperta,<br />
fissare l’altra estremità<br />
della catena ( servendosi<br />
dello sblocco catena)<br />
all’elemento catena<br />
fisso su <strong>CAT</strong> I.<br />
7) Eseguire i collegamenti<br />
elettrici sulla<br />
morsettiera quadro comando.<br />
N.B.: tutte le prove di<br />
funzionamento e collaudo<br />
verranno effettuate<br />
ad impianto ultimato<br />
e catena installata.<br />
<strong>CAT</strong> X<br />
1 ) Loosen the fixing<br />
screws and remove the<br />
casing.<br />
2) Remove the sides.<br />
3) Place the unit on the<br />
anchor plate and tighten<br />
the anchor bolts.<br />
4) The exact length of<br />
chain required is calculated<br />
by subtracting 500<br />
mm. from the net distance<br />
between the pillars.<br />
Cut off the excess chain.<br />
5) Attach one end of the<br />
barrier chain to the coupling<br />
fitted to the service<br />
chain.<br />
6) With the unit still in the<br />
open position, attach the<br />
other end of the chain<br />
(use the chain release) to<br />
the fixed chain mount on<br />
<strong>CAT</strong> 1.<br />
7) Connect the power<br />
cables to the terminal<br />
board on the control<br />
panel.<br />
N.B. All operating tests<br />
must be carried out after<br />
installation of the unit<br />
and with the barrier chain<br />
in position.<br />
Misura catena= luce netta - 500 mm.<br />
Chain size= opening space - 500mm.<br />
Dimension de la chaîne= espace net moins 500 mm.<br />
Kettenlange netto= Abstand 500 mm.<br />
Medida cadena= luz neta menos 500 mm.<br />
Sblocco catena<br />
Chain release<br />
Déblocage de la chaîne<br />
Kettenentriegelung<br />
Desbloqueo cadena<br />
<strong>CAT</strong> X<br />
1 ) Dévisser les vis de<br />
fixation et retirer la<br />
calotte.<br />
2) Retirer les panneaux<br />
latéraux.<br />
3) Procedér à la pose et<br />
a la fixation du groupe.<br />
4) Aprés avoir calculé<br />
la dimension exacte (la<br />
mesure exacte de la<br />
chaîne à utiliser est<br />
donnée par la mesure<br />
de l'espace net moins<br />
500 mm.) on coupe<br />
l'xcédent.<br />
5) Fixer un extrémité de<br />
la chaîne de fermeture<br />
à la chaîne de service<br />
à l'aide de la borne<br />
appropriée.<br />
6) Toujours avec le<br />
groupe en position<br />
ouverte, fixer l’autre<br />
extrémité de la chaîne<br />
(en utilisant le<br />
dispositif de déblocage<br />
chaîne) à l’élément<br />
chaîne fixe sur <strong>CAT</strong> 1.<br />
7) Effettuer les<br />
branchements<br />
électriques sur la<br />
plaque à bornes de<br />
l'armoire de<br />
commandes.<br />
N.B.: tous les essais de<br />
fonctionnement<br />
doivent être effectués<br />
lorsque l'installation<br />
est achevée et la<br />
chaîne montée.<br />
- 7 -<br />
<strong>CAT</strong> X<br />
1) Die PfeilerLappe<br />
durch Losen der<br />
Befestigungsschrauben<br />
enifernen.<br />
2) Die Seitenteile<br />
abneLmen:<br />
3) Die Pfeilerelemente<br />
aufstellen und<br />
befestigen.<br />
4) Die genaue Lange der<br />
Kette berechnen und auf<br />
MaB abschneiden; die<br />
korreLte Kettenlange<br />
entspricht der licUten<br />
Weite zwischen den<br />
Pfeilern minus 500 mm.<br />
5) Ein<br />
Absperrkettenende<br />
mittels Kettenverbindungsglied<br />
mit der<br />
BedienungsVette<br />
verbinden.<br />
6) Die Anlage in<br />
Ö ffnungsstellung<br />
bringen und das andere<br />
Kettenende (mit Hilfe der<br />
Kettenentriegelung) am<br />
festen Kettenelement auf<br />
<strong>CAT</strong> I befestigen.<br />
7) Die electrischen<br />
Anschlusse an der<br />
Klemmenleiste der<br />
Stouereinbeit gemaß<br />
AnschluBplan.<br />
Anmerkung: Samtliche<br />
Betriebsproben und<br />
Kontrollen werden nach<br />
abgeschlossener Installation<br />
und Kettenmontage<br />
vorgenommen.<br />
<strong>CAT</strong> X<br />
1 ) Aflojor los tornillos<br />
de su jeción y quitar el<br />
casquete.<br />
2) Retirar los laterales.<br />
3) Colocar y fi jor el<br />
grupo.<br />
4) Tras heber calculado<br />
la medida exacta (la<br />
medida exacta de la<br />
cadena a utilizar es<br />
dada por la medida de<br />
la luz neta menos 500<br />
mm.), se corta que<br />
sobra.<br />
5) Fijor un extremo de<br />
la cadena de la barrera<br />
en la cadena de<br />
servicio por medio del<br />
gancho especifico.<br />
6) Manteniendo el<br />
grupo en posición<br />
abierta, fijar el otro<br />
extremo de la cadena<br />
(mediante el<br />
desbloqueo cadena) al<br />
elemento cadena fijo<br />
en <strong>CAT</strong> 1.<br />
7) realizar las<br />
conexiones elétricas<br />
en las terminales del<br />
cuadro de mandos.<br />
N.B.: todas las pruebas<br />
de funcionamento y<br />
ensayo se deben<br />
efectuar una vez<br />
acabada la instalación<br />
y montada la cadena.
Regolare la posizione<br />
della catena in posizione<br />
di chiusura agendo<br />
sul limitatore di coppia<br />
motrice situato nel<br />
quadro comando.<br />
Per variare la coppia<br />
motrice, spostare il<br />
faston indicato in una<br />
delle 4 posizioni:<br />
1 min. - 4 max.<br />
Un aumento della coppia<br />
motrice corrisponde<br />
ad una maggiore<br />
tensione della catena.<br />
1 2 3 4<br />
1) Scostare il<br />
coperchietto in plastica<br />
e, inserita la chiave nella<br />
serratura (A),<br />
ruotarla in senso orario.<br />
2) Inserire la chiave di<br />
sblocco (C) nell'apposita<br />
sede (B) e ruotarla in<br />
senso orario fino allo<br />
sblocco della catena.<br />
3) Tirare la catena per<br />
facilitare lo sblocco.<br />
Per bloccare il<br />
motoriduttore, ruotare<br />
completamente la chiave<br />
di sblocco in senso<br />
antiorario.<br />
Regolazione catena - Chain position setting - Réglage de la position de la chaîne -<br />
Regulierung der Kettenstellung Regulación posición cadena<br />
Use the torque limiter on<br />
the control panel to<br />
adjust the position of the<br />
chain when closed.<br />
To vary the motor torque,<br />
move the indicated<br />
faston to one of the four<br />
positions: 1=min, 4=max.<br />
As the torque is<br />
increased, the tautness<br />
of the chain increases.<br />
Régler la chaîne en<br />
position de fermeture<br />
en agissant sur le<br />
limiteur de couple<br />
moteur situé dans<br />
l'armoire commande.<br />
Pour varier le couple<br />
du moteur, déplacer le<br />
connecteur indiqué<br />
sur l'une des 4 positions:<br />
1 min. - 4 max.<br />
Une augmentaction du<br />
couple moteur<br />
correspond à une<br />
tension plus forte de la<br />
chaîne.<br />
- 8 -<br />
Die Schließstellung der<br />
Kette über den auf der<br />
Steuerschalttafel<br />
b e f i n d l i c h e n<br />
Antriebsdrehmomentbegrenzer<br />
regeln.<br />
Zur Änderung des<br />
Motor-Drehmoments<br />
den angegebenen<br />
Faston auf eine der 4<br />
Stellungen positionieren:<br />
1 min. - 4 max.<br />
Eine hoherer<br />
Drehmomentwert<br />
entspricht einer<br />
starkeren kettenspannung.<br />
Chiuso - Closed - Fermée - Geschslossen - Cerrado<br />
Regular la posición la<br />
cadena en posición de<br />
cierre actuando en el<br />
limitador de par motor<br />
colocado en el cuadro<br />
de mando.<br />
Para variar el par motor,<br />
desplazar el faston<br />
indicado hasta una de<br />
las 4 posiciones:<br />
1 mín. - 4 máx.<br />
El aumento del par<br />
motor corresponde a<br />
una mayor tensión de la<br />
cadena.<br />
Sblocco motoriduttore - Gear motor release - Opération de déblocage - Antriebsentriegelung - Desbloqueo motorreductor<br />
C<br />
B<br />
Sede di sblocco<br />
Release seat<br />
Siège de déblocage<br />
Sitz der Entriegelungsvorrichtung<br />
Alojamiento de desbloqueo<br />
1) Push the plastic cover<br />
aside, insert the key in<br />
the lock (A) and rotate<br />
clockwise.<br />
2) Insert the release key<br />
(C) into its set (B) and<br />
rotate clockwise until the<br />
chain is released.<br />
3) Pull on the chain to<br />
facilitate its release.<br />
To lock the gear motor,<br />
rotate the release key<br />
anti-clockwise until it<br />
stops.<br />
1) Déplacer le<br />
couvercle en plastique<br />
puis, après avoir<br />
introduit la clé dans la<br />
serrure (A), la tourner<br />
dans le sens des<br />
aiguilles d'une montre.<br />
2) Introduire la clé de<br />
déblocage (C) dans le<br />
siège (B) prévu à cet<br />
effet et la tourner dans<br />
le sens des aiguilles<br />
d'une montre jusqu'à<br />
obtenir le déblocage de<br />
la chaîne.<br />
3) Tirer la chaîne pour<br />
faciliter son déblocage.<br />
Pour bloquer le<br />
motoréducteur, tourner<br />
complètement la clé de<br />
déblocage dans le sens<br />
inverse des aiguilles<br />
d'une montre.<br />
1) Kunstoffabdeckung<br />
entfernen, Schlüssel in<br />
das Schloß (A) einfügen<br />
und im Uhrzeigersinn<br />
drehen, bis die Kette<br />
entriegelt ist.<br />
2) Den<br />
Entriegelungsschlüssel<br />
(C) in seinen Sitz (B)<br />
einfügen und so lange im<br />
Uhrzeigersinn drehen,<br />
bis die Kette entriegelt<br />
ist.<br />
3) Zur leichteren<br />
Entriegelung an der<br />
Kette ziehen.<br />
Zur Blockierung des<br />
Getriebemotors den<br />
Entriegelungsschlüssel<br />
bis zum Anschlag gegen<br />
den Uhrzeigersinn<br />
drehen.<br />
Serratura<br />
Lock<br />
Serrure<br />
Schloß<br />
Cerradura A<br />
1) Desplazar la tapa de<br />
plástico y, una vez<br />
introducida la llave en<br />
la cerradura (A), girarla<br />
en sentido horario.<br />
2) Introducir la llave de<br />
desbloqueo (C) en el<br />
alojamiento correspondiente<br />
(B) y girarla<br />
en sentido horario<br />
hasta que se<br />
desbloquee la cadena.<br />
3) Tirar de la cadena<br />
para facilitar el<br />
desbloqueo.<br />
Para bloquear el<br />
motorreductor girar<br />
completamente la llave<br />
de desbloqueo en<br />
sentido antihorario.
ITALIANO<br />
ITALIANO<br />
Il circuito va alimentato con la tensione<br />
indicata (230V) sui morsetti<br />
L1-L2 ed è protetto in ingresso con<br />
fusibili da 5A.<br />
I comandi sono a bassa tensione<br />
(24V) protetti con fusibile da 1,6A con<br />
possibilità di utilizzo della stessa per<br />
l'alimentazione dei vari accessori<br />
(radiocomandi, fotocellule, ecc.).<br />
Sicurezza<br />
Le fotocellule possono essere collegate<br />
e predisposte per la riapertura in<br />
fase di chiusura;<br />
- Finecorsa di apertura (ottenuto con<br />
microinterruttore installato sul gruppo<br />
<strong>CAT</strong> X);<br />
- Finecorsa di chiusura elettronico<br />
fisso 15";<br />
- Finecorsa di sicurezza in chiusura<br />
(ottenuto con microinterruttore installato<br />
sul gruppo <strong>CAT</strong> X).<br />
ENGLISH<br />
ENGLISH<br />
The circuit is powered by the voltage<br />
indicaded (230V) on terminals L1-L2.<br />
The power input is protected by a 5A<br />
fuse.<br />
The low-tension controls (24V) are<br />
protected by a 1.6A fuse. The same<br />
LT power supply can be used to<br />
power the various accessories (radio<br />
controls, photocells, etc.).<br />
Safety<br />
Photocells can be connected to<br />
obtain on re-opening during the<br />
closing cycle;<br />
- Opening limit switch (microswitch<br />
fitted to <strong>CAT</strong> X unit);<br />
- Electronic closure limit switch, fixed<br />
time 15 seconds;<br />
- Safety closure limit switch<br />
(microswitch fitted to <strong>CAT</strong> X unit);<br />
FRANÇAIS<br />
FRANÇAIS<br />
Le circuit doit être alimenté avec la<br />
tension indiquée (230V), sur les<br />
bornes L1 - L2 et est protégé en<br />
entrée par des fusibles de 5A.<br />
Les commandes fonctionnent à basse<br />
tension (24V); elles sont<br />
protégées par des fusibles de 1.6A.<br />
Cette tension peut être utilisée pour<br />
l'alimentation des différents<br />
accessoires (radiocommandes,<br />
photocellules etc.).<br />
Sécurité<br />
Il est possible de brancher des<br />
photocellules et de les programmer<br />
pour réouverture en phase de<br />
fermeture;<br />
- Fin de course d'ouverture (obtenu<br />
avec microinterrupteur installé sur le<br />
groupe <strong>CAT</strong> X);<br />
- Fin de course de fermeture électronique<br />
fixé à 15";<br />
DESCRIZIONE TECNICA SCHEDA BASE ZC2-C<br />
Accessori collegabili<br />
In caso di applicazione del lampeggiatore,<br />
possibilità di prelampeggio nella<br />
fase di chiusura;<br />
- Lampada spia 24V in posizione aperto;<br />
- Selettore a chiave;<br />
- Lampeggiatore di movimento;<br />
- Ricevitore radio ad innesto.<br />
Altre funzioni selezionabili<br />
- Chiusura automatica. Il temporizzatore<br />
di chiusura automatica si<br />
autoalimenta a finecorsa di apertura. Il<br />
tempo regolabile, é comunque subordinato<br />
dall'intervento di eventuali<br />
accessori di sicurezza e si esclude<br />
dopo un intervento di «stop» totale o in<br />
mancanza di energia elettrica;<br />
(selezionabile tramite interruttore)<br />
TECHNICAL DESCRIPTION ZC2-C MOTHERBOARD<br />
Accessories which can be<br />
connected to this unit<br />
If a flashing light is fitted, a pre-flashing<br />
phase during closure can be selected;<br />
- 24V open position warning light;<br />
- Key selector;<br />
- Flashing signal light when chain is in<br />
motion;<br />
- Plug-in radio receiver.<br />
Other functions available<br />
- Automatic closing: The automatic<br />
closing timer is automatically activated<br />
at the end of the opening cycle. The<br />
preset, adjustable automatic closing<br />
time is automatically interrupted by the<br />
activation of any safety system, and is<br />
deactivated after a total stop command<br />
or in case of power failure; (inserting<br />
DESCRIPTION TECHNIQUE CARTE BASE ZC2-C<br />
- Fin de course de sécurité en<br />
fermeture (obtenu avec<br />
microinterrupteur installé sur le groupe<br />
<strong>CAT</strong> X).<br />
Accessoires branchés<br />
En cas d'application d'un clignotant, il<br />
est possible d'avoir un préclignotement<br />
dans la phase de fermeture;<br />
- Lampe témoin 24V en position<br />
ouverte;<br />
- Selecteur à clef;<br />
- Clignotant de mouvement;<br />
-Récepteur radio à insertion.<br />
Autres fonctions pouvant être<br />
sélectionnées<br />
- Fermeture automatique. Le temporisateur<br />
de fermeture automatique est<br />
autoalimenté à la fin du temps de la<br />
course en ouverture. Le temps<br />
réglable est programmé, cependant,<br />
- 9 -<br />
- Funzionamento a «uomo presente»<br />
(sulla scheda tagliare i punti contrassegnati);<br />
- Tipo di comando:<br />
- apre-chiude-inversione;<br />
- solo apertura.<br />
Regolazioni<br />
- Trimmer TCA = Tempo chiusura automatica:<br />
da 5 a 40";<br />
- Trimmer T.P. = Tempo prelampeggio<br />
in fase di chiusura: da 0" a 5".<br />
Attenzione: prima di intevenire all’interno<br />
dell’apparecchiatura, togliere la<br />
tensione.<br />
switch);<br />
- “Man present” operation (cut the<br />
board at the points indicated);<br />
- Selection of command sequence:<br />
-open-close-reverse;<br />
-open only.<br />
Adjustments<br />
- Trimmer TCA = Automatic closing<br />
time: 5" to 40";<br />
- Trimmer T.P.= Pre-flashing time in<br />
the closing phase: 0" to 5".<br />
Important: disconnect the unit from<br />
the main power lines before carrying<br />
out any operation inside the unit.<br />
il est subordonné à l’intervention<br />
d’éventuels accessoires de sécurité<br />
et il est exclu après une intervention<br />
de “stop” total ou en cas de coupure<br />
de courant; (sèlectionnée grace<br />
interrupteur);<br />
- Fonctionnement “homme mort”<br />
(couper suivant les pointillés sur la<br />
fiche).<br />
- Types de commande :<br />
-ouverte - fermée - inversion;<br />
-seulement ouverture.<br />
Réglages<br />
- Trimmer T.C.A. = Temps de<br />
fermeture automatique : de 5" à 40";<br />
- Trimmer T.P. = Temps de<br />
préclignotement dans la phase de<br />
fermeture: de 0" à 5".<br />
Attention: couper la tension avant<br />
d'intervenir à l'interieur de<br />
l'appareillage.
DEUTSCH<br />
DEUTSCH<br />
Die Stromversorgungsspannung<br />
muß der auf dem Typenschild<br />
angegebenen Nominalspannung<br />
entsprechen, der Anschluß erfolgt an<br />
den Klemmen L1 - L2. Der Eingang<br />
ist durch 5A Sicherungen geschützt.<br />
Die Steuerapparate werden mit<br />
Niederspannung (24V) versorgt und<br />
sind durch 1,6A Sicherungen<br />
geschützt; eventuelles Zubehör, wie<br />
Funksteuerung und Photozellen,<br />
kann ebenfalls mit Niederspannung<br />
versorgt werder.<br />
Sicherheitsvorrichtungen<br />
Die Lichtschranken können für<br />
folgende Funktionen angeschlossen<br />
bzw. vorbereitet werden Wiederöffnen<br />
beim Schließen;<br />
- Öffnungs-Endanschlag (wird durch<br />
im Element <strong>CAT</strong> X montiertem<br />
ESPAÑOL<br />
ESPAÑOL<br />
El circuito se debe alimentar con la<br />
tensión indicada (230V) en los<br />
bornes L1-L2 y está protegido en la<br />
entrada por fusibles de 5A.<br />
Los mandos son de baja tensión<br />
(24V) protegidos por fusibles de 1,6A<br />
con posibilidad de utilizar la misma<br />
para la alimentación de los varios<br />
accesorios (radiomandos,<br />
fotocélulas, etc.).<br />
Seguridad<br />
Las fotocélulas pueden estar<br />
conectadas y predispuestas para<br />
reapertura en la fase de cierre;<br />
- Final de carrera para la apertura<br />
(obtenido mediante microinterruptor<br />
instalado en el grupo <strong>CAT</strong> X);<br />
- Final de carrera electrónico para el<br />
cierre, fijado en 15".<br />
- Final de carrera de seguridad en la<br />
TECHNISCHE BESCHREIBUNG GRUNDPLATINE ZC2-C<br />
Mikroschalter bewirkt);<br />
- Elektronischer Schließ-Endanschlag,<br />
auf 15 sec. festeingestellt;<br />
- Sicherheits-Schließ-Endanschlag<br />
(wird durch im Element <strong>CAT</strong> X<br />
montiertem Mikroschalter bewirkt);<br />
Anschließbares Zubehör<br />
Sollte eine Blinkleuchte montiert<br />
werden, kann beim Schließen<br />
vorgeblinkt werder;<br />
- Kontrolleuchte auf 24V;<br />
- Schlüsseltaster;<br />
- Blinkleuchte "Tor in Bewegung";<br />
- Steck-Funkempfänger.<br />
Andere Wahlfunktionen<br />
- Schließautomatik. Der Schließautomatik-Zeischalter<br />
speist sich beim<br />
Öffnen am Ende der Torlaufzeit selbst<br />
. Die voreingestellte Zeit ist auf jeden<br />
Fall immer dem Eingriff eventueller<br />
DESCRIPCIÓN TÉCNICA TARJETA BASE ZC2-C<br />
fase de cierre (obtenido mediante<br />
microinterruptor instalado en el grupo<br />
<strong>CAT</strong> X);<br />
Accesorios conectables<br />
En caso de aplicación de la lámpara<br />
intermitente, posibilidad de preintermitencia<br />
en la fase de cierre;<br />
Lampara indicadora 24V cadena<br />
abierta;<br />
- Selector de llave;<br />
-Lámpara intermitente de movimiento;<br />
- Radioreceptor a encastre.<br />
Otras funciones seleccionables<br />
- Cierre automático. El temporizador de<br />
cierre automático se autoalimenta en<br />
fin-de-tiempo carrera en fase de apertura.<br />
El tiempo prefijado regulable, sin<br />
embargo, está subordinado a la<br />
intervención de posibles accesorios de<br />
- 10 -<br />
Sicherheits vorrichtungen<br />
untergeordnet und schließt sich nach<br />
einem “Totalstop"-Eingriff bzw. bei<br />
Stromausfall selbst aus;<br />
(Wahlfunktion kann durch Brücke T1-<br />
T2)<br />
- Funktion “Bedienung vom Steuerpult”<br />
(die Steuerkarte an den gekennzeichneten<br />
Stellen einschneiden);<br />
- Steuerart:<br />
-Öffnen-Schließen-<br />
Torlaufumsteuerung;<br />
-nur Öffnen.<br />
Einstellungen<br />
- Trimmer TCA = Zeiteinstellung<br />
Schließautomatik: von 5" bis 40";<br />
- Trimmer T.P. = Zeiteinstellung<br />
Vorblinken: 0" bis 5".<br />
Achtung: Vor Eingriff im Innern des<br />
Gerätes den Netzstecker ziehen.<br />
seguridad y se excluye después de<br />
una intervención de parada total o en<br />
caso de falta de energía eléctrica;<br />
(seleccionable mediante interruptor)<br />
- Funcionamiento a “hombre presente”<br />
(en la tarjeta, cortar los puntos<br />
marcados);<br />
- Tipo de mando:<br />
-apertura-cierre-inversión;<br />
-sólo apertura.<br />
Regulaciones<br />
- Trimmer TCA = Tiempo cierre automático:<br />
de 5" a 40”;<br />
- Trimmer T.P. = Tiempo preintermitencia<br />
en la fase de cierre: 0"<br />
a 5".<br />
Cuidado: antes de intervenir en el<br />
interior del aparato, hay que cortar<br />
la tensión.<br />
MISURE D'INGOMBRO / OVERALL DIMENSIONS / MESURES D'ENCOMBREMENT/ ABMESSUNGEN / MEDIDAS<br />
195 mm<br />
287 mm<br />
102 mm
4<br />
3<br />
QUADRO COMANDO / CONTROL PANEL / ARMOIRE DE COMMANDE / SCHALTTAFEL / CUADRO DE MANDO<br />
1 2 3 4<br />
T.P.<br />
2<br />
MAIN COMPONENTS<br />
1 Motor torque selector (see NOTE)<br />
2 T.P.: trimmer: pre-flashing time in the closing phase<br />
adjustment<br />
3 1.6A fuse on low voltage line<br />
4 5A fuse on 230V a.c. input power line<br />
5 T.C.A.: trimmer: automatic closing time adjustment<br />
6 Connect receiver<br />
7 Terminal block for external connections<br />
HAUPTKOMPONENTEN<br />
1 Motordrehmoment-Wahlschalter (siehe HINWEIS)<br />
2 Trimmer T.P.: Einstellung Schliessungszeit Vorblinken<br />
3 Niederspannungs-Sicherung 1.6A<br />
4 Netz-Sicherung 5A<br />
5 Trimmer T.C.A.: Einstellung automatische Schließzeit<br />
6 Kupplung-Empfänger<br />
7 Anschluss-Klemmenleiste<br />
T.C.A.<br />
L1 L2 U V W E �A �C 0 1 2 3 4 5 T1 T2 7 C S B1 B2<br />
7<br />
5<br />
1<br />
6<br />
GB<br />
D<br />
N.B.: Per variare la coppia motore, spostare il faston indicato su una delle 4 posizioni; 1 min - 4 max.<br />
N.B.:To vary the motor torque, move the indicated faston to one of the four positions: 1=min, 4=max.<br />
N.B.: Pour varier le couple du moteur, déplacer le connecteur indiqué sur l'une des 4 positions; 1 min. - 4 max.<br />
Hinweis: Zur Änderung des Motor-Drehmoments den angegebenen Faston auf eine der 4 Stellungen positionieren : 1 min. - 4 max.<br />
Nota: Para variar el par motor, desplazar el faston indicado hasta una de la 4 posiciones; 1 mín. - 4 máx.<br />
- 11 -<br />
Tagliare per la funzione "uomo presente"<br />
Cut here to obtain the "man present" function<br />
Enlever pour la fonction "personne présente"<br />
Für Funktion "Bedienung vom Steuerpult"<br />
abtrennen<br />
Cortar para la función "hombre presente"<br />
COMPONENTI PRINCIPALI<br />
1 Commutatore di coppia motore (vedi NOTA)<br />
2 Trimmer T.P.: regolazione tempo di prelampeggio in<br />
fase di chiusura<br />
3 Fusibile a bassa tensione 1.6A<br />
4 Fusibile di linea 5A<br />
5 Trimmer T.C.A.: regolazione tempo di chiusura automatica<br />
6 Innesto ricevitore radio<br />
7 Morsettiera per i collegamenti elettrici<br />
PRINCIPAUX COMPOSANTS<br />
1 Commutateur de couple moteur (voir NOTE)<br />
2 Trimmer T.P.: réglage temps pré-clignotement dans la<br />
phase de fermeture<br />
3 Fusible basse tension 1.6A<br />
4 Fusible de ligne 5A<br />
5 Trimmer T.C.A.: réglage temps de fermeture<br />
automatique<br />
6 Récepteur innestion<br />
7 Plaque à bornes de branchements électriques<br />
COMPONENTES PRINCIPALES<br />
1 Conmutator del par motor (mirar NOTA)<br />
2 Trimmer T.P.: regulación preintermitencia en la fase<br />
de cierre<br />
3 Fusible de baja tensión 1.6A<br />
4 Fusible de linea 5A<br />
5 Trimmer T.C.A.: regulación tiempo para el cierre<br />
automático<br />
6 Receptor a enjerto<br />
7 Caja de bornes para las conexiónes elétricas<br />
I<br />
F<br />
E
ZC2-C<br />
COLLEGAMENTI ELETTRICI - ELECTRICAL CONNECTIONS - BRANCHEMENTS ÉLECTRIQUES - ELEKRISCHE ANSCHLÜSSE - CONEXIONES ELÉCTRICAS<br />
L1<br />
L2<br />
U<br />
W<br />
V<br />
W<br />
E<br />
0<br />
FA<br />
0<br />
FC<br />
0<br />
1<br />
2<br />
7<br />
2<br />
3<br />
4<br />
L1 L2 U V W E �A �C 0 1 2 3 4 5 T1 T2 7 C S B1B2<br />
M<br />
Alimentazione 230V (a.c.)<br />
230V (a.c.) power supply<br />
Alimentation 230V (a.c.)<br />
Stromversorgung 230V (Wechselstrom)<br />
Alimentación 230V (a.c.)<br />
Motore monofase 220-230V(a.c.)<br />
220-230V (a.c.) motor sigle-phase<br />
Moteur monophase 220-230V (c.a.)<br />
Motor 220-230V (Welchselstrom)<br />
Motor monofasico 220-230V (a.c.)<br />
Uscita 230V (a.c.) in movimento (es.lampeggiatore )<br />
230V (a.c) output in motion (e.g. flashing light)<br />
Sortie 230V (c.c.) en mouvement (ex. branchement clignotant)<br />
Ausgang 230V (Wechselstrom) in Bewegung (z.B. Blinker-Anschluß)<br />
Salida de (a.c.) 230V en movimento (ej. lámpara intermitente)<br />
Collegamento finecorsa in apertura<br />
Connection limit switch opens<br />
Connexion fin de course en ouverture<br />
Anschluß Endschallter Öffnung<br />
Conexión fin de carrera en apertura<br />
Collegamento finecorsa di sicurezza in chiusura<br />
Connection limit switch on closed position<br />
Connexion fin de course de sécuritè en fermeture<br />
Anschluß Schließungs-Sicherheitsendschalter<br />
Conexión fin de carrera de seguridad en fase de cierre<br />
Alimentazione accessori 24V (max 20W)<br />
24V Power supply accessories (max. 20W)<br />
Alimentation accessories 24V (max 20W)<br />
Stromversorgung Zubehör 24V (max 20W)<br />
Alimentación accesorios 24V (max 20W)<br />
Collegamento radio e/o pulsante (N.O.) per comando "apre-chiude-inversione"<br />
Connector (N.O.) radio and/or pushbutton controlled "open-close-inversion"<br />
Connection radio et/ou bouton-poussoir (N.O.) pour commande "ouvreferme-inversion"<br />
Anschluß Funkkontakt und/oder Taste (N.O.) Steuerart "Öffnen-Schließen-<br />
Umschalte"<br />
Conexión radio y/o pulsador (N.O.) para mando "abierta-cierra-inversión"<br />
Selettore a chiave<br />
Key selector<br />
Selecteur à clef<br />
Schlüsseltaster<br />
Selector de llave<br />
- 12 -<br />
N.B. Rispettare la polarità<br />
nel collegamento delle<br />
fotocellule (TX e RX).<br />
N.B. When connecting the<br />
photocells (TX and RX),<br />
observe the correct<br />
polarities.<br />
N.B. Respecter la polarité<br />
lors de la connexion des<br />
photocellules (TX et RX).<br />
Anmerkung: beim<br />
Anschließen der<br />
Photozellen (TX und RX)<br />
auf die Polung achten.<br />
N.B. Respetar la polaridad<br />
en la conexión de las<br />
fotocélulas (TX y RX).<br />
TX<br />
RX<br />
10 11<br />
NO C NC
ZC2-C<br />
COLLEGAMENTI ELETTRICI - ELECTRICAL CONNECTIONS - BRANCHEMENTS ÉLECTRIQUES - ELEKRISCHE ANSCHLÜSSE - CONEXIONES ELÉCTRICAS<br />
1<br />
2<br />
2<br />
3<br />
2<br />
4<br />
2<br />
5<br />
2<br />
C<br />
T1<br />
T2<br />
B1<br />
B2<br />
L1 L2 U V W E �A �C 0 1 2 3 4 5 T1 T2 7 C S B1B2<br />
Pulsante stop (N.C.)<br />
Pushbutton stop (N.C.)<br />
Bouton-poussoir arrêt (N.C.)<br />
Stop-Taste (N.C.)<br />
Pulsador de stop (N.C.)<br />
Pulsante apre (N.O.)<br />
Open pushbutton (N.O.)<br />
Bouton-poussoir d'ouverture (N.O.)<br />
Taster auf Öffner (Arbeitskontakt)<br />
Pulsador de apertura (N.O.)<br />
Pulsante chiude (N.O.)<br />
Close pushbutton (N.O.)<br />
Bouton-poussoir fermeture (N.O.)<br />
Taster zu Schließer (Arbeitskontakt)<br />
Pulsador de apertura (N.O.)<br />
Lampada spia 24V-3W max. "aperto"<br />
24V -3W max. "opened" signal lamp<br />
Lampe-témoin 24V-3W max. "ouverte"<br />
Kontrollampe 24V-3W max. "Öffnen"<br />
Lámpara de señal 24V-3W max. "abierta"<br />
Contatto (N.C.) di «riapertura durante la chiusura»<br />
Contact (N.C.) for «re-aperture during closure»<br />
Contact (N.C.) de «réouverture pendant la fermeture»<br />
Kontakt (Ruhekontakt) «Wiederöffnen beim Schliessen»<br />
Contacto (N.C.) para «la apertura en la fase de cierre»<br />
Interruttore inserimento chiusura automatica<br />
Automatic shutting inserting switch<br />
Interrupteur pour l'insertion de la fermeture automatique<br />
Brücke für automatischem Zulauf<br />
Interruptor para conectar la cerradura automatica<br />
Uscita contatto (N.O.) con ricevitore bicanale ad innesto.<br />
Portata contatto: 1A a 24V(d.c.)<br />
Contact output (N.O.) with plug-in two-channel receiver.<br />
Resistive load: 1A 24V (d.c.)<br />
Sortie contact (N.O.) avec rècepteur bicanal à branchement.<br />
Portée contact: 1A a 24V(d.c.)<br />
Ausgang Arbeitskontakt mit Doppelkanal-Steck-Funkempfänger.<br />
Stromfestigkeit: 1A bei 24V (Gleichstrom)<br />
Salida contacto (N.O.) con receptor bicanal con inserción directa.<br />
Carga resistiva: 1A a 24V(d.c.)<br />
Collegamento antenna<br />
Antenna connection<br />
Connexion antenne<br />
Antennenanschluß<br />
Conexión antena<br />
- 13 -<br />
Per installare più pulsantiere collegare i pulsanti stop in serie, i pulsanti<br />
apre-chiude-lampada spia in parallelo.<br />
To install supplementary pushbutton arrays connect stop buttons in series,<br />
connet open-close buttons and warning lights in parallel.<br />
Pour install plusieurs panneaux de boutons-poussoirs, il faut connecter<br />
les boutons-poussoirs stop en série, les bouton-poussoirs ouverturefermeture-lampe-témoin<br />
en paralléle.<br />
Zum Installieren mehrerer Schalterreihen, folgendermaßen verbinder die<br />
Stop-Tasten hintereinander, die Tasten Öffnen-Schließen-Signallampe<br />
parallel.<br />
Para instalar más botoneras conectar los pulsadores de stop en serie,<br />
los pulsadores de apertura-cierre-lámpara indicadora en paralelo.
COLLEGAMENTO PER 2 MOTORI ABBINATI CON COMANDO UNICO / CONNECTIONS FOR 2 COMBINED MOTORS CONTROLLED TOGETHER<br />
CONNEXIONS POUR 2 MOTEURS ACCOUPLÉS AVEC COMMANDE INIQUE / ANSCHLUSS FÜR 2 PARALLELGESCHALTETE MOTOREN MIT<br />
GEMEINSAMER STEUERUNG / CONEXION PARA 2 MOTORES ACOPLADOS CON MANDO UNICO<br />
- Eseguire solo sulla morsettiera pilota i collegamenti elettrici predisposti normalmente;<br />
- Collegare il 2° motore come indicato nello schema. (1-2) pulsante stop totale e (2-C) contatto di<br />
apertura in fase di chiusura.<br />
- Wire the electrical connections only on the terminal board for the pilot motor in the normal;<br />
- Connect motor 2° as shown in the diagram above. (1-2) Total stop pushbutton and (2-C) contact for<br />
reopening during the closing cycle.<br />
- Effectuer seulement sur la plaque à borne pilote les branchements électriques habituellement<br />
prévus;<br />
- Brancher le 2 eme moteur de la façon indiquée dans le schéma. (1-2) Bouton-poussoir d'arrêt total<br />
et (2-C) contact de réouverture en phase de fermeture.<br />
- Nur auf der Mastermotor-Klemmleiste die normalerweise vorgesehenen elektrischen Anschlüsse<br />
ausführen;<br />
- Den 2° Motor wie auf dem hier aufgeführen Schema anschließen. (1-2) Die Drucktaste Totalstop und<br />
(2-C) den Kontakt der Wiederöffnung während der Schließung.<br />
- Efectuar sólo en la caja de bornes piloto las conexiones eléctricas predispuestas normalmente;<br />
- Conectar el 2° motor como muestra el esquema de esta página. (1-2) pulsador de stop total y (2-<br />
C) contacto de apertura durante la fase de cierre.<br />
Morsettiera motore master (o pilota)<br />
Master (or pilot) motor terminal block<br />
Plaque à bornes du moteur master (ou pilote)<br />
Klemmbrett Mastermotor (bzw. Steuermotor)<br />
Cuadro de bornes motor master (o piloto)<br />
- 14 -<br />
Morsettiera 2° motore<br />
Motor 2° terminal block<br />
Plaque à bornes du 2° moteur<br />
Klemmbrett 2° Motor<br />
Cuadro de bornes 2° motor<br />
L1 L2 U V W E �A �C 0 1 2 3 4 5 T1 T2 7 C S B1B2 L1 L2 U V W E �A �C 0 1 2 3 4 5 T1 T2 7 C S B1B2<br />
1-2 2-C<br />
*<br />
*<br />
*<br />
* DIODO IN4007 - DIODE IN 4007
Regolazione finecorsa - Adjusting the limit switches - Reglage des fins de course - Einstellung der Endanschläge<br />
Regulacion de los finales de carrera<br />
In apertura:<br />
gia' regolato.<br />
In chiusura:<br />
regolare la tensione<br />
della catena in chiusura,<br />
quindi ruotare la<br />
camma rossa fino all'inserimento<br />
del<br />
microinterruttore e<br />
bloccarla.<br />
Opening:<br />
pre-adjusted.<br />
Camma rossa (chiude)<br />
Red camme (closure)<br />
<strong>Came</strong> rouge (fermeture)<br />
Rote Noche (Schließen)<br />
Leva roja (cierre)<br />
Closing:<br />
adjust the tension on the<br />
chain when gate is<br />
closed, then rotate the<br />
red cam until the<br />
microswitch trips. Now,<br />
lock the cam into place.<br />
Pour la phase<br />
d'ouverture:<br />
prèrèglèe.<br />
Pour la phase de<br />
fermeture:<br />
reglèr la tension de la<br />
chaîne en fermeture,<br />
puis tourner la came<br />
rouge jusq'à<br />
l'enclenchement du<br />
microcontact et la<br />
bloquer.<br />
- 15 -<br />
Öffnungstellug:<br />
voreingestellt.<br />
Stop beim Schließen:<br />
Kettenspannung<br />
regulieren und dann den<br />
roten Nocken bis zum<br />
Einschalten des<br />
Mikroschalters drehen<br />
und blockieren.<br />
En la fase de apertura:<br />
pre-regulado.<br />
Microinterruttori<br />
Microswitches<br />
Micro-interrupteurs<br />
Mikroschalter<br />
Microinterruptores<br />
En la fase de cierre:<br />
regular la tensión de la<br />
cadena en fase de<br />
cierre, posteriormente<br />
girar la leva rija hasta la<br />
activación del<br />
microinterrurptor y<br />
bloquearla.<br />
Camma bianca (apre)<br />
Withe camme (aperture)<br />
<strong>Came</strong> blanche (ouverture)<br />
Weiße Noche (Öffnen)<br />
Leva blanca (apertura)
Tutti i dati sono stati controllati con la<br />
massima cura. Non ci assumiamo comunque<br />
alcuna responsabilità per<br />
eventuali errori od omissioni.<br />
CANCELLI AUTOMATICI<br />
ASSISTENZA TECNICA<br />
NUMERO VERDE<br />
800 295830<br />
WEB<br />
www.came.it<br />
E-MAIL<br />
info@came.it<br />
CAME CANCELLI AUTOMATICI S.P.A.<br />
DOSSON DI CASIER (TREVISO)<br />
(+39) 0422 4940 (+39) 0422 4941<br />
All data checked with the maximum care.<br />
However, no liability is accepted for any error<br />
or omission.<br />
SISTEMA QUALITÀ<br />
CERTIFI<strong>CAT</strong>O<br />
NOTE / NOTES / NOTE/ HINWEIS / NOTA<br />
Toutes les données ont été contrôlées<br />
très soigneusement. Nous n’assumons<br />
de toute façon aucune responsabilité pour<br />
les erreurs ou omissions éventuelles.<br />
CAME LOMBARDIA S.R.L.______COLOGNO M. (MI)<br />
(+39) 02 26708293 (+39) 02 25490288<br />
CAME SUD S.R.L. ___________________NAPOLI<br />
(+39) 081 7524455 (+39) 081 7529109<br />
CAME (AMERICA) L.L.C.____________MIAMI (FL)<br />
(+1) 305 5930227 (+1) 305 5939823<br />
CAME AUTOMATISMOS S.A__________MADRID<br />
(+34) 091 5285009 (+34) 091 4685442<br />
CAME BELGIUM__________________LESSINES<br />
(+32) 068 333014 (+32) 068 338019<br />
Die Daten wurden mit höchster Sorgfalt<br />
geprüft. Für eventuelle Fehler oder<br />
Auslassungen übernehmen wir keine<br />
Haftung.<br />
Todos los datos se han controlado con<br />
la máxima atención. No obstante no nos<br />
responsabilizamos de los posibles<br />
errores u omisiones.<br />
CAME FRANCE S.A.____NANTERRE CEDEX (PARIS)<br />
(+33) 01 46130505 (+33) 01 46130500<br />
CAME GMBH________KORNTAL BEI (STUTTGART)<br />
(+49) 07 11839590 (+49) 07 118395925<br />
CAME GMBH____________SEEFELD BEI (BERLIN)<br />
(+49) 03 33988390 (+49) 03 339885508<br />
CAME PL SP.ZO.O______________WARSZAWA<br />
(+48) 022 8365076 (+48) 022 8369920<br />
CAME UNITED KINGDOM LTD___NOTTINGHAM<br />
(+44) 0115 9210430 (+44) 0115 9210431