a b c d e f c - Dohse Aquaristik KG
a b c d e f c - Dohse Aquaristik KG
a b c d e f c - Dohse Aquaristik KG

Create successful ePaper yourself
Turn your PDF publications into a flip-book with our unique Google optimized e-Paper software.
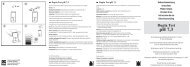
Regulador CO2 Pro Dupla<br />
El Regulador CO Pro es un producto de máxima calidad y fi abilidad. Gracias a los<br />
2<br />
controles de calidad estrictos y permanentes, y a la fabricación según la norma ISO<br />
9001, se obtiene un producto con una larga vida útil.<br />
Características especiales:<br />
posibilidad de conectar varias griferías en serie (abastecimiento de CO a varios<br />
2<br />
acuarios con una sola botella)<br />
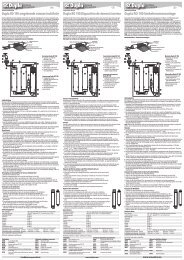
manómetro de presión de trabajo � y manómetro de presión de la botella �<br />
grandes y de fácil lectura<br />
alta precisión de regulación gracias a la gran membrana / relación de ajuste<br />
ajuste ultrafi no del número de burbujas mediante válvula de aguja fi na de acero inoxidable<br />
�<br />
válvula de seguridad de sobrepresión integrada �<br />
obturación a la válvula de la botella exenta de desgaste<br />
resistente a la corrosión gracias a la elaboración del material<br />
fi ltro de partículas fi nas en la conexión de la botella y en la<br />
válvula de aguja fi na<br />
anillo de descarga de presión en la válvula de sobrepresión<br />
para desmontar fácilmente la grifería<br />
baja presión ajustada de fábrica a 0 bar<br />
A tener en cuenta especialmente:<br />
El cambio de depósito y los trabajos en el Regulador CO Pro 2<br />
únicamente deben realizarse sin presión.<br />
Puesta en marcha:<br />
Asegúrese de que la válvula de aguja fi na de acero inoxidable<br />
� esté cerrada antes de conectar el Regulador CO Pro al<br />
2<br />
depósito de CO . 2<br />
Enchufe la conexión de la botella en la abertura de la válvula<br />
de la botella � y apriete con la mano la tuerca de unión �;<br />
en caso necesario utilice una llave inglesa de 30 mm.<br />
Una la boquilla de la conexión del tubo del Regulador CO Pro 2<br />
� y el reactor de CO con un tubo de 3 x 1 (que se envía<br />
2<br />
junto con el reactor).<br />
Abra completamente la válvula de la botella y controle la<br />
presión de la botella de CO en el manómetro de presión de la<br />
2<br />
botella �. A temperatura ambiente, ésta es de aprox. 60 bar.<br />
La primera vez que lo utilice, ajuste una presión de trabajo en el<br />
tornillo de regulación de la presión � de aproximadamente 1 a<br />
1,5 bar. En el manómetro de presión de trabajo � puede leer la<br />
presión ajustada. A continuación, con el tornillo de regulación<br />
situado en la válvula de aguja fi na de acero inoxidable �<br />
seleccione el número de burbujas aproximado que desea.<br />
Más o menos al cabo de 1 día (fase de rodaje) puede reajustar<br />
con más precisión el número de burbujas con el tornillo de<br />
regulación de la presión �. El número de burbujas tiene una<br />
relación proporcional con la presión de trabajo ajustada. Si con<br />
una presión de trabajo de 1 bar ha ajustado un número<br />
aproximado de 10 burbujas por minuto, puede duplicar<br />
sencillamente el número de burbujas aumentando la presión<br />
de trabajo a 2 bares, y puede conseguir reducir a la mitad el<br />
número de burbujas bajando la presión de trabajo a la mitad.<br />
De este modo, el ajuste del número de burbujas se puede<br />
realizar con gran precisión y comodidad. Para reducir la presión<br />
de trabajo, gire el tornillo de regulación de la presión � en<br />
sentido antihorario. La nueva presión ajustada se adapta de<br />
inmediato en cuanto se acciona brevemente el anillo de la<br />
válvula de seguridad de sobrepresión �.<br />
Para conseguir una regulación automática o semiautomática,<br />
existe la posibilidad de reequipar el dispositivo con una válvula<br />
magnética Dupla CO . La válvula magnética Dupla CO se<br />
2 2<br />
puede conectar directamente con el Regulador CO Pro pro<br />
2<br />
mediante el tornillo de unión � situado en la válvula<br />
magnética.<br />
32<br />
safety pressure control valve integrated �<br />
non-wearing seal to cylinder valve<br />
corrosion-proof through material improvement<br />
fi ne particle fi lter in cylinder connection and in needle valve<br />
pressure relief ring at the pressure control valve for easy removal of fi tting<br />
low pressure factory preset to 0 bar<br />
Please note:<br />
For any Depot change or work on the Dupla CO Fitting Pro make sure that the cylinder<br />
2<br />
is depressurised.<br />
Operation:<br />
Make sure that the stainless steel needle valve � is closed before connecting the<br />
Dupla CO Fitting Pro to the CO Depot.<br />
2 2<br />
Place the cylinder connection into the opening of the cylinder valve � and handtighten<br />
the union nut �; use a 30 mm spanner, where necessary.<br />
Connect the hose adapter of the Dupla CO Fitting Pro � and<br />
2<br />
the CO Reactor with a hose 3 x 1 (supplied with the Reactor).<br />
2<br />
Open the cylinder valve as far as possible and check the CO2 cylinder pressure at the cylinder pressure gauge �. At room<br />
temperature, the pressure must be approx. 60 bar. On fi rst<br />
use, change the working pressure at the pressure adjusting<br />
screw � from around 1 to 1.5 bar. The pressure is indicated<br />
on the working pressure gauge �. Set roughly the required<br />
bubble count using the regulating screw at the stainless steel<br />
needle valve �.<br />
After about 1 day (start-up phase), the bubble count can be<br />
readjusted to the exact amount using the pressure adjusting<br />
screw �. The bubble count is proportional to the working<br />
pressure set. If the working pressure is 1 bar, the bubble count<br />
will be 10 bubbles per minute. To double the bubble count,<br />
simply increase the working pressure to 2 bar, and to reduce<br />
the bubble count by half, reduce the working pressure by half.<br />
The bubble count can thus conveniently be set to the precise<br />
level. To reduce the working pressure, turn the pressure<br />
adjusting screw � counterclockwise. The new pressure is<br />
applied once the pull ring at the safety pressure relief valve �<br />
is briefl y activated.<br />
For automatic or semi-automatic adjustment, the Dupla CO2 Fitting Pro can be extended by adding a magnetic valve. The<br />
Dupla CO Magnetic Valve can be connected directly to the<br />
2<br />
Dupla CO Fitting Pro using the connecting screw at the<br />
2<br />
magnetic valve �.<br />
Magnetic valve assembly with connecting screw:<br />
Remove the hose connection from the valve.<br />
Screw the magnetic valve with the connecting screw into the<br />
fi tting.<br />
Adjust the magnetic valve and tighten the union nut.<br />
Make sure that all screw connections are tight!<br />
After long a period of use, the hose adapter at the bottom of<br />
the Dupla CO Fitting Pro may break off due to material<br />
2<br />
fatigue or improper handling. In this case, use the replacement<br />
adapter included in the supply. Before screwing it into the<br />
fi tting, we recommend wrapping the replacement adapter<br />
with a Tefl on strip for proper sealing.<br />
Technical data:<br />
Type of gas: CO 2 , connection acc. to DIN 477 Part 1,<br />
connection number 6<br />
Working pressure: 0 – 3 bar<br />
Gauge connection: 2 x G 1/4“<br />
Valve spindle: stainless steel<br />
Connections: output for CO 2 hose, size 3 x 1<br />
Microfi lter: 2 integrated<br />
Material: brass nickel-plated<br />
Weight: approx. 1,030 g<br />
Technical data subject to change.<br />
Illustrations may vary.<br />
Article number: 80204<br />
9