TDS 1001/3 TDS 1201/4 - AL-KO
TDS 1001/3 TDS 1201/4 - AL-KO
TDS 1001/3 TDS 1201/4 - AL-KO

You also want an ePaper? Increase the reach of your titles
YUMPU automatically turns print PDFs into web optimized ePapers that Google loves.
The submersible pump is designed to pump only<br />
the following liquids:<br />
− clear water,<br />
− rain water,<br />
− chlorinated water (pool water),<br />
− water for domestic use.<br />
Prohibited use<br />
Your submersible pump is not intended for permanent<br />
operation. The pump may not be used to<br />
pump the following liquids:<br />
− drinking water,<br />
− salt water,<br />
− beverages or liquid foods,<br />
− corrosives or chemicals<br />
− acids or combustible, explosive or gasforming<br />
liquids,<br />
− liquids with a temperature above 35 °C<br />
− sandy water or water containing abrasives,<br />
− waste water containing textile or paper particles.<br />
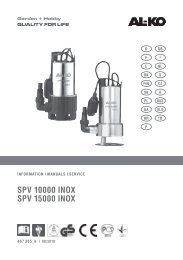
Description of the Pump<br />
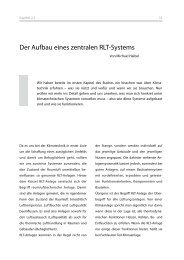
Submersible pump (Fig. A/C)<br />
1 Pump outlet<br />
2 Non-return valve<br />
3 Connection cable<br />
4 Rope bracket<br />
5 Carrying handle<br />
6 Cable clamp<br />
7 Float switch<br />
8 Inlet strainer<br />
9 Pump housing<br />
10 Multi-size nipple<br />
Function of the pump<br />
The submersible pump sucks the liquid to be<br />
pumped into the pump through the inlet strainer<br />
(8) and pumps it out at the outlet.<br />
Thermal protection<br />
Your submersible pump is equipped with a thermal<br />
protection switch which automatically switches<br />
off the pump in case of overheating. The<br />
pump will remain off until it has cooled down.<br />
After about 15 - 20 minutes, the pump will automatically<br />
switch on.<br />
The pump has a non-return valve (2) on<br />
the pump output that prevents the pressure<br />
hose from emptying the pump every<br />
time it is at a standstill.<br />
Setting up and Operating the<br />
Pump<br />
1. Screw the multi-size nipple (10) into the<br />
pump outlet.<br />
2. Attach a hose to the multi-size nipple.<br />
3. Fix the connection cable (3) with cable ties to<br />
the pressure hose.<br />
4. To submerse the pump into a well or cistern,<br />
attach a rope to the rope bracket (4) provided<br />
for this purpose.<br />
You can cut off the tip of the multi-size<br />
nipple to fit the diameter of the hose you<br />
are using. Using a hose with the largest<br />
possible diameter will greatly improve the<br />
performance of the pump.<br />
5. Uncoil the electric cable completely.<br />
Make sure that any electrical connections<br />
are not exposed to water and do not lie<br />
within the outflow of the pump.<br />
When placing the pump in the liquid,<br />
make sure to let it down slowly. You may<br />
need to tilt the pump slightly so that air<br />
trapped in the body is released. Set the<br />
pump on the bottom so that it cannot fall<br />
over. If the bottom should be sandy or<br />
muddy or rocky and uneven, place the<br />
pump on a suitable hard, flat surface or<br />
suspend it from a rope attached to a<br />
secure object. Make sure to leave adequate<br />
room between the pump and the<br />
bottom so that it cannot suck up solid<br />
matter.<br />
Make sure that the pump does not suck in<br />
solid matter. Sand or other abrasive<br />
particles suspended in the liquid will lead<br />
to increased wear and tear and may<br />
impact the performance of your pump.<br />
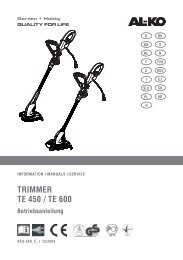
Before lowering the pump into a well or a<br />
cistern, attach a rope to the handle. When<br />
placing the pump inside a cistern, make<br />
sure that the shaft is large enough for the<br />
pump to fit. For min. shaft dimensions,<br />
see Figure B.<br />
Place a cover over the cistern so that no<br />
one will fall in.<br />
When switching the pump on again after<br />
removing it from a cistern, make sure that<br />
the pressure hose is completely empty<br />
otherwise the pump will not automatically<br />
vent and it could be damaged.<br />
Translation of original user instructions GB 2