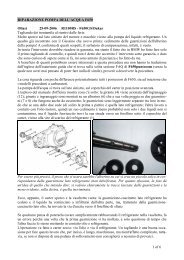
sostituzione ed equilibratura degli pneumatici fai-da-te - VAQ
sostituzione ed equilibratura degli pneumatici fai-da-te - VAQ
sostituzione ed equilibratura degli pneumatici fai-da-te - VAQ

You also want an ePaper? Increase the reach of your titles
YUMPU automatically turns print PDFs into web optimized ePapers that Google loves.
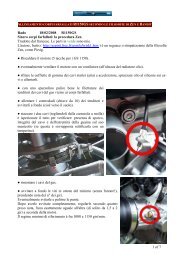
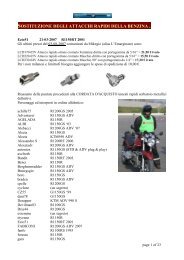
I have a couple of generic 9” levers that I use<br />
to hold the bead in place while I am moving<br />
the big one to the next spot.<br />
Make sure you place it under the rim pro<strong>te</strong>ctor<br />
as shown.<br />
Here you can see I have mov<strong>ed</strong> over about 6<br />
inches and am beginning to lever the tire on<br />
again.<br />
I have mov<strong>ed</strong> again.<br />
No<strong>te</strong>: It is very important to keep the upper<br />
bead of the tire in the deeper middle of the rim.<br />
This gives you the ne<strong>ed</strong><strong>ed</strong> room to be able to<br />
lever the bead over the other side of the rim. If<br />
you find the tire getting very hard, or impossible<br />
to lever, you most likely ne<strong>ed</strong> to move the<br />
bead on the opposi<strong>te</strong> side into the well of the<br />
rim. It will of<strong>te</strong>n move out on its own.<br />
When you get near all the way around you will<br />
find that you have to lever smaller pieces of<br />
the bead.<br />
The last little bit will be hardest, but you<br />
shouldn’t have to muscle it excessively.<br />
It should pop on <strong>fai</strong>rly easily.<br />
Occasionally you may ne<strong>ed</strong> to give it a rap<br />
with a rubber mallet.<br />
17 of 23