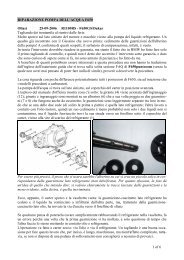
sostituzione ed equilibratura degli pneumatici fai-da-te - VAQ
sostituzione ed equilibratura degli pneumatici fai-da-te - VAQ
sostituzione ed equilibratura degli pneumatici fai-da-te - VAQ

Create successful ePaper yourself
Turn your PDF publications into a flip-book with our unique Google optimized e-Paper software.
SOSTITUZIONE ED EQUILIBRATURA DEGLI PNEUMATICI FAI-DA-TE<br />
Antoniox 12 Luglio 2006 BMW + Suzuki + Kawasaki + scoo<strong>te</strong>r del fra<strong>te</strong>llo<br />
E' alfin giunto il momento di cambiare le gomme alla Rosina. E tornano i problemi di sempre.<br />
Ci sono un paio di officine che si occupano dello smontaggio ma bisogna acquistare <strong>da</strong> loro altrimenti<br />
rispondono "no, guar<strong>da</strong>, sono troppo occupato oggi"... e acquistare <strong>da</strong> loro vuol dire subire un<br />
ricarico che non esito a definire eccessivo.<br />
I gommisti le stallonano e rimontano (mugugnando oppure facendomi notare gentilmen<strong>te</strong> che anche<br />
loro vendono Metz) ma non equilibrano, uno perchè non hanno l'attrezzatura e l'altro perchè "ci<br />
vuole troppo <strong>te</strong>mpo per montare l'accessorio" (???)<br />
Non mi dispiacerebbe attrezzarmi e provare a fare <strong>da</strong> me anche perchè ho un set di cerchi di ricambio,<br />
male che va<strong>da</strong> non resto a pi<strong>ed</strong>i.<br />
Ho <strong>da</strong>to un'occhiata al video http://video.google.com/videoplay?do...781&pr=goog-sl <strong>ed</strong> ora vorrei<br />
porre alcune domande. Innanzitutto : ne vale la pena?<br />
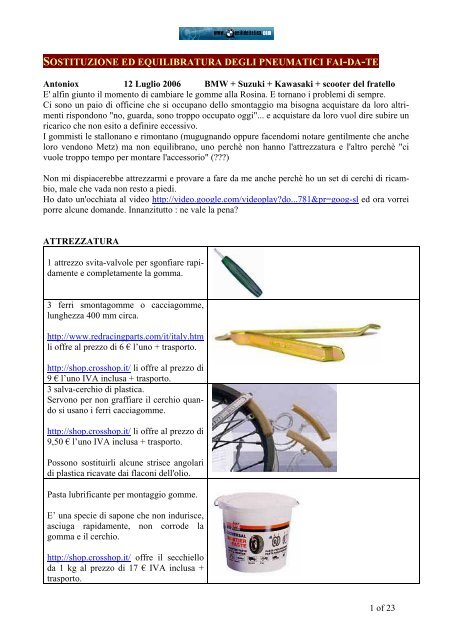
ATTREZZATURA<br />
1 attrezzo svita-valvole per sgonfiare rapi<strong>da</strong>men<strong>te</strong><br />
e completamen<strong>te</strong> la gomma.<br />
3 ferri smontagomme o cacciagomme,<br />
lunghezza 400 mm circa.<br />
http://www.r<strong>ed</strong>racingparts.com/it/italy.htm<br />
li offre al prezzo di 6 € l’uno + trasporto.<br />
http://shop.crosshop.it/ li offre al prezzo di<br />
9 € l’uno IVA inclusa + trasporto.<br />
3 salva-cerchio di plastica.<br />
Servono per non graffiare il cerchio quando<br />
si usano i ferri cacciagomme.<br />
http://shop.crosshop.it/ li offre al prezzo di<br />
9,50 € l’uno IVA inclusa + trasporto.<br />
Possono sostituirli alcune strisce angolari<br />
di plastica ricava<strong>te</strong> <strong>da</strong>i flaconi dell'olio.<br />
Pasta lubrifican<strong>te</strong> per montaggio gomme.<br />
E’ una specie di sapone che non indurisce,<br />
asciuga rapi<strong>da</strong>men<strong>te</strong>, non corrode la<br />
gomma e il cerchio.<br />
http://shop.crosshop.it/ offre il secchiello<br />
<strong>da</strong> 1 kg al prezzo di 17 € IVA inclusa +<br />
trasporto.<br />
1 of 23
1 pennello per applicare la pasta lubrifican<strong>te</strong><br />
per montaggio gomme.<br />
1 apparecchio per stallonare.<br />
http://www.r<strong>ed</strong>racingparts.com/it/ offre<br />
una stallonatrice al prezzo di 160 €.<br />
Bizio segnala una stallonatrice un po' più<br />
consis<strong>te</strong>n<strong>te</strong> su un catalogo t<strong>ed</strong>esco<br />
http://www.polomotorrad.de/polo_kat...g.html?jid=650<br />
, il<br />
prezzo è allineato (399 €!) e mi chi<strong>ed</strong>o<br />
quanto costi un macchinario <strong>da</strong> officina.<br />
Per stallonare puoi usare i morsetti serragiunti<br />
regolabili a vi<strong>te</strong> (<strong>da</strong> falegname o <strong>da</strong><br />
carpentiere) detti volgarmen<strong>te</strong> “sergenti”.<br />
Con 3 sergenti dovresti riuscirci.<br />
2 of 23
2 tavole di legno per appoggiare il cerchio<br />
sul pavimento senza <strong>da</strong>nneggiare il mozzo<br />
o il disco.<br />
Compressore.<br />
Basta anche una pompa a p<strong>ed</strong>ale <strong>da</strong> 5/10<br />
euro che raggiunga 4/5 atm.<br />
Ci sono dei compressorini a 12 V che raggiungono<br />
12 atm (13 euro).<br />
1 Pistola di gonfiaggio con manometro di<br />
qualità, tarato e ritarabile.<br />
Yuri consigliava l'EuroDainu della Michelin,<br />
che si trova a 75 € + IVA + sp<strong>ed</strong>izione,<br />
distribuito anche <strong>da</strong> Wurth.<br />
Per chi vuol spendere meno, il compressorino<br />
o la pompa a p<strong>ed</strong>ale può essere affiancato<br />
<strong>da</strong> un piccolo manometro digitale.<br />
http://www.r<strong>ed</strong>racingparts.com/it/italy.htm<br />
offre un’equilibratrice statica, con bolla<br />
per livellarla, a 106 € + IVA + sp<strong>ed</strong>izione<br />
+ A<strong>da</strong>ttatore per ruo<strong>te</strong> BMW<br />
Foto non disponibile<br />
3 of 23
https://www3.polo-expressversand.com/<br />
offre un’equilibratrice statica, con bolla<br />
per livellarla, a 69 € + IVA + sp<strong>ed</strong>izione<br />
+ A<strong>da</strong>ttatore per ruo<strong>te</strong> BMW<br />
piombi adesivi per l'<strong>equilibratura</strong><br />
http://www.laghiar-franken.it/ offre una<br />
confezione di barre con suddivisione di 8<br />
x 5 g, larghezza 10,0 mm, al<strong>te</strong>zza 4,7 mm<br />
incluso nastro adesivo.<br />
Unità d'imballo: 40 g / 25 pezzi<br />
SOSTITUZIONE DEL PNEUMATICO<br />
Nota: Se il pneumatico è fr<strong>ed</strong>do può essere più difficoltoso l'inserimento nel cerchio. Si suggerisce<br />
quindi, nella stagione invernale, di <strong>te</strong>nere qualche ora gli <strong>pneumatici</strong> in luogo caldo.<br />
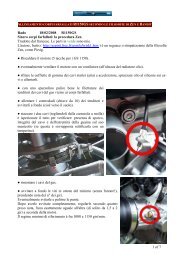
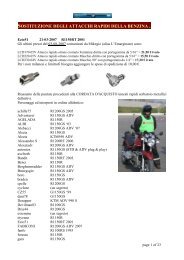
(A) Sonfiare il pneumatico e smontare la valvolina in<strong>te</strong>rna.<br />
(B) Stallonare il pneumatico utilizzando l’apposito apparecchio o i morsetti sergenti.<br />
Rigirare la ruota <strong>ed</strong> allo s<strong>te</strong>sso modo si stallonano i fianchi anche <strong>da</strong>ll'altra par<strong>te</strong>.<br />
(C) Lubrificare col pennello il bordo libero in<strong>te</strong>rno del cerchio, <strong>te</strong>nendo lo pneumatico schiacciato<br />
con le ginocchia.<br />
(D) Sis<strong>te</strong>mare i pro<strong>te</strong>ggi-cerchio di plastica.<br />
(E) Separare la gomma <strong>da</strong>l cerchio <strong>da</strong>ndoci dentro con i ferri.<br />
4 of 23
(F) Pulire il cerchio ora che è nudo e crudo.<br />
(G) Lubrificare il primo bordo es<strong>te</strong>rno del nuovo pneumatico.<br />
(H) Posizionare il nuovo pneumatico sul cerchio in modo che i puntini rossi o gialli di bilanciamento<br />
coinci<strong>da</strong>no con la valvola sul cerchio.<br />
Verificare anche il senso di rotazione indicato <strong>da</strong> una grossa freccia sul fianco del pneumatico.<br />
(I) Inserire il nuovo pneumatico sul cerchio.<br />
Duran<strong>te</strong> il montaggio, la par<strong>te</strong> di fianco già dentro il cerchio deve stare al centro del canale, altrimenti<br />
il tallone della gomma forzerà troppo.<br />
Terminare l’inserimento della gomma sis<strong>te</strong>mando i pro<strong>te</strong>ggi-cerchio di plastica e utilizzando i ferri.<br />
(L) Inserire analogamen<strong>te</strong> anche il "secondo bordo" del pneumatico.<br />
(M) Gonfiare bene finchè non si sentono 2 "scoppi" a significare che il pneumatico ha aderito perfettamen<strong>te</strong><br />
al cerchio.<br />
(N) Rimontare la valvolina.<br />
(O) Gonfiare la gomma con precisione alla pressione corretta.<br />
EQUILIBRATURA<br />
(P) Prima di usare il trespolo equilibratore ricor<strong>da</strong>rsi di livellarlo usando la bolla incorporata.<br />
(Q) Per coloro che in<strong>te</strong>ndono fare cambio tra gomme stra<strong>da</strong>li e <strong>da</strong> off e viceversa (magari per una<br />
giornata) è buona norma fare un segno su cerchio e pneumatico prima di smontarlo.<br />
Al rimontaggio, allineando i segni, si avrà la garanzia di aver ripristinato l'<strong>equilibratura</strong> prec<strong>ed</strong>en<strong>te</strong>.<br />
(R) Met<strong>te</strong>re la ruota sull'equilibratrice, al centro, e v<strong>ed</strong>ere se si muove.<br />
(S) Se non è equilibrata il cerchio <strong>te</strong>nderà a girare portando il punto più pesan<strong>te</strong> verso il basso.<br />
Fare varie prove facendo girare la ruota par<strong>te</strong>ndo <strong>da</strong> diverse posizioni. Posizionarla di volta in volta<br />
pazien<strong>te</strong>men<strong>te</strong> facendogli fare 1/4 di giro e identificare il punto più pesan<strong>te</strong>.<br />
Alla fine una volta individuato il punto più pesan<strong>te</strong>, met<strong>te</strong>re un peso perfettamen<strong>te</strong> sulla verticale<br />
del punto più pesan<strong>te</strong> (appoggiarlo solo, senza fissarlo, magari bisognerà cambiarlo).<br />
(T) Far girare di nuovo la ruota e v<strong>ed</strong>ere che succ<strong>ed</strong>e. Se si ferma sempre nello s<strong>te</strong>sso punto di prima<br />
aggiungere gradualmen<strong>te</strong> altro peso, se cambia provare a togliere peso. Quando alla fine la ruota<br />
comincerà a fermarsi sempre in punti differenti allora l'<strong>equilibratura</strong> sarà fatta.<br />
(U) Una volta <strong>te</strong>rminata l'operazione, fissare per bene i pesi.<br />
(V) Rimontare il cerchio sulla mukka e via.<br />
5 of 23
Alpheus 12 Luglio 2006 Ktm 990 Adventure + Suzuki Dr 350 S<br />
Il problema mi sa che è stallonare il pneumatico con le leve ... rovini tutto il cerchio<br />
greenmanalishi 12 Luglio 2006 FIREBLADE 1000 - R1150GS<br />
Se guardi sul sito di r<strong>ed</strong> racing parts vendono la stallonatrice manuale <strong>ed</strong> anche l'equilibratrice, mi<br />
pare che con 250 euri ti compri tutto.<br />
mammolo 17 Luglio 2006 MC65 colla + R1100GS 1994<br />
Per equilibrare il tutto, basta un perno e due cavalletti:<br />
- infili il perno nella ruota (cerchio + pneumatico montato e gonfiato) e l'appoggi sui due cavalletti.<br />
- v<strong>ed</strong>i <strong>da</strong> che par<strong>te</strong> gira la ruota; quella sarà la par<strong>te</strong> più pesan<strong>te</strong> della ruota.<br />
- si applicano i contrappesi a <strong>te</strong>ntativi fino a quando la ruota, girata a mano di un quarto di giro per<br />
volta, rimane ferma dove l'abbiamo posta.<br />
Ti ringrazio per lo spunto che hai <strong>da</strong>to. Cr<strong>ed</strong>o che anch'io proverò a cambiare i copertoni <strong>da</strong> solo.<br />
Il gommista era l'ultimo a met<strong>te</strong>re le mani sulla mia moto (non vado <strong>da</strong> un meccanico <strong>da</strong> 5 anni) e<br />
cr<strong>ed</strong>o che non ce le met<strong>te</strong>rà più neanche lui.<br />
Antoniox 17 Luglio 2006 BMW + Suzuki + Kawasaki + scoo<strong>te</strong>r del fra<strong>te</strong>llo<br />
Ok, chiaro che per equilibrare il tutto basta un perno e due cavalletti. Ma resta il problema per la<br />
ruota pos<strong>te</strong>riore (con monobraccio).<br />
Ci vuole per forza una flangia che lo <strong>te</strong>nga perpendicolare al perno. Nulla che un tornitore non possa<br />
realizzare in 10 minuti. Ma a quel punto dovrebbe essere soli<strong>da</strong>le col perno s<strong>te</strong>sso e quindi il perno<br />
dovrebbe ruotare su cuscinetti...<br />
Insomma, per il pos<strong>te</strong>riore serve l'equilibratrice o sbaglio?<br />
Ollast 7 Agosto 2006 R1100RS - F650GS/Dakar<br />
Giusto qualche giorno fa ho cambiato in casa le gomme del Dakar.<br />
Nessuno smonta-valvola: avendo camera d'aria, il problema non si poneva. Per sfilare lo s<strong>te</strong>lo della<br />
valvola basta un cappelletto apposito con il dentino che lo aggancia.<br />
Ho stallonato le gomme usando il cavalletto la<strong>te</strong>rale dell’altra moto.<br />
Il resto è stata una es<strong>te</strong>nuan<strong>te</strong> questione di wrestling tra me e le gomme.<br />
Avrei voluto avere i profili di plastica pro<strong>te</strong>ggi-cerchi: qualunque altro accrocchio (cartone, pezzo<br />
di bottiglia in pet, trancio di camera d'aria, ecc.) mostrava invariabilmen<strong>te</strong> la <strong>te</strong>ndenza a saltare.<br />
E' stato de<strong>te</strong>rminan<strong>te</strong> l'apporto del lubrifican<strong>te</strong> speciale che i gommisti mi dicono non essere in<br />
commercio ma di cui mi hanno regalato una piccola quantità. In prec<strong>ed</strong>enti occasioni avevo usato<br />
sapone per i piatti, ma <strong>da</strong> più parti questo viene sconsigliato in quanto, diversamen<strong>te</strong> <strong>da</strong>l lubrifican<strong>te</strong><br />
per gomme, risulta persis<strong>te</strong>n<strong>te</strong>.<br />
Nessuna <strong>equilibratura</strong>: in questo caso non ho fatto altro che rimontare due gomme che avevo smontato<br />
in prec<strong>ed</strong>enza e di cui avevo segnato la posizione rispetto alla valvola.<br />
Se dovessi fare i cambi di gomma con una maggiore sis<strong>te</strong>maticità prenderei in considerazione quell'attrezzatura<br />
di cui al link, ma per ora mi accon<strong>te</strong>nto di sapere come si fa: della serie "impara l'ar<strong>te</strong><br />
e mettila <strong>da</strong> par<strong>te</strong>".<br />
Antoniox 9 Agosto 2006 BMW + Suzuki + Kawasaki + scoo<strong>te</strong>r del fra<strong>te</strong>llo<br />
Premetto di non aver mai sostituito <strong>da</strong> solo uno pneumatico. Ho difficoltà a trovare un gommista<br />
che mi faccia il lavoro bene <strong>ed</strong> a costi accettabili. E' quasi impossibile trovarne uno che smonti e<br />
rimonti le gomme non compra<strong>te</strong> <strong>da</strong> lui.<br />
6 of 23
Abito in un paesello, ma i gommisti hanno parecchio <strong>da</strong> fare, a quanto pare.<br />
In un anno, quando va bene (nel senso che percorro i km che mi auguro), cambio 2 treni alla BMW,<br />
2 alla Suzuki, 1 alla Kawasaki, 1 allo scoo<strong>te</strong>r del fra<strong>te</strong>llo. Ed è sempre la s<strong>te</strong>ssa storia.<br />
La scorsa settimana ho montato le nuove Tourance: 220 euro monta<strong>te</strong> <strong>ed</strong> equilibra<strong>te</strong>. Un prezzo nella<br />
m<strong>ed</strong>ia. Ma sono dovuto an<strong>da</strong>re fino a Salerno! (in realtà tornavo <strong>da</strong>l tagliando <strong>da</strong> Co.Mo. <strong>ed</strong> ho<br />
approfittato).<br />
L'anno passato ho acquistato delle gomme per la Kawasaki <strong>da</strong> un meccanico di Salerno (dovevo<br />
partire di lì a poco <strong>ed</strong> avevo fretta) e mi ha let<strong>te</strong>ralmen<strong>te</strong> rapinato!<br />
Per ora mi informo... poi deciderò se attrezzarmi e provarci, come ha fatto ollast! l'ideale sarebbe<br />
avere un po' di amici con la s<strong>te</strong>ssa passione e che abitano vicini per dividere il costo dell'attrezzatura.<br />
S<strong>te</strong>f@no-LIVE 11 Agosto 2006 R1150GS 2001<br />
Un mio amico si è costruito lo stallonatore in ferro anziché in legno come il video e si cambia le<br />
gomme <strong>da</strong> solo!<br />
Per l'<strong>equilibratura</strong> è vero che basta un cavalletto con un perno, ricor<strong>da</strong><strong>te</strong>vi di far appoggiare però il<br />
perno su dei cuscinetti a sfere in modo <strong>da</strong> limitare l'attrito e avere un più precisa posizione di dove<br />
met<strong>te</strong>re il piombo!<br />
Alla fine è tutto un lavoro di forza. Togliere la gomma con i leverini è abbastanza facile, ma rimet<strong>te</strong>re<br />
quella nuova è una guerra.<br />
Ho notato anche che d'inverno il cambio gomme è difficoltoso, converrebbe <strong>te</strong>nere le gomme in casa<br />
qualche ora prima del cambio o lasciarle in un ambien<strong>te</strong> caldo, con il fr<strong>ed</strong>do diventano rigidissime<br />
e difficili <strong>da</strong> montare/smontare!<br />
Kar<strong>da</strong>no 6 Novembre 2006 K12ØØRS<br />
Vorrei acquistare il trespolo per la bilanciatura dei <strong>pneumatici</strong>.<br />
http://www.hein-gericke.com/uk/product_info.php/products_id/1720<br />
Nell'offerta v<strong>ed</strong>o che vengono forni<strong>te</strong> solo tre barre d'acciaio <strong>da</strong><br />
15/17/20 mm, ma per il cerchio pos<strong>te</strong>riore mi pare che non siano sufficienti.<br />
Ave<strong>te</strong> visto per caso in commercio qualcosa di più completo?<br />
guidopiano 6 Novembre 2006 R1150GS ADV ‘03 + KTM 450 EXC ‘04<br />
Posso dire la mia? Cos<strong>te</strong>rà anche poco ...... ma mi spieghi che <strong>te</strong> ne <strong>fai</strong>?<br />
Con tut<strong>te</strong> le apparecchiature elettroniche che hanno i gommisti per equilibrare le ruo<strong>te</strong> e per di più<br />
con uno scarto di errore quasi inesis<strong>te</strong>n<strong>te</strong>.<br />
Ma lo sai che non basta avere l'attrezzo? Bisogna saperlo usare.<br />
E’ un po’ come met<strong>te</strong>re un semplice mar<strong>te</strong>llo nelle mani di chi non l’ha mai visto, e dirgli di <strong>da</strong>re<br />
una mar<strong>te</strong>llata ..... deve saper a cosa e dove.<br />
Vabbè, mettiamo pure che sai come farlo. Ma quan<strong>te</strong> vol<strong>te</strong> hai la necessità di equilibrare una ruota?<br />
Sicuramen<strong>te</strong> al cambio del pneumatico. E poi ? Quando ?<br />
E’ solo un mio parere, ma è una spesa inutile.<br />
7 of 23
Vabbè, stavo solo cercando di salvaguar<strong>da</strong>re sti poveri operai delle dit<strong>te</strong> che fabbricano apparecchiature<br />
elettroniche per l'<strong>equilibratura</strong> delle ruo<strong>te</strong> che dopo questo post verranno messi tutti in mobilità<br />
per esauri<strong>te</strong> richies<strong>te</strong> di acquisto di s<strong>te</strong> macchine costosissime e (secondo voi ) meno precise<br />
di un semplice bilancino.<br />
Kar<strong>da</strong>no 6 Novembre 2006 K12ØØRS<br />
Il mio gommista usa solo quell'attrezzo per le moto, e lo fa usare al ragazzetto di turno.<br />
Visto che ho le istruzioni su come usarlo, e che vorrei comprare i <strong>pneumatici</strong> via in<strong>te</strong>rnet senza an<strong>da</strong>re<br />
come San Giuseppe in cerca di un gommista che me li monti e perderci il risparmio dell'acquisto<br />
on line (e poi lo sai che mi piace sporcarmi le mani), ci stavo pensando. Tutto qui.<br />
paolo b 6 Novembre 2006 K12ØØRS 16V<br />
Anche il gommista <strong>da</strong> cui an<strong>da</strong>vo mi ha fatto un paio di vol<strong>te</strong> l'<strong>equilibratura</strong> "a mano" con l'attrezzo<br />
linkato <strong>da</strong> Kar<strong>da</strong>no invece che con la macchina e, a suo dire, se fatta bene è addirittura più precisa.<br />
Piuttosto, v<strong>ed</strong>o molto più dura stallonare e rimontare il pneus.<br />
Ezio51 6 Novembre 2006 R1150RT 2001<br />
Il mio gommista (ciao Yuri) col trespolo mi fa un lavoro perfetto a regola d'ar<strong>te</strong>, ma non è famoso<br />
per i prezzi bassi.<br />
Non ho mai trovato convenien<strong>te</strong> cambiarsi le gomme <strong>da</strong> sè, perchè non ho mai trovato un rivenditore<br />
in<strong>te</strong>rnet che abbia prezzi migliori di un buon gommista.<br />
O no?<br />
mambo 16 Novembre 2006 CBR600RR + CRF450R MOTARD + R1200GS<br />
Io ce l'ho il trespolo d’<strong>equilibratura</strong>, e lo uso spesso.<br />
Come ti hanno confermato è molto preciso.<br />
Nel mondo delle corse si usa praticamen<strong>te</strong> solo quel sis<strong>te</strong>ma.<br />
Come stallonatore uso questo.<br />
Non è difficile, serve solo un po’ di pratica.<br />
Kar<strong>da</strong>no 16 Novembre 2006 K12ØØRS<br />
Come <strong>fai</strong> a montare il cerchio pos<strong>te</strong>riore sulla barretta d'acciaio <strong>da</strong>to che non ha i cuscinetti come<br />
l'an<strong>te</strong>riore? Dove hai acquistato l'attrezzo per il centraggio?<br />
mambo 16 Novembre 2006 CBR600RR + CRF450R MOTARD + R1200GS<br />
Io uso una sola barretta, del diametro della ruota<br />
<strong>da</strong>vanti.<br />
Poi mi sono costruito al tornio delle boccole in<br />
alluminio.<br />
Le boccole hanno un foro uguale al diametro<br />
della barretta, e un diametro es<strong>te</strong>rno uguale<br />
all’alesaggio del mozzo della ruota pos<strong>te</strong>riore.<br />
8 of 23
Ezio51 16 Novembre 2006 R1150RT 2001<br />
Per la ruota pos<strong>te</strong>riore ho sempre visto usare un alberino con avvitati due grossi coni autocentranti<br />
di alluminio.<br />
I due coni hanno un diametro (a okkio) <strong>da</strong> circa 20 mm sulla punta a circa 100 mm sulla base.<br />
Antoniox 16 Novembre 2006 BMW + Suzuki + Kawasaki + scoo<strong>te</strong>r del fra<strong>te</strong>llo<br />
Aggiorno per segnalare che la Gubellini http://www.fgspecialparts.it ha<br />
risposto ad una mia e-mail di 3 mesi fa per comunicarmi che esis<strong>te</strong> la<br />
flangia per equilibrare la ruota post (monobraccio).<br />
Il prezzo è di 45 € + iva. Si acquista direttamen<strong>te</strong> <strong>da</strong> loro.<br />
Mi hanno anche inviato un modulo d'ordine che mi permet<strong>te</strong>rebbe di ot<strong>te</strong>nere<br />
il 10% di sconto e la sp<strong>ed</strong>izione gratuita.<br />
PERANGA 16 Novembre 2006 K1200RS+R1200GS<br />
Per stallonare o compri l'apposito attrezzo o, come faccio<br />
io, puoi usare quei morsetti serragiunti regolabili a vi<strong>te</strong> (<strong>da</strong><br />
falegname o <strong>da</strong> carpentiere) detti volgarmen<strong>te</strong> “sergenti”.<br />
Con 3 sergenti dovresti riuscirci.<br />
At<strong>te</strong>nzione a non rovinare il cerchio!<br />
Pakinomio 12 Febbraio 2007 R1200GS<br />
Io ho trovato una via di mezzo tra il "correre" dei gommisti e l'onerosità delle officine meccaniche.<br />
Quando avevo l'RT chiesi al mio gommista di fiducia se po<strong>te</strong>va ordinarmi delle Metzler.<br />
Mi disse che non c'erano problemi, solo che lui aveva difficoltà a met<strong>te</strong>re le mani sulla MUKKA,<br />
ecc. <strong>te</strong>mpo, mancanza di know-how.<br />
Mi sono rivolto a Roma in un gommista specializzato € 300. Il prezzo era allineato al basso e mi<br />
sono messo a v<strong>ed</strong>ere come lavorava, professionali ma nulla di trascendentale.<br />
Adesso con il GS e for<strong>te</strong> dell'esperienza passata mi sono rivolto sempre <strong>da</strong>l gommista di fiducia per<br />
il montaggio delle gomme tassella<strong>te</strong>. Mi ha messo a disposizione il pon<strong>te</strong> per la moto. Ho portato<br />
tut<strong>te</strong> le mie chiavi e ho smontato io le ruo<strong>te</strong>. In 10 minuti ha cambiato le coperture e poi ha effettuato<br />
l'<strong>equilibratura</strong> della gomma an<strong>te</strong>riore (secondo me ne po<strong>te</strong>va fare a meno per via dei tacchetti)<br />
comunque l'ha fatto.<br />
Totale 180 € per due Metzler KArakoo (o come si chiamano loro). Mi ha regalato anche un misuratore<br />
di pressione digitale della MICHELIN.<br />
Non penso sia costo efficace met<strong>te</strong>rsi le gomme <strong>da</strong> soli in assoluto. Ci sono delle accor<strong>te</strong>zze <strong>ed</strong> una<br />
professionalità che vanno rispetta<strong>te</strong> e bisogna prenderne atto.<br />
Io non me la sento di viaggiare a 160 km/h senza fiducia.<br />
Ri<strong>te</strong>ngo di essere stato fortunato e non in<strong>te</strong>ndo proprio mollare il mio gommista.<br />
9 of 23
Ezio51 19 Febbraio 2007 R1150RT 2001<br />
Guar<strong>da</strong><strong>te</strong> un po’ questo magnifico reportage fotografico che casca a fagiolo.<br />
http://www.bmwmoa.org/forum/showthread.php?t=15338<br />
JimVonBaden1 05 Febbraio 2007 R1200GS 2005<br />
Since I am of<strong>te</strong>n ask<strong>ed</strong> to help people change their tires, I thought it would be cool to make up a little<br />
tutorial about how it is done. It wont substitu<strong>te</strong> for direct experience, but it should give you a<br />
start. I will list torque values where appropria<strong>te</strong>, as well as any hints that might help.<br />
This tire was about worn out anyhow, but the<br />
nail in it made me do it sooner.<br />
See this thread on how to plug a tire.<br />
If you plan on doing it yourself, it helps to<br />
have an assistant. Mine for the evening was my<br />
GF Tina. She is assisting by taking pictures!<br />
Normally your assistant will help in a more direct<br />
way!<br />
Bike on the cen<strong>te</strong>rstand, remove the lug bolts.<br />
On the 12GS/ST/RT it is a T-55 Torx socket.<br />
No ne<strong>ed</strong> to remove the brake caliper on the 12<br />
series, though some 1100/1150 R bikes and K<br />
bikes ne<strong>ed</strong> the caliper remov<strong>ed</strong> as the rotor<br />
comes off with the wheel.<br />
Once the wheel is off, remove the valve cap<br />
and valve core with the removal tool.<br />
I always have a couple spare valve cores in<br />
case one is bad.<br />
10 of 23
Breaking the bead is made <strong>fai</strong>rly easy with the<br />
HF tire changing tool with motorcycle a<strong>da</strong>p<strong>te</strong>r.<br />
I make sure not to let the <strong>ed</strong>ge of the tool touch<br />
the <strong>ed</strong>ge of the wheel. I am pretty good at<br />
avoiding scratches to the wheel, but it takes<br />
practice. Once you have push<strong>ed</strong> the bead down<br />
off the wheel, you ne<strong>ed</strong> to push it off all the<br />
way around by hand. Flip the wheel over and<br />
do it again. Notice that I use a piece of thick<br />
vinyl under the wheel to pro<strong>te</strong>ct it. I also make<br />
sure to not break the bead near the valve core<br />
with the machine. I am using the removal bar<br />
for leverage. It probably looks harder than it is.<br />
Then I mount the rim on the HF tire clamp.<br />
I make sure the clamps are in the right position<br />
to allow the cen<strong>te</strong>r of the wheel to be centr<strong>ed</strong>.<br />
That way I can install the cen<strong>te</strong>r levering bar.<br />
Don’t be afraid to pull it down snug, your<br />
wheel can take it. I also have nylon blocks,<br />
made by my friend Kermit, that pro<strong>te</strong>ct the<br />
wheel.<br />
The HF clamps are paint<strong>ed</strong> metal, and will<br />
scratch the wheels. These nylon clamps also<br />
work bet<strong>te</strong>r with GS wheels.<br />
Using a lube, either special tire lube, or dishwashing<br />
liquid and soap, make sure you apply<br />
plenty to the tire bead, and rim.<br />
Spray WD40 is also good around the rim bead.<br />
I also use a piece of leather over the end of the<br />
HF tire bar to pro<strong>te</strong>ct the rim.<br />
I lube it lightly as well.<br />
No<strong>te</strong>: There are a few good other bars out there<br />
with nylon ends, like the Nomar, but I find the<br />
HF init works fine, and came free.<br />
11 of 23
Insert the thin end of the bar in between the tire<br />
and rim.<br />
Catch the lip of the bead on the tire and pull<br />
the bar over.<br />
Hook the bar on the cen<strong>te</strong>r levering bar and<br />
begin to pull.<br />
The bar will slide along removing the tire.<br />
You may ne<strong>ed</strong> to hold the tire to keep it from<br />
moving on the clamps, and you may ne<strong>ed</strong> to<br />
lift up a little to make sure the tire doesn’t slip<br />
back on.<br />
Pull it all the way around, or until the upper<br />
bead comes comple<strong>te</strong>ly loose.<br />
12 of 23
With the upper bead off, you can lift the tire<br />
and lube the lower bead.<br />
This is a little tricky, but not bad with a little<br />
practice.<br />
Next you lift the tire and insert the removal<br />
tool under the lower bead.<br />
Then twist the bar to lift the bead.<br />
As before, you pull the lever around the bar<br />
while lifting on the tire.<br />
As you come around the bar, the tire will come<br />
comple<strong>te</strong>ly free.<br />
But don’t remove the tire yet. Let it rest on the<br />
rim and check the direction of the rotation.<br />
13 of 23
It is a good idea to check the rotation, see arrow,<br />
then place the tire on the ground in the<br />
same orientation as it came off, just in case you<br />
forgot the direction.<br />
Here is the wheel on the stand. It is a food look<br />
at how it fits.<br />
At this time it is a good idea to clean the inside<br />
of the rim, and make sure there is no <strong>da</strong>mage,<br />
and no burrs on the rim.<br />
Some people actually clean the wheel now as<br />
well!<br />
Here is a nice look at how Kermit’s rim pro<strong>te</strong>ctors<br />
work on the HF unit.<br />
And no, he doesn’t make them publicly.<br />
You can make your own from a 1” square<br />
block of nylon.<br />
We also add small sections of bicycle inner<br />
tube to keep the rim from slipping.<br />
Clip the tires from the package, and ensure<br />
they are the correct size.<br />
(You should probably do this BEFORE removing<br />
your old tires and wheels.)<br />
14 of 23
Check the rotation of the new tire.<br />
Make sure it is pointing in the same direction.<br />
Ignore the tread pat<strong>te</strong>rn unless you know that<br />
you want to put it on backwards (NOT recommend<strong>ed</strong><br />
unless you KNOW what you are doing).<br />
Make sure you flip the tire over and lube the<br />
bottom side thoroughly for installation.<br />
No<strong>te</strong>: I said flip, but keep in mind some tires<br />
have a directional arrow only on one side, so<br />
the arrow may be on the bottom.<br />
Just make sure you have the orientation correct.<br />
Flip the tire over and push one side on, just the<br />
lower bead.<br />
At this time you can use the heal of your hand,<br />
or a rubber mallet to force the tire over the rim.<br />
Keep the lower bead centr<strong>ed</strong> on the rim, in the<br />
indent<strong>ed</strong> spot, and the upper bead above the<br />
rim. It takes a bit of work on some tires, but<br />
isn’t that hard.<br />
Occasionally you may have to “spoon” the tire<br />
on the last little bit. See this <strong>te</strong>chnique la<strong>te</strong>r.<br />
15 of 23
Once the lower bead is all the way on, lube the<br />
upper bead thoroughly.<br />
I install a C-clamp on the wheel with a piece of<br />
leather, you can use rubber or plastic, to keep<br />
the bead from “walking” around as I spoon on<br />
the tire<br />
I also insert rim pro<strong>te</strong>ctors to prevent scratches.<br />
Notice I us<strong>ed</strong> zip ties on them? This is to make<br />
them retrievable if they slip off into the tire as I<br />
install it. They also help in that I can hold on to<br />
them so they don’t slip.<br />
You could use thick nylon, plastic or rubber,<br />
but these are nice in that they stay in place.<br />
I use a 14” Motion Prow lever to “spoon” on<br />
the tires. Notice the orientation of the lever.<br />
It is precisely this shape of the lever that makes<br />
me use it. It is easy to get in, grips well, and<br />
allows a lot of leverage.<br />
Make sure the lever is us<strong>ed</strong> only on the rim<br />
pro<strong>te</strong>ctors to avoid scratching the rim.<br />
16 of 23
I have a couple of generic 9” levers that I use<br />
to hold the bead in place while I am moving<br />
the big one to the next spot.<br />
Make sure you place it under the rim pro<strong>te</strong>ctor<br />
as shown.<br />
Here you can see I have mov<strong>ed</strong> over about 6<br />
inches and am beginning to lever the tire on<br />
again.<br />
I have mov<strong>ed</strong> again.<br />
No<strong>te</strong>: It is very important to keep the upper<br />
bead of the tire in the deeper middle of the rim.<br />
This gives you the ne<strong>ed</strong><strong>ed</strong> room to be able to<br />
lever the bead over the other side of the rim. If<br />
you find the tire getting very hard, or impossible<br />
to lever, you most likely ne<strong>ed</strong> to move the<br />
bead on the opposi<strong>te</strong> side into the well of the<br />
rim. It will of<strong>te</strong>n move out on its own.<br />
When you get near all the way around you will<br />
find that you have to lever smaller pieces of<br />
the bead.<br />
The last little bit will be hardest, but you<br />
shouldn’t have to muscle it excessively.<br />
It should pop on <strong>fai</strong>rly easily.<br />
Occasionally you may ne<strong>ed</strong> to give it a rap<br />
with a rubber mallet.<br />
17 of 23
Remove the rim pro<strong>te</strong>ctors and the C-clamp.<br />
Make sure there is still plenty of lube on it, as<br />
it will help the bead seat when inflating the<br />
tire.<br />
Install the valve core and cap.<br />
Then bounce the tire several times around the<br />
circumference. This helps to set the bead.<br />
Using a compressor with decent power.<br />
DO NOT HOLD THE TIRE NEAR THE RIM<br />
during this process. As the tire infla<strong>te</strong>s it will<br />
POP onto the rim in a couple spots. If your<br />
fingers are in there you will not like the results.<br />
See the r<strong>ed</strong> arrow!<br />
I have had a few instances where the tire took<br />
as much as 4 bar of pressure to seat the bead.<br />
I wouldn’t generally go any higher than 3,5<br />
bar, though I know a few who have gone as<br />
high as 5 bar.<br />
If the bead wont seat, and no air is staying in,<br />
you may have to use a ratcheting strap to compress<br />
the tire to get the bead to seat with air<br />
pressure.<br />
Just make sure you remove the strap as soon as<br />
it takes air in and holds a few pounds.<br />
The pressure on the strap will not only make it<br />
hard to get off, but might cause the strap to<br />
come off explosively.<br />
18 of 23
My friend Chris made this stand for me, and I<br />
attach<strong>ed</strong> the beamerbalancer bearings to it.<br />
Place the beamerbalancer insert onto the<br />
wheel, ignore the rod for a moment.<br />
Install the a<strong>da</strong>p<strong>te</strong>r using wing nuts and nylon<br />
washers.<br />
Then add the rod through and put on the<br />
s<strong>te</strong>pp<strong>ed</strong> sliders with black o-ring retainers, see<br />
above, and place it on the stand.<br />
19 of 23
Notice I leave the weights on the rim? This is<br />
because sometimes it is right on with original<br />
weights, and this way I don’t have to remove<br />
them.<br />
By the way, I did not balance this wheel.<br />
It was done for me at the MOA by the NoMar<br />
guy.<br />
I wouldn’t normally use that much weight, I<br />
would rota<strong>te</strong> the tire on the rim.<br />
Rota<strong>te</strong> the tire 90 degrees from where it is and<br />
let go.<br />
The tire will, if not balanc<strong>ed</strong>, rota<strong>te</strong> on its own<br />
so that the heavy spot is down.<br />
If the weights are on, and the tire moves on its<br />
own. Remove them.<br />
If you release the tire and it doesn’t move, try<br />
again 180 degrees off, and if it still doesn’t<br />
move, the tire is balanc<strong>ed</strong>.<br />
Try this several times until you are certain of<br />
where the heavy spot is, always down.<br />
Next get some alcohol for the rim.<br />
No, not to get it drunk, but to clean it.<br />
Spray WD40 is also good around the rim bead.<br />
20 of 23
Clean the top of the rim; opposi<strong>te</strong> the heavy<br />
spot exactly 180 degrees, with alcohol to remove<br />
grease and dirt.<br />
No<strong>te</strong>: In this picture I spun the wheel 180° to<br />
show me cleaning the wheel.<br />
The spe<strong>ed</strong> the wheel spins when releas<strong>ed</strong> will<br />
give you some clue about the weight ne<strong>ed</strong><strong>ed</strong>,<br />
but it takes some experience. Most wheels take<br />
less than 30 grams of weight, so you shouldn’t<br />
start with more than that.<br />
I use tape to hold the weights on to <strong>te</strong>st how<br />
much you ne<strong>ed</strong>. Go through the process of<br />
checking at 90° in<strong>te</strong>rvals for balance. Once the<br />
wheel stops moving on its own when you release<br />
it, it might move a tiny bit and that is<br />
OK, you know you have the right amount of<br />
weight in the right spot.<br />
I split the weights as evenly as possible and<br />
adhere them on both sides of the wheel.<br />
I don’t know if it helps, but it looks bet<strong>te</strong>r, and<br />
works on car wheels.<br />
You are now ready to remove it from the balancer,<br />
and install it back on the bike.<br />
Place the wheel back on the bike and install all<br />
the lug nuts finger tight.<br />
Then torque them to 60 Nm in a crosshatch<br />
fashion.<br />
21 of 23
Now on to the front wheel.<br />
Raise the front of the bike using a jack, like I<br />
did, or block it up with wood, or anything you<br />
choose. It doesn’t have much weight on it, and<br />
it will be stable on the cen<strong>te</strong>rstand.<br />
Remove the caliper bolts.<br />
Remove the inspection sticker placard if you<br />
have one.<br />
Tweak the caliper sideways on the rotor, this is<br />
especially important for bikes with 17” rims, as<br />
you would otherwise not be able to work the<br />
caliper off.<br />
It also spreads the pads making reinstallation<br />
much easier.<br />
I just gently let the caliper hang by the brake<br />
line. The caliper doesn’t weigh much, and it<br />
doesn’t hurt it. However, if it bothers you, use<br />
a string or coat hanger to hang the caliper.<br />
Now do the same to the other side.<br />
22 of 23
Next loosen the pinch bolt, but don’t remove it,<br />
just so it has no torque on it at all, a couple<br />
threads out from finger tight.<br />
I made a tool for the 22mm axle shaft out of a<br />
13/16” Taiwan spark plug socket.<br />
I just cut the end off.<br />
This makes it easier to carry and use, but you<br />
could use the socket on the ex<strong>te</strong>nsion backwards<br />
to do the same thing.<br />
Loosen the axle shaft and remove it.<br />
Be ready to catch the tire as it will drop partially<br />
when you pull the axle shaft out.<br />
Also catch the spacer on the left, opposi<strong>te</strong>,<br />
side.<br />
Pull the axle shaft out and remove the wheel.<br />
See the above for dismounting and mounting<br />
the tire, as well as balancing it.<br />
Install the front wheel in reverse order of removal,<br />
and tigh<strong>te</strong>n the bolts to the following<br />
torques: Front axle 50 Nm<br />
Pinch Bolt 19 Nm<br />
Caliper Bolts 30 Nm<br />
When you are done, and the bike is ready to<br />
ride, make sure you give the brakes a couple<br />
pumps to get full power back. (Servo brakes do<br />
not ne<strong>ed</strong> this, but you should <strong>te</strong>st them before<br />
riding off.)<br />
Other advice, make sure you take it pretty easy<br />
until the tires are scrubb<strong>ed</strong> in. Depending on<br />
how you ride, this could be up to 200 miles.<br />
23 of 23