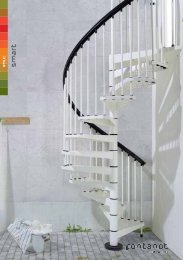
Istruzioni_Zooom_ZooomPLUS
Handleiding Zooom PLUS
Handleiding Zooom PLUS

Create successful ePaper yourself
Turn your PDF publications into a flip-book with our unique Google optimized e-Paper software.
up of two sections) to open the ladder from underneath,<br />
by inserting the hook into the projecting ring of the panel<br />
and pull the pole. Then turn and extend the ladder until<br />
it reaches the floor (securely foot the ladder with the<br />
two nylon casters resting firmly on the floor). Should you<br />
need to adjust the ladder for heights falling outside the<br />
standard, you must adjust the rods by either screwing<br />
or unscrewing both M10 nuts with the 17mm ( 25 / 64 ”)<br />
wrench (the nuts must always rest simultaneously on<br />
the ratchets).<br />
While the ladder rests on the floor, screw or unscrew the<br />
end stroke so it always rests on the frame.<br />
N.B. The ladder must not be walled in.<br />
N.B. Climbing up and down the ladder must always take<br />
place with the body facing the ladder.<br />
5. In case you have to assemble a handrail on the right<br />
hand side (facing the ladder), fit it when the ladder is<br />
unfolded. Place the handrail next to the ladder, with the<br />
“L” shaped lever next to the bottom pre-drilled lever<br />
and the “straight” lever next to the top pre- drilled lever.<br />
Next, tighten the 2+2 screws with nuts by means of a<br />
screwdriver and a 10mm ( 43 / 64 ”) wrench.<br />
Only for <strong>Zooom</strong> Plus:<br />
6. On the landing floor, left-hand side while climbing up,<br />
connect the ladder to a 220V power socket. Press the<br />
top button of the remote control once, you will note that<br />
the blinker turns on with no movement of the ladder; the<br />
control unit is memorizing data. Allow it to end its cycle.<br />
Press the same button again and you will notice that the<br />
ladder opens completely. The rotation brackets of the<br />
ladder will rest on the M10 end stroke nuts. To close<br />
the ladder, press the same button again. To stop the<br />
ladders movement before it ends it motion, simply press<br />
the button on the remote control; a new impulse will get<br />
the ladder moving again, but in the opposite direction.<br />
6.1 = Reset button<br />
6.2 = Working button<br />
6.3 = Control unit<br />
6.4 = Blinker<br />
6.5 = Rotating arm<br />
6.6 = Motor<br />
6.7 = M10 Bolt - end stroke<br />
7. In case of lack of electricity, follow the instructions<br />
below:<br />
- divide the two parts of the pole;<br />
- using the forked part of the pole, pull the steel sphere<br />
with the steel cable situated under the panel and<br />
connected to the motor release mechanism;<br />
- keeping the wire taut, pull until the panel is completely<br />
open;<br />
- still keeping the wire taut, use the hooked part of the<br />
pole to pull down on the tread and unfold the ladder to<br />
the floor.<br />
zooom plus - zooom<br />
6<br />
N.B. Climbing up and down the ladder must always take<br />
place with the body facing the ladder.<br />
DE<br />
1. Öffnen Sie die Verpackung und lassen Sie die Treppe<br />
und den Öffnungsstab auf der unteren Etage.<br />
Bringen Sie die 4 Befestigungsbügel mit den zugehörigen<br />
Muttern zu M10 auf die obere Etage.<br />
2. Schieben Sie die Treppe mit Hilfe von Stützen oder<br />
Seilen von unten in die Bodenöffnung und bringen Sie<br />
dann sofort die 4 gebohrten Bügel senkrecht über den<br />
herausragenden Gewindestäben zu M10 an.<br />
Ziehen Sie die Muttern zu M10 mit einem 17mm-er<br />
Schlüssel fest, bis der untere Anschlag der Treppe<br />
auf dem Deckenausschnitt aufliegt (nicht endgültig<br />
festziehen).<br />
3. Schauen Sie die Treppe (geschlossen) von unten<br />
an und vergewissern Sie sich, dass der Schlitz<br />
zwischen Rahmen und Platte konstant ist (Treppe<br />
rechtwinklig) sowie dass die Platte nicht den Rahmen<br />
berührt. Anderenfalls muss die Position der Treppe<br />
von oben durch Vornahme kleiner Verschiebungen<br />
korrigiert werden. Ziehen Sie dann die Treppe am<br />
Deckenausschnitt mit einem 17mm-er Schlüssel an den<br />
Muttern M10 der Bügel fest.<br />
Anm.: Es wird geraten, den aus der Stellmutter<br />
herausragenden Teil des Gewindestabs abzuschneiden.<br />
4. Öffnen Sie die Treppe von unten durch Betätigen des<br />
Rings am Verschluss mit der Stange, die über einen<br />
Haken zum Öffnen verfügt, indem dieser eingeführt<br />
und gedreht wird (besteht aus 2 Teilen). Ziehen Sie die<br />
Treppe bis zum Boden (die beiden kleinen Nylonräder<br />
müssen auf dem Fußboden aufliegen). Sollte die Treppe<br />
wegen Höhen an der Grenze des Zulässigen eingestellt<br />
werden müssen, sind die Zuganker zu betätigen oder<br />
müssen beide Muttern M10 mit 17mm-er Schlüssel<br />
gelöst werden (die Muttern müssen immer gleichzeitig<br />
auf den Klinken aufliegen). Drehen Sie bei aufliegender<br />
Treppe den Zapfen M10x50 ab oder ein, so dass dieser<br />
immer auf dem Rahmen aufliegt.<br />
Bei am Boden angelehnter Treppe, den Endanschlag einoder<br />
abschrauben, sodass er immer auf dem Rahmen<br />
bleibt.<br />
Anm.: Die Treppe darf nicht eingemauert werden.<br />
Anm.: Das Heben und Senken der Treppe muss immer<br />
bei in die gleiche Richtung gedrehtem Körper erfolgen.<br />
5. Für die eventuelle Montage des Handlaufs auf der<br />
rechten Seite beim Hochsteigen muss bei geöffneter<br />
Treppe gearbeitet werden. Positionieren Sie den<br />
Handlauf seitlich der Treppe, so dass sich der “L”-<br />
förmige Hebel am unteren gelochten Hebel und der