GB - Novatherm Klimageräte GmbH
GB - Novatherm Klimageräte GmbH
GB - Novatherm Klimageräte GmbH

Create successful ePaper yourself
Turn your PDF publications into a flip-book with our unique Google optimized e-Paper software.
VENTILCONVETTORI<br />
FAN COIL<br />
VENTILO-CONVECTEURS<br />
GEBLÄSEKONVEKTOREN<br />
Omnia HL<br />
HL M<br />
ISO 9001 - Cert. nº 0128/3<br />
AERMEC S.P.A.<br />
C E R T I F I E D<br />
Q U A L I T Y S Y S T E M<br />
Sostituisce - Replace<br />
Remplace - Ersetzt:<br />
68872.01/0302<br />
IHLLX<br />
0404<br />
68872.01_01<br />
MMM AAA NNN UU AAA LL E D ’’ UU S O EEE II N S TTA LL LL A ZZ II OO NN EE DD II R EE C TT II O NN F OO R UU S E AA N DDD II NN S TA LL L AT II OO N<br />
MMAANUUELL DE FFOONNCCTTIOONNNNEEMMMEENNTT EETT DD’’INNSTTALLLLATTIOONN BEEDDDIENNNUNGG- UUNND IINSTAALLLLLAATIIOONSANLLEIIITUUNNG
INDICE • CONTENTS INDEX INHALTSVERZEICHN<br />
I<br />
<strong>GB</strong><br />
F<br />
D<br />
INFORMAZIONI GENERALI GENERAL INFORMATION<br />
INFORMATIONS GENERALES ALLGEMEINE INFORMATIONEN 4<br />
Descrizione di Omnia HL - HL M • Utilizzo 5<br />
Caratteristiche di funzionamento Imballo Installazione dell’unità<br />
Collegamenti elettrici Rotazione batteria 6<br />
Informazioni importanti e manutenzione 7<br />
Description of Omnia HL - HL M Use 8<br />
Operation Packaging Installation<br />
Electrical connections Coil rotation 9<br />
Important maintenance information 10<br />
Description de l’unité Omnia HL - HL M Emploi 11<br />
Caracteristiques de fonctionnement Emballage Installation de l’unité<br />
Connexions electriques Rotation batterie 12<br />
Informations importantes sur la maintenance 13<br />
Beschreibung des Gerätes Omnia HL - HL M Anwendung 14<br />
Funktionseigenschaften Verpackung Installation der Einheit<br />
Elektrischer anschluss Umdrehen des Wärmetauschers 15<br />
Wichtige hinweise und wartung 16<br />
DATI DIMENSIONALI DIMENSIONS DIMENSIONS ABMESSUNGEN 17<br />
SCHEMA ELETTRICO WIRING DIAGRAM SCHEMAS ELECTRIQUES SCHALTPLANE 20<br />
MISURE DI SICUREZZA SAFETY MEASURES MISURES DE SECURITE SICHEREITSMAßNAHMEN 21<br />
SOLUZIONE DEI PROBLEMI REMEDY<br />
SOLUTION ABHILFE 22<br />
SERVIZI ASSISTENZA 23
AERMEC S.p.A.<br />
I-37040 Bevilacqua (VR) Italia – Via Roma, 44<br />
Tel. (+39) 0442 633111<br />
Telefax (+39) 0442 93730 – (+39) 0442 93566<br />
www.aermec.com - info@aermec.com<br />
Omnia HL<br />
HL M<br />
DICHIARAZIONE DI CONFORMITÀ<br />
Noi, firmatari della presente, dichiariamo sotto la nostra<br />
esclusiva responsabilità, che la macchina in oggetto è<br />
conforme a quanto prescritto dalle seguenti Direttive:<br />
- Direttiva macchine 89/392 CEE e modifiche 91/368 CEE -<br />
93/44 CEE - 93/68 CEE;<br />
- Direttiva bassa tensione 73/23 CEE;<br />
- Direttiva compatibilità elettromagnetica EMC 89/336 CEE.<br />
CERTIFICAT DE CONFORMITE<br />
Nous, signataires de la présente, certifions sous notre propre<br />
responsabilité, que l’appareil en objet est conforme aux suivantes<br />
Directives:<br />
- Directive appareil 89/392 EEC e modifications 91/368 EEC -<br />
93/44 EEC - 93/68 EEC;<br />
- Directive basse tension 73/23 EEC;<br />
- Direttiva compatibilità elettromagnetica EMC 89/336 EEC.<br />
Bevilacqua, 1/1/2004 La Direzione Commerciale - Sales and Marketing Director<br />
LUIGI ZUCCHI<br />
AERMEC S.p.A. partecipa al Programma di Certificazione<br />
EUROVENT. I prodotti interessati figurano nella Guida<br />
EUROVENT dei Prodotti Certificati.<br />
AERMEC S.p.A. partecipe au Programme de Cerification<br />
EUROVENT. Les produits figurent dans l’Annuaire EURO-<br />
VENT des Produits Certifiés.<br />
DECLARATION OF CONFORMITY<br />
We declare under our own responsability that the above<br />
equipment complies with provisions of the following<br />
Standards:<br />
- Equipment Standard 89/392 CEE and amandments<br />
91/368 CEE - 93/44 EEC - 93/68 EEC;<br />
- Low voltage Standard 73/23 EEC;<br />
- Electromagnetic compatibility Standard EMC 89/336 EEC.<br />
KONFORMITÄTSERKLÄRUNG<br />
Wir, Unterzeichner dieser Bescheinigung, bestätigen, daß<br />
diese Geräte den Vorschriften:<br />
- Vorschrift Geräte 89/392 EWG und entersprechende<br />
ergänzungen 91/368 EWG - 93/44 EWG - 93/68 EWG;<br />
- Niederspannung - Vorschrift 73/23 EWG;<br />
- Funkentstörung - Vorschrift EMC 89/336 EWG.<br />
AERMEC S.p.A. is partecipating in the EUROVENT<br />
Certification Program. Products are as listed in the EURO-<br />
VENT Directory of Certified Products.<br />
AERMEC S.p.A. is am Zertifikations - programm EUROVENT<br />
beteiligt. Die entsprechend gekennzeichneten Produkte sind<br />
im EUROVENT - Jahrbuch aufgefürt.
VENTILCONVETTORE OMNIA HL - HL M<br />
Il ventilconvettore OMNIA HL (High Line) è caratterizzato<br />
dal suo design esclusivo opera dello Studio Giugiaro<br />
Design, ma concentra anche elevate caratteristiche tecnologiche<br />
che ne fanno il mezzo ideale di climatizzazione per<br />
ogni ambiente.<br />
L’erogazione di aria climatizzata è immediata e distribuita<br />
in tutto il locale; OMNIA HL genera calore se inserito in un<br />
impianto termico con caldaia o pompa di calore ma può<br />
essere usato anche nei mesi estivi come condizionatore se<br />
l’impianto termico è dotato di un refrigeratore d’acqua.<br />
La qualità dell’aria trattata è garantita da uno speciale filtro<br />
precaricato elettrostaticamente che assorbe e trattiene le<br />
polveri in sospensione, a ventilconvettore spento l’aletta<br />
chiusa impedisce alla polvere e a corpi estranei di penetrare<br />
all’interno. La possibilità di rimuovere la bacinella e le<br />
coclee dei ventilatori ispezionabili (eseguibile solo da soggetti<br />
in possesso dei requisiti tecnico-professionali di abilitazione<br />
all'installazione, alla trasformazione, all'ampliamento<br />
e alla manutenzione degli impianti ed in grado di verificare<br />
gli stessi ai fini della sicurezza e della funzionalità) consentono<br />
di eseguire una pulizia accurata delle parti interne,<br />
condizione necessaria per installazioni in luoghi molto<br />
affollati o che richiedono uno standard elevato di igiene.<br />
La silenziosità del nuovo gruppo di ventilazione centrifugo<br />
è tale che alla normale velocità di utilizzo, non si percepisce<br />
quando l’OMNIA HL entra in funzione.<br />
Il pannello comandi con commutatore è protetto da uno<br />
sportellino sulla testata.<br />
Il ventilconvettore OMNIA HL è concepito per poter soddisfare<br />
ogni esigenza di impianto, grazie anche alla ricca<br />
dotazione di accessori.<br />
Facilità di installazione che può essere sia orizzontale sia<br />
verticale, con attacchi idraulici reversibili in fase di installazione.<br />
Pieno rispetto delle norme antinfortunistiche.<br />
La manutenzione ordinaria è ridotta alla pulizia periodica<br />
del filtro dell’aria con un semplice lavaggio in acqua.<br />
VERSIONI:<br />
HL Mobile colore bianco RAL9002 con commutatore. La testata e gli zoccoli sono di colore RAL7044.<br />
HL M Mobile colore grigio metallizzato FIAT656 con commutatore. La testata e gli zoccoli sono di colore grigio<br />
RAL7031.<br />
SELETTORE (A)<br />
- Acceso/Spento.<br />
- Selezione manuale della velocità.<br />
V1 =Velocità minima<br />
V2 =Velocità media<br />
V3 =Velocità massima<br />
UTILIZZO (OMNIA HL - HL M)<br />
COMANDI:<br />
La ventilazione è consentita solo con la aletta aperta, è<br />
necessario aprirla manualmente. La chiusura dell’aletta provoca<br />
lo spegnimento della ventilazione.<br />
Accensione / Spegnimento<br />
OFF Il ventilconvettore è spento.<br />
Per avviare il ventilconvettore ruotare la manopola<br />
verso il modo di funzionamento desiderato<br />
in una delle tre velocità di ventilazione.<br />
5<br />
I
I<br />
CARATTERISTICHE DI FUNZIONAMENTO<br />
I ventilconvettori OMNIA HL - HL M sono forniti pronti a<br />
funzionare in configurazione standard.<br />
La risposta ai comandi è immediata.<br />
Tipologie d’impianto<br />
I ventilconvettori della serie OMNIA HL - HL M sono progettati<br />
per impianti a 2 tubi senza valvola<br />
Ventilazione<br />
La ventilazione a tre velocità è comandata manualmente<br />
con il selettore (A) in posizione V1, V2 e V3 .<br />
La ventilazione è consentita solo con l’aletta aperta, nei<br />
modelli senza aletta motorizzata è necessario aprirla<br />
manualmente.<br />
IMBALLO<br />
I ventilconvettori vengono spediti con imballo standard<br />
costituito da gusci di protezione e cartone.<br />
INSTALLAZIONE DELL’UNITÀ<br />
ATTENZIONE: prima di effettuare qualsiasi intervento, assicurarsi<br />
che l’alimentazione elettrica sia disinserita.<br />
ATTENZIONE: i collegamenti elettrici, l’installazione dei<br />
ventilconvettori e dei loro accessori devono essere eseguiti<br />
solo da soggetti in possesso dei requisiti tecnico-professionali<br />
di abilitazione all'installazione, alla trasformazione,<br />
all'ampliamento e alla manutenzione degli impianti ed in<br />
grado di verificare gli stessi ai fini della sicurezza e della<br />
funzionalità.<br />
Il ventilconvettore deve essere installato in posizione tale da<br />
consentire facilmente la manutenzione ordinaria (pulizia del<br />
filtro) e straordinaria, nonchè l’accesso alla valvola di sfiato<br />
dell’aria sulla fiancata del telaio (lato attacchi); si raccomanda<br />
inoltre di non installare il ventilconvettore sopra oggetti<br />
che temono l’umidità in quanto in particolari condizioni si<br />
potrebbero verificare fenomeni di condensazione sulla struttura<br />
esterna dell’apparecchio con possibilità di gocciolamento<br />
oppure guasti agli impianti idraulico e di scarico condensa<br />
con conseguente riversamento di liquidi.<br />
Il luogo di montaggio deve essere scelto in modo che il limite<br />
di temperatura ambiente massimo e minimo venga rispettato<br />
0÷45°C (
INFORMAZIONI IMPORTANTI E MANUTENZIONE<br />
Il ventilconvettore è collegato alla rete elettrica ed al circuito idraulico, un intervento da parte di personale non provvisto di<br />
specifica competenza tecnica può causare danni allo stesso operatore, all’apparecchio ed all’ambiente circostante.<br />
ALIMENTARE IL VENTILCONVETTORE SOLO CON TENSIONE 230 VOLT MONOFASE<br />
Utilizzando alimentazioni elettriche diverse il ventilconvettore può subire danni irreparabili.<br />
NON USARE IL VENTILCONVETTORE IN MODO IMPROPRIO<br />
Il ventilconvettore non va utilizzato per allevare, far nascere e crescere animali.<br />
VENTILARE L'AMBIENTE<br />
Si consiglia di ventilare periodicamente l'ambiente ove è installato il ventilconvettore, specialmente se nel locale risiedono<br />
parecchie persone o se sono presenti apparecchiature a gas o sorgenti di odori.<br />
REGOLARE CORRETTAMENTE LA TEMPERATURA<br />
La temperatura ambiente va regolata in modo da consentire il massimo benessere alle persone presenti, specialmente se si<br />
tratta di anziani, bambini o ammalati, evitando sbalzi di temperatura tra interno ed esterno superiori a 7 °C in estate.<br />
In estate una temperatura troppo bassa comporta maggiori consumi elettrici.<br />
ORIENTARE CORRETTAMENTE IL GETTO D'ARIA<br />
L'aria che esce dal ventilconvettore non deve investire direttamente le persone; infatti, anche se a temperatura maggiore di<br />
quella dell'ambiente, può provocare sensazione di freddo e conseguente disagio.<br />
NON USARE ACQUA TROPPO CALDA<br />
Per pulire l'unità interna usare panni o spugne morbidi bagnati in acqua al massimo a 40 °C. Non usare prodotti chimici o solventi<br />
per nessuna parte del ventilconvettore. Non spruzzare acqua sulle superfici esterne o interne del ventilconvettore (si<br />
potrebbero provocare dei corti circuiti).<br />
PULIRE PERIODICAMENTE IL FILTRO<br />
Una pulizia frequente del filtro garantisce una maggiore efficienza di funzionamento.<br />
Controllare se il filtro risulta molto sporco: nel caso ripetere l’operazione più spesso.<br />
Pulire frequentemente, togliere la polvere accumulata con un aspiratore, l’uso di acqua e detergenti, accelera sensibilmente<br />
il decadimento della precarica elettrostatica.<br />
Quando il filtro è pulito rimontarlo sul ventilconvettore procedendo al contrario rispetto allo smontaggio.<br />
PULIZIA STRAORDINARIA<br />
La possibilità di rimuovere la bacinella e le coclee dei ventilatori ispezionabili (eseguibile solo da personale provvisto di<br />
specifica competenza tecnica) consentono di eseguire una pulizia accurata delle anche delle parti interne, condizione<br />
necessaria per installazioni in luoghi molto affollati o che richiedono uno standard elevato di igiene.<br />
DURANTE IL FUNZIONAMENTO<br />
Lasciare sempre il filtro montato sul ventilconvettore durante il funzionamento, altrimenti la polvere presente nell'aria andrà<br />
a sporcare le superfici della batteria.<br />
È NORMALE<br />
Nel funzionamento in raffreddamento può uscire del vapore acqueo dalla mandata del ventilconvettore.<br />
Nel funzionamento in riscaldamento un leggero fruscio d’aria può essere avvertibile in prossimità del ventilconvettore.<br />
Talvolta il ventilconvettore può emettere odori sgradevoli dovuti all'accumulo di sostanze presenti nell'aria dell'ambiente<br />
(specialmente se non si provvede a ventilare periodicamente la stanza, pulire il filtro più spesso).<br />
LIMITI DI FUNZIONAMENTO<br />
Massima temperatura ingresso acqua 80 °C<br />
Massima pressione d'esercizio 8 bar<br />
Minima temperatura media dell’acqua<br />
Per evitare fenomeni di condensazione sulla struttura esterna dell’apparecchio con ventilatore in funzione, la temperatura<br />
media dell’acqua non deve essere inferiore ai limiti riportati nella tabella sottostante, che dipendono dalle condizioni<br />
termo-igrometriche dell’aria ambiente. I suddetti limiti si riferiscono al funzionamento con ventilatore in moto alla minima<br />
velocità. In caso di prolungata situazione con ventilatore spento e passaggio di acqua fredda in batteria, è possibile la formazione<br />
di condensa all’esterno dell’apparecchio, pertanto si consiglia l’inserimento dell’accessorio valvola a tre vie.<br />
MINIMA TEMPERATURA MEDIA ACQUA<br />
Temperatura a bulbo secco dell’aria ambiente °C<br />
21 23 25 27 29 31<br />
15 3 3 3 3 3 3<br />
Temperatura a bulbo umido<br />
dell’aria ambiente °C<br />
17<br />
19<br />
21<br />
3<br />
3<br />
6<br />
3<br />
3<br />
5<br />
3<br />
3<br />
4<br />
3<br />
3<br />
3<br />
3<br />
3<br />
3<br />
3<br />
3<br />
3<br />
23 - 8 7 6 5 5<br />
7<br />
I
<strong>GB</strong><br />
OMNIA HL - HL M FANCOIL<br />
The OMNIA HL (High Line) fancoil, with its characteristic<br />
design by Studio Giugiaro, offers an array of technical features<br />
that make it the ideal climate-control unit for all types of<br />
applications.<br />
Treated air is immediately delivered to the entire room;<br />
the OMNIA HL produces warm air when fitted to a heating<br />
system with boiler or heat pump, but can also be used<br />
during the summer season as an air-conditioning unit (if the<br />
main system is also equipped with a water chiller).<br />
The quality of processed air is guaranteed by a special<br />
electrostatically pre-charged filter that absorbs and traps<br />
suspended dust particles (when the unit is off, a closed louver<br />
prevents dust and other foreign particles from entering<br />
the unit interior). The removable drip tray and fan volute<br />
ensure thorough cleaning of the unit (should be performed<br />
by a technician who has the necessary technical and professional<br />
expertise to install, modify, extend and maintain<br />
SELECTOR (A)<br />
- On/Off<br />
- Manual speed selection<br />
V1 =Minimun fan speed<br />
USE (OMNIA HL - HL M)<br />
CONTROLS:<br />
Ventilation is only permitted when the louver is manually<br />
opened. When the louvers are closed, ventilation is shut<br />
down.<br />
On / Off<br />
OFF The fancoil is off.<br />
speeds.<br />
8<br />
V2 =Mediun fan speed<br />
V3 =Maximun fan speed<br />
To restart the fancoil, rotate the knob to the operation<br />
mode required in one of the three fan<br />
plants and who is able to check the plants for the purposes<br />
of safety and correct operation), essential for installations in<br />
venues subject to crowding or in those with special hygiene<br />
requirements.<br />
The new centrifugal fan assembly is so quiet that during<br />
standard operation it's virtually impossible to hear when the<br />
OMNIA HL starts up.<br />
The control panel with switch is protected by a panel on<br />
the unit head.<br />
With its large range of accessories, the OMNIA HL fancoil<br />
is designed to satisfy all installation types.<br />
The unit can be easily installed either vertically or horizontally<br />
(water connections can be reversed as required<br />
during installation).<br />
Full compliance with safety regulations.<br />
Routine maintenance is limited to periodic cleaning of the<br />
air filter in water.<br />
VERSIONS:<br />
HL RAL9002 white body with switch. The air distribution head and the skirts are in RAL7044.<br />
HL M FIAT656 metallic grey body with switch. The air distribution head and the skirts are in RAL7031 grey.
OPERATION<br />
OMNIA HL - HL M fancoils are delivered ready to operate<br />
in standard configuration.<br />
Response to controls is immediate.<br />
Unit types<br />
OMNIA HL - HL M units are designed for twin-tube units<br />
without valve, and are prearranged for motorised louver<br />
operation (kit supplied as accessory).<br />
Ventilation<br />
Ventilation speed is controlled either manually by setting<br />
the selector switch A to position V1, V2 or V3 .<br />
Ventilation is only permitted with louvers open (manually in<br />
the case of units without motorised louvers).<br />
PACKAGING<br />
The fancoils are delivered in standard packing comprising<br />
protective shells and cardboard.<br />
INSTALLATION<br />
IMPORTANT: check that the power supply is disconnected<br />
before performing operations on the unit.<br />
CAUTION: wiring connections installation of the fancoil<br />
and relevant accessories should be performed by a technician<br />
who has the necessary technical and professional<br />
expertise to install, modify, extend and maintain plants and<br />
who is able to check the plants for the purposes of safety<br />
and correct operation.<br />
IInstall the fancoil in a position that will facilitate routine (filter<br />
cleaning) and special maintenance, and easy access to<br />
the air breather valve on the side of the unit (connections<br />
side).<br />
Note that certain operating conditions could lead to the formation<br />
of condensate on the unit housing with subsequent<br />
dripping, or faults to the water circuit or condensate drainage<br />
could cause liquids to overflow. For these reasons, avoid<br />
installing the unit on surfaces damageable by moisture.<br />
Make sure that the unit is installed in a site where the<br />
ambient temperature is inside the minimum and maximum<br />
limits 0 - 45°C (
<strong>GB</strong><br />
IMPORTANT MAINTENANCE INFORMATION<br />
The fancoil is connected to the power supply and a water circuit. Operations performed by persons without the required<br />
technical skills can lead to personal injury to the operator or damage to the unit and surrounding objects.<br />
POWER THE FANCOIL WITH SINGLE-PHASE 230 V ONLY<br />
Use of other power supplies could cause permanent damage to the fancoil.<br />
NEVER USE THE FANCOIL FOR APPLICATIONS FOR WHICH IT WAS NOT DESIGNED<br />
Do not use the fancoil in husbandry applications (e.g. incubation).<br />
AIR THE ROOM<br />
Periodically air the room in which the fancoil has been installed; this is particularly important if the room is occupied by<br />
many people, or if gas appliances or sources of odours are present.<br />
CORRECTLY ADJUST THE TEMPERATURE<br />
Room temperature should be regulated to ensure maximum comfort to persons present, particularly in the case of the<br />
elderly, infants and invalids. Prevent temperature fluctuations between indoors and outdoors greater than 7 °C during summer.<br />
Note that very low temperatures during summer will lead to greater electricity consumption.<br />
ORIENT AIR FLOW CORRECTLY<br />
Air delivered by the fancoil should not be oriented directly at people; even if air temperature is greater than room temperature,<br />
it can cause a cold sensation and consequently discomfort.<br />
DO NOT USE HOT WATER<br />
When cleaning the indoor unit, use rags or soft sponges soaked in warm water (no higher than 40°C).<br />
Do not use chemical products or solvents to clean any part of the fancoil.<br />
Do not splash water on interior or exterior surfaces of the fancoil; danger of short circuit.<br />
PERIODICALLY CLEAN THE FILTER<br />
Frequent cleaning of the filter will ensure more efficient unit operation.<br />
Check whether the filter requires cleaning; if it is particularly dirty, clean it more often.<br />
Clean the filter frequently. Use a vacuum cleaner to remove built up dust. Avoid water or detergents if possible since they<br />
greatly accelerate loss of the filter's electrostatic charge.<br />
After cleaning and drying the filter, fit it on the fancoil by following the removal procedure in reverse order.<br />
SPECIAL CLEANING<br />
The removable drip tray and fan volute ensure thorough cleaning of the unit (by specifically trained personnel), essential for<br />
installations in venues subject to crowding or in those with special hygiene requirements.<br />
DURING UNIT OPERATION<br />
Always leave the filter on the fancoil during operation (otherwise dust in the air could soil the surface of the coil).<br />
IT IS NORMAL<br />
During cooling, water vapour may be present in the air delivery.<br />
During heating operation a light rustling sound may be perceived near the fancoil.<br />
Sometimes the fancoil can give off unpleasant odours due to the accumulation of substances present in the room: air the<br />
room and clean the filter more often.<br />
OPERATING LIMITS<br />
Maximum water inlet temperature 80 °C<br />
Maximum working pressure 8 bar<br />
Minimum average water temperature<br />
To prevent the formation of condensation on the exterior of the unit while the fan is operating, the average water temperature<br />
should not drop beneath the limits shown in the table below, determined by the ambient conditions. These limits refer to<br />
unit operation with fan at minimum speed. Note that condensation may form on the exterior of the unit if cold water circulates<br />
through the coil while the fan is off for prolonged periods of time, so it is advisable to fit the additional three-way<br />
valve.<br />
MINIMUM AVERAGE WATER TEMPERATURE<br />
Dry bulb temperature °C<br />
21 23 25 27 29 31<br />
15 3 3 3 3 3 3<br />
17 3 3 3 3 3 3<br />
Wet bulb temperature °C 19 3 3 3 3 3 3<br />
21 6 5 4 3 3 3<br />
23 - 8 7 6 5 5<br />
10
VENTILO-CONVECTEUR OMNIA HL - HL M<br />
Le ventilo-convecteur OMNIA HL (High Line) est caractérisé<br />
par son design exclusif, élaboré par le Studio Giugiaro<br />
Design, mais ce sont principalement ses caractéristiques<br />
technologiques qui en font un moyen idéal de climatisation<br />
pour chaque local.<br />
La distribution d'air climatisé est immédiate et concerne<br />
la totalité du local; OMNIA HL génère de la chaleur si<br />
inséré dans une installation thermique avec une chaudière<br />
ou une pompe de chaleur, mais il peut être utilisé également<br />
durant les mois d'été comme climatiseur si l'Unité<br />
thermique est équipée d'un réfrigérateur d'eau.<br />
La qualité de l'air traité est garantie par un filtre spécial<br />
préchargé électrostatiquement qui absorbe et retient les<br />
poussières en suspension: lorsque le ventilo-convecteur est<br />
éteint, l'ailette fermée empêche à la poussière et aux corps<br />
étrangers de pénétrer à l'intérieur. La possibilité d'enlever le<br />
bac et les vis sans fin des ventilateurs faciles à inspecter<br />
(opération qui doit être réalisée uniquement par un personnel<br />
en possession de la qualification technico-professionnelle<br />
requise pour l'habilitation à l'installation, la transformation,<br />
le développement et l'entretien des installations, et en<br />
COMMANDES:<br />
La ventilation est autorisée uniquement avec l'ailette ouverte;<br />
il faut l'ouvrir manuellement. La fermeture de l'ailette<br />
provoque l'extinction de la ventilation, mais le thermostat<br />
électronique reste actif et enregistre, de manière continue,<br />
les données ambiantes pour un redémarrage rapide lors de<br />
la réouverture de l'ailette.<br />
Activation/Désactivation<br />
OFF Le ventilo-convecteur est désactivé.<br />
mesure de vérifier ces dernières aux fins de la sécurité et de<br />
la fonctionnalité, permettent de nettoyer soigneusement des<br />
organes internes également, une condition nécessaire pour<br />
les installations dans des locaux très fréquentés ou qui exigent<br />
un standard d'hygiène important.<br />
Le caractère silencieux caractéristique de ce nouveau<br />
groupe de ventilation centrifuge est tel que l'on ne perçoit<br />
pas la mise en service d'OMNIA HL avec une vitesse normale<br />
d'utilisation.<br />
Le tableau de commande avec un commutateur est<br />
protégé par un portillon sur la tête.<br />
Le ventilo-convecteur OMNIA HL est conçu de manière à<br />
satisfaire toutes les exigences d'installation, grâce également<br />
à une dotation très riche en accessoires.<br />
Facilité d'installation qui peut être aussi bien horizontale<br />
que verticale, avec des raccords hydrauliques réversibles<br />
durant l'installation.<br />
Respect total des normes contre les accidents.<br />
La maintenance habituelle concerne uniquement le nettoyage<br />
périodique du filtre d'air avec un simple lavage dans<br />
l'eau.<br />
VERSIONS:<br />
HL Meuble blanc RAL9002 avec commutateur. La tête et les sabots sont RAL7044.<br />
HL M Meuble gris métallisé FIAT656 avec commutateur. La tête et les sabots sont gris RAL7031.<br />
SELECTEUR (A).<br />
- Activé/Désactivé.<br />
- Sélection manuelle de la vitesse.<br />
V1 =Vitesse minimale<br />
V2 =Vitesse moyenne<br />
V3 =Vitesse maximale<br />
EMPLOI (OMNIA HL - HL M)<br />
Pour démarrer le ventilo-convecteur tourner la<br />
poignée vers le mode de fonctionnement<br />
souhaité sur l'une des trois vitesses de ventilation.<br />
11<br />
F
F<br />
CARACTERISTIQUES DE FONCTIONNEMENT<br />
Les ventilo-convecteurs OMNIA HL - HL M sont livrés prêts<br />
à fonctionner dans une configuration standard.<br />
La réponse aux commandes est immédiate.<br />
Catégories d'installations<br />
Les ventilo-convecteurs de la série OMNIA HL - HL M sont<br />
conçus pour des installations à 2 tubes sans valve et ils sont<br />
prédisposés pour la motorisation des ailettes (avec un kit<br />
spécifique fourni comme accessoire).<br />
Ventilation<br />
La ventilation à trois vitesses est commandée soit manuellement<br />
avec le sélecteur (A) sur la position V1, V2 et V3 .<br />
La ventilation est autorisée uniquement avec les ailettes<br />
ouvertes; dans les modèles sans ailettes motorisées, il faut<br />
les ouvrir manuellement.<br />
EMBALLAGE<br />
Les ventilo-convecteurs sont expédiés en emballage standard<br />
constitué par un habillage de protection et carton.<br />
INSTALLATION DE L'UNITE<br />
ATTENTION ! avant d'effectuer une intervention quelconque<br />
s'assurer que l'alimentation électrique est bien désactivée.<br />
ATTENTION: les raccordements électriques, l'installation<br />
des ventiloconvecteurs et de leurs accessoires ne doivent<br />
être exécutés que par des personnes en possession de la<br />
qualification technico-professionnelle requise pour l'habilitation<br />
à l'installation, la transformation, le développement<br />
et l'entretien des installations, et en mesure de vérifier ces<br />
dernières aux fins de la sécurité et de la fonctionnalité.<br />
IInstaller le ventilo-convecteur dans une position qui facilite la<br />
maintenance habituelle (nettoyage du filtre) et extraordinaire,<br />
mais aussi l'accès à la valve de purge d'air sur le côté du châssis<br />
(côté raccords); nous insistons vivement sur le fait qu'il faut<br />
éviter d'installer le ventilo-convecteur au dessus des objets qui<br />
craignent l'humidité car, dans des conditions particulières, des<br />
phénomènes de condensation pourraient intervenir sur la<br />
structure externe de l'appareil, ce qui pourrait faire enregistrer<br />
un suintement ou endommager les organes hydrauliques et<br />
d'évacuation de la buée, avec une fuite de liquides.<br />
Le lieu de montage doit être choisi de manière que la limite<br />
de température ambiante maximale et minimale soit<br />
respectée 0÷45°C (
INFORMATIONS IMPORTANTES SUR LA MAINTENANCE<br />
Le ventilo-convecteur est connecté au réseau électrique et au circuit hydraulique : l'intervention d'un personnel sans<br />
compétence technique spécifique peut entraîner des blessures pour l'opérateur ou endommager l'appareil ou le milieu intéressé.<br />
ALIMENTER LE VENTILO-CONVECTEUR EXCLUSIVEMENT AVEC UNE TENSION DE 230 VOLTS MONOPHASE<br />
Si l'on utilise des alimentations électriques différentes, le ventilo-convecteur peut être irrémédiablement endommagé.<br />
NE PAS UTILISER LE VENTILO-CONVECTEUR DE MANIERE IMPROPRE.<br />
Le ventilo-convecteur ne doit pas être utilisé pour l'élevage, la naissance ou la croissance d'animaux.<br />
VENTILER LE LOCAL<br />
Nous conseillons de ventiler périodiquement le local où est installé le ventilo-convecteur, plus spécialement si plusieurs<br />
personnes résident dans le local ou si des appareillages à gaz ou des sources d'odeurs se trouvent dans le local.<br />
REGLER CORRECTEMENT LA TEMPERATURE<br />
La température ambiante doit être réglée de manière à permettre le bien-être maximal des personnes présentes, en particulier<br />
s'il s'agit de personnes âgées, d'enfants ou de personnes malades, en évitant des écarts de température -entre l'intérieur<br />
et l'extérieur- supérieurs à 7 °C en été. En été une température trop basse entraîne une consommation d'électricité plus<br />
importante.<br />
ORIENTER CORRECTEMENT LE JET D'AIR<br />
L'air qui sort du ventilo-convecteur ne doit pas frapper directement les personnes ; en effet, même si ce jet est à une température<br />
supérieure à celle du local, il peut provoquer une sensation de froid et donc de malaise.<br />
NE PAS UTILISER DE L'EAU TROP CHAUDE<br />
Pour nettoyer l'intérieur de l'Unité utiliser des chiffons ou des éponges souples et mouillés avec de l'eau dont la température<br />
maximale ne dépasse pas 40 °C. N'utiliser aucun produit chimique ou solvant pour nettoyer une partie quelconque du ventilo-convecteur.<br />
Ne pas asperger avec de l'eau les surfaces externes ou internes du ventilo-convecteur (on pourrait provoquer<br />
des courts-circuits).<br />
NETTOYER LE FILTRE PERIODIQUEMENT<br />
Un nettoyage fréquent du filtre garantit une meilleure efficacité de fonctionnement.<br />
Contrôler si le filtre est sale: répéter l'opération plus souvent si nécessaire.<br />
Nettoyez fréquemment, enlevez la poussière qui s'accumule avec un aspirateur, l'utilisation d'eau et de détergent accélère<br />
sensiblement l'épuisement de la précharge électrostatique.<br />
Le remonter sur le ventilo-convecteur en adoptant la procédure inverse de celle du démontage.<br />
NETTOYAGE EXTRAORDINAIRE<br />
La possibilité d'enlever le bac et les vis sans fin des ventilateurs qui peuvent être inspectés (une opération qui doit être réalisée<br />
uniquement par un personnel doté d'une expérience technique) permettent d'effectuer un nettoyage soigné des organes<br />
internes également, une condition nécessaire pour une mise en place dans des locaux très fréquentés ou qui exigent un<br />
standard d'hygiène élevé.<br />
DURANT LE FONCTIONNEMENT:<br />
Laisser toujours le filtre monté sur le ventilo-convecteur durant le fonctionnement : la poussière qui se trouve dans l'air<br />
pourrait, dans le cas contraire, salir les surfaces de la batterie.<br />
IL EST NORMAL<br />
que durant la fonction de refroidissement, de la vapeur d'eau soit refoulée du ventilo-convecteur.<br />
Durant le fonctionnement pour le chauffage, une légère brise d'air peut être perçue à proximité du ventilo-convecteur.<br />
Quelquefois le ventilo-convecteur peut émettre des odeurs désagréables dues à l'accumulation de substances présentes<br />
dans l'air ambiant (plus spécialement si le local n'est pas périodiquement ventilé ; nettoyer le filtre plus souvent).<br />
LIMITES DE FONCTIONNEMENT<br />
Température maximale d'entrée de l'eau 80 °C<br />
Pression maximale de fonctionnement 8 bar<br />
Température minimale moyenne de l’eau<br />
Pour éviter les phénomènes de condensation sur la structure externe de l'appareil avec le ventilateur en service, la température<br />
moyenne de l'eau ne doit pas être inférieure aux limites reprises sur le tableau ci-après, qui dépendent des conditions<br />
thermo-hygrométriques de l'air ambiant. Ces limites se réfèrent au fonctionnement avec un ventilateur en mouvement à la<br />
vitesse minimale. En cas de situation prolongée avec le ventilateur éteint et le passage de l'eau froide dans la batterie, de la<br />
buée peut se former à l'extérieur de l'appareil , il est conseillé d'insérer l'accessoire vanne 3 voies.<br />
TEMPÉRATURE MINIMUM MOYENNE DE L’EAU<br />
Température bulbe sèche °C<br />
21 23 25 27 29 31<br />
15 3 3 3 3 3 3<br />
17 3 3 3 3 3 3<br />
Température bulbe humide °C 19 3 3 3 3 3 3<br />
21 6 5 4 3 3 3<br />
23 - 8 7 6 5 5<br />
13<br />
F
D<br />
GEBLÄSEKONVEKTOR OMNIA HL - HL M<br />
Der Gebläsekonvektor OMNIA HL (High Line) mit exklusivem<br />
Design des Designer Studios Giugiaro ist ein<br />
Konzentrat neuester Technologien, die ihn zum idealen<br />
Klimagerät für jeden Raum machen.<br />
Unmittelbare und gleichmäßige Verteilung klimatisierter<br />
Luft im ganzen Raum: OMNIA HL verbreitet Wärme bei<br />
Einbau in eine Heizanlage mit Heizkessel oder<br />
Wärmepumpe, kann im Sommer jedoch auch als Klimagerät<br />
eingesetzt werden, wenn die Heizanlage mit einem<br />
Kaltwassersatz ausgestattet ist.<br />
Die Qualität der behandelten Luft wird durch ein spezielles<br />
elektrostatisches Filter gewährleistet, das den in der Luft<br />
schwebenden Staub filtert und zurückhält; bei abgeschaltetem<br />
Gebläsekonvektor verhindert die geschlossene<br />
Umlenkklappe das Eindringen von Staub und Fremdkörpern.<br />
Die Möglichkeit, die Kondensatwanne und die<br />
Ventilatorschnecken der inspizierbaren Lüfter zu entfernen<br />
(eine Arbeit, die nur von qualifizertem Fachpersonal durchgeführt<br />
werden, das die technisch-professionellen<br />
Fähigkeiten für die Installation, den Umbau, die Erweiterung<br />
und die Wartung von Anlagen besitzt und fähig ist, die<br />
WAHLSCHALTER (A)<br />
- Ein-/Ausgeschaltet<br />
- Manuelle Drehzahlauswahl.<br />
V1 =Mindestgeschwindigkeit<br />
ANWENDUNG (OMNIA HL - HL M)<br />
BEDIENELEMENTE:<br />
Die Lüftung ist nur bei geöffneter Umlenkklappe freigegeben;<br />
sie muss nur von Hand geöffnet werden. Die geschlossene<br />
Umlenkklappe löst den umgehende Halt des Gerätes<br />
aus; der elektronische Raumthermostat bleibt jedoch aktiv<br />
und speichert kontinuierlich die Raumdaten und hält das<br />
Gerät betriebsbereit, sobald die Klappen geöffnet werden.<br />
Ein-/Abschalten der Einheit<br />
OFF Der Gebläsevektor ist abgeschaltet<br />
Drehen Sie den Bedienknopf auf die gewünschte<br />
Betriebsart auf eine der drei Ventilatordrehzahlen,<br />
um den Gebläsekonvektor einzuschalten.<br />
14<br />
V2 =Mittlere Geschwindigkeit<br />
V3 =Höchstgeschwindigkeit<br />
Sicherheitsanforderungen und die Funktionstüchtigkeit solcher<br />
Anlagen zu überprüfen), ermöglicht die sorgfältige<br />
Reinigung aller Innenteile, eine unerlässliche Voraussetzung<br />
für Installationen in stark frequentierten Räumlichkeiten<br />
oder solchen, die einen hohen Hygienestandard erfordern.<br />
Die ausgeprägte Laufruhe der neuen Radiallüftereinheit<br />
macht selbst das Anlaufen des Gebläsevektors OMNIA HL<br />
bei normaler Drehzahl unhörbar.<br />
Die Schalttafel mit Umschalter befindet sich unter einer<br />
Schutzabdeckung auf dem Gerätekopf.<br />
Der Gebläsekonvektor OMNIA HL wird dank der reichhaltigen<br />
Zubehörausstattung jeder<br />
Installationsanforderung gerecht.<br />
Einfache horizontale oder vertikale Installation mit während<br />
der Montage umkehrbaren Wasseranschlüssen.<br />
Vollständige Übereinstimmung mit den<br />
Umfallschutzbestimmungen.<br />
Die normale Wartung beschränkt sich auf die Reinigung<br />
des Luftfilters, das lediglich unter laufendem Wasser zu spülen<br />
ist.<br />
AUSFÜHRUNGEN:<br />
HL Gehäuse in weißer Farbe RAL9002 mit Umschalter. Btirnseite und Sockel in Farbe RAL7044.<br />
HL M Gehäuse in grauer Metallic-Farbe FIAT656 mit Umschalter. Btirnseite und Sockel in grauer Farbe RAL7031.
FUNKTIONSEIGENSCHAFTEN<br />
Die Gebläsekonvektoren OMNIA HL - HL M werden<br />
betriebsbereit mit Standardkonfiguration geliefert.<br />
Von einigen besonderen Fällen abgesehen sprechen die<br />
Einheiten sofort auf die Änderungen an.<br />
Anlagentypologien<br />
Die Gebläsevektoren der Baureihe OMNIA HL - HL sind für<br />
Anlagen mit 2 Rohren ohne Ventil bestimmt und sind für die<br />
Motorsteuerung der Umlenkklappen vorgerüstet (als<br />
Zubehör erhältlicher Bausatz).<br />
Lüftung<br />
Die Dreistufen - Lüftung kann mit dem Wahlschalter (A) von<br />
Hand auf eine der drei Stellungen V1, V2 und V3.<br />
Die Lüftung ist nur bei geöffneten Umlenkklappen freigegeben;<br />
bei den Modellen ohne Motorsteuerung der<br />
Umlenkklappen müssen dieselben von Hand geöffnet werden.<br />
VERPACKUNG<br />
Der Versand der Gebläsekonvektoren erfolgt mit<br />
Standardverpackung aus einer Schutzhülle und Pappe.<br />
INSTALLATION DER EINHEIT<br />
ACHTUNG: Vergewissern Sie sich, dass die<br />
Stromversorgung des Gerätes unterbrochen ist, bevor Sie<br />
Eingriffe an demselben vornehmen.<br />
ACHTUNG: Der Stromanschluß sowie die Installation der<br />
Gebläsekonvektoren und deren Zubehörteile darf nur von<br />
qualifizertem Fachpersonal durchgeführt werden, das die<br />
technisch-professionellen Fähigkeiten für die Installation, den<br />
Umbau, die Erweiterung und die Wartung von Anlagen besitzt<br />
und fähig ist, solche Anlagen auf Sicherheitsanforderungen<br />
und Funktionstüchtigkeit zu überprüfen.<br />
Der Gebläsekonvektor muss so installiert werden, dass die<br />
planmäßigen (Filterreinigung) und außerplanmäßigen<br />
Wartungsarbeiten ohne Behinderung ausgeführt werden<br />
können und dass das Entlüftungsventil auf der rechten Seite<br />
des Rahmens (Anschlussseite) zugänglich ist; es ist weiterhin<br />
angebracht, den Gebläsekonvektor nicht über feuchtigkeitsempfindlichen<br />
Gegenständen anzubringen; unter besonderen<br />
Umständen kann die Luft auf der Geräteaußenseite kondensieren<br />
mit der Möglichkeit von Tropfenbildung oder<br />
kann ein Defekt in der Wasser- oder im Kondensatablauf<br />
zum Austreten von Flüssigkeiten führen.<br />
Die oberen und unteren Temperaturgrenzwerte des<br />
Aufstellungsraums müssen innerhalb des vorgeschriebenen<br />
Bereichs von 0÷45°C (
D<br />
WICHTIGE HINWEISE UND WARTUNG<br />
Der Gebläsekonvektor ist sowohl an das Stromnetz wie auch an die Wasserversorgung angeschlossen; Eingriffe durch<br />
Personen ohne spezifische technische Fachkenntnisse können zu Personenverletzungen und zu Maschinen- und<br />
Umweltschäden führen.<br />
DER GEBLÄSEKONVEKTOR DARF NUR MIT WECHSELSPANNUNG 230 VOLT BETRIEBEN WERDEN<br />
Jede andere Netzspannung kann zu nicht wiedergutzumachenden Schäden des Gebläsekonvektors führen.<br />
DEN GEBLÄSEKONVEKTOR NIE AUF UNZULÄSSIGE WEISE VERWENDEN<br />
Der Gebläsekonvektor darf nicht für die Aufzucht von Tieren eingesetzt werden.<br />
RAUMBELÜFTUNG<br />
Es wird empfohlen, den Raum, in dem der Gebläsekonvektor installiert wird, regelmäßig zu lüften, ganz besonders wenn<br />
der Raum stark frequentiert wird oder Gasgeräte und Geruchsquellen vorhanden sind.<br />
KORREKTE TEMPERATUREINSTELLUNG<br />
Die Raumtemperatur sollte so eingestellt werden, dass maximales Wohlbefinden der anwesenden Personen gewährleistet<br />
ist; im Sommer sollten Temperaturunterschiede von mehr als 7°C zwischen Innen und Außen vermieden werden, ganz<br />
besonders für ältere Personen, Kranke und Kinder. Zu niedrige Temperaturen im Sommer führen außerdem zu einem erhöhten<br />
Energieverbrauch.<br />
KORREKTE EINSTELLUNG DES LUFTSTROMS<br />
Der vom Gebläsekonvektor kommende Luftstrom sollte nicht direkt auf die Personen gerichtet sein; selbst wenn die<br />
Temperatur des Luftstroms höher als die des Raums ist, kann er Kälteempfinden und Unbehagen verursachen.<br />
NIE ZU WARMES WASSER BENUTZEN<br />
Das Innere der Einheit mit einem in warmem Wasser angefeuchteten (max. 40 °C) Lappen oder Schwamm reinigen. Nie<br />
chemische Produkte oder Lösemittel für die Reinigung des Gebläsekonvektors verwenden. Nie Wasser auf die Außen- oder<br />
Innenflächen des Gerätes spritzen (Kurzschlussgefahr).<br />
REGELMÄSSIG DEN FILTER REINIGEN<br />
Regelmäßiges Reinigendes Luftfilters gewährleistet einen dauerhaften störungsfreien Betrieb.<br />
Prüfen Sie dabei den Verschmutzungsgrad: bei starker Verschmutzung den Filter häufiger säubern.<br />
Staub mit einem Staubsauger entfernen; der Gebrauch von Wasser und Reinigungsmitteln beschleunigt deutlich die elektrostatische<br />
Entladung.<br />
Nach der Reinigung und dem Trocknen des Filters den Filter wieder in den Gebläsekonvektor einbauen und dabei in<br />
umgekehrter Reihenfolge zum Ausbau vorgehen.<br />
AUSSERGEWÖHNLICHE REINIGUNGSARBEITEN<br />
Nach Ausbau der Kondensatwanne und der inspizierbaren Ventilatorschnecken (diese Arbeiten dürfen nur von Personen mit<br />
spezifischen Fachkenntnissen ausgeführt werden) kann auch eine sorgfältige Reinigung der Innenteile des Gerätes vorgenommen<br />
werden; solche Arbeiten sind für Installationen in stark frequentierten Räumen und in solchen, die einen hohen<br />
Hygienestandard erfordern, notwendig.<br />
WÄHREND DES BETRIEBS<br />
Benutzen Sie den Gebläsekonvektor nie ohne Filter, da sonst der in der Luft schwebende Staub das Register des<br />
Wärmetauschers verschmutzt.<br />
NORMALE ERSCHEINUNG<br />
Beim Kühlbetrieb kann Wasserdampf aus dem Auslass des Gebläsekonvektors austreten.<br />
Beim Heizbetrieb kann ein leichtes Rauschen der Luft in der Nähe des Gebläsekonvektors zu vernehmen sein. Mitunter<br />
kann der Gebläsekonvektor unangenehme Gerüche verbreiten, die durch die Anhäufung von in der Raumluft enthaltenen<br />
Stoffen verursacht werden (ganz besonders bei unzureichender Raumlüftung oder Filterreinigung).<br />
GRENZWERTE FÜR DEN GERÄTEBETRIEB<br />
Maximale Wassereintrittstemperatur 80 °C<br />
Maximaler Betriebsdruck 8 bar<br />
Minimale mittlere Wassertemperatur<br />
Zur Vermeidung von Kondenswasserbildung auf der Geräteaußenseite während des Gebläsebetriebs darf die durchschnittliche<br />
Wassertemperatur nicht niedriger als die in der unten stehenden Tabelle aufgeführten Grenzwerte sein, die von den<br />
thermohygrometrischen Raumbedingungen abhängen. Die genannten Grenzwerte beziehen sich auf den Gerätelauf mit<br />
Mindestdrehzahl. Bei längerem Gebläsestillstand und gleichzeitigem Kaltwasserdurchfluss durch das Register kann es auf<br />
der Geräteaußenseite zur Kondenswasserbildung kommen, als Zubehör das Dreiwege-Ventil einzubauen.<br />
MINIMALE MITTLERE WASSERTEMPERATUR<br />
Temperatur T.K. °C<br />
21 23 25 27 29 31<br />
15 3 3 3 3 3 3<br />
17 3 3 3 3 3 3<br />
Temperatur F.K. °C 19 3 3 3 3 3 3<br />
21 6 5 4 3 3 3<br />
23 - 8 7 6 5 5<br />
16
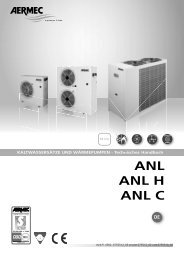
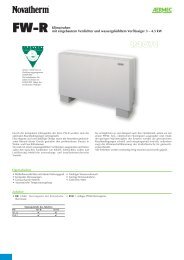
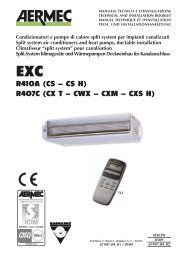
DATI DIMENSIONALI DIMENSIONS DIMENSIONS ABMESSUNGEN [mm]<br />
L<br />
A<br />
Mod Omnia HL 10 HL 15 HL 25 HL 35<br />
Larghezza Width Largeur Breite A 640 750 980 1200<br />
Altezza Height Hauter Höhe H 600 605 615 623<br />
Profondità Depth Profondeur Tiefe L 187 189 191 198<br />
Altezza zoccoli Feet height Hauter pieds Höhe Sockel Z 93 93 93 93<br />
Peso Weight Poids net Nettogewicht kg 13,6 14,6 17,6 20,6<br />
Peso ventilconvettore senza zoccoli Weight of fan coil without feet<br />
Poids ventilo-convecteur sans pieds Gewicht Gebläsekonvektor ohne Sockel<br />
OUT<br />
IN<br />
1<br />
38<br />
149<br />
125<br />
93<br />
210<br />
243<br />
Attacchi batteria (femmina) Coil connection (female)<br />
Raccords batterie (femelle) Anschlüsse des Warmetäuschers (Innengewinde)<br />
Mod. Omnia HL 10 Omnia HL 15 Omnia HL 25 Omnia HL 35<br />
1/2” 1/2” 1/2” 1/2”<br />
H<br />
50mm 50mm<br />
Z 100 mm<br />
91<br />
429<br />
17<br />
I<br />
<strong>GB</strong><br />
F<br />
D
I<br />
<strong>GB</strong><br />
F<br />
D<br />
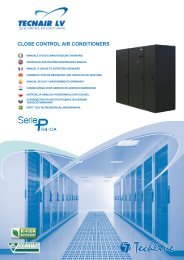
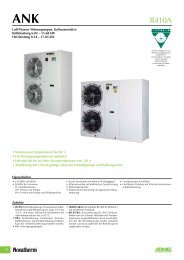
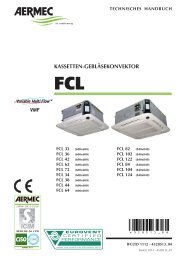
DATI DIMENSIONALI DIMENSIONS DIMENSIONS ABMESSUNGEN [mm]<br />
18<br />
10<br />
10<br />
6,5<br />
14,5<br />
6,5<br />
450<br />
170<br />
97<br />
26<br />
91<br />
53 26<br />
10<br />
36<br />
17<br />
E<br />
D<br />
72 29<br />
72<br />
38<br />
76 22<br />
131 196<br />
A<br />
B<br />
C<br />
= =<br />
=<br />
Mod. HL 10 HL 15 HL 25 HL 35<br />
A 640 750 980 1200<br />
B 384 494 725 945<br />
C 360,5 470,5 701,5 921,5<br />
D 288 398 629 849<br />
E 394 504 735 955<br />
D<br />
=<br />
=<br />
C<br />
B<br />
A<br />
=<br />
29<br />
344
SCHEMI DI MONTAGGIO INSTALLATION DIAGRAMS<br />
1<br />
2<br />
3<br />
4<br />
OMNIA HL<br />
L<br />
N<br />
19<br />
I<br />
<strong>GB</strong><br />
F<br />
D
I<br />
<strong>GB</strong><br />
F<br />
D<br />
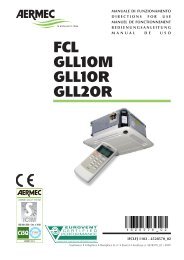
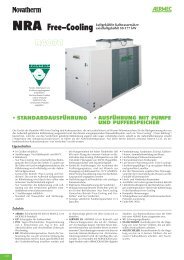
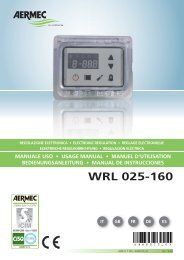
SCHEMI ELETTRICI WIRING DIAGRAMS SCHEMAS ELECTRIQUES SCHALTPLÄNE<br />
LEGENDA READING KEY LEGENDE LEGENDE<br />
MS = Microinterruttore Microswitch<br />
Microinterrupteur Mikroschalter<br />
IG = Interruttore generale Main switch<br />
Interupteur général Hauptschalter<br />
M = Morsettiera Terminal board<br />
Boitier Klemmleiste<br />
MV = Motore ventilatore Fan motor<br />
Moteur ventilateur Ventilatormotor<br />
PE = Collegamento di terra Earth connection<br />
Mise à terre Erdanschluss<br />
SA = Sonda ambiente Room sensor<br />
Sonde ambiante Raumtemperaturfuhler<br />
SC = Scheda di controllo Electronic control board<br />
Platine de contrôle Steuerschaltkreis<br />
20<br />
MS<br />
E2<br />
ON/VEL<br />
M<br />
SC<br />
E6<br />
V1<br />
V2<br />
V3<br />
1<br />
L<br />
2 3 4<br />
IG<br />
SW = Sonda temperatura acqua<br />
Water temperature sensor<br />
Sonde eau<br />
Fühler Wassertemperatur<br />
= Collegamenti da eseguire in loco<br />
On-site wiring<br />
Raccordements à effectuer in situ<br />
Vor Ort auszuführende Anschlüsse<br />
= Componenti non forniti Components not supplied<br />
Composants non fournis Nicht lieferbare Teile<br />
BL = Blu Blue Bleu Blau<br />
GR = Grigio Grey Gris Gray<br />
GV = Giallo-Verde Yellow-Green<br />
Jaune-Vert Gelb-Grün<br />
MA = Marrone Brown Marron Braun<br />
NE = Nero Black Noir Schwarz<br />
RO = Rosso Red Rouge Rot<br />
GR<br />
5 6 7<br />
L N<br />
23OV 50Hz<br />
NE<br />
8<br />
MAX<br />
MA<br />
RO<br />
9<br />
MED<br />
10<br />
MIN<br />
BL<br />
M<br />
1<br />
MV<br />
NE MA RO<br />
Gli schemi elettrici sono soggetti ad aggiornamento; è opportuno fare riferimento allo schema elettrico allegato all'apparecchio.<br />
Wiring diagrams may change for updating. It is therefore necessary to refer always to the wiring diagram inside the units.<br />
Les schémas électriques peuvent être modifies en conséquence des mises à jour. Il faut toujours se référer aux schémas électrique dans les appareils.<br />
Die Schaltschemas können geändert werden; es empfiehlt sich immer auf das mit dem Gerät verpackte El. Schaltschema zu beziehen.<br />
PE
TRASPORTO CARRIAGE TRANSPORT TRANSPORT<br />
NON bagnare Do NOT wet<br />
CRAINT l’humidité Vor Nässe schützen<br />
Sovrapponibilità: controllare sull’imballo la posizione della freccia per conoscere il<br />
numero di macchine impilabili<br />
Stacking: control the packing for the arrow position to know the number of machines<br />
that can be stacked<br />
Empilement: vérifier sur l’emballage la position de la flèche pour connaître le nombre<br />
d’appareils pouvant être empilés<br />
Stapelung: Anhand der Position des Pfeiles an der Verpackung kontrollieren, wieviele<br />
Geräte stapelbar sind<br />
NON trasportare la macchina da soli se il suo peso supera i 35 Kg.<br />
DO NOT handle the machine alone if its weight is over 35 Kg.<br />
NE PAS transporter tout seul l’appareil si son poids dépasse 35 Kg.<br />
Das Gerät NICHT alleine tragen, wenn sein Gewicht 35 Kg überschreitet.<br />
NON calpestare Do NOT trample<br />
NON lasciare gli imballi sciolti durante il trasporto<br />
Do NOT leave loose packages during transport<br />
ATTACHER les emballages pendant le transport<br />
Die Verpackungen nicht ungesichert transportieren<br />
35 Kg<br />
SIMBOLI DI SICUREZZA SAFETY SYMBOL SIMBOLES DE SECURITE SICHERHEITSSYMBOLE<br />
Pericolo: Pericolo: Pericolo!!!<br />
Tensione Organi in movimento<br />
Danger: Danger: Danger!!!<br />
Power supply Movings parts<br />
Danger: Danger: Danger!!!<br />
Tension Organes en mouvement<br />
Gefahr ! Gefahr ! Gefahr!!!<br />
Spannung Rotierende Teile<br />
6<br />
5<br />
4<br />
3<br />
2<br />
1<br />
21<br />
I<br />
<strong>GB</strong><br />
F<br />
D
I<br />
<strong>GB</strong><br />
F<br />
D<br />
PROBLEMA PROBLEM<br />
PROBLEME PROBLEM<br />
Poca aria in uscita<br />
Feeble air discharge<br />
Il y a peu d’air en sortie<br />
Schwacher Luftstrom am A<br />
ustritt<br />
Non fa caldo<br />
It does not heat<br />
Pas de chaleur<br />
Keine Heizung<br />
Non fa freddo<br />
It does not cool<br />
Pas de froid<br />
Keine Kühlung<br />
Il ventilatore non gira<br />
The fan does not turn<br />
Le ventilateur ne tourne pas<br />
Ventilator Arbeitet nicht<br />
Fenomeni di condensazione<br />
sulla struttura esterna<br />
dell’apparecchio.<br />
Condensation on the unit<br />
cabinet.<br />
Phénomènes de condensation<br />
sur la structure exterieure<br />
de l’appareil.<br />
Kondenswasserbildung am<br />
Gerät.<br />
22<br />
PROBABILE CAUSA PROBABLE CAUSE<br />
CAUSE PROBABLE MÖGLICHE URSACHE<br />
Errata impostazione della velocità sul pannello comandi<br />
Wrong speed setting on the control panel<br />
Mauvaise préselection de la vitesse sur le panneau de commandes<br />
Falsche Geschwindigkeitseinstellung am Bedienpaneel<br />
Filtro intasato<br />
Blocked filter<br />
Filtre encrassé<br />
Filter verstopft<br />
Ostruzione del flusso d’aria (entrata e/o uscita)<br />
Obstruction of the air flow (inlet and/or outlet)<br />
Obstruction du flux d’air (entrée/sortie)<br />
Luftstrom behindert (Eintritt bzw. Austritt)<br />
Mancanza di acqua calda<br />
Poor hot water supply<br />
Il n’y a pas d’eau chaude<br />
Kein Warmwasser<br />
Impostazione errata del pannello comandi<br />
Wrong setting on control panel<br />
Mauvaise présélection sur le panneau de commandes<br />
Falsche Einstellung am Bedienpaneel<br />
Mancanza di acqua fredda<br />
Poor chilled water supply<br />
Il n’y a pas d’eau froide<br />
Kein Kaltwasser<br />
Impostazione errata del pannello comandi<br />
Wrong setting on control panel<br />
Mauvaise présélection sur le panneau de commandes<br />
Falsche Einstellung am Bedienpaneel<br />
Mancanza di corrente<br />
No current<br />
l n’y a pas de courant<br />
Kein Strom<br />
L’acqua non ha raggiunto la temperatura d’esercizio.<br />
The water has not reached operating temperature.<br />
L'eau n'a pas atteint la température de service.<br />
Das Wasser hat die Betriebstemperatur nicht erreicht.<br />
Sono state raggiunte le condizioni limite di temperatura e<br />
umidità descritte in “MINIMA TEMPERATURA MEDIA<br />
DELL’ACQUA”.<br />
The limit conditions of temperature and humidity indicated in<br />
“MINIMUM AVERAGE WATER TEMPERATURE” have been<br />
reached.<br />
On a atteint les conditions limite de température et d’humidité<br />
indiquées dans “TEMPERATURE MINIMALE MOYENNE<br />
DE L'EAU”.<br />
Erreichen der maximalen Temperatur- und Feuchtigkeitswerte<br />
(siehe Abschnitt “DURCHSCHNITTLICHE MINDEST -<br />
WASSERTEMPERATUR”).<br />
Per anomalie non contemplate, interpellare tempestivamente il Servizio Assistenza.<br />
For anomalies don’t hesitate, contact the aftersales service immediately.<br />
Pour toute anomalie non répertoriée, consulter le service après-vente.<br />
Sich bei hier nicht aufgeführten Störungen umgehend an den Kundendienst wenden.<br />
SOLUZIONE REMEDY<br />
SOLUTION ABHILFE<br />
Scegliere la velocità corretta sul pannello<br />
comandi<br />
Select the speed on the control panel<br />
Choisir la vitesse sur la panneau de commandes<br />
Die Geschwindigkeit am Bedienpaneel wählen<br />
Pulire il filtro<br />
Clean the filter<br />
Nettoyer le filtre<br />
Filter reinigen<br />
Rimuovere l’ostruzione<br />
Remove the obstruction<br />
Enlever l’objet faisant obstruction<br />
Verstopfung beseitigen<br />
Controllare la caldaia<br />
Control the boiler<br />
Verifier la chaudière<br />
Kaltwasserseitigen Wärmeaustauscher kontrollieren<br />
Impostare il pannello comandi<br />
See control panel settings<br />
Présélectionner au panneau de commandes<br />
Richtige Einstellung am Bedienpaneel vornehmen<br />
Controllare il refrigeratore<br />
Control the chiller<br />
Vérifier le réfrigerateur<br />
Kaltwasserseitigen Wärmeaustauscher kontrollieren<br />
Impostare il pannello comandi<br />
See control panel settings<br />
Présélectionner au panneau de commandes<br />
Richtige Einstellung am Bedienpaneel vornehmen<br />
Controllare la presenza di tensione elettrica<br />
Control the power supply<br />
Contrôler l’alimentation électrique<br />
Kontrollieren, ob Spannung anliegt<br />
Controllare la caldaia o il refrigeratore.<br />
Controllare il settaggio del termostato<br />
Please check up the boiler or the chiller.<br />
Check up the thermostat settings.<br />
Contrôler la chaudière ou le refroidisseur.<br />
Contrôler le réglage du thermostat.<br />
Das Heiz- oder Kühlaggregat überprüfen.<br />
Die Einstellungen des Temperaturreglers<br />
überprüfen.<br />
Innalzare la temperatura dell’acqua oltre i<br />
limiti minimi descritti in “MINIMA TEMPERA-<br />
TURA MEDIA DELL’ACQUA”.<br />
Increase the water temperature beyond the<br />
minimum limits indicated in “MINIMUM<br />
AVERAGE WATER TEMPERATURE”.<br />
Elever la température de l’eau audelà des<br />
limites minimales indiquées dans “TEMPERA-<br />
TURE MINIMALE MOYENNE DE L'EAU”.<br />
Wassertemperatur über die um Abschnitt<br />
“DURCHSCHNITTLICHE MINDEST -<br />
WASSERTEMPERATUR” angegebenen min.<br />
Werte erhöhen.
SERVIZI ASSISTENZA<br />
VALLE D’AOSTA<br />
AOSTA<br />
PIEMONTE<br />
AERSAT TORINO snc di Borioli Secondino & C. Strada Bertolla, 163 - 10156 Torino 0115 611 220<br />
ALESSANDRIA - ASTI - CUNEO BELLISI s.r.l. Corso Savona, 245 - 14100 Asti 0141 556 268<br />
BIELLA - VERCELLI LOMBARDI SERVICES s.r.l. Via Piave, 25 - 13894 Gaglianico (BI) 0152 543 189<br />
NOVARA - VERBANIA (tutta la gamma esclusi split system) AIR CLIMA SERVICE di F. & C. s.a.s. Via Pertini, 9 - 21021 Angera (VA) 0331 932 110<br />
NOVARA - VERBANIA (split system) CI. Elle Clima snc di Benvegnù L. Via S. Anna, 6 - 21018 Sesto Calende (VA) 0331 914 186<br />
TORINO<br />
LIGURIA<br />
AERSAT TORINO snc di Borioli Secondino & C. Strada Bertolla, 163 - 10156 Torino 0115 611 220<br />
GENOVA - SAVONA BRINZO ANDREA Via Del Commercio, 27 1/C2 - 16167 Genova Nervi 0103 298 314<br />
IMPERIA AERFRIGO di A. Amborno e C. s.n.c . Via Z. Massa, 152/154 - 18038 Sanremo (IM) 0184 575 257<br />
LA SPEZIA<br />
LOMBARDIA<br />
TECNOFRIGO di Veracini Nandino Via Lunense, 59 - 54036 Marina di Carrara (MS) 0585 631 831<br />
BERGAMO ESSEBI di Sironi Bruno e C. sas Via Pacinotti, 98 - 24100 Bergamo 0354 536 670<br />
BRESCIA TERMOTEC. di Vitali G. & C. s.n.c. Via G. Galilei - Trav. I°, 2 - 25010 S. Zeno S. Naviglio (BS) 0302 160 812<br />
COMO - SONDRIO - LECCO PROGIELT di Libeccio & C. s.r.l. Via Rigamonti, 21 - 22020 San Fermo della Battaglia (CO) 031 536 423<br />
CREMONA MORETTI ALBANO & C. s.n.c. Via Manini, 2/C - 26100 Cremona 0372 433 624<br />
LODI CLIMA LODI di Sali Cristian Via Felice Cavallotti, 29 - 26900 Lodi 0371 549 304<br />
MANTOVA F.LLI COBELLI di Cobelli Davide & C. s.n.c. Via Tezze, 1 - 46040 Cavriana (MN) 0376 826 174<br />
MILANO<br />
CRIO SERVICE s.r.l.<br />
S.A.T.I.C. di Lovato Dario<br />
Via Gallarate, 353 - 20151 Milano<br />
Via G. Galilei, 2 int. A/2 - 20060 Cassina dè Pecchi (MI)<br />
0233 498 280<br />
0295 299 034<br />
PAVIA BATTISTON GIAN LUIGI Via Liguria, 4/A - 27058 Voghera (PV) 038 362 253<br />
VARESE (tutta la gamma esclusi split system) AIR CLIMA SERVICE di F. & C. s.a.s. Via Pertini, 9 - 21021 Angera (VA) 0331 932 110<br />
VARESE (split system)<br />
TRENTINO ALTO ADIGE<br />
CI. Elle Clima snc di Benvegnù L. Via S. Anna, 6 - 21018 Sesto Calende (VA) 0331 914 186<br />
BOLZANO - TRENTO<br />
FRIULI VENEZIA GIULIA<br />
SESTER F. s.n.c. di Sester A. & C. Via E. Fermi, 12 - 38100 Trento 0461 920 179<br />
PORDENONE CENTRO TECNICO s.n.c. di Menegazzo G. & C. Via Conegliano, 94/A - 31058 Susegana (TV) 0438 450 271<br />
TRIESTE - GORIZIA LA CLIMATIZZAZIONE TRIESTE SRL Strada della Rosandra, 269 - 34018 San Dorligo della Valle(TS) 040 828 080<br />
UDINE<br />
VENETO<br />
S.A.R.E. di Musso Dino Corso S. Valentino, 4 - 33050 Fraforeano (UD) 0432 699 810<br />
BELLUNO FONTANA SOFFIRO FRIGORIFERI s.n.c. Via Sampoi, 68 - 32020 Limana (BL) 0437 970 042<br />
LEGNAGO DE TOGNI STEFANO Via De Nicola, 2 - 37045 Legnago (VR) 044 220 327<br />
PADOVA CLIMAIR s.a.s. di F. Cavestro & C. Via Nona Strada, 36 - Z.I. - 35129 Padova 049 772 324<br />
ROVIGO FORNASINI MAURO Via Sammartina, 18/A - 44040 Chiesuol del Fosso (FE) 0532 978 450<br />
TREVISO CENTRO TECNICO s.n.c. di Menegazzo G. & C. Via Conegliano, 94/A - 31058 Susegana (TV) 0438 450 271<br />
VENEZIA (centro) SIMIONATO GIANNI Via Trento, 29 - 30174 Mestre (VE) 041 959 888<br />
VENEZIA (escluso centro) e provincia S.M. s.n.c. di Spolaore Andrea e Musner Maurizio Via Fapanni 41/D - 30030 Martellago (VE) 0415 402 047<br />
VERONA (escluso LEGNAGO) ALBERTI FRANCESCO Via Tombetta, 82 - 37135 Verona 045 509 410<br />
VICENZA (split system) ASSICLIMA di Colpo Donato Via Capitello, 63/c - 36010 Cavazzale (VI) 336-813963<br />
VICENZA<br />
EMILIA ROMAGNA<br />
BIANCHINI GIOVANNI & IVAN snc Via G. Galilei, 1Z - Loc. Nogarazza - 36057 Arcugnano (VI) 0444 569 481<br />
BOLOGNA EFFEPI s.n.c. di Ferrazzano & Proto Via I° Maggio, 13/8 - 40044 Pontecchio Marconi (BO) 0516 781 146<br />
FERRARA FORNASINI MAURO Via Sammartina, 18/A - 44040 Chiesuol del Fosso (FE) 0532 978 450<br />
FORLÌ - RAVENNA - RIMINI ALPI GIUSEPPE Via N. Copernico, 100 - 47100 Forlì 0543 725 589<br />
MODENA Nord CLIMASERVICE di Golinelli Stefano Via Per Modena, 18/E - 41034 Finale Emilia (MO) 053 592 156<br />
MODENA Sud AERSAT s.n.c. di Leggio M. & Lolli S. Piazza Beccadori, 19 - 41057 Spilamberto (MO) 059 782 908<br />
PARMA ALFATERMICA s.n.c. Galbano & Biondo Via Mantova, 161 - 43100 Parma 0521 776 771<br />
PIACENZA MORETTI ALBANO & C. s.n.c. Via Manini, 2/C - 26100 Cremona 0372 433 624<br />
REGGIO EMILIA<br />
TOSCANA<br />
ECOCLIMA S.r.l. Via Maestri del lavoro, 14 - 42100 Reggio Emilia 0522 558 709<br />
AREZZO CLIMA SERVICE ETRURIA s.n.c. Via G. Caboto, 69/71/73/75 - 52100 Arezzo 0575 900 700<br />
FIRENZE - PRATO S.E.A.T. di Benedetti Giancarlo Via P. Fanfani, 55 - 50127 Firenze 0554 255 721<br />
GROSSETO ACQUA e ARIA SERVICE s.r.l. Via D. Lazzaretti, 8A - 58100 Grosseto 0564 410 579<br />
LIVORNO - PISA SEA s.n.c. di Rocchi R. & C. Via dell’Artigianato, Loc.Picchianti - 57121 Livorno 0586 426 471<br />
LUCCA - PISTOIA FRIGOTEC. s.n.c. G. & MC. BENEDETTI Via V. Civitali, 2 - 55100 Lucca 0583 491 089<br />
MASSA CARRARA TECNOFRIGO di Veracini Nandino Via Lunense, 59 - 54036 Marina di Carrara (MS) 0585 631 831<br />
SIENA<br />
MARCHE<br />
FRIGOTECNICA SENESE s.n.c. di B. & C. Strada di Cerchiaia, 42 - Z.A. 53100 Siena 0577 284 330<br />
ANCONA - PESARO MARCHETTI SAURO Via M. Ricci, 16/A - 60020 Palombina (AN) 071 889 435<br />
MACERATA - ASCOLI PICENO<br />
UMBRIA<br />
CAST s.n.c. di Antinori-Cardinali & R. Via D. Alighieri, 68 - 62010 Morrovalle (MC) 0733 865 271<br />
PERUGIA A.I.T. s.r.l. Via dell’industria, Z.I. Molinaccio - 06154 Ponte S. Giovanni (PG) 0755 990 564<br />
TERNI<br />
ABRUZZO<br />
CAPOCCETTI OTELLO Via G. Medici, 14 - 05100 Terni 0744 277 169<br />
CHIETI - PESCARA - TERAMO - L’AQUILA<br />
ISERNIA - CAMPOBASSSO<br />
LAZIO<br />
PETRONGOLO DINO Via Torremontanara, 30 - 66010 Torre Vecchia Teatina (CH) 0871 360 311<br />
FROSINONE - LATINA MASTROGIACOMO AIR SERVICE - M. C. P.zza Berardi, 16 - 03023 Ceccano (FR) 0775 601 403<br />
RIETI CAPOCCETTI OTELLO Via G. Medici, 14 - 05100 Terni 0744 277 169<br />
ROMA TAGLIAFERRI 2001 s.r.l. Via Guidonia Montecelio snc - 00191 Roma 063 331 234<br />
VITERBO<br />
CAMPANIA<br />
AIR FRIGO di Massimo Piacentini Viale Baccelli, 74 - 00053 Civitavecchia (RM) 0766 541 945<br />
AVELLINO - SALERNO SAIT s.r.l. Via G. Deledda, 10 - 84010 San Marzano sul Sarno (SA) 0815 178 451<br />
CAPRI CATALDO COSTANZO Via Tiberio, 7/F - 80073 Capri (NA) 0818 378 479<br />
NAPOLI - CASERTA - BENEVENTO AERCLIMA Sud s.n.c. di Fisciano Carmelo & C. Via Nuova Toscanella, 34/c - 80145 Napoli 0815 456 465<br />
SALERNO<br />
PUGLIA<br />
GDS TECNO Via Acquasanta, 16 Z.I. - 84131 Salerno 089 771 167<br />
BARI KLIMAFRIGO s.r.l. Via Vallone, 81 - 70121 Bari 0805 538 044<br />
FOGGIA CLIMACENTER di Amedeo Nardella Via Carmicelli, 29 Pal. A Sc. A - 71016 San Severo (FG) 3396 522 443<br />
LECCE - BRINDISI GRASSO VINCENZO Zona P.I.P. - Lotto n. 38 - 73052 Parabita (LE) 0833 595 267<br />
TARANTO<br />
BASILICATA<br />
ORLANDO PASQUALE Via Vespucci, 5 - 74023 Grottaglie (TA) 0995 639 823<br />
MATERA - POTENZA<br />
MOLISE<br />
AERLUCANA di A. Scalcione Via Dei Peucezi, 23 - 75100 Matera 0835 381 467<br />
CAMPOBASSO - ISERNIA<br />
CALABRIA<br />
PETRONGOLO DINO Via Torremontanara, 30 - 66010 Torre Vecchia Teatina (CH) 0871 360 311<br />
CATANZARO - CROTONE A.E.C. di Ranieri Annarita Via B. Miraglia, 72 - 88100 Catanzaro 0961 771 123<br />
COSENZA CLIMA SUD s.n.c. dei F.lli Mandarino Via Tevere, 84/86 - 87030 Roges di Rende (CS) 0984 465 004<br />
REGGIO CALABRIA REPACI ANTONINO Via Militare 2nda Trav. 8D - 89053 Catona (RC) 0965 301 431<br />
REGGIO CALABRIA - VIBO VALENTIA<br />
SICILIA<br />
MANUTENSUD di Antonio Amato Via F. Cilea, 62 - 88065 Guardavalle (CZ) 096 786 516<br />
CATANIA - MESSINA GIUFFRIDA GIUSEPPE Via Mandrà, 15/A - 95124 Catania 095 351 485<br />
ENNA - CALTANISSETTA - AGRIGENTO FONTI FILIPPO Viale Aldo Moro, 141 - 93019 Sommatino (CL) 0922 871 333<br />
PALERMO - TRAPANI S.E.A.T. di A. Parisi & C. s.n.c. Via T. Marcellini, 7 - 90135 Palermo 091 591 707<br />
SIRACUSA - RAGUSA<br />
SARDEGNA<br />
FINOCCHIARO ANTONINO Via Paternò, 71 - 96100 Siracusa 0931 756 911<br />
CAGLIARI - ORISTANO MUREDDU L. di Mureddu Pasquale Via Garigliano, 13 - 09122 Cagliari 070 284 652<br />
SASSARI - NUORO POSADINU SALVATORE IGNAZIO Z.I. Predda Niedda - Sud - Strada 11 - 07100 Sassari 079 261 234<br />
I
GARANZIA DI 3 ANNI<br />
La garanzia è valida solo se l’apparecchio è venduto ed installato sul territorio italiano. Il periodo decorre dalla data d’acquisto comprovata da<br />
un documento che abbia validità fiscale (fattura o ricevuta) e che riporti la sigla commerciale dell’apparecchio. Il documento dovrà essere esibito,<br />
al momento dell’intervento, al tecnico del Servizio Assistenza Aermec di zona.<br />
Il diritto alla garanzia decade in caso di:<br />
– interventi di riparazione effettuati sull’apparecchiatura da tecnici non autorizzati;<br />
– guasti conseguenti ad azioni volontarie o accidentali che non derivino da difetti originari dei materiali di fabbricazione.<br />
AERMEC Spa effettuerà la riparazione o la sostituzione gratuita, a sua scelta, delle parti di apparecchiatura che dovessero presentare difetti dei<br />
materiali o di fabbricazione tali da impedirne il normale funzionamento. Gli eventuali interventi di riparazione o sostituzione di parti<br />
dell’apparecchio, non modificano la data di decorrenza e la durata del periodo di garanzia. Le parti difettose sostituite resteranno di proprietà<br />
della AERMEC Spa.<br />
Non è prevista in alcun caso la sostituzione dell’apparecchio. La garanzia non copre le parti dell’apparecchio che risultassero difettose a<br />
causa del mancato rispetto delle istruzioni d’uso, di un’errata installazione o manutenzione, di danneggiamenti dovuti al trasporto, di difetti<br />
dell’impianto (es: scarichi di condensa non efficienti).Non sono coperte, infine, le normali operazioni di manutenzione periodica (es: la pulizia<br />
dei filtri d’aria) e la sostituzione delle parti di normale consumo (es: i filtri d’aria).<br />
Le agenzie di Vendita Aermec ed i Servizi di Assistenza Tecnica Aermec della vostra provincia sono negli Elenchi telefonici dei capoluoghi<br />
di provincia - vedi “Aermec” - e nelle Pagine Gialle alla voce “Condizionatori d’aria - Commercio”.<br />
Aermec partecipa al Programma di<br />
Certificazione EUROVENT.<br />
I prodotti interessati figurano nella Guida<br />
EUROVENT dei Prodotti Certificati.<br />
I dati tecnici riportati nella presente documentazione non sono impegnativi.<br />
AERMEC S.p.A. si riserva la facoltà di apportare in qualsiasi momento<br />
tutte le modifiche ritenute necessarie per il miglioramento del prodotto.<br />
Les données mentionnées dans ce manuel ne constituent aucun engagement<br />
de notre part. Aermec S.p.A. se réserve le droit de modifier à tous<br />
moments les données considérées nécessaires à l’amelioration du produit.<br />
AERMEC S.p.A.<br />
I-37040 Bevilacqua (VR) - Italia<br />
Via Roma, 44 - Tel. (+39) 0442 633111<br />
Telefax (+39) 0442 93730 - (+39) 0442 93566<br />
www.aermec.com - info@aermec.com<br />
Aermec partecipe au Programme de<br />
Certification EUROVENT.<br />
Les produits figurent dans l’Annuaire<br />
EUROVENT des Produits Certifiés.<br />
Aermec is partecipating in the EUROVENT<br />
Certification Program.<br />
Products are as listed in the EUROVENT<br />
Directory of Certified Products.<br />
Aermec ist am Zertifikations - Programm<br />
EUROVENT beteiligt.<br />
Die entsprechend gekennzeichneten Produkte<br />
sind im EUROVENT - Jahrbuch aufgefürt.<br />
Technical data shown in this booklet are not binding.<br />
Aermec S.p.A. shall have the right to introduce at any time whatever<br />
modifications deemed necessary to the improvement of the product.<br />
Im Sinne des technischen Fortsschrittes behält sich Aermec S.p.A. vor,<br />
in der Produktion Änderungen und Verbesserungen ohne<br />
Ankündigung durchzuführen.