REMS Solar-Push I 80 REMS Solar-Push K 60 - REMS WERK
REMS Solar-Push I 80 REMS Solar-Push K 60 - REMS WERK
REMS Solar-Push I 80 REMS Solar-Push K 60 - REMS WERK

You also want an ePaper? Increase the reach of your titles
YUMPU automatically turns print PDFs into web optimized ePapers that Google loves.
eng eng<br />
ensure perfect operation of the power tool.<br />
● Damaged protective devices and parts must be properly repaired by a recognised<br />
specialist workshop unless specified otherwise in the operating instructions.<br />
● Damaged switches must be replaces at a customer service workshop.<br />
● Do not use power tools on which the switch cannot be turned on and off.<br />
21) WARNING<br />
● The use of other insertion tools and accessories can cause you injury.<br />
22) Have your power tools repaired by a qualified electrician<br />
● This power tool satisfies the pertinent safety regulations. Repairs may only be<br />
carried out by a qualified electrician with genuine spare parts, otherwise accidents<br />
can occur for the user.<br />
Specific Safety Instructions<br />
DANGER<br />
● Potentially lethal explosion risk! Do not transport any liquids with a flash point<br />
less than 55°C, e.g. petrol or solvents.<br />
● Only connect the machine to a socket with a functioning PE conductor. Check<br />
the PE conductor or have it checked if in doubt.<br />
● Only operate the machine on the mains with a 30 mA fault current protection<br />
(FI-switch).<br />
● If it is necessary to change the plug or the connecting cable, this should only be<br />
done by the manufacturer or his customer service.<br />
Use for the intended purpose<br />
Only use the <strong>REMS</strong> <strong>Solar</strong>-<strong>Push</strong> for the intended purpose, namely filling, flushing<br />
and bleeding solar systems, geothermal systems and underfloor heating and for<br />
filling tanks. Permissible media: heat transfer liquids, antifreeze, water, aqueous<br />
solutions, emulsions.<br />
WARNING<br />
All other uses are not for the intended purpose and are prohibited.<br />
Explanation of symbols<br />
Read the operating instructions before use<br />
Power tool complies with protection class I<br />
Environmentally friendly disposal<br />
CE conformity mark<br />
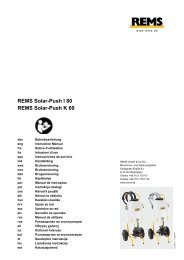
1. Technical Data<br />
1.1. Article numbers<br />
<strong>REMS</strong> <strong>Solar</strong>-<strong>Push</strong> I <strong>80</strong>, without hoses 115301<br />
<strong>REMS</strong> <strong>Solar</strong>-<strong>Push</strong> K <strong>60</strong>, without hoses 115302<br />
PVC fabric hose ½” T<strong>60</strong> 115314<br />
EPDM fabric hose ½” T100 115315<br />
EPDM fabric hose ½” T165 115319<br />
30 l plastic tank 115375<br />
Pressure relief valve 115217<br />
Fine filter unit 115323<br />
Fine filter with fine filter bag 70 μm 115220<br />
Filter bag 70 μm (10 bags) 115221<br />
Adapter for cover 115379<br />
Shut-off valve ¾” 115324<br />
Changeover valve 115325<br />
1.2. Applications <strong>Solar</strong>-<strong>Push</strong> I <strong>80</strong> <strong>Solar</strong>-<strong>Push</strong> K <strong>60</strong><br />
Plastic tank volume<br />
Transport capacity at<br />
30 l 30 l<br />
40 m pumping head 18 l/min 16 l/min<br />
Transport pressure < 6.5 bar/0.65 MPa/ < 5 bar/0.55 MPa/<br />
Temperature of the transpor-<br />
94 psi <strong>80</strong> psi<br />
ted media (constant load)<br />
pH value of the<br />
≤ <strong>80</strong>°C ≤ <strong>60</strong>°C<br />
transported media 7 – 8 7 – 8<br />
1.3. Electrical data 230 V 1~; 50 Hz; 230 V 1~; 50 Hz;<br />
1000 W 8<strong>60</strong> W<br />
110 V 1~; 50 Hz;<br />
8<strong>60</strong> W<br />
Motor protection IP 55 IP 44<br />
1.4. Dimensions<br />
L × W × H 550 × 4<strong>80</strong> × 970 mm 550 × 4<strong>80</strong> × 970 mm<br />
(21.7” × 18.9” × 38.3”) (21.7” × 18.9” × 38.3”)<br />
1.5. Weights<br />
with PVC fabric hoses 20.4 kg (45 lb) 19.8 kg (43.7 lb)<br />
with EPDM fabric hoses 20.0 kg (44.2 lb) 19,4 kg (42.9 lb)<br />
1.6. Noise information <strong>Solar</strong>-<strong>Push</strong> I <strong>80</strong> <strong>Solar</strong>-<strong>Push</strong> K <strong>60</strong><br />
Workplace-related<br />
emissions value 73 dB (A) 70 dB (A)<br />
1.7. Vibrations<br />
Weighted effective value<br />
of the acceleration 2.5 m/s² 2.5 m/s²<br />
The indicated weighted effective value of acceleration has been measured<br />
against standard test procedures and can be used by way of comparison with<br />
another device. The indicated weighted effective value of acceleration can also<br />
be used as a preliminary evaluation of the exposure.<br />
CAUTION<br />
The indicated weighted effective value of acceleration can differ during operation<br />
from the indicated value, dependent on the manner in which the device is<br />
used. Dependent upon the actual conditions of use (periodic duty) it may be<br />
necessary to establish safety precautions for the protection of the operator.<br />
1.8. Suction and pressure hoses PVC- EPDM- EPDMfabric<br />
fabric fabric<br />
hose T<strong>60</strong> hose T100 hose T165<br />
Hose length 3 m 3 m 3 m<br />
Hose size ½” ½” ½”<br />
Hose connector, both sides ¾” ¾” ¾”<br />
Temperature resistance ≤ <strong>60</strong>°C ≤ 100°C ≤ 165°C<br />
2. Start-up<br />
2.1. Electrical connection<br />
WARNING<br />
Ensure that the mains voltage is correct! Before connecting the unit, check<br />
whether the voltage given on the rating plate corresponds to the mains voltage.<br />
2.2. Connecting the electrical filling and flushing unit to the solar system<br />
Connect one of the two fabric hoses to the pressure line connection (1). Connect<br />
the 2nd fabric hose to the return line connection (2) of the plastic tank (3).<br />
Connect the respective free end of the pressure or return line to the ball valves<br />
of the solar system and open the ball valves. Close the connecting valve between<br />
the two ball valves of the solar system. Fill the plastic tank (3) with transported<br />
medium and open the ball valve (4). Plug the mains plug of the electrical filling<br />
and flushing unit into the socket with a protective earth.<br />
CAUTION<br />
Danger of injury due to escaping transported medium. Tighten the hose<br />
screw connections and check for leaks regularly.<br />
2.3. Screw cover with return line connection ¾” and fine filter bag 70 μm<br />
(accessory art. no. 115220, Fig. 3)<br />
Remove the screw cover (6). Replace the inner plate of the screw cover (6) by<br />
an adapter (10). Screw the screw cover (6) with adapter to the plastic tank.<br />
Insert the fine filter into the opening in the adapter, screw the screw cover with<br />
¾” return line connection to the adapter, screw the return line to the return line<br />
connection, seal the connection (2).<br />
2.4. Fine filter unit with large dirt collection vessel (accessory art. no. 115323,<br />
Fig. 4)<br />
Fasten the fine filter unit to the return line connection (2), connect the return<br />
line to the fine filter unit.<br />
2.5. Changeover valve for alternative suction of the transport medium from<br />
another tank (accessory art. no. 115325, Fig. 5)<br />
Unscrew the line from the plastic tank to the pump at the ball valve (4) and<br />
screw on the changeover valve for alternative suction of the transport medium<br />
at the ball valve. Connect one outlet of the T-piece to the pump line, connect<br />
a line to another tank to the other outlet of the T-piece. Control the flow direction<br />
with the valve handle.<br />
2.6. Flow direction changeover valve (accessory art. no. 115326, Fig. 6)<br />
The flow direction changeover valve serves for clearing deposits/sludge in solar<br />
stations and underfloor heating. Screw the flow direction changeover valve with<br />
connection (P) to the pressure line connection (1). Connect connection (R) of<br />
the flow direction changeover valve and the return line connection (2) with the<br />
enclosed ½” T100 EPDM fabric hose. The two "solar station" connections on<br />
the flow direction changeover valve are connected to the outlets on the solar<br />
station with the two ½” fabric hoses belonging to the <strong>REMS</strong> <strong>Solar</strong>-<strong>Push</strong>. The<br />
pressure line and return line to and from the solar station are switched by turning<br />
the toggle lever on the flow direction changeover valve. Deposits/sludge are<br />
loosened by the generated pressure pulses.<br />
3. Operation<br />
Do not switch the <strong>Solar</strong>-<strong>Push</strong> K <strong>60</strong> pump on until it is filled completely with<br />
liquid. Do not allow the pump to run dry! Procedure for filling the <strong>Solar</strong>-<strong>Push</strong> K<br />
<strong>60</strong>: The plastic tank (3) must be filled with liquid. The pressure line (1) and<br />
return line (2) must be connected. Open the ball valve (4). Open the bleed<br />
screw (9). Close the bleed screw (9) as soon as liquid emerges.<br />
The pump of the <strong>Solar</strong>-<strong>Push</strong> I <strong>80</strong> also sucks dry.<br />
Switch the pump on at the On / Off switch (5). Open and remove the screw<br />
cover (6) on the plastic tank (3) so that the air can escape from the system.