4. Installation et montage - Kessel
4. Installation et montage - Kessel
4. Installation et montage - Kessel

You also want an ePaper? Increase the reach of your titles
YUMPU automatically turns print PDFs into web optimized ePapers that Google loves.
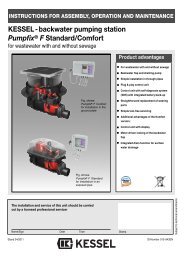
7. Maintenance7.1 Maintenance Preliminary sedimentation + aerationNote: Please find out who is responsible for the maintenanceof small sewage treatment plants in your area.For maintenance purposes, work and inspections must becarried out by the service staff at intervals of approx. 6months (at least twice every year). The plant components insid<strong>et</strong>he tank are easy to maintain. The examination resultsof the purified sewage are requested by the Lower Water Authorityas proof of the purification performance (operationsdiary).We recommend to at least carry out the following tasks:• Inspection of the operations diary for regular entry of theoperating times.• Checking the plant's state of repair, e.g.: accessibility, ventilation,screw connections, hoses.• Checking the free mobility of the floater.• Function check of all mechanical, electrical and other plantparts, in particular of the compressor and ventilation facilities.• Function check of the alarm function and control for possiblefaults or incidents.• Inspection of the air syphons (clear water, feeding and sludgesyphon) for clogging. For this purpose it may be necessaryto remove and clean the air syphons. To do so, unlockthe snap closing on the syphon and pull out the grey airhose. Afterwards open the red locking lever and pull the airsyphon out of the purification tower. Thus, the syphon incl.the inside hose can be cleaned of any dirt. Afterwards r<strong>et</strong>urnthe lever into the appropriate position and connect itcorrectly.• If an inadequate ventilation pattern makes it necessary toclean or replace the aerator spark plug, the latter can be removedvia the integrated guide rail on the purification tower.The aerator spark plug is located underneath the outl<strong>et</strong> pipeon the bottom of the tank. Pull out the aerator spark plug bymeans of the pertinent air hose. When inserting the aeratorspark plug, pay attention that the integrated guide claw isplaced back into the guide rail on the purification tower. Theaerator spark plug must be l<strong>et</strong> down to the bottom of th<strong>et</strong>ank.• Performance of general cleaning work such as e.g.: removalof deposits, removal of foreign matter.• Pay attention that the floating switch is clean and free floating.• S<strong>et</strong>ting optimum performance data (see table page 29) e.g.oxygen supply (~ 2 mg/l), sludge volume (300 - 500 ml/l).• D<strong>et</strong>ermining the sludge level inside the sludge storage andpossibly initiating the sludge removal.The maintenance that is carried out must be recorded in theoperations diary. Sampling vessel Clear water syphon Feed syphon Sludge syphon Discharge pipe Snap closing Locking lever Valve block Floating switch119