- Page 7 and 8:
2. Allgemeines2.3 Anlagenkonfigurat
- Page 9 and 10:
Anlagenkonfiguration EW 4, EW 6, EW
- Page 11 and 12:
2. AllgemeinesAnlagenkonfiguration
- Page 13:
2. Allgemeines2.5 Funktionsbeschrei
- Page 16 and 17:
4. Einbau und MontageWährend der Z
- Page 18 and 19:
4. Einbau und MontageBetondeckeKell
- Page 20 and 21:
4. Einbau und MontageDie Dichtlippe
- Page 22 and 23:
4. Einbau und MontageMontage und An
- Page 24 and 25:
5. Inbetriebnahme Display/Anzeigenf
- Page 26 and 27:
6. Betrieb und EntsorgungWenn Sie s
- Page 28 and 29:
6. Betrieb und Entsorgung6.4 Entsor
- Page 30 and 31:
7. Wartung7.2 Wartung des Verdichte
- Page 32 and 33:
8. Steuerung der Kleinkläranlage8.
- Page 34 and 35:
8. Steuerung der Kleinkläranlage8.
- Page 36 and 37:
9. Störungen und Abhilfemaßnahmen
- Page 38 and 39:
1. Ist eine Lieferung oder Leistung
- Page 40 and 41:
12. Konformitätserklärung40
- Page 42 and 43:
14. WartungschecklisteStammdatenNam
- Page 44 and 45:
E16. ErsatzteileAnlage allgemeinAus
- Page 46:
ÜbergabeprotokollBezeichnung und N
- Page 49 and 50:
1. Consignes de sécuritéAttention
- Page 51 and 52:
Cher client,Nous nous réjouissons
- Page 54 and 55:
2. Généralités2.4. Masse et volu
- Page 56 and 57:
2. GénéralitésConfiguration des
- Page 58 and 59: 2. GénéralitésConfiguration des
- Page 60 and 61: 2. Généralités4. Phase de décan
- Page 62 and 63: 4. Installation et montagePendant l
- Page 64 and 65: 4. Installation et montageDalle en
- Page 66 and 67: 4. Installation et montageLes lange
- Page 68 and 69: 4. Installation et montageMontage e
- Page 70 and 71: 5. Mise en service écran / champ d
- Page 72 and 73: 6. Entretien et vidange de boueCett
- Page 74 and 75: 6. Entretien et vidange de boue6.4
- Page 76 and 77: 7. Maintenance7.2 Maintenance du co
- Page 78 and 79: 8. Programmation de la micro statio
- Page 80 and 81: 8. Programmation de la micro statio
- Page 82 and 83: 9. Pannes - solutionsDéfaut Raison
- Page 84 and 85: 10. Garantie1. Si une livraison ou
- Page 86 and 87: 12. Certificat de conformité86
- Page 88 and 89: 14. Piéces détachée d´INNO-CLEA
- Page 90 and 91: 16. Information techniqueAppareil d
- Page 92 and 93: INSTALLATION, OPERATING AND MAINTEN
- Page 94 and 95: Table of contents1. Safety instruct
- Page 96 and 97: 2. General2.1 Area of applicationII
- Page 98 and 99: 2. General2.4 Dimensions and useful
- Page 100 and 101: 2. GeneralPlant configuration EW 12
- Page 102 and 103: 2. GeneralPlant configuration EW 32
- Page 104 and 105: 2. General4. Sedimentation phaseThe
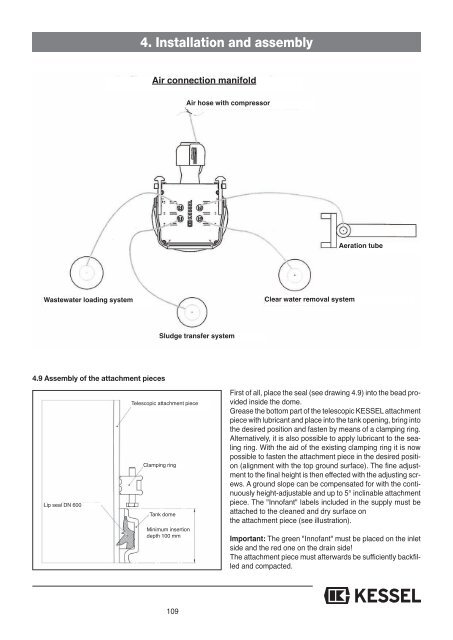
- Page 106 and 107: 4. Installation and assemblyDuring
- Page 110 and 111: 4. Installation and assemblyThe sea
- Page 112 and 113: 4. Installation and assemblyAssembl
- Page 114 and 115: 5. Commissioning Display/indicator
- Page 116 and 117: 6. Operation and disposalAs soon as
- Page 118 and 119: 6. Operation and disposal6.4 Dispos
- Page 120 and 121: 7. Maintenance7.2 Compressor mainte
- Page 122 and 123: 8. Control of the septic system8. C
- Page 124 and 125: 8. Control of the septic system8.3.
- Page 126 and 127: 9. Malfunctions and remedial measur
- Page 128 and 129: 10. Warranty1. In the case that a K
- Page 130 and 131: 12. EC Declaration of conformity130
- Page 132 and 133: 14. Maintenance ChecklistMaster dat
- Page 134 and 135: 16. Spare Parts134
- Page 136 and 137: INSTRUKCJA ZABUDOWY, OBSŁUGI I KON
- Page 138 and 139: Spis treści1. Wskazówki dotycząc
- Page 140 and 141: 2. Informacje ogólne2.1 Zakres zas
- Page 142 and 143: 2.4 Wymiary i pojemność użytkowa
- Page 144 and 145: Konfiguracja urządzenia EW 12, EW
- Page 146 and 147: 2. Informacje ogólneKonfiguracja u
- Page 148 and 149: 2. Informacje ogólne4. Faza osadza
- Page 150 and 151: 4. Zabudowa i montażPodczas skład
- Page 152 and 153: 4. Zabudowa i montażStrop betonowy
- Page 154 and 155: 4. Zabudowa i montażWarga uszczelk
- Page 156 and 157: 4. Zabudowa i montażMontaż i pod
- Page 158 and 159:
Durch Betätigen der Bewegungstaste
- Page 160 and 161:
6. Eksploatacja i opróżnianieGdy
- Page 162 and 163:
6. Eksploatacja i opróżnianie6.4
- Page 164 and 165:
7. Konserwacja7.2 Konserwacja sprę
- Page 166 and 167:
8. Sterowanie oczyszczalni8. Obsłu
- Page 168 and 169:
8. Sterowanie oczyszczalni8.4 Menu
- Page 170 and 171:
9. Zakłócenia i usuwanie awariiB
- Page 172 and 173:
10. Gwarancja1. Jeśli dostarczono
- Page 174 and 175:
174
- Page 176 and 177:
14. Lista kontrolna konserwacjiPods
- Page 178 and 179:
Części zamienneNumer artykułuUrz
- Page 180 and 181:
ISTRUZIONI PER L’INSTALLAZIONE, L
- Page 182 and 183:
Indice1. Avvertenze sulla sicurezza
- Page 184 and 185:
2. Generale2.1 Campo d’impiegoINN
- Page 186 and 187:
2. Generale2.4 Dimensioni e volumi
- Page 188 and 189:
2. GeneraleConfigurazione impianto
- Page 190 and 191:
2. GeneraleConfigurazione impianto
- Page 192 and 193:
2. Generale4. Fase di sedimentazion
- Page 194 and 195:
4. Installazione e montaggioDurante
- Page 196 and 197:
4. Installazione e montaggioSoletta
- Page 198 and 199:
4. Installazione e montaggioSul lat
- Page 200 and 201:
4. Installazione e montaggioMontagg
- Page 202 and 203:
5. Messa in funzione Display/Pannel
- Page 204 and 205:
6. Funzionamento e smaltimentoQuest
- Page 206 and 207:
6. Funzionamento e smaltimentoInter
- Page 208 and 209:
7. Manutenzione7.2 Manutenzione del
- Page 210 and 211:
8. Controllo del piccolo depuratore
- Page 212 and 213:
8. Controllo del piccolo depuratore
- Page 214 and 215:
9. Anomalie e rimediAnomalia Possib
- Page 216 and 217:
10. Garanzia1. Se la merce consegna
- Page 218 and 219:
12. Dichiarazione di conformità CE
- Page 220 and 221:
14. Check-list per la manutenzioneD
- Page 222 and 223:
■16. Pezzi di ricambio ricamboNum
- Page 224 and 225:
Verrohrung / Tuyauteries / Pipework
- Page 226 and 227:
Verrohrung / Tuyauteries / Pipework
- Page 228:
❑ Rückstauverschlüsse❑ Hebean