Fan-coil âCASSETTEâ 4 vie/way - serie CT
Fan-coil âCASSETTEâ 4 vie/way - serie CT
Fan-coil âCASSETTEâ 4 vie/way - serie CT

Create successful ePaper yourself
Turn your PDF publications into a flip-book with our unique Google optimized e-Paper software.
<strong>Fan</strong>-<strong>coil</strong> “CASSETTE” 4 <strong>vie</strong>/<strong>way</strong> - <strong>serie</strong> <strong>CT</strong>Serie “D” (double)Serie “M” (mono)Le cassette ad acqua <strong>serie</strong> “<strong>CT</strong>”sono state ideate e realizzate per rispondere ad una duplice esigenza : elevate prestazioni con la massimasilenziosità, design innovativo compatibile con ogni tipo di ambiente e di arredamento. Disponibili in versione2 tubi (<strong>CT</strong>2W) e 4 tubi (<strong>CT</strong>4W), permettono il condizionamento sia estivo che invernale con una distribuzionedell’aria ottimizzata grazie alla notevole efficienza del ventilatore, appositamente progettato per questaapplicazione e ai deflettori regolabili. Le dimensioni sia del chassis che del pannello esterno sono compatibilicon i moduli standard europei di contro soffitto e l’inserimento telescopico del pannello di copertura(brevettato), ne consente una rapida installazione evitando tutti gli inconvenienti tipici di queste applicazioni.L’ampia gamma di modelli e la vasta disponibilità di accessori rendono le cassette estremamente versatili eadattabili ad ogni tipo di richiesta.Ceiling fan-<strong>coil</strong> water cassettes 4-<strong>way</strong>s <strong>serie</strong> “<strong>CT</strong>”have been planned and produced for a double exigency: high performances with maximum noiseless andinnovative design for every type of environment. Two versions are available: with 2 (<strong>CT</strong> 2W) and 4 (<strong>CT</strong> 4W)tubes. They allow the winter and summer air-conditioning with a uniform optimized air-conditioned air, thanksto the fan efficiency, which has been on purpose planned for this application and to the adjustable fins. Thedimensions of the chassis and of the external panel are compatible with the European standard modules offalse ceiling. The installation is very simple and quick thanks to the patented device, which allows a quickinstallation of the cassette, by avoiding all the typical disadvantages of this application. The water cassette areextremely versatile and suitable for several requests. Wide range of models and a large availability ofaccessories.1/20
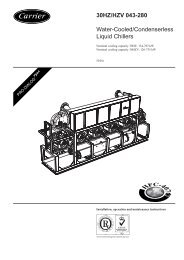
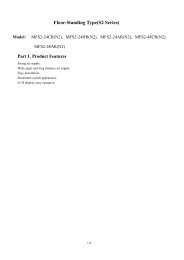
Serie <strong>CT</strong> “M” – Dimensioni / Dimensions (mm)Serie <strong>CT</strong> “D” – Dimensioni / Dimensions (mm)A : ingresso freddo / cooling IN B : uscita freddo / cooling OUT C : scarico condensaD : ingresso caldo / heating IN E : uscita caldo / heating OUT condensing discharge4/20
Cassette <strong>serie</strong> “<strong>CT</strong>” GE 03-A [22.02.2008]Limiti di funzionamentoMassima pressione Circuito idraulico Bar 14Temp.acqua (Riscaldamento) °C 80Temp.acqua minima (Raffrescamento) °C 4Temp.aria ambiente minima (Riscaldamento) °C 5 (1)Temp.aria ambiente massima (Raffrescamento) °C 32Alimentazione elettrica Volt 230 ± 10%Functional limitMaximum pressure hidraulic circuit Bar 14Maximum Water temperature (Heating) °C 80Mimum Water temperature (Cooling) °C 4Room temperature mimum (Heating) °C 5 (1)Room temperature maximum (Cooling) °C 32Power supply Volt 230 ± 10%Funktions-BegrenzungenMaximaler Wasserdruck Bar 14Maximale Wassertemperatur für HEIZEN °C 80Minimale Wassertemperatur für KUEHLEN °C 4Minimale Raumtempertur zum HEIZEN °C 5 (1)Maximale Raumtemperatur Zum KUEHLEN °C 32Spannungs Versorgung Volt 230 ± 10%(1) Nel caso si preveda che la temperatura ambiente possa raggiungere valori prossime allo zero svuotare l’impianto per evitare rottureda gelo - In case it is foreseen that the temperature could reach values next to the zero, empty the plant to avoid breakups because of ice. Wenn dieMöglichkeit besteht, dass die Temperatur nahe dem Nullpunkt absinken kann, entleeren Sie den Wasserkreislauf, um auffrieren zu verhindern.Lancio utile aria in uscita in metri“Per lancio utile si intende la distanza misurata dal punto di uscita dell’aria dalla cassette, fino a quello in cui la velocitàdell’aria stessa è decrementata fino al valore di 0,2 m/s”.La misura è stata effettuata con il deflettore rivolto verso l’alto el’aria uscente in orizzontale. NB : l’altezza max dell’unità nel locale è bene non superi 3 m per evitare stratificazioni.Air flow injection distance in meter“It is the distance measured from cassette delivery grill till the point in which air velocity has been reduced to the value of 0,2m/sec”. The test has been realized with grill oriented to the ceiling and horizontal air exit.VelocitàSpeed<strong>CT</strong>2WAlette aperteGrill open1 aletta chiusa1 grill closed2 alette chiuse2 grills closed<strong>CT</strong>4WAlette aperteGrill openHighMed 25M4,603,21+ 0,60 + 0,90Low 1,94HighMed 46M4,903,56 + 0,60 + 1,10 20M3,902,73Low 2,79 1,95High5,406,00Med 57M4,18 + 0,60 + 1,30 50M3,67Low 2,99 2,77High5,906,30Med 67M3,81 + 0,60 + 1,40 58M3,92Low 2,69 2,93High3,503,30Med 80D2,92 + 0,60 + 1,40 80D2,70Low 2,58 2,35High5,305,00Med 120D4,60 + 0,60 + 1,35 120D4,35Low 4,05 3,751 aletta chiusa1 grill closed2 alette chiuse2 grills closed+ 0,60 + 0,90+ 0,60 + 1,10+ 0,60 + 1,30+ 0,60 + 1,40+ 0,60 + 1,405/20
Valvola - Valve – WasserventilCassette <strong>serie</strong> “<strong>CT</strong>” VA 01/A [01.06.2007]2W4WSerie <strong>CT</strong> 2W 80/120Dvalve installation tubes kit6/20
Cassette <strong>serie</strong> “<strong>CT</strong>” VA 02/A [01.06.2007]Valvola motorizzataLa valvola è necessaria non solo per controllare la temperatura ambiente, ma anche per bloccare il flusso dell’acquarefrigerata alla batteria nel caso di innalzamento anomalo del livello acqua condensa nella vaschetta di raccolta. Per laversione a 4 tubi è obbligatorio l’uso di valvole motorizzate.Il circuito di comando montato a bordo della cassetta è una valida interfaccia interno - esterno unità. Il ventilatorepresente nella cassetta, collegato al comando standard, funziona in modo continuo.In questo modo, si evitano i fastidiosi effetti di stratificazione. Il circuito di comando controlla il livello dell’acqua dicondensa e nel caso di un innalzamento anomalo (dovuto, per esempio, ad eventuale scarico difettoso, a guasto dellapompa, a ventilazione non funzionante, etc.) provoca la chiusura del contatto del galleggiante. Il circuito di controlloprovvede sia a far funzionare la pompa scarico condensa, sia, contemporaneamente, a far chiudere la valvole, bloccandoil flusso d’acqua verso la batteria, se collegate correttamente, come da schema elettrico.Devono essere utilizzate valvole che in mancanza di tensione d’alimentazione chiudano l’entrata d’acqua nell’unità. Utilizzando tensione dialimentazione diversa da 230V, prevedere relè con bobine da 230V che pilotino le valvoleMotor-operated valveThe valve is not necessary only for checking the room temperature, but also for stopping the refrigerated water flowtowards the storage <strong>coil</strong>, in case the condensate water level in the pan raised irregularly. For the 4 pipes version it iscompulsory to use motor-operated valves. The control circuit of the cassette is a valid internal – external interface. Thefan connected to the standard control works continually avoiding therefore annoying stratification effects. The level ofwater condensate is checked by the control circuit that, in case of anomalous raising of water (due , for example, todefective dischage, or to the breakdown of the pump or to an operational defect to the ventilation system) causes theclosing of the float contact. The circuit control makes the discharge condensate pump operating and, at the same time, itcaused the shuting of the valves, if correctly connected as per wiring diagrams.You must use valves that, in deficiency of supply voltage can shut the entrance of water in the unit.If valves with different supply voltage from 230V are used, utilize relay with <strong>coil</strong>s from 230V that pilots the valves.MotorventileDas Ventil ist nicht nur für die Regelung der Raumtemperatur zuständig, es unterbricht auch den Kaltwasserdurchsatz imWärmetauscher, damit im Stillstand kein Kondensat anfällt.Die 4-Leiter Version kann ohnehin nur mit motorgetriebenen Ventilen ausgerüstet werden.Hierdurch bleibt die Kondensatpumpe immer unter Spannung.(1) Bei den Kassetten ist das Wasserventil Spannungslos geschlossen.(2) Der Ventilator läuft immer in der gewählten Stufe.(3) Die Kondensatpumpe steht immer unter Spannung. Auch dann, wenn die Kassette “OFF” ist (am Thermostatausgeschaltet ist).Das Wasserventil erhält Spannung und öffnet, wenn im Sommer die Raumtemperatur Höher ist als derSollwert, oder im Winter niedriger, als der Sollwert.(4) Bevor das Wasserventil öffnet, prüft die eingebaute Systemabfrage zuerst, ob die Punkte 1-3 erfüllt sind. Wenn dieKondensatpumpe defekt oder der Ablauf verstopft ist, und das Wasser steigt in der Wanne über einen bestimmten Punkt,schaltet der Schwimmer die Stromzufuhr ab. Hierdurch wird gewährleistet, dass kein Wasser aus der Decke in den Raumfließen kann.Es müssen Ventilantriebe verwendet werden, die bei Spannungsausfall den Wasserdurchfluss schließen . Und mit 230V betrieben werden. Wirempfehlen die 3-Wegeventile des Herstellers, die auf den Kassetten abgestimmt sind.• Il disegno precedente indica gli ingombri e mostra l’installazione della vaschetta di raccolta condensa esterna, posta sotto levalvole di zona• Per collegare la valvola, o le valvole, al quadro elettrico: far passare i cavetti attraverso il passacavo dell’unità e collegarli allamorsettiera come da schemi elettrici• Montare la bacinella ausiliaria sotto il gruppo valvole inserendo il tubetto di scarico nell’apposito foro; mettere in bolla• The above drawing shows the obstructon and the installation of the external collecting condensate pan placed under the zonevalves• To connect the valve, or valves, to the wiring box: make the cables go through the withered cable of the unit and connect them tothe clamp as seen on the wirings diagrams.• Assemble the auxiliary basin under the valves group introducing the tube of discharges in the appropriate hole and alligne• Die Schläuche können aus flexiblem Kunststoff (mit eingesetzter Stahlspirale) oder Aluflecks, mit außenliegender Isolierung sein(Mineralwolle 12±25 mm stark).• Wird der Aussenluftanschluss entfernt, kann die Öffnung mit einer Isoliermatte (z.B. Neopren 6 mm dick) verschlossen werden.• Bei schlechter Ausführung kann Tropfenbildung durch Kondensat-Ausscheidung entstehen. Für Schäden die durch Nichtbeachtungdieser Hinweise entstehen, kann der Hersteller oder der Lieferant nicht haftbar gemacht werden.7/20
Cassette <strong>serie</strong> “<strong>CT</strong>” VA 03/A [01.06.2007]Valvola - Valve – WasserventilFunzionamento Una molla interna, a riposo, tiene in alto lo stelo e l'otturatore. Nelle valvole a due <strong>vie</strong> questo causal'apertura ed il passaggio dell'acqua. Nelle valvole a tre <strong>vie</strong> (ed a 3 <strong>vie</strong> + by-pass) lo stesso movimento chiude la via A-AB e neblocca il passaggio. L’attuatore realizza il controllo automatico muovendo lo stelo su e giù, aprendo o intercettando il flussodell'acqua, calda o fredda.Utilizzo regolare Le valvole devono essere montate sul ritorno del flusso. Se la perdita di carico ∆p supera il valore di 60kPa,valutare il rischio di livelli di rumore non consentiti.Valvola a 2 <strong>vie</strong> La direzione del flusso deve sempre essere da A verso B.Porta B: UscitaValvole a 3 <strong>vie</strong> Queste valvole richiedono il montaggio come miscelatrici e più precisamente:Porta AB: Uscita del flusso totale (costante)Porta A : Ingresso del flusso regolatoPorta B : Ingresso del flusso ri-circolato (Bypass)Valvole a tre <strong>vie</strong> con bypass (di <strong>serie</strong>) N.C. (Normalmente Chiuse) V230/1/50 HzQueste valvole semplificano l'installazione, adattandosi alla conformazione delle rete idrica, essendo il bypass realizzato nelcorpo valvola. Le indicazioni date per le valvole a tre <strong>vie</strong> sono valide anche per queste valvole.Montaggio Durante l'installazione prestare attenzione al senso del flusso, seguendo anche le indicazioni sul corpo valvola.Non installare il corpo valvola con lo stelo in giù. Il corpo valvola deve essere installato senza eccessiva forza di torsione,compresa tra 25 e 30Nm. L'acqua deve essere pulita e filtrata.8/20
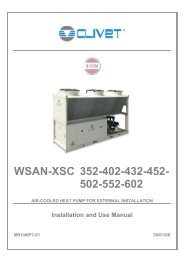
4-port body valveAttuatore / ActuatorCassette <strong>serie</strong> “<strong>CT</strong>” VA 04/A Actuator & body valve [25.02.2008]Sezione / SectionDimensions 4131.xx1) zona trasparente2) elemento termostatico3) molla antagonista4) microswitch (x 4 fili)5) cavo alimentazione6) attacco corpo valvola1) Transparent zone2) Thermostatic element3) Opposing spring4) Elec.microswitch (4 wire)5) Electrical wiring6) Provision for sealingDN Valve DN KVs KVs ΔP max 2 <strong>vie</strong> /<strong>way</strong> dimensions 3 <strong>vie</strong>/<strong>way</strong>+by-pass dimensionsGas typeNomgr<strong>way</strong> by-pass Bar A mm B mm C mm.A mm B mm C mm gr½“ 4131.12 15 1,7 1,2 0,7 52 43 -- 200 52 83 35 350¾“ 4131.34 20 2,5 1,6 0,5 56 45 -- 230 56 96 50 450La valvola montata in batteria con il kit std funziona come miscelatrice. Per funzionamento come deviatrice scambiare entrata/uscitaacqua nel kit. The valve assembled with std kit in the <strong>coil</strong> is mixing application. For diverting application, to invert water in/out in kit tubes.Caratteristiche Technical features Attuatore / Actuator <strong>serie</strong> “22 C”Funzione Type Normally Closed (NC)Elemento termostatico Thermostatic element cera/wax/cireAlimentazione std Std Voltage supply 230 (+10% / -15%) / 50-60 HzA richiesta on request V24 (+10% / -15%)Sez.cavo x lungh. Cable suction minimalxlenght 0,75 * 1 mProtezione elettrica in classe Electrical protection class Class II - IP44 to EN60529Assorbimento a regime Power consumption 2,5 WattAssorbimento all’avviamento Peak starting current 0,25 Amp x 0,5 sec (230V)Corsa massima dello stelo Actuator stroke max 3,5 mmMassima corsa in valvola Valve stroke 2,5 mmTempo di posizion.in apertura Initial opening time 90 secTempo di posizion.tutto aperto Final opening time 3 minTemperatura di lavoro Operation temperature limit 0°C to 50°<strong>CT</strong>emperatura di stoccaggio Storage temperature limit -25°C to 60°<strong>CT</strong>emperatura massima liquido Fluid temperature limit 110 °C maxSpinta dell’otturatore Thrust with stroke 3,5 mm 140 N (± 10%)Dimensioni indicative Indicative dimensions 50 x 51 x 38 mmPeso indicativo Indicative weight gr 150Compatibilità elettromagnetica Electromagnetic compatibility EMC-CEI 55104/95 & EMC-CEI 55014/93Approvato a norme CE CE marked in accordance with UNI 8156/81-9497/89 EN 60730-1&60730-2-14Caratteristiche Technical features Corpo valvola / Body valveApre in tensione Open on power Action Normally Closed (NC)Corpo valvola in ottone Brass Body valve CW 617N UNI 8156/81Molla di contrasto Spring AISI 302Corsa Stem Stroke 2,5 mmAlbero Stem Acciaio / Stainless steelPressione nominale Nominal pressure PN 16 barBocchettone Pipe union Ottone / Brass CW 614NTemperatura massima di lavoro Max working fluid temperature Da / from 4° a / to 110°CDisco Plug disk EPDMPerdita sul by-pass By-pass leakage < 0,02 % KvsDP in chiusura a 20°C DP close off with 20°C 2,5 bar (valve 1/2”)DP in chiusura a 20°C DP close off with 20°C 1,5 bar (valve 3/4”)Liquidi impiegabili acqua con glicole Liquids which can be used water also with glycol ≤ 30%9/20
Cassette <strong>serie</strong> “<strong>CT</strong>” VA 06/A [04.06.2008]<strong>CT</strong> 2W : 3-<strong>way</strong> 4-port on/off valveFasi del montaggio valvola / valve installation procedure10/20
Cassette <strong>serie</strong> “<strong>CT</strong>” VA 07/A [04.06.2008]<strong>CT</strong> 4W : 3-<strong>way</strong> 4-port on/off valveFasi del montaggio valvolaValve installation procedure11/20
Cassette <strong>serie</strong> “<strong>CT</strong>” SE 00-D [<strong>CT</strong> Base standard-01.09.2007]Serie “D” : 2W80/120D – 4W80/120DATTENZIONE ATTENTION ACHTUNGSeguire gli schemi elettriciriportati sul manuale in casocontrario l’azienda non si assumealcuna responsabilità deglieventuali danni conseguenti. Percollegamenti elettrici nonriportati sul manuale, contattarel’azienda produttrice.Gli schemi elettrici fannoriferimento a collegamenti con itermostati e accessori fornitidall’azienda produttrice .Follow the electrical diagramreported in the manual, otherwisethe Company doesn’t assume anyliability for possible consequentlydamages. For different electricaldiagram not reported in themanual contact the. Manufacturer.The electrical diagrams refer to theconnections with thermostat andaccessories supplied by themanufacturer.Folgend Sie bitte die Schaltpläne,die Sie in dieserBedienungsanleitung findenkönnen, sonst macht sich die Firmafür eventuellen herrührendenSchaden nicht verantwortlich.Wenn Sie jede Schaltpläne nicht indieser Anleitung berichtet finden,wollen Sie bitte die Herstellerkontaktieren. Die Schaltplänebeziehen sich auf die Anschlussemit Thermostate und andereZubehöre vom Hersteller geliefert.13/20
Cassette <strong>serie</strong> “<strong>CT</strong>” SE 99 [Morsettiera base – 18.10.2006]MorsettieraLa morsettiera è costituita da una scheda a circuiti stampati sulla quale si trovano il fusibile di sicurezza, ilcondensatore del motore ed un relè a 4 contatti. I morsetti sono disposti su 2 banchi con numerazione da 1 a22 (i morsetti XI sono già cablati in fabbrica)Terminal boardThe terminal board is composed of a panel control board with printed circuits and it is equipped with a safetyfuse, a motor condenser and one relay with 4 contacts. The clamps are placed on 2 rows with numbers from 1to 22 (the XI clamps have been already cabled in our factory)KlemmenbrettDas Klemmbrett besteht aus einer Leiterplatte, wo sind die Sicherung, der Motorkondensator und der Relaismit 4 Kontakten installiert. Die Klemme sind auf 2 Reihen angeordnet mit einer Nummerierung vom 1 bis 22(die Klemme XI werden schon bei unserem Werk verkabelt)Serie <strong>CT</strong> 2W & 4WXEMorsetti esternolato utenteClamps on externaluser sideKlemme der AußenSeite der MaschineXIMorsetti internolato unitàClamps of the internalunit sideKlemme der interneSeite der Maschine14/20
Cassette <strong>serie</strong> “<strong>CT</strong>” Analogic electronic RT TA 01/A-[01.07.2007]Comando a parete elettronico / Electronic RT / WandthermostatAlimentazione / Power supply / Spannungsversorgung Netzschwankung 24/230V 50/60HzPotenza massima dissipata / Max power dissipation / Stromaufnahme < 1 VACampo di regolazione / Range / Regelbereich 5° - 30°CSensore di temperatura / Temperature sensor / Temperaturfühler PTCDifferenziale di intervento / Differential / Genauigkeit0,5°CContatto relè / Relais contact / Relais6 A / 250VLimiti temperatura utilizzo / Max temperature /Umgebungstemperatur 0° - 40°CLimite umidità di utilizzo / Max humidity / Umgebungsfeuchte10-90% URGrado di protezione / Protection / Schutzklasse IP 30Contenitore / Dimension / Abmessungen144 x 82 x 27 mmTermostato elettronicoElectronic thermostat for Room temperature controlIl termostato permette la libertà di scelta fra :The thermostat the user choose freely the following optionsa) ventilatore termostatato unitamente alle valvole a) thermostatic fan together with the valvesb) ventilazione continua e controllo sulle valvole b) continuos fan rotation and valve controlIl termostato è impiegato con impianti a 2 o 4 tubi,con o senza valvole,con o senza termostato di minima temperatura,con sonda di temperatura interna o remotaThe th can be used for 2 or 4 pipe fan <strong>coil</strong>s system,with or without control valves,with or without minimum temperature thermostat,with internal or remote temperature sensorTermostato elettronicopermette la libertà di scelta fra : ventilatore termostatato unitamente alle valvole e ventilazione continua e controllo sullevalvole. Il termostato è impiegato con impianti a 2 o 4 tubi, con o senza valvole, con o senza termostato di minimatemperatura, con sonda di temperatura interna o remota. Questo termostato, completamente elettronico, garantisce uncontrollo stabile e preciso dell’unità. E’ equipaggiato con : interruttore On/Off – selettore di velocità – selettore estate/inverno.Collegare il termostato basandosi sugli schemi allegati, in particolare fare attenzione alle polarità (in particolare il neutro). Iltermostato deve essere posizionato lontano da fonti di calore e i collegamenti devono essere fatti rispettando la norma CEI 23-32 da personale qualificato.ATTENZIONE : Se si utilizza un termostato ambiente diverso da quello standard, collegare il comando seguendo le istruzioni relative al comando utilizzato.Devono essere utilizzate valvole che in mancanza di tensione d’alimentazione chiudano l’entrata d’acqua nell’unità (NC). Se si utilizzano valvole con tensione dialimentazione diversa da 230V utilizzare relè con bobine da 230V che pilotino le valvole.Electronic thermostat for Room temperature controlThe thermostat the user choose freely the following options : thermostatic fan together with the valves or continuos fanrotation and valve control. The th can be used for 2 or 4 pipe fan <strong>coil</strong>s system, with or without control valves, with or withoutminimum temperature thermostat, with internal or remote temperature sensor .This thermostat has been specially designedfor ambient temperature control on applications for fan <strong>coil</strong>s. The device is totally electronic and therefore guarantees perfectcontrol, stability and precision over time. The device is equipped with: On/Off switch - <strong>Fan</strong> <strong>coil</strong> speed selector - Winter functionselection - Summer function selection. Make the electrical connections as shown in the diagram below, taking care to strictlyobserve the phase and neutral connections. After checking that connections correspond to the wiring diagram. Do not positionthe thermostat in locations exposed to draughts, sources of heat or particularly cold walls. Lay cables using ducting incompliance with standards CEI 23-32.ATTENTION : If a different room thermostat from the standard one is used, connect the remote control following the concerning instructions. You must usevalves that, in deficiency of supply voltage can close the entrance of water in the unit (NC). If valves with different supply voltage from 230V are used, utilizerelay with <strong>coil</strong>s from 230V that pilots the valves.Dieser Thermostatwurde für Klimatruhen und Kassette konzipiert. Er regelt die Raumtemperatur in der vorgewählten Lüfterstufe. Auf seinemGehäuse befinden sich folgende Bedienteile: Drehschalter für Temperatur-Sollwert - Ein-Aus-Schalter (ON-OFF) -Winterfunktion (Heizen mit PKW) Stufenschalter Min-Med-Max. Die elektrische Verkabelung laut Schema ausführen und dabeibesonders auf den richtigen Anschluss von Null und Phase achten. Nach der Kontrolle der richtigen Verdrahtung das Oberteilwieder aufsetzen. Es ist zu vermeiden, den Regler an Stellen zu montieren wo Luftströme, Wärmequellen oder extrem kalteWände vorhanden sind. Für die Kabelkanäle nach der Norm CEI 23-32 benutzen.ACHTUNG : Sollten Sie einen Raumthermostat benutzen, der nicht dem Standard-Thermostat entspricht, durchführen Sie die Verbindungen des Thermostates,wie in den Hinweisen beschrieben. Es müssen Ventilantriebe verwendet werden, die bei Spannungsausfall den Wasserdurchfluss schließen.Und mit 230Vbetrieben werden. Wir empfehlen die 3-Wegeventile des Herstellers, die auf den Kassetten abgestimmt sind.15/20
Cassette <strong>serie</strong> “<strong>CT</strong>” SE 02 Analogic RT A70 [01.09.2007]16/20
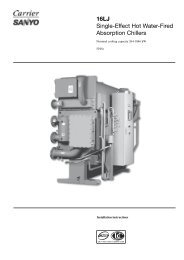
Cassette <strong>serie</strong> “<strong>CT</strong>” Electric Elements [31.01.2008]Resistenze elettrichePer il riscaldamento invernale, sostitutivo o integrativo all’acqua calda, è possibile utilizzare delle resistenzeelettriche, fornite già installate e collegate elettricamente. Il comando di avviamento e spegnimento èdeterminato dal termostato, attraverso la morsettiera interna: l’utente deve provvedere alla solaalimentazione elettrica del quadro resistenze come da schema elettrico più avanti riportato (SE 60).Electrical HeatersIt is possible to supply an additional or substitutive heating system to the warm water by using electric heaters, whichwill be supplied already connected and installed in the unit. The thermostat will switch on or switch off this system bymeans of the internal terminal board: the user should only provide the power supply to the electric heaters controlboard as indicated in the wiring diagram you will find in the specific section on the next pages (SE 60).Elektrischen WiderstaendeDas Gerät kann mit den elektrischen Widerstände für das Ergänzungs- oder ersetzenden zu dem WarmwasserHeizungssystem versorgt sein. Diese Widerstände werden bei uns installiert und schon angeschlossen und sie werdenbei dem Wandthermostat durch das interne Klemmenbrett geschaltet : der Benutzer solltet nur die Stromversorgungvon dem Widerständetafel besorgen, wie auf dem nächsten Seiten bei dem Schaltpläne berichtet (SE 60).Model Potenza - Power Lunghezza Alimentazione - SupplyType Elekt. Leistungen verfügbar Lenght - Länge Spannungsversorgung1 1500 watt 2950 mm V 230/50 Hz/1 Ph2 2000 watt 2950 mm V 230/50 Hz/1 Ph3 2500 watt 2950 mm V 230/50 Hz/1 PhCaratteristiche:• Resistenze di tipo corazzato• corpo in acciaio AISI diametro 8,5 mm• conformazione tale da adattarsi alla batteria alettata in modo da incrementare lo scambio termico• cavi elettrici di collegamento in silicone sezione 1 mm 2• con attacco al corpo resistenza completamente isolato tramite vulcanizzazione in gomma al silicone• termostato di sicurezza a taratura fissa +100°C (max temp. +315°C) a riarmo manuale (togliere in cappuccio epremere il pulsante) a contatto (fascetta) dell’elementoLe resistenze elettriche vengono fornite già montate e funzionanti sulle cassette senza necessità di nessun interventoaggiuntivoELEMENTO ELETTRICO - EL. ELEMENT V230/1QUADRETTO COMANDO - ELE<strong>CT</strong>RIC BOX3
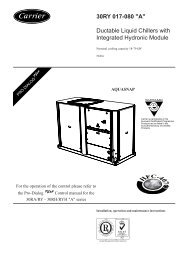
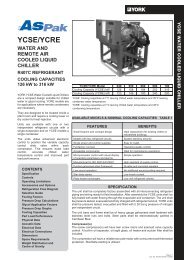
Cassette <strong>serie</strong> “<strong>CT</strong>” AE 02/A [18.02.2008]ARIA ESTERNA DI RINNOVOLe aperture laterali consentono la realizzazione separata di un condotto di aspirazione aria esterna di rinnovo. Toglierel’isolante esterno anticondensa, delimitato dalla fustellatura ed asportare i pannelli in lamiera pre-tranciata (D=67 mmper flangia D=93 mm) utilizzando un punteruolo.Aria esterna di rinnovo : Utilizzare materiale acquistato localmente e idoneo al funzionamento con temperature di60°C in continuo.• I condotti possono essere flessibili in poliestere con anima spiralata in acciaio o in alluminio corrugato,rivestiti eternamente con materiale anticondensa (fibra di vetro sp. 12±25 mm o altro).• Ad installazione terminata, le superfici non coibentate possono essere rivestite con isolante anticondensa (es.neoprene espanso, 6 mm di spessore). L’inosservanza di queste istruzioni può causare gocciolamenti dovutialla condensa; il produttore non risponde di eventuali danni.• L’eventuale ventilatore supplementare per l’aspirazione dell’aria esterna (a cura dell’installatore) deve esserecollegato alla morsettiera come da schemi allegati. Il funzionamento del ventilatore è in parallelo alla valvoladi regolazione, in modo che si arresti alla chiusura della valvola.FRESH AIR RENEWALSide knockouts allow connection of ducts for fresh air inlet. Remove the external anti-condenser insulator andremove the knockout panels (D=67 mm) using a punch.Fresh air renewal : Use material acquired locally and fit to the operation with temperatures of 60°C in continuous• The ducts could be in polyester flexible type (with steel spiral core) or in wrinkled aluminium, eternallycovered with anti condensate material (fiber glass 12±25 mm thick).• Once the installation is over the surfaces that have not been insulated can be coated with anti insulatorcondensate (i.g.: expanded neoprene, 6 mm thick). Failure to comply with these instructions can causedrippings due to the condensate; the producer cannot be held responsible for possible damages.• The additional fan for aspiration of external air ( installer’s responsability ) must be connected to theclamps as per enclosed diagrams. The operation of the fan is in parallel to the register, so that it halts to theclosing of valve.AUSSENLUFT NEBENRAUMESDie seitlichen vorbereitente Anschlüsse ermöglichen einen Aussenluftanschluss und den luftseitigen Anschluss einesNebenraumes. Entfernen Sie ein Stück der Isoliermatte und brechen Sie die vorgestanzte Öffnung aus. Entfernen Sievorsichtig die inneliegende thermische Isolierung, um den Wärmetauscherblock nicht zu beschädigen. Es dürfen nichtbeide vorbereiteten Anschlüsse gleichzeitig für den Luftanschluss eines Nebenraumes verwendet werden.Frische – Aussenluft : Verwenden Sie handelsübliches Material, temperaturbeständig bis 60°C.• Die Schläuche können aus flexiblem Kunststoff (mit eingesetzter Stahlspirale) oder Aluflecks, mitaußenliegender Isolierung sein (Mineralwolle 12±25 mm stark).• Wird der Aussenluftanschluss entfernt, kann die Öffnung mit einer Isoliermatte (z.B. Neopren 6 mm dick)verschlossen werden. Bei schlechter Ausführung kann Tropfenbildung durch Kondensat-Ausscheidungentstehen. Für Schäden die durch Nichtbeachtung dieser Hinweise entstehen, kann der Hersteller oder derLieferant nicht haftbar gemacht werden.• Ein zusaetzlicher Aussenluftventilator (bauseits, wenn erforderlich) muss laut beiliegendem Schaltschemaangeschlossen werden. Der Ventilator ist mit dem Geraet verrigelt, so dass er stoppt wenn die VentileschliessenSchema montaggio condotto flessibile - Diagram assemblage flexible duct Vorgehen beim Anschluss des flexiblen Schlauches(1) Lamiera pre-tranciata da asportare (1) Knockout plenum to remove (1) Ausbrechen des Anschlusses(2) Raccordo imbocco e viti (2) Connection entrance and screws (2) Anschluss-Stutzen anschrauben(3) Guarnizione (3) Gasket (3) Dichtung(4) Condotto flessibile coibentato (4) Flexible duct covers (4) Flexibler Schlauch5
6Serranda con ritorno amolla – Damper withspring return (SER)
Cassette <strong>serie</strong> “<strong>CT</strong>” AE 01/A [18.02.2008]MANDATA ARIA IN LOCALE ATTIGUOTogliere l’isolante interno anticondensa, avendo cura di non danneggiare la batteria retrostante (pre-tranciato da D=155 mmper flangia D=180 mm). NON è consentito utilizzare contemporaneamente le due aperture laterali pre-tranciate previstesull’unità. La mandata d’aria verso il locale attiguo richiede la chiusura almeno della bocchetta corrispondente al condotto.Tra il locale climatizzato (in cui è installata l’unità) e quello attiguo, è necessario applicare una griglia di ripresa ariapossibilmente vicino al pavimento o prevedere una porta con un griglia che permette uno scambio d’aria tra i due locali.AIR SUPPLY TO AN ADJACENT ROOMRemove the inner anti condensate insulator, taking care not to damage the behind thermic exchange <strong>coil</strong>.It is NOT allowed to use simultaneously the two opening sides pre-punched for air ducting to an next roomThe air supply to an adjacent room requires the closing of at least the corresponding mouthpiece to the duct. Between theconditioned place (in which it is installed the unit) and the nearby one, it is necessary to apply an air inlet grille, (possiblynear to the floor) or n alternative to foresee a door with a grate that allows an air exchange between the two places.ANSCHLUSS EINES NEBENRAUMESEntfernen Sie vorsichtig die innenliegende thermische Isolierung, um den Wärmetauscherblock nicht zu beschädigen. Esdürfen nicht beide vorbereiteten Anschlüsse gleichzeitig für den Luftanschluss eines Nebenraumes verwendet werden. BeimAnschluss eines Nebenraumes ist die auf der gleichen Seite zugehörige Luftaustritöffnung zu schließen. In der Türe mitgroßem Luftspalt einzusetzen, damit eine ungehinderte luftseitige Verbindung zwischen den beiden Räumen hergestellt ist.(A) Locale climatizzato (A) Air conditioned room (A) Klimatisierter Raum(B) Locale attiguo (B) Adjacent room (B) Angegrenzender Raum(1) Griglia di comunicazione su porta (1) Communication grate on door (1) Überstromgitter in der Tür(2) Griglia di comunicazione su parete (2) Communication grate on wall (2) Überstromgitter in der Wand20/20