001 SET-K - Came
001 SET-K - Came
001 SET-K - Came
- No tags were found...

You also want an ePaper? Increase the reach of your titles
YUMPU automatically turns print PDFs into web optimized ePapers that Google loves.
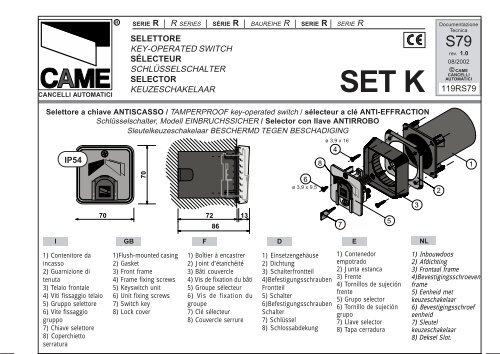
IMONTAGGIO- Fissare ilcontenitore daincasso,predisponendo i cavielettrici dicollegamentoall’interno delcontenitore stesso.- Posizionare laguarnizione di tenutae fissare il telaiofrontale.- Procedere alcollegamentoelettrico.- Inserire il grupposelettore tenendogirata la chiave, efissarlo al telaio.GBASSEMBLY- Fasten thekeyswitch’s flushmountedcasing, insertingthe electricwiring in the casingitself (making use ofthe marked holes).- Position the gasketand affix the frontframe.- Make the necessarypower connections.- Insert the switch unitwhile keeping the keyturned, and fasten it tothe frame.FMONTAGE- Fixer le boîtier àencastrer du sélecteuren introduisant lescâbles électriques debranchement àl’intérieur du boîtier(utiliser pour cela lestrous déjà percés).- Placer le jointd’étanchéité et fixer lebâti du couvercle.- Effectuer lebranchementélectrique.- Installer le groupesélecteur en tenant laclé tournée et le fixerau bâti.DMONTAGE- Die Anschlußkabeldurch dievorgestanzten Löcherin dasEinsetzengehäuseführen und dasSchaltergehäuseanbringen.- Die Dichtungplazieren und dasSchalterfrontteilanbringen.- Die elektrischenKabel anschließen.- Den Schaltereinsetzen undbefestigen. Dabei denSchlüssel gedrehthalten.EMONTAJE- Fije el contenedorempotrado delselector, colocando loscables eléctricos deconexión adentro elmismo (use lasperforacionesmarcadas).- Coloque la juntaestanca y fije el frente.- Realice la conexióneléctrica.- Introduzca el gruposelector manteniendogirada la llave y fíjeloal frente.NLMONTAGEPlaats deinbouwdoos door deelektrische kabelscorrect in de doos teschikken (gebruik devoorziene voorafgemaakte gaatjes).-Plaats de afdichtingen bevestig hetfrontale frame.- Maak de elektrischeaansluiting.- Plaats de eenheidmet keuzeschakelaardoor de sleutelgedraaid te houdenen bevestig dit aanhet frame.portata contattocurrent rating of contactportée contactStromfestigkeit der Kontaktealcance contactocapaciteit contact3A - 250VIMONTAGGIO- Fissare ilcontenitore daincasso,predisponendo i cavielettrici dicollegamentoall’interno delcontenitore stesso.- Posizionare laguarnizione di tenutae fissare il telaiofrontale.- Procedere alcollegamentoelettrico.- Inserire il grupposelettore tenendogirata la chiave, efissarlo al telaio.GBASSEMBLY- Fasten thekeyswitch’s flushmountedcasing, insertingthe electricwiring in the casingitself (making use ofthe marked holes).- Position the gasketand affix the frontframe.- Make the necessarypower connections.- Insert the switch unitwhile keeping the keyturned, and fasten it tothe frame.FMONTAGE- Fixer le boîtier àencastrer du sélecteuren introduisant lescâbles électriques debranchement àl’intérieur du boîtier(utiliser pour cela lestrous déjà percés).- Placer le jointd’étanchéité et fixer lebâti du couvercle.- Effectuer lebranchementélectrique.- Installer le groupesélecteur en tenant laclé tournée et le fixerau bâti.DMONTAGE- Die Anschlußkabeldurch dievorgestanzten Löcherin dasEinsetzengehäuseführen und dasSchaltergehäuseanbringen.- Die Dichtungplazieren und dasSchalterfrontteilanbringen.- Die elektrischenKabel anschließen.- Den Schaltereinsetzen undbefestigen. Dabei denSchlüssel gedrehthalten.EMONTAJE- Fije el contenedorempotrado delselector, colocando loscables eléctricos deconexión adentro elmismo (use lasperforacionesmarcadas).- Coloque la juntaestanca y fije el frente.- Realice la conexióneléctrica.- Introduzca el gruposelector manteniendogirada la llave y fíjeloal frente.NLMONTAGEPlaats deinbouwdoos door deelektrische kabelscorrect in de doos teschikken (gebruik devoorziene voorafgemaakte gaatjes).-Plaats de afdichtingen bevestig hetfrontale frame.- Maak de elektrischeaansluiting.- Plaats de eenheidmet keuzeschakelaardoor de sleutelgedraaid te houdenen bevestig dit aanhet frame.portata contattocurrent rating of contactportée contactStromfestigkeit der Kontaktealcance contactocapaciteit contact3A - 250V2