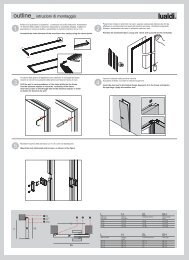
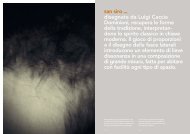
rasomuro 41_ muratura-wall istruzioni di montaggio ... - Lualdi Porte
rasomuro 41_ muratura-wall istruzioni di montaggio ... - Lualdi Porte
rasomuro 41_ muratura-wall istruzioni di montaggio ... - Lualdi Porte
- No tags were found...

Create successful ePaper yourself
Turn your PDF publications into a flip-book with our unique Google optimized e-Paper software.
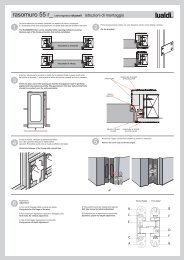
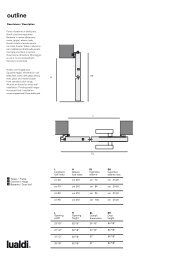
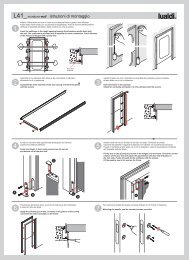
asomuro <strong>41</strong>_ <strong>muratura</strong>-<strong>wall</strong> <strong>istruzioni</strong> <strong>di</strong> <strong>montaggio</strong>®1La porta <strong>rasomuro</strong> può essere installata con aperture a tirare o a spingere.E' necessario prima della posa asportare una parte della pellicola protettiva del telaio.The RASOMURO door can be installed either opening pulling or pushing.2Prima <strong>di</strong> posizionare il telaio nel vano piegare le zanche verso destra o sinistra.Bend the brackets.RASOMURO A TIRAREAPERTURA A TIRARERASOMURO A SPINGEREAPERTURA A SPINGERE3Inserire il blocco porta nel vano in modo che la rasatura finale in gesso risulti a filodel profilo <strong>di</strong> alluminio. Inoltre controllare che gli spessori siano in posizione corretta(l'aria tra anta e telaio dev'essere costante su tutto il perimetro).Insert the door unit in the opening so that the final gypsum layer is perfectly alignedwith the aluminium profile. Also make sure that the shims are in correct position(the gap between the door leaf and frame should be constant over theentire perimeter).4Prima <strong>di</strong> murare, verificare la planarità del telaio e delle cernierecon il filo a piombo.Check flatness of the frame and hinges with a plumb line.INTONACORASATURA IN GESSOZANCAPROFILO TELAIORASATURA IN GESSOIl telaio è fornito con un pannello d'irrigi<strong>di</strong>mento ( a perdere ) per facilitarne la posa..5 6The frame is provided with a templatefor easier installation.Montare l'anta inserendo il perno della cerniera inferiore nell'apposita sede (A).Far corrispondere le cerniere superiori (B), inserire il perno (C) e avvitareil grano <strong>di</strong> sicurezza.Fit the door in the opening by inserting the pin of the bottom hinge in its seat (A).Join the top hinges (B), insert pin (C) and then tighten set screw.ABC7ATTENZIONE!Per evitare l'imbarcatura delle ante è opportuno applicare finiture identichesu entrambe le facciate. Inoltre la finitura dei due lati deve avvenire contestualmente.(Non devono trascorrere più <strong>di</strong> 4/5 ore)CAUTION !!To avoid the warping of the door leaves , apply identical finishes on both sides .Moreover the finishes on the two sides should be applied practicallyat the same time. (do not allow more than 4 / 5 hours to pass)
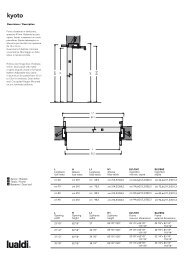
asomuro <strong>41</strong>_ con falso telaio-with subframe <strong>istruzioni</strong> <strong>di</strong> <strong>montaggio</strong>®RASOMURO APERTURA INTERNA - TIRARE -T1zancabracket2telaioframecerniera3hinge4 battentedoor leaffalso telaio5subframe54321HH1LTT1L1Llarghezzaluce nettacm 60cm 70cm 80Lopeningwidth (net)Haltezzaluce nettacm 210cm 210cm 210Hopeningheight (net)TspessoremurotuttituttituttiT<strong>wall</strong>thicknessL1ingombroesternocm 67,4cm 77,4cm 87,4H1ingombroesternocm 214cm 214cm 214T1spessoretelaiocm 4.2cm 4.2cm 4.2cm 90 cm 210 tutti cm 97,4 cm 214 cm 4.2max external<strong>di</strong>mension23" 5/827" 1/231" 1/282" 5/882" 5/882" 5/8all thicknessall thicknessall thickness26" 1/230" 1/234" 3/884" 1/484" 1/484" 1/<strong>41</strong>" 5/81" 5/81" 5/835" 3/8 82" 5/8 all thickness 38" 3/8 84" 1/4 1" 5/8L1H1max external<strong>di</strong>mensionT1framethicknessRASOMURO APERTURA ESTERNA - SPINGERE -T1zancabracket2telaioframeHH1345cernierahingebattentedoor leaffalso telaiosubframeL54321TT1L1Llarghezzaluce nettacm 60cm 70cm 80Lopeningwidth (net)Haltezzaluce nettacm 210cm 210cm 210Hopeningheight (net)TspessoremurotuttituttituttiT<strong>wall</strong>thicknessL1ingombroesternocm 67,4cm 77,4cm 87,4H1ingombroesternocm 214cm 214cm 214T1spessoretelaiocm 4.2cm 4.2cm 4.2cm 90 cm 210 tutti cm 97,4 cm 214 cm 4.2L1 H1 T1max external<strong>di</strong>mensionmax external<strong>di</strong>mensionframethickness23" 5/827" 1/231" 1/282" 5/882" 5/882" 5/8all thicknessall thicknessall thickness26" 1/230" 1/234" 3/884" 1/484" 1/484" 1/<strong>41</strong>" 5/81" 5/81" 5/835" 3/8 82" 5/8 all thickness 38" 3/8 84" 1/4 1" 5/8
asomuro <strong>41</strong>_ con falso telaio-with subframe <strong>istruzioni</strong> <strong>di</strong> <strong>montaggio</strong>®1La porta <strong>rasomuro</strong> può essere installata con aperture a spingere o a tirare.Posizionare il falso telaio secondo l'apertura a spingere o a tirare.The RASOMURO door can be installed either opening pushingor pulling.2Prima <strong>di</strong> posizionare il telaio nel vano piegare le zanche verso destra o sinistra secondol'apertura a spingere o a tirare.Before positioning the frame, bend the brackets either right or left, it dependsfrom the push or pull side opening.APERTURA A TIRAREAPERTURA A SPINGERE3Inserire il falso telaio nel vano in modo che la rasatura finale in gesso risulti allineata.Il falso telaio viene fornito con un pannello <strong>di</strong> irrigi<strong>di</strong>mento.Insert the subframe in the rough opening keeping the aluminium profile flush withthe <strong>wall</strong>. The subframe is provided with a template for easier installation.4Prima <strong>di</strong> murare definitivamente, verificare la planarità del telaio e delle cernierecon il filo a piombo.Check flatness of the frame and hinges with a plumb line.PROFILO FALSO TELAIOZANCATELAIO PORTAPROFILO FALSO TELAIO5Il telaio è fornito con un pannello d'irrigi<strong>di</strong>mento ( a perdere ) per facilitarne la posa..The frame is provided with a templatefor easier installation.6Dopoaver ancorato, in modo definitivo, il falso telaio, è possibile inserire il telaio dellaporta nel vano.After the subframe is fixed, it's possible to insert the door in the <strong>wall</strong> opening.PROFILO FALSO TELAIOMontare l'anta inserendo il perno della cerniera inferiore nell'apposita sede (A).Far corrispondere le cerniere superiori (B), inserire il perno (C) e avvitareil grano <strong>di</strong> sicurezza.7 8Fit the door in the opening by inserting the pin of the bottom hinge in its seat (A).Join the top hinges (B), insert pin (C) and then tighten set screw.ATTENZIONE! Per evitare l'imbarcatura delle ante è opportuno applicare finiture identichesu entrambe le facciate. Inoltre la finitura dei due lati deve avvenire contestualmente.(Non devono trascorrere più <strong>di</strong> 4/5 ore)CAUTION !!To avoid the warping of the door leaves , apply identical finishes on both sides .Moreover the finishes on the two sides should be applied practicallyat the same time. (do not allow more than 4 / 5 hours to pass)ABC
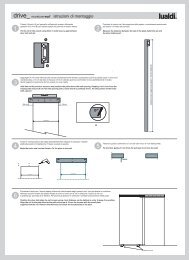
asomuro <strong>41</strong>_ cartongesso-dry<strong>wall</strong> <strong>istruzioni</strong> <strong>di</strong> <strong>montaggio</strong>®RASOMURO APERTURA A TIRARET1staffabracket2telaioframe3cernierahinge43214battentedoor leafL2H2HH1LTT1L1Llarghezzaluce nettacm 60cm 70cm 80Lopeningwidth (net)Haltezzaluce nettacm 210cm 210cm 210Hopeningheight (net)TspessoremurotuttituttituttiT<strong>wall</strong>thicknessall thicknessall thicknessall thicknessall thicknessL1luce vanoda pre<strong>di</strong>sporrecm 64cm 74cm 8425” 1/429” 1/833” 1/8H1luce vanoda pre<strong>di</strong>sporrecm 212cm 212cm 21283” 1/283” 1/283” 1/2T1spessoretelaiocm 4.2cm 4.2cm 4.21” 5/81” 5/81” 5/81” 5/8L2larghezzavanocm 68cm 78cm 8826” 3/430” 3/434” 5/8H2altezzavanocm 212cm 212cm 212cm 90 cm 210 tutti cm 94 cm 212 cm 4.2 cm 98 cm 21223” 5/8 82” 5/827” 1/2 82” 5/831” 1/2 82” 5/835” 3/8 82” 5/8L1frameoverall widthH1roughopeningT1roughopeningL2Roughopening widthH283” 1/283” 1/283” 1/237” 83” 1/2 38”83” 1/2Rough openingheightRASOMURO APERTURA A SPINGERET1staffabracket2telaioframe3cernierahinge43214battentedoor leafL1H1HH2TT1LL2Llarghezzaluce nettacm 60cm 70cm 80Lopeningwidth (net)Haltezzaluce nettacm 210cm 210cm 210Hopeningheight (net)TspessoremurotuttituttituttiT<strong>wall</strong>thicknessall thicknessall thicknessall thicknessall thicknessL1luce vanoda pre<strong>di</strong>sporrecm 64cm 74cm 8425” 1/429” 1/833” 1/8H1luce vanoda pre<strong>di</strong>sporrecm 212cm 212cm 212roughopening83” 1/283” 1/283” 1/2T1spessoretelaiocm 4.2cm 4.2cm 4.2roughopening1” 5/81” 5/81” 5/81” 5/8L2larghezzavanocm 68cm 78cm 88Roughopening width26” 3/430” 3/434” 5/8H2altezzavanocm 212cm 212cm 212cm 90 cm 210 tutti cm 94 cm 212 cm 4.2 cm 98 cm 21223” 5/8 82” 5/827” 1/2 82” 5/831” 1/2 82” 5/835” 3/8 82” 5/8L1 H1 T1 L2roughopeningH237” 83” 1/2 38”83” 1/2Rough openingheight83” 1/283” 1/283” 1/2
asomuro <strong>41</strong>_ cartongesso-dry<strong>wall</strong> <strong>istruzioni</strong> <strong>di</strong> <strong>montaggio</strong>®1La porta <strong>rasomuro</strong> su parete in cartongesso può essere installata con aperturea tirare o a spingere.The Rasomuro door can be installed on dry<strong>wall</strong>s either opening pullingor pushing.2Prima <strong>di</strong> posizionare il telaio avvitare le staffe speciali in dotazione facendo attenzioneal senso <strong>di</strong> apertura che si intende ottenere.Before positioning the frame, screw-in the brackets, and pay attentionto the required <strong>di</strong>rection of opening.APERTURA A TIRAREAPERTURA A TIRAREAAPERTURA A SPINGEREAPERTURA A SPINGERE3Inserire il blocco porta nel vano in modo che la rasatura finale in gesso risulti a filodel profilo <strong>di</strong> alluminio. Inoltre controllare che gli spessori siano in posizione corretta(l'aria tra anta e telaio dev'essere costante su tutto il perimetro).Insert the door unit in the opening so that the final gypsum layer is perfectly alignedwith the aluminium profile. Also make sure that the shims are in correct position(the gap between the door leaf and frame should be constant overthe entire perimeter).4Prima <strong>di</strong> tamponare, verificare la planarità del telaio e delle cernierecon il filo a piombo.Check flatness of the frame and hinges with a plumb line.DISTANZIALESTRUTTURAPORTANTESTAFFAtogliere il montante d'irrigi<strong>di</strong>mento prima <strong>di</strong> murare il telaioremove to the wooden beam before installing the framePROFILO TELAIOCARTONGESSOIl telaio è fornito con un pannello d'irrigi<strong>di</strong>mento ( a perdere ) per facilitarne la posa..5 6The frame is provided with a templatefor easier installation.Montare l'anta inserendo il perno della cerniera inferiore nell'apposita sede (A).Far corrispondere le cerniere superiori (B), inserire il perno (C) e avvitareil grano <strong>di</strong> sicurezza.Fit the door in the opening by inserting the pin of the bottom hinge in its seat (A).Join the top hinges (B), insert pin (C) and then tighten set screw.ABC7ATTENZIONE!Per evitare l'imbarcatura delle ante è opportuno applicare finiture identichesu entrambe le facciate. Inoltre la finitura dei due lati deve avvenire contestualmente.(Non devono trascorrere più <strong>di</strong> 4/5 ore)CAUTION !!To avoid the warping of the door leaves , apply identical finishes on both sides .Moreover the finishes on the two sides should be applied practicallyat the same time. (do not allow more than 4 / 5 hours to pass)