caution - Tekno Point
caution - Tekno Point
caution - Tekno Point
- No tags were found...

Create successful ePaper yourself
Turn your PDF publications into a flip-book with our unique Google optimized e-Paper software.
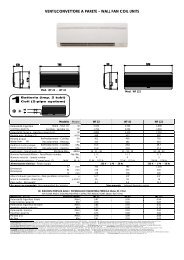
III. 5. INDOOR UNIT INSTALLATION♦ INSTALLATION DRAWINGIndoor unitOutdoor unit≥20260≥1500≥500mm≥300mm≥500mm≥1000mm≥1000mm≥1500≥1800≥2000mmUnit: mmUscita aria≥2000mm♦ INSTALLATION SITE◊ Indoor unit installation site* Position the unit well away from heat or steam sources and where the air intake and the delivery parts are notobstructed.* Do not install the unit in rooms where inflammable gas or acid or alkaline substances are present since these couldirreparably damage the copper-alluminium heat exchangers or the plastic components.* Do not expose the indoor unit to direct sunlight.* Position the unit in a place where condensate can be easily discharged and from whence the pipes can be easilyconnected to the outdoor unit.* Position the unit in compliance with a minimum distance from walls, furniture or other as shown below.* Do not install the unit in workshops or kitchens where oil vapours mixed with the treated air could settle on the heatexchanger batteries, thus reducing their performances, or on the interior parts of the unit, causing them damage.* Position the unit in a place where the treated air can distribute throughout the room.* Position the unit at least one meter from televisions, radios, appliances with remote controls and fluorescent lamps.♦ DIMENSIONS INDOOR UNIT INSTALLATIONModels: 3500 W, 5300 WModel: 7100 W650 (Panel)604 (Hooks positions)570 (Indoor unit body)950 (Panel)890 (Ceiling opening)840 (Indoor unit)780 (Hooks positions)Refrigerant pipeHoisting screw (X4)400 (Hooks positions)570 (Indoor unit body)650 (Panello)6 80 (Hooks positions)840 (Indoor unit)890 (Ceiling opening)9 5 0 (Panel)♦ INSTALL THE MAIN BODYA) The existing ceiling (to be horizontal)a) Please cut a quadrangular ceiling according to the shape of the installation paper board.* The center of the hole should be at the same position of that of the air conditioner body.* Determine the lengths and outlets of the connecting pipe, drainpipe and cables.* To balance the ceiling and to avoid vibration, please enforce the ceiling when necessary.b) Please select the position of installation hooks according to the hook holes on the installation board.* Drill four holes of 12mm, 45-50mm deep at the selected positions on the ceiling. Then embed the expansible hooks(fittings).* Face the concave side of the installation hooks toward the expansible hooks. Determine the length of the installationhooks from the height of ceiling, and then cut off the unnecessary part.* If the ceiling is extremely high, please determine the length of the installation hook according to facts.The hooks length could be calculated:A50