important - Bike-Manual.com
important - Bike-Manual.com
important - Bike-Manual.com
- No tags were found...

You also want an ePaper? Increase the reach of your titles
YUMPU automatically turns print PDFs into web optimized ePapers that Google loves.
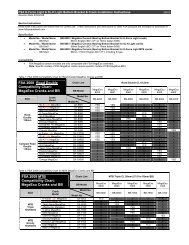
EnglishPike, Reba, Revelation, Domain & Argyle User <strong>Manual</strong>Pike, Reba, Revelation, Domain & Argyle User <strong>Manual</strong>EnglishRemote InstallationThe PopLoc or PushLoc Remote Lockout lever allows the rider to control the movement of their suspensionfork without removing their hands from the handlebars. Specific left and right levers are available.If needed, remove the grip, brake lever, and shifter from the handlebar. If you are unfamiliar with theremoval of these items, please consult the manufacturer’s instructions.1. Slide the Poploc onto the handlebar, or install the PushLoc on the handlebars.2. Re-install the shifter, brake lever, and grip on the handlebars. If you are unfamiliar with the installationof these items, please consult the manufacturer’s instructions. Always adhere to the re<strong>com</strong>mendedtorque specifications for these items.3. Position the PopLoc or PushLoc as desired on the handlebar and tighten the clamp boltto 20in-lb (2.25 Nm).4. Forks with PopLoc Adjust: Turn the blue <strong>com</strong>pression adjustment dial counterclockwise until it stops.5. Verify that the PushLoc or PopLoc is in the “open” position. To do this, press the lever on the PushLocuntil it returns towards the rider. Press the release button on the PopLoc.6. Install the cable in the PopLoc or PushLoc.7. Install the cable into the housing.8. Feed the cable and housing into the cable stop on the fork crown.9. Gently pull on the cable and align it with the groove in the rotating cam of the Motion Control damper.10. Tighten the cable fixing bolt on the rotating cam to 8in-lb (.9 Nm).i m p o r t a n tconsumer safety informationThe Maxle Quick Release system allows the use of a standard 20mm X 110mmthru-axle hub for enhanced stiffness. The axle threads into the left fork leg,tightening the hub against the left drop out. The axle is fixed in place in thelower leg by the Maxle Quick Release lever.Riding with an improperly installed wheel can allow the wheel to move ordisengage from the bicycle, causing damage to the bicycle, and serious injury ordeath to the rider. It is essential that that you:• Ensure that your axle, dropouts, and quick release mechanisms are clean andfree of dirt or debris.• Ask your dealer to help you understand how to properly secure your frontwheel using the Maxle Quick Release System.• Apply the correct techniques when installing your front wheel.• Never ride your bicycle unless you are sure the front wheel is installedproperly and secure.Maxle 360° Quick Release SystemInstallation1. Position your wheel in the dropouts of the lower leg. The hub should seat firmly in the dropouts. Besure to position the rotor in the caliper. Verify that neither the rotor, hub, nor rotor bolts interfere withthe lower legs. If unfamiliar with adjusting your disc brake, see your brake manufacturer’s instruction.Tighten1. Place Maxle lever in the open position (Fig. A). Ensure the leverengages with the corresponding slot in the axle.2. Slide the axle through the right side of the hub until it engagesthe threads of the left drop out.3. To tighten the axle into the dropout, turn the axle lever clockwiseuntil hand tight.Notes: Never use any other tool to tighten the axle into the lower leg. Over-tightening of the axle candamage the axle and/or the lower leg.Securew a r n i n g1. To lock the axle into the lower leg close the Maxle quick release lever.2. The quick release mechanism is an “over-center cam”, similar to the quick release found on manybicycle wheels. When closing the lever, tension should be felt when the quick release lever is in thehorizontal position (90 degrees to the lower leg), and the quick release lever should leave an imprintin the palm of your hand. If resistance is not felt at the 90 degree position and if the lever does notleave a clear imprint in the palm of your hand, tension is insufficient. To increase tension, open thequick release lever turn the quick release lock nut in small increments until proper tension is felt.A small (1-2mm) gap may be noticed between the inside flange of the maxle and the outside of the dropout.This gap is normal, and allows the right leg to “Float” in position prior to closing of the quick release.w a r n i n gFig. ADIRT AND DEBRIS CAN ACCUMULATE BETWEEN THE DROPOUTOPENINGS. ALWAYS CHECK AND CLEAN THIS AREA WHEN REINSTALLINGTHE WHEEL. ACCUMULATED DIRT AND DEBRIS CAN COMPROMISE THESECURITY OF THE AXLE, LEADING TO SERIOUS AND/OR FATAL INJURY.AFTER CLOSING THE MAXLE QUICK RELEASE LEVER, DO NOTREPOSITION OR SPIN THE LEVER. REPOSITIONING OR SPINNINGTHE MAXLE LEVER CAN CAUSE THE AXLE TO COME LOOSE,COMPROMISING THE SECURITY OF THE AXLE.95-4015-000-000, Rev. A© SRAM Corporation • May 2006