Lib.ist.F97 TSE H45.pmd - Airforce
Lib.ist.F97 TSE H45.pmd - Airforce
Lib.ist.F97 TSE H45.pmd - Airforce

You also want an ePaper? Increase the reach of your titles
YUMPU automatically turns print PDFs into web optimized ePapers that Google loves.
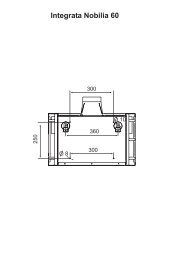
GBInstallationThe cooker hood must be placed at a minimum d<strong>ist</strong>ance of 65cm from the cooking plane for electric cookers and 75cm forgas or mixed cookers.If the instructions for installation for the gas hob specify a greaterd<strong>ist</strong>ance, this has to be taken into account.Do not tile, grout or silicone this appliance to the wall. Surfacemounting only. Do not fix chimney flue to furniture or fly overshelves unless the chimney flue can be easily removed, incase maintenance is ever required.UseThe cooker hood is provided with an upper air exit B fordischarging fumes externally for models including chimneyflue C ( Suction Version A- exhaust pipe not supplied).If cooking fumes and vapours cannot be externally discharged,the cooker hood can be used in the recirculating versionF: the installation of 1 active charcoal filter F allows therecirculation of fumes and vapours through the upper grid G.Electrical connectionMake sure that there is a power socket near the hood andthat the system has a 30 mA differential. The mains voltagemust be the same as that on the label inside the hood. Thehood has a 1250 mm power cable with or without plug: if itdoes have a plug, connect the hood to an accessibleapproved socket; or if it does not (connection direct to themains), fit an approved bipolar switch with a minimumcontact opening of no less than 3 mm (accessible). Thisinstallation and electrical connection must be executed by aqualified technician.OperationINSTRUCTION ON MOUNTING AND USECheck also the drawings on the initial pages with the alphabeticaland numerical references in the explanatory text.Closely follow the instructions in this manual. We cannotaccept liability for any faults, detriment or fire damage to theappliance due to non-compliance with the manual’sinstructions. Installation and electrical connections must beexecuted by a qualified technician. You should affix the hoodto a wall of sufficient weight-bearing capacity, so not to onemade of plasterboard. Do not install it inside a cupboard.D: Increase extraction speed (power) key: press this touchsensor to increase the extraction speed of the hood.E: Timer key: irrespective of the extraction speed selected,touching the key will activate the timer function for 5 minutes(during this phase a dot will flash on and off on the display). Toreset the timer operate the E motor key.F: Filters reset key: touching this key will reset the metalanti-grease filter (1) saturation and carbon filter replacement (2)warning.(1) After the hood has been operating for 40 hours, the“FG“or”G” symbol on the display will begin toflash, indicating the need to clean the metal antigreasefilters.(2) After the hood has been operating for 120 hours,the “FC”or”C” symbol on the display will begin toflash, indicating the need to clean the active carbonfilters.Sensor function: Touching keys ‚C‘ and ‚D‘ simultaneouslywill activate the sensor. In this mode the extraction speed willset itself automatically causing keys C and D to flashintermittently. Operate key ‘C’ or ‘D’ to resume manual operation.MaintenancePrior to any maintenance operation ensure that the cooker hoodis disconnected from the electrical outlet.Cleaning:The hood must be cleaned frequently both inside (apart fromthe area behind the grease filter) and outside. Use a clothmo<strong>ist</strong>ened with denatured alcohol or neutral liquid detergents.Never use products containing abrasives.Warning: Failure to carry out the basic standards of the cleaningof the cooker hood and replacement of the filters may cause firerisks. Therefore we recommend observing these instructions.Anti-grease Filter – must be cleaned once a month, with nonabrasive detergents, by hand or in dishwasher on low temperatureand short cycle.When washed in a dishwasher, the grease filter may discolourslightly, but this does not affect its filtering capacity.A B C D E FA: Light ON/OFF key: press this touch sensor to switch onor off the lights of the hood.B: Motor ON/OFF key (4 speed): press this touch sensor toswitch on the hood extractor fan at the same speed as it waswhen last switched off. Use the „D“ and „C“ keys to vary thespeed (power) of extraction.Charcoal Filter - (only for filter version):The active charcoal filters F are not washable nor regenerative.It should be changed every 6 months in normal use.The active charcoal filters capture unpleasant cooking odours.Replacing lightbulbsWarning! Prior to touching the light bulbs ensure they are cooleddown.Extract the lamp cover by levering it off with a small screwdriveror similar tool.Replace the damaged light bulb. Only use halogen bulbs of 20Wmax (G4), making sure you do not touch them with your hands.Close the lamp cover (it will snap shut).C: Decrease extraction speed (power) key: press this touchsensor to reduce the extraction speed of the hood.6