drive_ muratura-wall istruzioni di montaggio - Lualdi Porte
drive_ muratura-wall istruzioni di montaggio - Lualdi Porte
drive_ muratura-wall istruzioni di montaggio - Lualdi Porte
- No tags were found...

You also want an ePaper? Increase the reach of your titles
YUMPU automatically turns print PDFs into web optimized ePapers that Google loves.
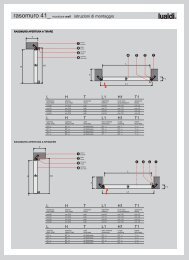
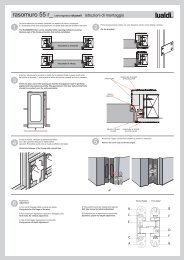
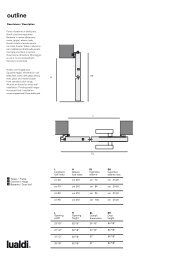
H<strong>drive</strong>_ cartongesso-dry<strong>wall</strong> <strong>istruzioni</strong> <strong>di</strong> <strong>montaggio</strong>®TLT1202ELEH8050L1ELL1ELEHLlarghezzaluce nettaHaltezzaluce nettaTspessore muroL1luce nettapassaggioEL -EHingombro esterno massimocm 70cm 80cm 90cm 210cm 210cm 210tutti gli spessoritutti gli spessoritutti gli spessoricm 62cm 72cm 82cm 84cm 94cm 104Lopening widthHopeningheightT<strong>wall</strong> thicknessL1NetopeningEL -EHmax external<strong>di</strong>mensions27" 1/231" 1/231" 1/282" 5/882" 5/882" 5/8any thiknessany thiknessany thikness24" 3/828" 3/833" 1/233" 1/837"41"
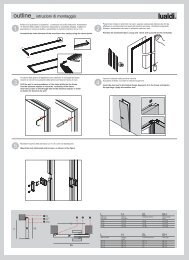
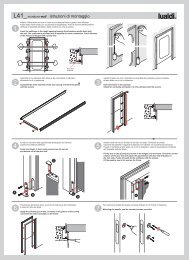
<strong>drive</strong>_ cartongesso-dry<strong>wall</strong> <strong>istruzioni</strong> <strong>di</strong> <strong>montaggio</strong>®Fissare il binario (A) sul pannello nell'apposito scasso utilizzandospessori da 2 mm (B) per lasciare spazio tra pannello e binario stesso.1 2Fix the rail in the cutout using 2mm in order leave a gap betweendoor leaf and rail.Prendere la misura tra il lato superiore della piastra, correttamente posizionatasul binario e il fondo del pannello.Measure the <strong>di</strong>stance between the top of the plate behid the rail andthe door bottom part.A39,6 cmBAggiungere 4 mm (aria inferiore) alla misura precedentemente rilevata e posizionare quin<strong>di</strong> la piastra sopra il vano muromantenendola a 1,6 cm dal lato <strong>di</strong> chiusura e 9,6 cm dal lato apertura (controllare che sia perfettamente in bolla).Quin<strong>di</strong> segnare la posizione dei fori svasati con una matita.Add 4mm to the previous measure and position the plate above the <strong>wall</strong> opening. Keeping it at 1,6 cm from theclosing side and at 9,6 cm from the opening side ( check that it is perfectly level ). Fix the position of the holeswith a pencil.1,6 cmDistanza lato superiore piastra / fondo battente700/800/900Forare in corrispondenza dei segni precedentemente eseguiti ed utilizzare i tasselliadatti alla parete <strong>di</strong> installazione. Fissare a parete la piastra.4 5Make the holes and use the fishers. Fix the plate to the <strong>wall</strong>.Fissare la guida a pavimento a 5 cm dal vano muro e 4 cm dalla parete.Fix the floor guide at 5 cm from the <strong>wall</strong> and 4 cm from the <strong>wall</strong>.4 cm5 cm700/800/900700/800/9006Posizionare l’anta con il binario aperto utilizzando inferiormente degli spessori da 4 mm per tenerla in posizione.Allineare quin<strong>di</strong> il binario alla piastra fissata al muro ed unirli con le viti in dotazione. Coprire le viti conla piattina gia’ provvista <strong>di</strong> bi-adesivo. Rimuovere gli spessori e verificare il corretto funzionamento della porta.Position the door leaf when the rail is open using 4 mm thikness on the bottom in order to keep it in position.Align the rail to the plate fixed to the <strong>wall</strong> and screw it. Cover the screws with the small platesupplied with the rail. Remove the thikness and check the functionality of the door.Spessori da 4 mm