Инструкция по монтажу
Инструкция по монтажу
Инструкция по монтажу

Create successful ePaper yourself
Turn your PDF publications into a flip-book with our unique Google optimized e-Paper software.
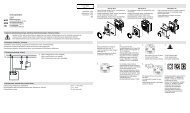
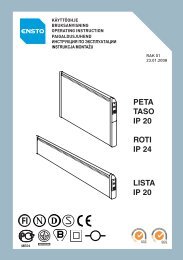
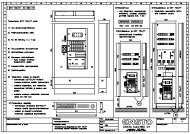
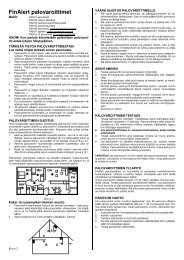
INSTALLATION OF UNDERFLOOR HEATING (Fig. A)1. Soil2. Compacted gravel3. Thermal insulation4. Plastic film5. Reinforced concrete floor slab- the surface of the slab must be cleaned thoroughlybefore the cable is spread out6. Fixing strip- the fixing strip is nailed to the base casting. It is easiestto attach the strip before the concrete is fully set.- if the slab is cast in a single work stage, attach thecable to the mesh reinforcement.7. Heating cable8. Concrete screed- in direct heating, thickness 30-50 mm, storageheating 50-80 mm9. Finish material- in direct heating hard, very thermally conductive(e.g. ceramic tile)- in storage heating, less thermally conductive (e.g.parquet, cork or vinyl flooring)10. ThermostatTASSU-STASSU-S heating cable is designed for renovationinstallation on top of an old flooring surface, on aplasterboard or wooden flooring. The loading permetre of the cable is approx. 10 W/m.Recommended laying distancesThe usual laying distance for underfloor heating is9-12 cm.In a plasterboard floor, the laying distance is min.10 cm.INSTALLATION ON TOP OF AN OLD FLOOR (Fig. B)1. Old flooring- Note! Check the old flooring adheres to thesubfloor- the surfaces must be free of dirt and dust- wash the old flooring with crystal soda or a suitablesolvent- vinyl flooring must be dried and roughened, removeloose fragments- level out the old flooring with plaster if necessary2. Adhesion layer- an approx. 2 mm layer of renovation plaster is spreadon vinyl flooring to make an adhesion surface.The plaster is allowed to set for approx. 24 hours.- the new floor’s adhesion to the concrete and slabsurface is ensured when necessary with a suitableadhesive3. Mesh ( e.g. thin wire mesh, approx. 25x25 mm)- attachment of the mesh and cable with hot glueor similar- a cable may also be attached to a concrete and slabfloor with an fixing strip4. Heating cable5. Screed and filler if necessary- renovation plaster, which should cover the entirecable6. Installing the surfacing- vinyl flooring is laid with glue and a tile flooringwith renovation plaster7. Flooring- vinyl flooring or ceramic tiling8. ThermostatINSTALLATION ON A PLASTERBOARD FLOOR(Fig. C)1. Plasterboard layer- an intact layer of plasterboard should be left underthe cables. Additional strips of plasterboard will beattached to this.2. Heating cable3. Plasterboard strips- attach the strips to the base with nails or similar4. Grooves for heating cable- the cable is laid in the grooves, which are filled witha mineral-based plaster5. Filler (if necessary)6. Extra-hard plasterboard- if the fl oor structure underneath is suffi cientlyrigid, the surface tiling can be performed without aplasterboard layer; a layer of boards is recommendedunder vinyl flooring7. Damp-proofing- damp-proofing under a tiled floor- damp-proofing can be left out under watertightvinyl flooring8. Flooring material- vinyl flooring or ceramic tiling9. Thermostat13