rasomuro 55 r_ cartongesso-drywall istruzioni di ... - Lualdi Porte
rasomuro 55 r_ cartongesso-drywall istruzioni di ... - Lualdi Porte
rasomuro 55 r_ cartongesso-drywall istruzioni di ... - Lualdi Porte

Create successful ePaper yourself
Turn your PDF publications into a flip-book with our unique Google optimized e-Paper software.
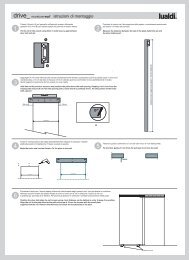
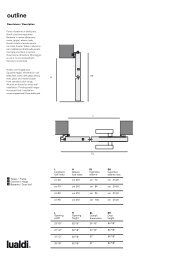
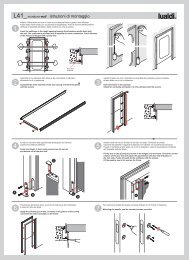
Viteper fidello<strong>rasomuro</strong> <strong>55</strong> r_ <strong>cartongesso</strong>-<strong>drywall</strong> <strong>istruzioni</strong> <strong>di</strong> montaggio®La porta <strong>rasomuro</strong> può essere installata con aperture a tirare o a spingere.E' necessario prima della posa asportare una parte della pellicola protettiva del telaio.The RASOMURO door can be installed either opening pulling or pushing.Remove part of the frame protection film before installation.Prima <strong>di</strong> posizionare il telaio nel vano fissare le zanche verso destra o sinistra.Fix the brackets.RASOMURO A SPINGERERASOMURO A TIRAREInserire il blocco porta nel vano in modo che la rasatura finale in gesso risulti a filodel profilo <strong>di</strong> alluminio. L'aria tra anta e telaio dev'essere costante su tutto il perimetro.STRUTTURAGYPSUM LAYERInsert the door unit in the opening so that the final gypsum layer is perfectlyaligned with the aluminum profile. The gap between the door leaf and the frameshould be constant over the entire perimeter.BRACKETtogliere il montante d'irrigi<strong>di</strong>mento prima <strong>di</strong> murare il telaioremove to the wooden beam before installing the frameFRAMEGYPSUM LAYER4Prima <strong>di</strong> murare, verificare la planarità del telaiocon il filo a piombo.Bloccare in sede tramitespessori. Procedere quin<strong>di</strong> con la muratura effettiva del telaio.5Rimuovereil tappo copricerniera e fissare le cerniere in dotazione.Remove the cover cap and fix the hinges.Check the flatness of the frame with a plumb line.6 RegolazioniAdjustmentA Foro viti <strong>di</strong> fissaggio della cerniera allo stipite.Fixing hole for the hinge of the door.D Vite autobloccante per regolazione laterale.Self step screw for lateral adjustment.Stipite FramePorta DoorB Fori asolati per regolazione verticale e fissaggio porta.Oval holes for vertical adjustment.E Eccentrico per la regolazione in profon<strong>di</strong>tà.Excentric system for depth adjustment.C Vite <strong>di</strong> bloccaggio regolazione in profon<strong>di</strong>tà.Fixing screw od depth adjustment.
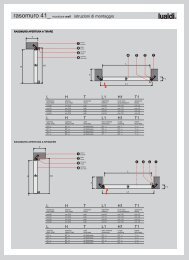
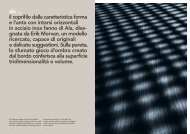
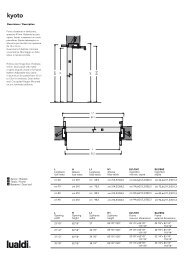
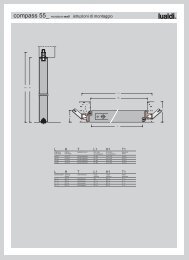
asomuro <strong>55</strong> r_ <strong>cartongesso</strong>-<strong>drywall</strong> <strong>istruzioni</strong> <strong>di</strong> montaggio®ATTENZIONE! Per porte grezze evitare l'imbarcatura delle ante è opportuno applicarefiniture identiche su entrambe le facciate. Inoltre la finitura dei due lati deve avvenirecontestualmente. (Non devono trascorrere più <strong>di</strong> 4/5 ore)6 7CAUTION !!To avoid the warping of the door leaves, apply identical finishes on both sides.Moreover the finishes on the two sides should be applied at the same time.(do not allow more than 4/5 hours to pass)ATTENZIONE! Per fissare maniglie e rosette non avvitare <strong>di</strong>rettamente,ma perforare con il trapano.CAUTION!!When fastening the handles and the escutcheons, do not screw <strong>di</strong>rectly,but prepare a hole first with the drill.NOTA:La serratura viene fornita separatamente e deve essere inserita nell'apposita sedee fissata al battente con le viti in dotazione.PLEASE NOTE: The lock set is supplied separately, install it in the lock set cutoutand fly it with the screws.RASOMURO APERTURA A TIRARE - RASOMURO IN SWINGING - PULLTH1HT1LL1Llarghezzaluce nettacm 60cm 70cm 80Haltezzaluce nettacm 210cm 210cm 210Tspessore murotuttituttituttiL1luce vanoda pre<strong>di</strong>sporrecm 69cm 79cm 89H1luce vanoda pre<strong>di</strong>sporrecm 214,5cm 214,5cm 214,5cm 90 cm 210 tutti cm 99 cm 214,5T1spessoretelaiocm 5,5cm 5,5cm 5,5cm 5,5Lopening widthHopeningheightTwall thicknessL1roughopeningH1roughopening23" 5/882" 5/8 all27"84" 5/827" 1/231" 1/235" 3/882" 5/882" 5/8allallall30" 7/834" 7/838" 3/484" 5/884" 5/884" 5/882" 5/8T1framethickness2" 1/82" 1/82" 1/82" 1/8RASOMURO APERTURA A SPINGERE - RASOMURO OUT SWINGING - PUSHH1HTT1LL1Llarghezzaluce nettacm 60cm 70cm 80Haltezzaluce nettacm 210cm 210cm 210Tspessore murotuttituttituttiL1luce vanoda pre<strong>di</strong>sporrecm 69cm 79cm 89H1luce vanoda pre<strong>di</strong>sporrecm 214,5cm 214,5cm 214,5cm 90 cm 210 tutti cm 99 cm 214,5T1spessoretelaiocm 5,5cm 5,5cm 5,5cm 5,5Lopening widthHopeningheightTwall thicknessL1roughopeningH1roughopening23" 5/882" 5/8 all27"84" 5/827" 1/231" 1/235" 3/882" 5/882" 5/8allallall30" 7/834" 7/838" 3/484" 5/884" 5/884" 5/882" 5/8T1framethickness2" 1/82" 1/82" 1/82" 1/8
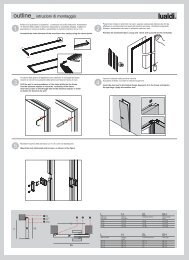
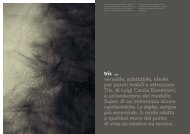
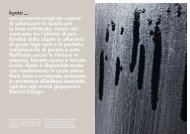
Viteper fidello<strong>rasomuro</strong> <strong>55</strong> r_ muratura-wall <strong>istruzioni</strong> <strong>di</strong> montaggio®La porta <strong>rasomuro</strong> può essere installata con aperture a tirare o a spingere.E' necessario prima della posa asportare una parte della pellicola protettiva del telaio.The RASOMURO door can be installed either opening pulling or pushing.Remove part of the frame protection film before installationPrima <strong>di</strong> posizionare il telaio nel vano piegare le zanche verso destra o sinistra.Bend the brackets.RASOMURO A TIRARERASOMURO A SPINGEREInserire il blocco porta nel vano in modo che la rasatura finale in gesso risulti a filodel profilo <strong>di</strong> alluminio. L'aria tra anta e telaio dev'essere costante su tutto il perimetro.Insert the door unit in the opening so that the final gypsum layer is perfectlyaligned with the aluminum profile. The gap between the door leaf and the frameshould be constant over the entire perimeter.GYPSUM LAYERBRACKETFRAMEGYPSUM LAYER4Prima <strong>di</strong> murare, verificare la planarità del telaiocon il filo a piombo.Bloccare in sede tramitespessori. Procedere quin<strong>di</strong> con la muratura effettiva del telaio.5Rimuovereil tappo copricerniera e fissare le cerniere in dotazione.Remove the cover cap and fix the hinges.Check the flatness of the frame with a plumb line.6 RegolazioniAdjustmentA Foro viti <strong>di</strong> fissaggio della cerniera allo stipite.Fixing hole for the hinge of the door.D Vite autobloccante per regolazione laterale.Self step screw for lateral adjustment.Stipite FramePorta DoorB Fori asolati per regolazione verticale e fissaggio porta.Oval holes for vertical adjustment.E Eccentrico per la regolazione in profon<strong>di</strong>tà.Excentric system for depth adjustment.C Vite <strong>di</strong> bloccaggio regolazione in profon<strong>di</strong>tà.Fixing screw of depth adjustment.
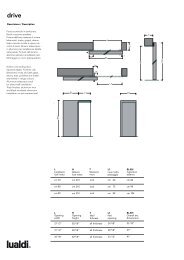
asomuro <strong>55</strong> r_ muratura-wall <strong>istruzioni</strong> <strong>di</strong> montaggio®ATTENZIONE! Per porte grezze per evitare l'imbarcatura delle ante è opportunoapplicare finiture identiche su entrambe le facciate. Inoltre la finitura dei due lati deveavvenire contestualmente. (Non devono trascorrere più <strong>di</strong> 4/5 ore)6 7CAUTION !!To avoid the warping of the door leaves, apply identical finishes on both sides.Moreover the finishes on the two sides should be applied at the same time.(do not allow more than 4/5 hours to pass)ATTENZIONE! Per fissare maniglie e rosette non avvitare <strong>di</strong>rettamente,ma perforare con il trapano.CAUTION!!When fastening the handles and the escutcheons, do not screw <strong>di</strong>rectly,but prepare a hole first with the drill.NOTA:La serratura viene fornita separatamente e deve essere inserita nell'apposita sedee fissata al battente con le viti in dotazione.PLEASE NOTE: The lock set is supplied separately, install it in the lock set cutoutand fly it with the screws.RASOMURO APERTURA A TIRARE - RASOMURO IN SWINGING - PULLretemetallic wireTH1HT1LL1Llarghezzaluce nettacm 60cm 70cm 80Haltezzaluce nettacm 210cm 210cm 210Tspessore murotuttituttituttiL1luce vanoda pre<strong>di</strong>sporrecm 69cm 79cm 89H1luce vanoda pre<strong>di</strong>sporrecm 214,5cm 214,5cm 214,5cm 90 cm 210 tutti cm 99 cm 214,5T1spessoretelaiocm 5,5cm 5,5cm 5,5cm 5,5Lopening widthHopeningheightTwall thicknessL1roughopeningH1roughopening23" 5/882" 5/8 all27"84" 5/827" 1/231" 1/235" 3/882" 5/882" 5/8allallall30" 7/834" 7/838" 3/484" 5/884" 5/884" 5/882" 5/8T1framethickness2" 1/82" 1/82" 1/82" 1/8RASOMURO APERTURA A SPINGERE - RASOMURO OUT SWINGING - PUSHretemetallic wireH1HTT1LL1Llarghezzaluce nettacm 60cm 70cm 80Haltezzaluce nettacm 210cm 210cm 210Tspessore murotuttituttituttiL1luce vanoda pre<strong>di</strong>sporrecm 69cm 79cm 89H1luce vanoda pre<strong>di</strong>sporrecm 214,5cm 214,5cm 214,5cm 90 cm 210 tutti cm 99 cm 214,5T1spessoretelaiocm 5,5cm 5,5cm 5,5cm 5,5Lopening widthHopeningheightTwall thicknessL1roughopeningH1roughopening23" 5/882" 5/8 all27"84" 5/827" 1/231" 1/235" 3/882" 5/882" 5/8allallall30" 7/834" 7/838" 3/484" 5/884" 5/884" 5/882" 5/8T1framethickness2" 1/82" 1/82" 1/82" 1/8