Magic 600.book
Magic 600.book
Magic 600.book
- No tags were found...

You also want an ePaper? Increase the reach of your titles
YUMPU automatically turns print PDFs into web optimized ePapers that Google loves.
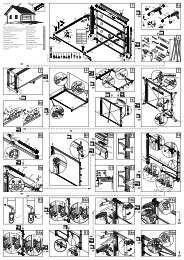
the door type that is being attached and/or install it accordingto the relevant manual.13 InstallationSee instructions for installation on page ff 155.The head of the operator can be turned by 90° to the runningrail respectively as required (see page 155 (A)).Installation step D, page 156:1. Tighten the toothed belt’s clamping nut until the toothedbelt no longer rests on the guide rail (equivalent todimension X).2. Use the clamping nut (dimension B) to increase thetoothed belt tension to correspond to the length of the dooroperator.14 CommissioningOnce installation is complete• Slowly open the door by hand until you hear the slide snapin.• Make connection to mains, display flashes alternately withL and 4. The door operator lamp flashes in intervals of 4.• Teach in the door operator (see Chapter 15).• Teach in the remote transmitter (see Chapter 16).• Carry out a safety inspection (see Chapter 9).15 Teaching in the door operatorATTENTION: No protection is provided by the loadswitch-off whilst the door operator is being taughtin.Note: Teaching in is only possible during initial installation orafter resetting the door operator. Do not press any keysduring the teach-in procedure.Preparation: Connect the door to the door operator.Teaching in with a remote transmitterAt the time of delivery and after resetting the dooroperator, the remote transmitter supports the followingfunctions:• A Safety control operation and fine adjustment "OPEN"• B Safety control operation and fine adjustment "CLOSE"• C and D Confirmation (storage)Once the door operator has been taughtin, key A is used for remote control andthe other keys can be used to controlother similar door operators or otherradio receivers.Teaching in• Press and hold down key A; the doormoves in the open direction.• When you reach the desired end position "OPEN", releasekey A. (You can make corrections with key B.)• Press key C once briefly, teach-in procedure: The dooroperator automatically stores "End position OPEN/CLOSE"and the loads of the "Travel path OPEN/CLOSE". The dooroperator lights flash in synchronism.Teach-in is complete when the door is open and the dooroperator lights are on.Check load switch-off according to Chapter 9,Safetyinspection.Teaching in without a remote transmitterOn the door operator:• Press and hold pushbutton and the door moves in theopen direction. Release pushbutton when the desiredopening position is reached. A correction can be made withthe pushbutton .• Press the Menu pushbutton The door operatorautomatically stores "End position OPEN/CLOSE" and theloads of the "Travel path OPEN/CLOSE" . The dooroperator lights flash in synchronism.Teach-in is complete when the door is open and the dooroperator lights are on.Check load switch-off according to Chapter 9,Safetyinspection.16 Teaching in/deleting a remotetransmitterProgramming the remote transmitter:• During one of the 3 status messages A, B or C (seeChapter10), press the pushbuttons and simultaneously(approx. 1 s), F flashes in the display.• Press the desired key on the remote transmitter, the radiocommand is taught in. F appears in the display.Note: F appears in the display during the transmission pulse.Deleting (all) remote transmitter(s):During one of the 3 status messages A, B or C (see Chapter10), press the pushbuttons and simultaneously for >6seconds, F flashes in the display. The status messagereappears after 3 seconds.17 OperationCAUTION: Mishandling the product can result ininjuries or material damage. Follow the basic safetyrules:When opening or closing the door, do not block the interior orexterior swivel ranges. Keep children away.The door movements can be activated or stopped using theremote transmitter provided or via switching elements suchas the wall keypad, which can be connected if desired.Optional external features (such as the EMERGENCY STOP)can also be connected to the door operator.The operator must be connected to a door beforeit is used. If it is not, incorrect load values will betaught in to the electronic system. This can causemalfunctions.18 ProgrammingSwitch on programming modeDuring one of the 3 status messages A, B or C (seeChapter10) press the Menu pusbutton for longer than 1.5seconds. The display changes to the menu (D).Select programming menuSelect the desired menu with the pushbuttons and . The2-character menu name flashes on and off. The followingappears for menu A0: A 0 A...Show / change menu valueDisplays: Press the Menu pushbutton for less than 1.5seconds, the menu value (E) is displayed.Change: Change the value with the pushbuttons and .Save: Press the Menu pushbutton for less than 1.5seconds, the programming menu (D) is displayed.10 / 208 N000924 12/2010 <strong>Magic</strong> 600