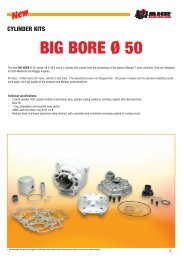
FORCELLE FORK FOURCHE - Malossi Performance Parts
FORCELLE FORK FOURCHE - Malossi Performance Parts
FORCELLE FORK FOURCHE - Malossi Performance Parts

Create successful ePaper yourself
Turn your PDF publications into a flip-book with our unique Google optimized e-Paper software.
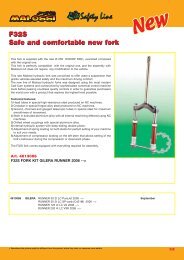
10) È fondamentale serrare correttamente l’anello cuscinetto superiore e la ghiera al fine di avere uno sterzofluido ma senza eccessivo gioco.Per fare questo, utilizzare attrezzo Piaggio 19.1.20055.10.1) Chiudere l’anello superiore (part. 3 fig. 1) con una coppia torcente di 50÷60 N.m. e poi svitare l’anello di80÷90°10.2) Inserire la rondella di fermo (part. 2 fig. 1).10.3) Chiudere la ghiera (part. 1 fig. 1) con una coppia torcente di 30÷40 N.m.11.1) Per le forcelle 46 9550, 46 9552, e 46 9627Rimontare il manubrio serrando il bullone con una coppia torcente di 45÷50 N.m., allineandolo grazie alriferimento presente sulla parte superiore del tubo di sterzo.Dopo i primi 500 Km verificare la chiusura dell’anello e della ghiera.F32S10) It is very important for the upper bearing ring and the respective lock nut to be tightened correctly inorder to ensure fluid steering without excessive play.For correct tightening, use Piaggio Tool 19.1.20055.10.1) Tighten the upper ring (part. 3 fig. 1) to a torque of 50÷60 Nm and then unscrew the ring by 80÷90°.10.2) Insert the lock washer (part. 2 fig. 1).10.3) Tighten the lock nut (part. 1 fig. 1) to a torque of 30÷40 Nm.11.1) For 46 9550, 46 9552, and 46 9627 forksRe-assemble the handlebar by tightening the bolt to a torque of 45÷50 Nm, aligning it using the referencemark present on the upper part of the steering tube.Check ring and lock nut tightening after 500 km.respectifs sur le garde-boue supérieur.10) Il est essentiel de serrer correctement la cuvette supérieure et la bague afin d’avoir une direction fluidema sans trop de jeu. Pour ce faire, utilisez l’outils Piaggio 19.1.20055.10.1) Bloquez la cuvette supérieure (part. 3 fig. 1) à 50÷60 N.m. et, dévissez ensuite la cuvette de 80÷90°10.2) Introduisez la rondelle de fermeture (part. 2 fig. 1).10.3) Bloquez la bague (part. 1 fig. 1) à 30÷40 N.m.11.1) Pour les fourches 46 9550, 46 9552, et 46 9627Remontez le guidon en serrant le boulon à 45÷50 N.m., en l’alignant avec le repère visible sur la partiesupérieure de la colonne de direction.Après les 500 premiers kilomètres, vérifier la fermeture de la cuvette et de la bague.- 11 -
ITALIANOENGLISHFRANÇAIS11.2) Per la forcella 46 9554 per Gilera StalkerInserire il tubo del manubrio nella nuova forcella <strong>Malossi</strong> ed una volta regolato l’allineamento con laruota serrare il bulloncino superiore con una coppia di 13÷16 N.m.12) Rimontare i coperchi del manubrio come in origine.13) Rimontare la ruota originale con il disco freno modificato avendo cura di inserire anche il rinvio del contachilometri.14) Inserire il perno ruota come da fig. 1 accertandovi che la vite (part. 12 fig. 1) sia lenta.15) Con una chiave a brugola da 8 mm serrare a fondo il perno ruota con una coppia torcente 40÷50 N.m.e dopo aver fatto affondare completamente la vostra nuova forcella <strong>Malossi</strong> una decina di volte, serrareil dado di fermo (part. 12 fig. 1) che blocca il perno ruota allo stelo sinistro.11.2) For 46 9554 forks for Gilera StalkersInsert the handlebar tube into your new <strong>Malossi</strong> fork and after making alignment with the wheel tightenthe upper bolt to a torque of 13÷16 Nm.12) Reassemble the handlebar plastic covers as before.13) Reassemble the original wheel with the modified brake disc, making sure to also insert the odometertransmission.14) Insert the wheel pin as shown in fig. 1, making sure that the screw (part. 12 fig. 1) is partially unscrewed.15) Using an 8 mm setscrew wrench, firmly tighten the wheel pin to a torque of 40÷50 Nm. After sinking yournew <strong>Malossi</strong> fork completely down and up a dozen times or so, tighten the lock nut (part. 12 fig. 1) thatlocks the wheel pin to the left fork rod.- 12 -11.2) Pour la fourche 46 9554 pour Gilera StalkerIntroduisez le tube du guidon dans la nouvelle fourche <strong>Malossi</strong>. Une fois que l’alignement avec la roueest réglé, serrez le boulon supérieur à 3-16 N.m.12) Remontez les couvercles du guidon comme auparavant.13) Remontez la roue d’origine avec le disque de frein modifié en veillant à introduire également le renvoidu compteur kilométrique.14) Introduisez l’axe de roue comme indiqué sur la fig. 1 en vous assurant que la vis (part. 12 fig. 1) soit dévissée.15) Avec une clé allen de 8 mm, serrez à fond l’axe de roue à 40÷50 N.m. et après avoir complètement faittravailler de haut en bas votre nouvelle fourche <strong>Malossi</strong> une dizaine de fois, serrez l’écrou de fermeture(part. 12 fig. 1) qui bloque l’axe de roue à la tige gauche.
16) Per le forcelle 46 9550, 46 9552 e 46 9627Regolare le due viti (part. 18 fig. 1) per i fine corsa dello sterzo e serrare il tutto con i due dadi (part. 19 fig. 1).MONTAGGIO NUOVA PINZA FRENO1.1) Per la forcella 46 9550 e 46 9554, con la sola esclusione dei veicoli Piaggio Nrg Mc3 (per i quali ènecessario attenersi alle indicazioni riportate nel punto 1.2 a seguire):Montare la nuova pinza freno avendo cura di controllare che il disco freno sia centrato nella sede dellapinza freno; eventualmente spessorare con rasamenti opportuni fino ad ottenere un adeguato centraggiodel disco freno nella pinza freno.Scollegare dalla pinza originale il tubo del liquido frenante e collegarlo alla vostra nuova pinza freno.F32S16) For 46 9550, 46 9552, and 46 9627 forksAdjust the two screws (part. 18 fig. 1) for the steering stroke ends and lock everything with the two nuts(part. 19 fig. 1).NEW BRAKE CALIPER ASSEMBLY1.1) For 46 9550 and 46 9554 forks, with the exception of Piaggio Nrg Mc3 vehicles (for which theinstructions provided from Point 1.2 onwards must be followed):Assemble the new brake caliper making sure to check that the brake disc is centred over the brake caliperhousing; if necessary, create the right distance using adequate shims until the adequate centring ofthe brake disc in the brake caliper is obtained.Disconnect the brake fluid hose from the original caliper and connect it to your new brake caliper.16) Pour les fourches 46 9550, 46 9552 et 46 9627Règlez les deux vis (part. 18 fig. 1) de butée de la direction et serrez le tout avec les deux écrous (part. 19 fig. 1).MONTAGE DE LA NOUVELLE PINCE FREINS1.1) Pour la fourche 46 9550 et 46 9554, sauf pour les véhicules Piaggio Nrg Mc3 (pour lesquels il estnécessaire de se conformer aux indications mentionnées au point 1.2 qui suit):Montez la nouvelle pince freins en veillant à ce que le disque de frein soit centré dans l’emplacementde la pince freins; vous pouvez éventuellement utilisé des entretoises afin d’obtenir le centrage correctdu disque de frein dans la pince freins.Débranchez la durite de liquide de frein de la pince d’origine et la relier à votre nouvelle pince freins.- 13 -
ITALIANO1.2) Per la forcella 46 9552 e per i veicoli Piaggio NRG Mc3Per questi veicoli non é necessario sostituire la pinza freno originale.Inserire fra l’attacco superiore della pinza freno e la pinza originale il distanziale (part. 34 fig. 3) e serrareil tutto con i due bulloni (part. 27 fig. 3) ed il bullone ORIGINALE (part. 35 fig. 3).Tra la pinza e l’attacco inferiore inserire la rondella piana 8x18 spessore 2mm data in dotazione.Prima di serrare il tutto, accertarsi che il disco freno sia centrato nella sede della pinza freno; eventualmentespessorare con rasamenti opportuni fino ad ottenere un adeguato centraggio del disco frenonella pinza freno.ENGLISHFRANÇAIS1.2) For 46 9552 forks and Piaggio NRG Mc3 vehiclesThese vehicles do not require the replacement of the original brake caliper. Insert the spacer (part. 34 fig.3) between the brake caliper’s upper attachment and the original caliper and then tighten the entireassembly using the two bolts (part. 27 fig. 3) and the ORIGINAL bolt (part. 35 fig. 3). Insert the 2 mm thickplain washer (8x18) supplied between the caliper and the lower attachment..Before definitively tightening everything, make sure that the brake disc is centred in the brake caliperhousing; if necessary, create the right distance using adequate shims until the adequate centring of thebrake disc in the brake caliper is obtained.1.2) Pour la fourche 46 9552 et pour les véhicules NRG Mc3Pour ces véhicules, il n’est pas nécessaire de substituer la pince freins d’origine. Introduisez entre la fixationsupérieure de la pince freins et la pince d’origine l’entretoise (part. 34 fig. 3), et serrez le tout avecles deux boulons (part. 27 fig. 3) et le boulon D’ORIGINE (part. 35 fig. 3). Entre la pince et la fixation inférieureintroduisez la rondelle 8x18 de 2mm d’épaisseur fournie.Avant de serrer le tout, vous devez vous assurer que le disque de frein est bien centré dans l’emplacementde la pince freins; éventuellement utiliser des entretoises jusqu’à l’obtention du centrage correctdu disque de frein dans la pince freins.- 14 -
1.3) Per la forcella 46 9627Montare sulla pinza originale il distanziale fornito nel kit e fissarlo alla pinza tramite le due viti che si inseriscononelle sedi per la testa. Fissare la pinza con il distanziale alla forcella, utilizzando le due viti M8 originali,avendo cura di controllare che il disco freno sia centrato nella sede della pinza freno; eventualmentespessorare fra distanziale e fissaggio sul gambale della forcella con opportuni rasamenti fino adottenere un adeguato centraggio del disco freno nella pinza freno.ATTENZIONELe superfici verniciate vengono danneggiate dal contatto con il liquido frenante. La presenzadi liquido frenante sulle pastiglie freno e sul disco freno riduce enormemente l’efficienzadell’impianto frenante. Nel caso in cui ciò si verifichi, pulire con un buon solventele superfici che sono venute a contatto con il liquido frenante.1.3) For the 46 9627 forkAssemble the spacer supplied in the kit on the original caliper and fasten it in place using the two screwsto be inserted in the housings for the head. Fasten the caliper with the spacer to the fork using the two originalM8 screws, making sure that the brake disc is centred in the brake caliper housing; if necessary,create the right distance between the spacer and the fastening point on the fork’s stem using adequateshims until the adequate centring of the brake disc in the brake caliper is obtained.F32SIMPORTANTPainted surfaces are damaged by contact with brake fluid. The presence of brake fluidon the brake pads and brake disc reduces braking system efficiency considerably.Whenever brake fluid has spread to these place, clean all contaminated surfaces usinga good solvent.1.3) Pour la fourche 46 9627Montez sur la pince d’origine l’entretoise fournie dans le kit et fixez-la sur la pince avec les deux vis quis’insèrent dans les emplacements par la tête. Fixez la pince avec l’entretoise à la fourche en utilisant lesdeux vis M8 d’origine, en veillant à ce que le disque de frein soit centré dans l’emplacement de la pincefreins; éventuellement épaissir entre les entretoises et la fixation sur le fourreau de la fourche avec lesentretoises opportunes jusqu’à l’obtention du centrage correct du disque de frein dans la pince freins.ATTENTIONLe surfaces vernies se trouvent endommagées au contact du liquide de frein. La présencede liquide de frein sur les pastilles de frein et sur le disque de frein réduit considérablementl'efficacité du système de freins. Si vous vous trouvez dans ce cas, vousdevez nettoyer avec un bon solvant les surfaces ayant été en contact avec le liquide defrein.- 15 -
ITALIANOENGLISHFRANÇAISSPURGO DELL’IMPIANTO FRENANTENB Questa operazione deve essere effettuata in tutti i veicoli che richiedono la sostituzione della pinza originale.Il veicolo deve essere posizionato sul cavalletto su una superficie piana.Una volta collegata la nuova pinza freno al tubo del liquido dei freni, bisogna eliminare ogni presenza di bolled’aria dal circuito dell’impianto frenante. Per fare questo procedere come indicato di seguito:1) Con la valvola di sfiato sulla pinza freno chiusa, riempire fino al massimo livello il serbatoio del liquido deifreni con liquido per freni DOT 4.2) Con la leva del freno azionare il pistoncino fin tanto che non si notano più fuori-uscite di bolle d’aria dalforellino del serbatoio.3) Collegare un tubicino, possibilmente trasparente, alla vite di spurgo presente sulla pinza freno ed immergerloin un recipiente contenente il liquido per i freni.4) Tirare la leva del freno e contemporaneamente allentare la vite di spurgo e far defluire le bolle d’aria pre-BRAKING SYSTEM AIR BLEEDINGNote: This operation must be performed for all vehicles that require the replacement of the original caliper.The vehicle must be positioned on a stand on a flat surface.After connecting the new brake caliper to the brake fluid hose, all air bubbles must be eliminated from thebraking system by proceeding as follows:1) With the bleeder valve on the brake caliper closed, fill the brake fluid tank with DOT 4 brake fluid.2) Using the brake lever, work the piston until no more air bubbles are seen to emerge from the hole in thetank.3) Connect a hose (preferably transparent) to the air bleeding screw on the brake caliper and insert theother end into a recipient containing brake fluid.4) Squeeze the brake lever while simultaneously loosening the bleeding screw to bleed away all the air bub-- 16 -VIDANGE DU CIRCUIT DE FREINSNB Cette opération doit être effectuée sur tous les véhicules qui nécessitent l’échange de la pince d’origine.Le véhicule doit être placé sur la béquille sur une surface plane.Une fois que la nouvelle pince freins est reliée à la durite de liquide de freins, vous devez éliminer toutes les bullesd’air du circuit de freins. Pour ce faire, veuillez suivre les indications suivantes :1) Avec la vis de purge sur la pince freins fermée, remplissez jusqu’au niveau maximum du réservoir de liquidede frein avec du liquide de frein DOT 4.2) Avec le levier de frein, actionnez le petit piston jusqu’à ce qu’il n’y ait plus de bulles d’air sortant du petittrou dans le réservoir.3) Reliez un petit tube, de préférence transparent, à la vis de purge visible sur la pince freins et immergez-ledans un récipient contenant du liquide de frein.4) Tirez le levier de frein tout en déserrant la vis de purge en laissant s’échapper les bulles d’air présentes
senti nella pinza freno.5) Chiudere la vite di spurgo e poi rilasciare la leva del freno e ripristinare il livello nel serbatoio del liquido deifreni.6) Ripetere l’operazione fino a che dalla vite di spurgo non escono più bollicine d’aria.N.B. Se durante le operazioni di spurgo l’aria continua ad uscire, controllare tutti i raccordi e letenute del circuito dell’impianto frenante.Attenzione: Si consiglia vivamente di controllare l’impianto frenante anteriore per i primi chilometri, provandola frenata a partire da velocità molto basse in quanto, se lo spurgo aria non vieneeseguito correttamente ed in modo scrupoloso, si corre il rischio che l'impianto frenante nonfunzioni.F32Sbles contained in the brake caliper.5) Close the bleeding screw and then release the brake lever and top up the level of brake fluid in the tank.6) Repeat the operation until no more air bubbles emerge from the bleeding screw.Note: If air continues emerging during these air bleeding operations, check all the connectors andthe sealing in the entire brake system circuit.Important: We strongly recommend checking the front wheel’s braking system during the first kilometresof use by checking braking efficiency starting with low speed stopping because if airbleeding has not been performed correctly or thoroughly, the risk of inefficient braking arises.dans la pince freins.5) Fermez la vis de purge, relâchez ensuite le levier de frein et rétablir le niveau du liquide de frein dans leréservoir.6) Répétez l’opération jusqu’à ce qu’ils n’y aient plus de bulles d’air qui s’échappent de la vis de purge.N.B. Si pendant les opérations de vidange, l’air continue de s’échapper, vous devez contrôlertous les raccords et l’étanchéité du système de freins.Attention : Il est vivement conseillé de contrôler le circuit de frein avant, pendant les premiers kilomètres,en testant le freinage à très faible allure car, si la vidange n’a pas été réalisée correctementet de manière très scrupuleuse, il se peut que le système de freinage ne fonctionnepas.- 17 -
ITALIANOF36R - Forcella Racing - Forcella da competizione ai massimi livelliQuesta forcella é stata studiata e progettata utilizzando la migliore tecnologia attualmente disponibile nelsettore competizione cross a livello internazionale.La forcella anteriore F36R viene realizzata completamente dal pieno per ottenere le forme e la rigidità strutturaleatte a sopportare i carichi elevatissimi ai quali sono sottoposti i mezzi durante le competizioni.Il progetto e lo sviluppo sono il frutto di una collaborazione fra i tecnici della <strong>Malossi</strong> e della Paioli Meccanica.La forcella F36R è una forcella al top della tecnologia delle sospensioni.Caratteristiche tecniche1) Tubo di sterzo in acciaio speciale ad alta resistenza lavorato su macchine a controllo numerico.2) Trapezio in acciaio legato forgiato, lavorato con macchine a controllo numerico.F36R – Racing Fork - Racing fork with the highest performanceThis fork was studied and designed using the best technology currently available in the cross racing sector atthe international level.The F36R front fork is machined entirely from the solid in order to obtain the shape and structural strength requiredto withstand the elevated loads applied during competition.ENGLISHFRANÇAIS- 18 -The F36R fork represents the crown of suspension technology.Technical features1) Head tubes in special high-resistance steel produced on NC machines2) Crossbar in special forged alloy steel produced on Nc machinesF36R - Fourche Racing - Fourche de compétition de très haute qualitéCette fourche a été étudiée et projetée en utilisant la technologie la plus avancée actuellement disponibledans le secteur compétition cross au niveau international. La fourche avant F36R a été entièrement réaliséedans la masse afin d’obtenir les formes et la rigidité de la structure capable de supporter les poids très élevésauxquels sont soumis les engins pendant les compétitions.La fourche F36R est une fourche au sommet de la technologie des suspensions.Caractéristiques techniques1) Colonne de direction en acier spécial à haute résistance usinée par des machines à contrôle numérique.2) Trapèze en acier lié forgé, usiné par des machines à contrôle numérique.
3) Tubi di scorrimento di diametro 36 in acciaio speciale rettificati, lappati con riporto di titanio per assicurareuna scorrevolezza eccezionale.4) Gambali in lega speciale di alluminio (Anticorodal) estruso, lavorati dal pieno con macchine a controllonumerico ed anodizzati.5) Attacchi ruota in lega speciale di alluminio ricavati dal pieno per asportazione di trucciolo.6) Sistema idraulico mono cartuccia con scorrimento su boccole D.U. e boccola paraolio oscillante per limitarea valori bassissimi gli attriti di scorrimento.7) Regolazione fine del precarico molla.8) Regolazione della frenatura in estensione.9) Regolazione della frenatura in compressione.F36R3) 36 mm telescopic tubes in special steel, ground and lapped with titanium coating for exceptional smoothnessof movement4) Stem in special extruded aluminium alloy (Anticorodal), machined from the solid using NC machines andanodized5) Wheel couplings in special aluminium alloy machined from the solid by chip machining6) Single-cartridge hydraulic piston system with sliding on D.U. bushes and oscillating oil-seal bush to keep frictionto an absolute minimum7) Spring loading adjustment8) Rebound braking adjustment9) Compression braking adjustment3) Tubes plongeurs de 36 cm de diamètre en acier spécial rectifiés, polis avec apport de titane pour assurerune fluidité exceptionnelle.4) Fourreau en alliage spécial d’aluminium (Anticorodal) extrudé, usiné dans la masse par des machines àcontrôle numérique et anodisé.5) Fixation de roue en alliage spécial d’aluminium obtenu dans la masse par extraction de copeaux.6) Système hydraulique mono-cartouche avec coulissement sur les bagues D.U. et bague pare-huile oscillantepour limiter au maximum les frottements des coulissements.7) Réglage précis de la pré-charge du ressort.8) Réglage du freinage en extension.9) Réglage du freinage en compression.- 19 -
ITALIANO10) Escursione della forcella pari a ben 120mm.La forcella F36R viene fornita di:- Disco freno maggiorato di diametro 205 (forcella 46 9623).- Pinza freno maggiorata con doppio pistoncino di diametro 30mm (forcella 46 9625).- Viti, dadi e tutto quanto serve per il montaggio.ENGLISHFRANÇAIS10) Range of fork 120 mmThe F36R fork comes supplied with:- An oversized 205 diameter brake disc (46 9623 fork)- An oversized brake caliper with a double piston of 30 mm diameter (46 9625 fork)- Screws, nuts, and everything else required for assembly.10) Amplitude de la fourche égale à 120mm.La fourche F36R est fournie avec :- Un disque de frein majoré de 205 cm de diamètre (fourche 46 9623).- Une pince freins majorée avec un double piston de 30mm de diamètre (fourche 46 9625).- Les vis, les écrous et tout le nécessaire pour le montage.- 20 -
art. 46 9623ISTRUZIONI DI MONTAGGIOPer il montaggio di questa nuova forcella da competizione si é ritenuto opportuno fornire un disco freno maggiorato.Si deve pertanto sostituire il disco freno originale (part. 33 fig. 2) con il disco freno <strong>Malossi</strong> e fissarlo al mozzo dellaruota con le tre viti svasate fornite in dotazione.Per le restanti fasi di montaggio vedere l’istruzione riferita alla forcella F32S, art. 46 9550, esclusi i punti 1 e 5 delparagrafo “Montaggio Forcella”.F36RASSEMBLY INSTRUCTIONSWe decided to provide an oversized brake disc for the assembly of this new racing fork.For the reason above, the original brake disc (part. 33 fig. 2) must be replaced by the <strong>Malossi</strong> brake disc andfastened to the wheel hub using the three countersunk head screws supplied.For the remaining assembly phases, follow the instructions provided for the F32S fork, art. 46 9550, with the exceptionof Points 1 and 5 in the Paragraph entitled “Fork Assembly”.INSTRUCTIONS POUR LE MONTAGEPour le montage de cette nouvelle fourche de compétition, il nous a semblé préférable de fournir un disquede frein majoré. Par conséquent, vous devez échanger le disque de frein d’origine (part. 33 fig. 2) avec ledisque de frein <strong>Malossi</strong> et le fixer au moyeu de la roue avec les trois vis évasées fournies.Pour les phases de montages restantes, voir les instructions concernant la fourche F32S, art. 46 9550, excepté lespoints 1 et 5 du paragraphe “Montage de la fourche”.- 21 -
art. 46 9625ITALIANOISTRUZIONI DI MONTAGGIOPer il montaggio di questa nuova forcella da competizione si é ritenuto opportuno fornire una pinza frenomaggiorata.Si deve pertanto sostituire la pinza freno originale (part. 26 fig. 2) con la pinza freno <strong>Malossi</strong> e fissarla al gambalecon le due viti fornite in dotazione.Per le restanti fasi di montaggio vedere l’istruzione riferita alla forcella F32S, art. 46 9550, esclusi i punti 1 e 5 delparagrafo Montaggio Forcella.ENGLISHFRANÇAISASSEMBLY INSTRUCTIONSWe decided to provide an oversized brake caliper for the assembly of this new racing fork.For the reason above, the original brake caliper (part. 26 fig. 2) must be replaced by the <strong>Malossi</strong> brake caliperand fastened to the stem using the two screws supplied.For the remaining assembly phases, follow the instructions provided for the F32S fork, art. 46 9550, with theexception of Points 1 and 5 in the Paragraph entitled “Fork Assembly”.INSTRUCTIONS POUR LE MONTAGEPour le montage de cette nouvelle fourche de compétition, il nous a semblé préférable de fournir une pincefreins majorée. Par conséquent, vous devez échanger la pince freins d’origine (part. 26 fig. 2) avec la pincefeins <strong>Malossi</strong> et la fixer au fourreau avec les deux vis fournies.Pour les phases de montages restantes, voir les instructions concernant la fourche F32S, art. 46 9550, exceptéles points 1 et 5 du paragraphe Montage de la fourche.- 22 -
Cambio olioSmontare i due gambali della forcella dal trapezio allentandole viti che lo fissano e togliendo i tappi che hanno anchefunzione di fermo (part. 1 fig. 1)Capovolgere lo stelo per far defluire tutto l’olio presente alsuo interno, prestando attenzione affinché la molla (part. 2fig. 1) del gambale e gli eventuali distanziali (part. 3 fig. 1)non escano dallo stelo e vadano smarriti.13Rimontare il tutto come in origine e serrare a fondo tutte leviti.Oil changeDisassemble the two fork stems from the trapezoid by looseningthe fixing screws and removing the plugs that also servefor locking (part. 1 fig. 1).Turn the fork rod over to drain all the oil present inside,paying attention to prevent the spring (part. 2 fig. 1) of thestem and any spacers inserted (part. 3 fig. 1) do not leavethe fork rod and get lost.2Reassemble everything as before and firmly tighten allscrews.Changement des huilesDémontez les deux fourreaux de la fourche du trapèze endéserrant les vis qui le maintiennent et en retirant les bouchonsqui font également office de fermeture (part. 1 fig. 1).Renversez la tige afin de laisser s’écouler toute l’huile présenteà l’intérieur, en veillant à ce que le moyeu (part. 2 fig.1) du fourreau et les éventuelles entretoises (part. 3 fig. 1) nes’échappent pas de la tige et ne soient pas perdues.Remontez le tout comme c’était le cas à l’origine et serrezà fond toutes les vis.F36RF32S- 23 -
ITALIANOForcella F32 STipo di olio usato Agip Arnica 46Classificazione SAESAE15Quantità per stelo100ccViscosità cst 40 °C 44Viscosità cst 100 °C 8,2Indice di viscosità 165Punto di scorrimento 0-28 °CForcella F36 RTipo di olio usatoBel-Ray SAE5 MC10Classificazione SAESAE5Quantità per stelo160ccViscosità cst 40 °C 25Viscosità cst 150 °C 20Indice di viscosità 100Punto di scorrimento 0-60 °CENGLISHFRANÇAISF32 S forkType of oil used Agip Arnica 46SAE RatingSAE15Quantity per fork rod100 ccViscosity cst 40°C 44Viscosity cst 100°C 8.2Viscosity index 165Pour point0-28°CF36 R forkType of oil usedBel-Ray SAE5 MC10SAE RatingSAE5Quantity per fork rod160 ccViscosity cst 40°C 25Viscosity cst 150°C 20Viscosity index 100Pour point0-60°CFourche F32 SType d’huile utilisé Agip Arnica 46Classification SAESAE15Quantité par tige100ccViscosité cst 40 °C 44Viscosité cst 100 °C 8,2Indice de viscosité 165Point de coulissement 0-28 °CFourche F36 RType d’huile utiliséBel-RaySAE5 MC10Classification SAESAE5Quantité par tige160ccViscosité cst 40 °C 25Viscosité cst 150 °C 20Indice de viscosité 100Point de coulissement 0-60 °C- 24 -
RICAMBI / SPARE PARTS / PIECES DE RECHANGE F32S F32S F32S F32S F36R F36RKIT <strong>FORCELLE</strong> 46 9550 46 9552 46 9554 46 9627 46 9623 46 9625FORCELLA COMPLETA 46 9133 46 9524 46 9526 46 9524 46 9624 46 9626<strong>FORK</strong> KIT / <strong>FOURCHE</strong> COMPLETECOMPL. PERNO della RUOTA 19 9899 19 9900 19 9899 19 9900 19 9901 19 9901PIVOT KIT WHEEL / ENSEMBLE PIVOT de la ROUECOMPL. SUPPORTO PINZA/FRENO 18 9525 18 9525 18 9800COMPL. SUPPORT for ORIGINAL BRAKE PINC / SUPPORT PINCE FREIN COMPL.COMPL. SUPPORTO PARAFANGO/FORCELLA 18 9555 18 9555 18 9555 18 9555COMPL. MUDGARD SUPPORT for <strong>FORK</strong> / SUPPORT GARDE-BOUE <strong>FOURCHE</strong>COMPL. FASCETTE 21 9547 21 9547B 21 9547B 21 9815RUBBER CLAMPS / COLLIER CAOUT.PINZA IDRAULICA per FRENO 62 8986 62 8986 62 8986 62 9813HYDR. BRAKE PINC / PINCE HYDR. de FREINBRAKE POWER DISK 62 9740 62 9446TUBO DI FORZA ( LATO MECCANICO ) / 4611685B 4611685B 4611685B 4611685BINNER TUBE (MECHANICAL SIDE) / TUYAU INTERIEUR (COTE MECANIQUE)TUBO DI FORZA ( LATO IDRAULICO ) 4611686B 4611686B 4611686B 4611686BINNER TUBE (HYDRAULIC SIDE)TUYAU INTERIEUR (COTE HYDRAULIQUE)COPPIA GAMBALI / 4611350 4611350 4611350 4611350<strong>FORK</strong> SHAFT PAIR for <strong>FORK</strong>S / COUPLE FOURREAUX pour <strong>FOURCHE</strong>STRAPEZIO COMPLETO 4612017COMPLETE TRAPEZIUM for <strong>FORK</strong>STRAPEZE COMPL. pour <strong>FOURCHE</strong>PARAOLIO / 6611231B 6611231B 6611231B 6611231B 6611232B 6611232BOIL-SEAL / PARE-HUILE- 25 -
ITALIANOSperiamo che lei abbia trovato sufficientemente chiare le indicazioni che precedono. Nel caso che qualchepunto le risultasse poco chiaro, potrà interpellarci per iscritto inviando un'e-mail all'indirizzo mkt@malossi.com.Ringraziamo fin d’ora per le osservazioni e suggerimenti che vorrà eventualmente farci pervenire.La <strong>Malossi</strong> si commiata e coglie l’occasione per complimentarsi ulteriormente con Lei ed augurarle un BuonDivertimento. In BOCCA al LUPO e ... alla prossima.Le descrizioni riportate nella presente pubblicazione, si intendono non impegnative. <strong>Malossi</strong> si riserva il diritto diapportare modifiche, qualora lo ritenesse necessario, al fine di migliorare il prodotto, e non si assume nessunaresponsabilità per eventuali errori tipografici e di stampa. La presente pubblicazione sostituisce ed annulla tuttele precedenti riferite agli aggiornamenti trattati.We hope you found the above instructions sufficiently clear. However, if any points are not particularly clear,please contact us sending an email to the address mkt@malossi.com.We thank you in advance for any comments and suggestions you may wish to send us.So goodbye from us all at <strong>Malossi</strong>, and please accept our compliments. Have Fun. GOOD LUCK and … see younext time.ENGLISHFRANÇAIS- 26 -The descriptions in this publication are not binding. <strong>Malossi</strong> reserves the right to make modifications, if it considersthem necessary, and does not accept any responsibility for any typographic or printing errors. This publicationreplaces all previous publications referring to the updating matters contained therein.Nous espérons que vous avez trouvé ces instructions suffisamment claires. Au cas où vous ne comprendriez pascertains points, vous pouvez nous contacter par écrit en envoyant un e-mail à l’adresse mkt@malossi.com.Nous vous remercions d’avance des éventuelles observations et suggestions que vous voudrez bien nous faireparvenir. <strong>Malossi</strong> prend maintenant congé et profite de l’occasion pour vous féliciter une fois encore et voussouhaiter un Bon Divertissement. BONNE CHANCE et…à la prochaine!Les descriptions reportées dans cette publication n’engagent à rien. <strong>Malossi</strong> se réserve le droit d’apporter toutesles modifications qu’elle jugera nécessaires et décline toute responsabilité pour d’éventuelles coquilles eterreurs d’impression. Cette publication remplace et annulle toutes les publications précédentes relatives auxthèmes mis à jour.
GARANZIAEgregio Signora/re, La ringraziamo vivamente per la preferenza accordataci con la scelta dei nostri prodotti.Il consenso della clientela é lo stimolo più importante per la creatività e l’efficienza di un’azienda.Ogni prodotto commercializzato dalla <strong>Malossi</strong> è pensato, progettato e concepito negli stabilimenti della casamadre con il preciso intento di soddisfare le attese dei motociclisti più esigenti che intendono dare una personalizzazionetecnica al proprio veicolo.L’alto livello tecnologico della produzione, la severità dei collaudi ed il controllo qualità certificati ISO 9001, garantisconoun grado di difettosità dei prodotti molto basso.Qualora il ns. prodotto dovesse presentare delle anomalie di funzionamento, pur essendo:- stato montato seguendo scrupolosamente le istruzioni di montaggio;- sottoposto ad un corretto rodaggio su di in veicolo in buone condizioni;WARRANTYDear Sir/Madam, Thank you for choosing our products.Customer approval is the greatest form of encouragement a company can have for creativity and efficiency.Each <strong>Malossi</strong> product sold is conceived, designed and developed at the factories of the parent company with theprecise aim of satisfying the needs of the most demanding motorcyclists who wish to race tune their vehicle.High-tech production, stringent testing and quality control certified to ISO 9001 all ensure a very low defective productrate.Should our product present defects in spite of having:- been assembled exactly as per the assembly instructions given;- undergone a correct running in procedure with the vehicle in good condition;GARANTIECher Monsieur/ Chère Madame, nous vous remercions vivement pour la préférence que vous nous avez accordéeen choisissant un de nos produits.L’approbation de notre clientèle est le meilleur encouragement à la créativité et à l’efficacité d’une entreprise.Chaque produit commercialisé par <strong>Malossi</strong> est pensé et conçu dans les usines de la maison mère dans l’intentionprécise de satisfaire les attentes des motocyclistes les plus exigeants qui veulent donner une personnalisation techniqueà leur véhicule. Le haut niveau technologique de la production, la sévérité des essais et le contrôle de la qualitécertifié ISO 9001, garantissent un degré de défectuosité des produits très réduit.Si notre produit devait présenter des anomalies de fonctionnement, bien qu’il:- ait été monté en suivant scrupuleusement les instructions de montage;- ait été soumis à un rodage correct sur un véhicule dans de bonnes conditions;- 27 -
ITALIANOENGLISHFRANÇAIS- 28 -- non associato a prodotti diversi da quelli originali o <strong>Malossi</strong>;Lei potrà consultare il ns. sito internet www.malossi.com, dove troverà precise informazioni tecniche visualizzandole tavole relative al vs. veicolo. Se questo non fosse sufficiente, unitamente al suo meccanico, potràesporre dettagliatamente il problema inviando un'e-mail che sarà sottoposta ai nostri tecnici, all'indirizzomkt@malossi.com.Se a seguito di uno o più colloqui si rivelasse necessario l’invio presso la nostra sede del prodotto oggetto delproblema, perché sia sottoposto ad una verifica tecnica, la procedura da seguire sarà la seguente.Il punto vendita autorizzato <strong>Malossi</strong> presso il qual è stato effettuato l’acquisto curerà la spedizione, corredandoladi tutti i dati necessari, scontrino fiscale compreso, mettendo in tal modo il nostro reparto di controllo qualitànelle condizioni di valutare l’eventuale difettosità e di risalire al lotto di produzione al quale appartiene ilprodotto in oggetto.- been fitted with either original or <strong>Malossi</strong> parts;you can look up our Internet site at www.malossi.com, where you will find all the correct technical informationby examining the relative tables for your vehicle. If this is not enough you can, along with your mechanic,explain the problem in greater detail by sending an email, which will be forwarded to our technicians, to theaddress mkt@malossi.com.If after one or two consultations it proves necessary to send the faulty product in question to our headquartersfor technical assessment, the procedure is as follows.The authorized sales <strong>Malossi</strong> outlet where the vehicle was purchased will have it shipped back to us, along withall the necessary details, including the receipt, so that Quality Control can assess the existence of any defectand trace the vehicle's production lot.If warranty approval is granted, only the faulty part (which will be retained by us) will be replaced.- n’ait pas été associé à des produits différents des produits d’origine ou <strong>Malossi</strong>;vous pourrez consulter notre site internet www.malossi.com, sur lequel vous trouverez des informations techniquesprécises en visualisant les tables concernant votre véhicule. Si cela ne suffit pas, avec votre mécanicien,vous pourrez exposer en détail le problème en envoyant un e-mail qui sera examiné par un de nos techniciens,à l’adresse mkt@malossi.com.Si après un ou plusieurs contacts, il est nécessaire d’envoyer à notre siège le produit faisant l’objet du problème,pour qu’il soit soumis à une vérification, la procédure devra être la suivante :Le point de vente autorisé <strong>Malossi</strong> auprès duquel vous avez effectué l’achat se chargera de l’envoi, en l’accompagnantde toutes les données nécessaires, ticket fiscal compris, ce qui permettra à notre départementcontrôle de la qualité, d’évaluer l’éventuelle défectuosité et de retrouver le lot de production auquel le produitappartient.
Qualora la garanzia fosse riconosciuta, sarà sostituita soltanto la parte difettosa che sarà trattenuta da noi.Qualora, invece, la garanzia non fosse riconosciuta, il prodotto in oggetto sarà in ogni modo rispedito al ns. puntovendita in porto assegnato, ovvero con la stessa modalità di spedizione che la <strong>Malossi</strong> S.r.l. segue anche in caso diriconoscimento della garanzia.- Non si accettano resi di merce non provenienti da nostri punti vendita.- La garanzia non è riconosciuta sui prodotti manomessi.- La garanzia si esaurisce nella sostituzione di quei particolari di nostra produzione da noi ritenuti difettosi per erroridi lavorazione o altro e non copre eventuali danni al mezzo, a cose o a persone.- Decliniamo ogni responsabilità derivante dall’uso improprio dei nostri prodotti.Tutti i nostri prodotti sono destinati ad impieghi sportivi, essendo stati creati per i molteplici Trofei Internazionali, peruso privato e di noleggio.However, should the warranty not be approved, the product will be sent back to our sales outlet, carriage forward,the same shipment method used by <strong>Malossi</strong> srl when it approves a warranty.- Goods not purchased from our sales outlets cannot be returned to us.- Warranty approval will not be granted for any products which have been tampered with.- The warranty becomes void if parts manufactured by us which we deem defective due to production errors orother circumstances are replaced, and does cover any damage to the vehicle or to property or persons.- We decline all responsibility for improper use of our products.The end use of all our products is for sports purposes, having been designed for many International Trophies, for privateuse and for hire. Like all products for competition purposes <strong>Malossi</strong> products must be considered differently tothose destined for road use and cannot comply with the laws and highway codes of the different nations in whichSi la garantie est reconnue, seule la partie défectueuse, que nous garderons chez nous, sera remplacée.Si au contraire la garantie n’est pas reconnue, le produit vous sera réexpédié à notre point de vente en port dû,avec la même modalité d’emploi de <strong>Malossi</strong> srl même en cas de reconnaissance de la garantie.- Nous n’acceptons pas de restitutions de marchandises ne provenant pas de nos points de vente.- La garantie n’est pas reconnue sur les produits manipulés.- La garantie concerne seulement les pièces que nous produisons et que nous reconnaissons comme étant défectueusesà cause d’erreurs d’usinage ou autre et ne couvre pas les éventuels dommages aux véhicules, aux choseset aux personnes.- Nous déclinons toute responsabilité dérivant de l’emploi impropre de nos produits.Tous nos produits sont destinés aux utilisations sportives, puisqu’ils ont été conçus pour les divers Trophées internationaux,pour un emploi privé et la location.- 29 -
ITALIANOENGLISHFRANÇAIS- 30 -Come tutti i prodotti destinati alle competizioni, i prodotti <strong>Malossi</strong> devono essere considerati diversamente daiprodotti destinati all’impiego stradale e non possono sottostare alle leggi ed ai codici stradali delle diversenazioni nei quali sono venduti.I prodotti <strong>Malossi</strong> appartenenti alla linea competizione MHR, sono prodotti selezionatissimi, costruiti con i materialipiù prestigiosi, e sono destinati alle competizioni più esasperate.Sono pertanto esclusi da ogni forma di garanzia, a meno che non si tratti di un caso rarissimo di un componentesfuggito al collaudo che rechi una reale difettosità produttiva all’origine e non una rottura per fatica oper grippaggio.Prodotti riservati esclusivamente alle competizioni nei luoghi ad esse destinate secondo le disposizionidelle competenti autorità sportive. Decliniamo ogni responsabilità per l’uso improprio.Ces articles sont uniquement destinés aux compétitions dans les lieux qui leur sont réservés, conformémentaux dispositions des autorités sportives compétentes. Nous déclinons toute responsabilité en cas d'utilisatheyare sold.<strong>Malossi</strong> products belonging to the MHR competition line, are highly select products, constructed using prestigiousmaterials, and are destined for the toughest competitions.As such they are exempt from any form of warranty, except in the rare instance of a component which hasescaped testing and has a real manufacturing defect from source; the warranty does not cover their failurethrough fatigue or seizure.These products are reserved solely for races in locations reserved for those purposes and in accordancewith the regulations issued by the competent authorities for sports events. We decline any and allresponsibility for improper use.Comme tous les produits destinés aux compétitions, les produits <strong>Malossi</strong> doivent être considérés différemmentdes produits destinés à l’emploi sur route et ne peuvent être soumis aux lois et aux codes routiers des différentspays dans lesquels ils sont vendus. Les produits <strong>Malossi</strong> appartenant à la ligne de compétition MHR, sont desproduits hautement sélectionnés, construits avec les matériaux les plus prestigieux et sont destinés aux compétitionsles plus extrêmes. Ils ne sont donc couverts par aucune forme de garantie à moins qu’il ne s’agisse ducas très rare d’un composant qui n’ait pas été relevé en phase d’essai et qui ait un vrai défaut de productionà l’origine et non pas une rupture par fatigue ou grippage.
F32S FORCELLA / <strong>FORK</strong> / <strong>FOURCHE</strong>art. 46 9550 GILERA Storm 50cc, Typhoon 50-125cc, Typhoon X 50-125ccPIAGGIO Extrem 50cc, Extrem LC 50cc, Nrg MC2 LC 50cc, Nrg LC 50cc, Nrg MC3 Dt 50cc,Nrg MC3 Dd LC 50cc, Ntt LC 50ccart. 46 9554 GILERA Stalker 50ccF36R FORCELLA / <strong>FORK</strong> / <strong>FOURCHE</strong>art. 46 9623 PIAGGIO Ntt 50cc - Scooter-Crossart. 46 9625 GILERA Runner LC 50cc, Runner Sp LC 50cc, Runner Fx 2T 125cc, Runner Fxr 2T 180cc,Runner Vx 4T 125cc 4T, Runner Vxr 4T 180-200ccfig. 2- 31 -
F32S FORCELLA / <strong>FORK</strong> / <strong>FOURCHE</strong>art. 46 9552GILERARunner 50cc,Runner Sr Lc 50ccart. 46 9627GILERARunner Fx 2T 125cc,Runner Fxr 2T 180cc,Runner Vx 4T 125cc,Runner Vxr 4T 180-200ccfig. 3fig. 4- 32 -