onair lola, lilo - Planlicht
onair lola, lilo - Planlicht
onair lola, lilo - Planlicht

You also want an ePaper? Increase the reach of your titles
YUMPU automatically turns print PDFs into web optimized ePapers that Google loves.
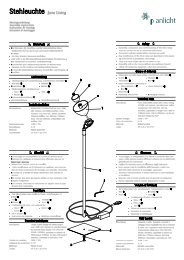
<strong>onair</strong><br />
Montageanleitung<br />
Assembly instructions<br />
Instruction de montage<br />
Istruzioni di montaggio<br />
<strong>lola</strong>, <strong>lilo</strong><br />
Sicherheit<br />
● Die Montage, der Anschluss und die Inbetriebnahme dieses Spots<br />
darf nur durch eine autorisierte Elektrofachkraft erfolgen.<br />
● Vor dem Arbeiten Spannung abschalten.<br />
● Jede nicht in der Montageanleitung beschriebene Veränderung am<br />
Spot ist verboten. (Gewährleistung)<br />
● Leuchtmittel, Spot und Adapter werden im Betrieb heiss. Daher ist<br />
bei der Montage ein Mindestabstand zu brennbaren Gegenständen<br />
von 50cm einzuhalten.<br />
● Nur in trockenen, explosionsfreien Räumen montieren.<br />
● Dieser Spot ist nur für das System <strong>onair</strong> geeignet und darf auf keinem<br />
anderen System montiert werden.<br />
● Es sind alle landesüblichen Normen, Vorschriften und Hinweise zu<br />
beachten.<br />
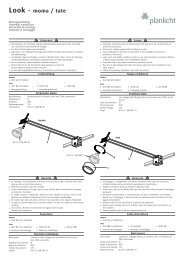
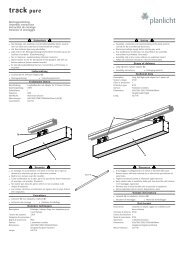
Lieferumfang<br />
● Spot (a) mit 2 Seilklemmen ● Schirm (b)<br />
● Feder (c)<br />
● Montageanleitung ● Verpackungsmaterial<br />
Technische Daten<br />
Beschreibung: Niedervoltspot bis max. 50W für System <strong>onair</strong>;<br />
schwenkbar und drehbar 359°<br />
Schutzklasse: III<br />
Systemspannung: 12V<br />
Material: Messing verchromt, vergoldet oder<br />
perlverchromt<br />
Leuchtmittel: GU 5,3 / QR-CBC 51<br />
GU 5,3 / QR-CBC 51<br />
Sécurité<br />
● Le montage, le raccordement et la mise en service de ce spot ne<br />
doivent être effectués que par un électricien autorisé.<br />
● Mettre hors tension avant de travailler.<br />
● Toute modification sur le spot, qui n’est pas décrite dans<br />
l’instruction de montage, est interdite. (Garantie)<br />
● La lampe, le spot et l’adaptateur deviennent très chauds en service.<br />
Ainsi, il faut observer une distance minimale de 50cm avec<br />
les objets combustibles.<br />
● Ne monter que dans des pièces sèches et non soumises à des risques<br />
d’explosion.<br />
● Ce spot ne convient que pour le système <strong>onair</strong> et ne doit être<br />
monté sur aucun autre système.<br />
● Les normes, directives et indications en vigueur dans le pays doivent<br />
être respectées.<br />
Fourniture<br />
● Spot (a) avec 2 colliers de serrage<br />
● Abat-jour (b) ● Ressort (c)<br />
● Instruction de montage ● Matériau d’emballage<br />
Données techniques<br />
Description: Luminaire à bas voltage jusqu’à max. 50W<br />
pour le système <strong>onair</strong>: orientable et<br />
pivotant à 359°<br />
Catégorie de protection: III<br />
Tension du système: 12V<br />
Matériau: Laiton chromé, doré ou chromé perle<br />
Lampe: GU 5,3 / QR-CBC 51<br />
b<br />
a<br />
c<br />
Safety<br />
● Assembly, connection and commissioning of this spot must be<br />
carried out by an authorized electrician.<br />
● Disconnect voltage supply before starting any work.<br />
● Any modification of the spot not described in the assembly<br />
instructions is prohibited. (warranty)<br />
● Lamp, spot and adapter will be hot when in use. Keep therefore<br />
a minimum distance of 50cm during assembly from inflammable<br />
objects.<br />
● Assemble only in dry rooms without any explosion hazard.<br />
● This spot is only designed for the <strong>onair</strong> system and must not be<br />
attached to any other system.<br />
● Follow all customary standards, rules and instructions.<br />
Scope of delivery<br />
● Spot (a) with 2 cable clamps ● Shade (b)<br />
● Spring (c)<br />
● Assembly instructions ● Packaging material<br />
Technical data<br />
Description: Low voltage light fitting with a max. rating of<br />
50W for the <strong>onair</strong> system; can be turned and<br />
rotated by 359°<br />
Class of protection: III<br />
System voltage: 12V<br />
Material: Brass chrome-plated, gold-plated or<br />
pearl chrome-plated<br />
Lamp: GU 5,3 / QR-CBC 51<br />
Sicurezza<br />
● Il montaggio, il collegamento e la messa in funzione dello spot<br />
devono essere effettuati soltanto da un elettricista specializzato ed<br />
autorizzato.<br />
● Togliere la tensione prima di effettuare degli interventi.<br />
● Sono vietate tutte le modifiche dello spot non descritte nelle istruzioni<br />
di montaggio. (garanzia)<br />
● Durante il funzionamento, il mezzo luminoso, lo spot e l‘adattatore<br />
si riscaldano. Quindi, per il montaggio si deve rispettare una distanza<br />
minima di 50cm verso gli oggetti infiammabili.<br />
● Montare solo in locali asciutti privi di pericolo di esplosioni.<br />
● Questo spot è idoneo solo per il sistema <strong>onair</strong> e non deve essere<br />
montato su un altro sistema.<br />
● Vanno rispettate tutte le norme, disposizioni e note.<br />
Lotto di fornitura<br />
● Spot (a) con 2 bloccanti ● Paralume (b)<br />
● Molla (c)<br />
● Istruzioni di montaggio ● Materiale d‘imballaggio<br />
Dati tecnici<br />
Descrizione: Lampada a voltaggio basso regolabile fino ad<br />
un massimo di 50W per sistema <strong>onair</strong>;<br />
orientabile e girevole per 359°<br />
Classe di protezione: III<br />
Tensione di sistema: 12V<br />
Materiale: Ottone cromato, dorato o cromato perla<br />
Mezzo luminoso: GU 5,3 / QR-CBC 51
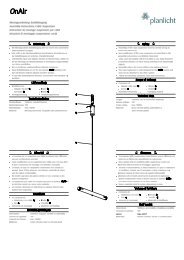
<strong>onair</strong> <strong>lola</strong>, <strong>lilo</strong><br />
Montageanleitung<br />
Assembly instructions<br />
Instruction de montage<br />
Istruzioni di montaggio<br />
Montage<br />
● Leuchtmittel (d) in Schirm (b) einsetzen<br />
● Leuchtmittel (d) mit der Feder (c) fixieren, dabei die Feder (c)<br />
zusammendrücken<br />
● Leuchtmittel (d) in Spot (a) einsetzen<br />
● Schrauben (e) von beiden Seilklemmen (f) lockern<br />
● Spot (a) auf die Seile (g) setzen und mit Schrauben (e) sichern<br />
Montage<br />
● Poser la lampe (d) dans l’abat-jopur (b)<br />
● Fixer la lampe (d) avec le ressort (c), en pressant sur le ressort (c)<br />
● Insérer la lampe (d) dans le spot a)<br />
● Desserrer les vis (e) des deux colliers de serrage (f)<br />
● Placer le spot (a) sur le câble (g) et fixer avec les vis (e)<br />
g<br />
a<br />
Diese Montageanleitung entspricht unserem derzeitigen Kenntnisstand und unterliegt der Überarbeitung, sobald sich neue Erkenntnisse und Erfahrungen ergeben.<br />
The given assembly instructions are based on our current state of knowledge and will be reviewed as soon as new facts or experiences are gained.<br />
Cette instruction de montage correspond à notre niveau actuel de connaissances et peut être remaniée dès que de nouvelles informations et expériences apparaissent.<br />
Queste istruzioni di montaggio rispondono allo stato attuale delle conoscenze e sono soggette alla revisione al momento che si verificano nuove nozioni ed esperienze.<br />
<strong>Planlicht</strong> Gmbh & Co. KG - Fiecht Au 25 - A-6130 Schwaz-Vomp - Austria - Tel.Nr.: +43-(0)5242-71608 - Fax: +43-(0)5242-71283 - FN: 24492v - Landesgericht Innsbruck<br />
f<br />
e<br />
b<br />
d<br />
c<br />
Assembly<br />
● Place the lamp (d) in the Shade (b)<br />
● Fix lamp (d) with the spring (c) by pressing spring (c) together<br />
● Insert lamp (d) into Spot (a)<br />
● Loosen screws (e) of both cable clamps (f)<br />
● Place spot (a) on the cables (g) and fix with the screw (e)<br />
Montaggio<br />
● Inserire il mezzo luminoso (d) nello paralume (b)<br />
● Fissare il mezzo luminoso (d) mediante la molla (c) comprimendo<br />
la stessa molla (c)<br />
● Inserire il mezzo luminoso (d) nello spot (a)<br />
● Allentare le viti (e) dai due bloccanti (f)<br />
● Poggiare lo spot (a) sulla corda (g) e fissarlo mediante le viti (e)<br />
03/2008 - Copyright by <strong>Planlicht</strong> GmbH & Co. KG