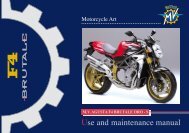
Quick_F4_FT (Multilenguaje).pdf - MV Agusta
Quick_F4_FT (Multilenguaje).pdf - MV Agusta
Quick_F4_FT (Multilenguaje).pdf - MV Agusta

You also want an ePaper? Increase the reach of your titles
YUMPU automatically turns print PDFs into web optimized ePapers that Google loves.
Part No. 8A00B5370 - Ed. No. 1 Page 1 of 4<br />
Dear Customer,<br />
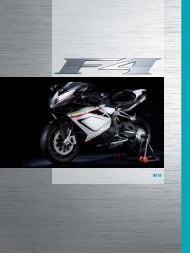
We wish to thank you for your preference and congratulate you on purchasing your new <strong>MV</strong> <strong>Agusta</strong> motorcycle.<br />
This manual will provide you with practical informations so as to familiarize yourself with the position and the working of the controls during the first<br />
use of the vehicle.<br />
WARNING: Remember to carefully read the User’s manual and the Maintenance manual before using the motorcycle for<br />
the first time and before having the scheduled maintenance operations performed at the prescribed mileage intervals by<br />
an authorized <strong>MV</strong> <strong>Agusta</strong> Service Centre.<br />
Km covered 1000 6000 12000 18000 24000 30000 36000<br />
Intervals for scheduled<br />
(mi covered) (600) (3800) (7500) (11200) (14900) (18600) (22400)<br />
maintenance operations :<br />
Service coupon A B C D E F G<br />
1. Check list - Before starting<br />
It is necessary to carry out the checks described below before each ride.<br />
1. Tyres: Check inflating pressure (see label on the right side of the windscreen) and<br />
the depth of the tyre tread (according to the law provisions of the nation in which<br />
you use your motorcycle).<br />
2. Engine oil: Check that the level is between the MIN and MAX marks.<br />
3. Brake fluid: Check that the level is between the MIN and MAX marks.<br />
4. Coolant: Check that the level is between the MIN mark and the lower side of the<br />
frame tube.<br />
5. Lights, visual and acoustic signals: Check operation.<br />
6. Fuel: Check level and refuel if necessary.<br />
7. Registration documents: Check their presence inside the glove compartment.<br />
1<br />
7 6 4 3<br />
2<br />
1<br />
5<br />
2. Starting procedure<br />
START button<br />
WARNING<br />
Only start the engine outdoor, in the open air.<br />
CHOKE lever”<br />
• Bring the gear lever in neutral position.<br />
• Turn the ignition switch to the ON position.<br />
• Cold starting:<br />
- Rotate the CHOKE lever without turning the throttle<br />
twist grip.<br />
- Press the START button.<br />
- When the engine is warm, disengage the CHOKE lever.<br />
• Hot starting:<br />
- Press the START button.<br />
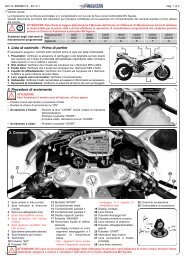
3. Controls<br />
3<br />
4<br />
5<br />
6<br />
7<br />
8<br />
9 10 11<br />
12<br />
2<br />
1<br />
21<br />
17<br />
20<br />
15<br />
13<br />
14<br />
16<br />
23<br />
19<br />
22<br />
26<br />
18<br />
28<br />
29<br />
30<br />
31<br />
27<br />
24 25<br />
1 Neutral indicator (green)<br />
2 Turn indicator light (green)<br />
3 High beam warning light (blue)<br />
4 Battery charge indicator (red)<br />
5 Engine oil pressure warning<br />
light (red)<br />
6 Sidestand down warning light<br />
(red)<br />
7 Reserve fuel indicator (arancio)<br />
8 Tyre pressure warning light<br />
(red)<br />
9 Rev limiter warning light (red)<br />
10 Speedometer<br />
11 “SET” button<br />
12 “OK” button<br />
13 “SPORT” mode<br />
14 TOTAL Mileage Counter<br />
15 TRIP 1 Mileage Counter<br />
16 RIP 2 Mileage Counter<br />
17 Gear display<br />
18 Ignition switch<br />
19 “HAZARD” button<br />
20 Coolant thermometer<br />
• the display shows just one<br />
blinking segment; it means<br />
that the temperature is low<br />
• all segments are on, while the<br />
upper segment is blinking; it<br />
means that the temperature is<br />
high<br />
21 Tachometer<br />
22 Clutch lever<br />
23 High beam flasher button<br />
24 Horn button<br />
25 Turn indicator switch<br />
26 Low/high beam button<br />
27 “START” button<br />
28 Engine stop switch<br />
29 Cold start (CHOKE) lever<br />
30 Front brake lever<br />
31 Throttle twist grip<br />
WARNING: If the warning lights come on or start blinking (see writings in red colour), immediately stop the vehicle, turn off the<br />
engine and contact an <strong>MV</strong> <strong>Agusta</strong> Service Centre.