Pro Flight Multi Panel - Saitek
Pro Flight Multi Panel - Saitek
Pro Flight Multi Panel - Saitek

Create successful ePaper yourself
Turn your PDF publications into a flip-book with our unique Google optimized e-Paper software.
VS<br />
APR<br />
AP<br />
REV<br />
HDG NAV<br />
IAS<br />
DN<br />
ALT<br />
VS<br />
<strong>Saitek</strong><br />
CRS<br />
HDG<br />
UP<br />
IAS<br />
FLAPS<br />
UP<br />
ALT<br />
OFF<br />
ARM<br />
PITCH TRIM<br />
DN<br />
AUTO THROTTLE<br />
<strong>Pro</strong>_<strong>Flight</strong>_multi_panel_PP.qxd 30/04/2009 14:30 Page 1<br />
<strong>Saitek</strong><br />
<strong>Pro</strong> <strong>Flight</strong> <strong>Multi</strong> <strong>Panel</strong><br />
®<br />
USER MANUAL<br />
BEDIENUNGSANLEITUNG<br />
GUIDE D’UTILISATION<br />
MANUALE D’USO<br />
MANUAL DEL USUARIO
<strong>Pro</strong>_<strong>Flight</strong>_multi_panel_PP.qxd 30/04/2009 14:30 Page 2<br />
SAITEK PRO FLIGHT MULTI PANEL<br />
Congratulations on buying the <strong>Saitek</strong> <strong>Pro</strong> <strong>Flight</strong> <strong>Multi</strong> <strong>Panel</strong>. The multi panel interacts<br />
with Microsoft <strong>Flight</strong> Simulator X to control a range of functions, including auto pilot<br />
settings, flaps and trim controls.<br />
Installing the <strong>Pro</strong> <strong>Flight</strong> <strong>Multi</strong> <strong>Panel</strong><br />
Fix the multi panel to the supplied mounting bracket. Insert the screws through the<br />
holes at the corners of the panel into the bracket behind and tighten. If you already<br />
own a <strong>Saitek</strong> <strong>Pro</strong> <strong>Flight</strong> Yoke System, you can mount the panel and bracket on top of<br />
the yoke unit using the screws provided.<br />
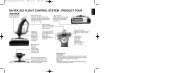
Autopilot settings selector<br />
Settings adjustment<br />
wheel<br />
Auto throttle arm<br />
Pitch trim<br />
rotary control<br />
1 2 3<br />
ALT<br />
VS<br />
IAS<br />
HDG<br />
CRS<br />
AUTO THROTTLE<br />
OFF<br />
ARM<br />
FLAPS<br />
UP<br />
PITCH TRIM<br />
DN<br />
HDG NAV IAS ALT VS<br />
AP<br />
APR<br />
REV<br />
DN<br />
UP<br />
<strong>Saitek</strong><br />
Installation for users of Windows® XP, XP64 and Vista<br />
1. With your computer switched on, close down any programs that are currently<br />
running and plug the USB cable of your panel into one of your PC’s free USB ports.<br />
A dialogue window will open on your windows task bar saying your PC is installing<br />
drivers. Please note that the LED screen will not light up until the panel software is<br />
installed.<br />
2. Insert the Installation CD into your CD or DVD drive. If the CD does not run<br />
automatically, select Start from the Windows® Taskbar, then Run and type<br />
D:\Setup.exe and click OK - where D:\ is letter of your disc drive. For Vista users, if<br />
you receive the “User Account Control” prompt, click continue.<br />
3. For XP users, when the setup wizard screen appears, click “Next” to continue. For<br />
Vista users, when prompted “Do you want to run this program from <strong>Saitek</strong>?” and<br />
“Do you always want to run this program from <strong>Saitek</strong>?”, click “Yes”. After reading<br />
2<br />
Autopilot function buttons<br />
Flaps retract (up) or<br />
extend (down)<br />
the Disclaimer, select the “I accept the terms of the Disclaimer” option and click<br />
“Next” to continue.<br />
4. The following screen will say “Driver setup is installing Direct Output”.<br />
5. Once the driver installation has finished, click “Finish” to exit the installation<br />
process.<br />
6. You can now run a test application by going to Windows Start/<strong>Pro</strong>grams/<strong>Saitek</strong>/<strong>Pro</strong><br />
<strong>Flight</strong> <strong>Multi</strong> <strong>Panel</strong>/ or open Microsoft FS X. When you open the test application or<br />
FS X the display of your panel will light up.<br />
Note: If you install a <strong>Saitek</strong> X52 <strong>Pro</strong> after having installed a <strong>Pro</strong> flight panel, the<br />
panel’s Direct Output file will be overwritten. If this happens, please reinstall the panel<br />
software.<br />
3
<strong>Pro</strong>_<strong>Flight</strong>_multi_panel_PP.qxd 30/04/2009 14:30 Page 4<br />
VS<br />
IAS<br />
HDG<br />
CRS<br />
ALT<br />
AP<br />
HDG NAV IAS ALT VS<br />
APR<br />
REV<br />
Using the <strong>Saitek</strong> <strong>Pro</strong> <strong>Flight</strong> <strong>Multi</strong> <strong>Panel</strong><br />
Button Autopilot function<br />
AP<br />
Master switch to engage or disengage the autopilot<br />
HDG Plane will fly to selected compass heading<br />
NAV Plane will fly to selected NAV1 frequency or GPS<br />
IAS<br />
Plane will fly at selected indicated airspeed<br />
ALT<br />
Plane will fly to and maintain selected altitude<br />
VS<br />
Plane will climb or descend at selected vertical speed<br />
APR Plane will fly on approach to runway localizer<br />
REV Plane will fly on a back course from the localizer<br />
Adjusting autopilot settings<br />
To change the values of the autopilot settings, first turn the selector switch on the left<br />
side of the panel to the function you want to adjust. Turn the rotary control to the right<br />
of the LED display to increase or decrease the values for the function you have<br />
selected.<br />
For example, if you want to adjust the altitude setting, first turn the selector switch on<br />
the left to ALT and then increase or decrease the desired altitude setting using the<br />
rotary controls on the right.<br />
To engage any of the autopilot functions, first select the function, eg, HDG, NAV etc<br />
and then press the autopilot master switch.<br />
VS<br />
IAS<br />
HDG<br />
CRS<br />
ALT<br />
AP<br />
HDG NAV IAS ALT VS<br />
APR<br />
REV<br />
It is possible to use each of the autopilot functions individually but more common to<br />
use a combination of functions. For example, if you wanted to fly at 20,000 feet at a<br />
speed of 150 knots on a heading of 210 degrees, first select the ALT function with the<br />
selector knob on the left and adjust altitude to 20,000 with the right rotary controls.<br />
Next turn the function selector knob to IAS and adjust speed to 150. Now turn the<br />
function selector to HDG and adjust heading to 210. To engage the altitude, speed and<br />
heading functions, first switch the autothrottle to “Arm” (this allows the autopilot to<br />
control the engines to maintain speed), then press the HDG, IAS and ALT buttons<br />
under the LED screen and press the AP button to engage the autopilot. Your plane<br />
should now climb or descend to 20,000 feet, turn to heading 210 degrees and<br />
maintain a speed of 150 knots.<br />
Please note: Not all aircraft available in Microsoft FS X have the full range of autopilot<br />
functions. For instance, the Cessna C172SP Skyhawk and many of the smaller aircraft<br />
do not have an autothrottle arm control - using this function on the multi panel will<br />
have no effect on the aircraft autopilot.<br />
Troubleshooting<br />
The <strong>Pro</strong> <strong>Flight</strong> <strong>Multi</strong> <strong>Panel</strong> controls are automatically configured to interact with FS X<br />
software. When you open Microsoft FS X you will be asked “Do you trust this program<br />
from <strong>Saitek</strong>?” Click “Yes”. You will then be asked “Do you always want to load this<br />
plugin when launching <strong>Flight</strong> Sim X?” Again, click “Yes”. If your FS X software does not<br />
recognise the multi panel, unplug the USB cable and plug it back in.<br />
If FS X appears not to load, this is because it is waiting for a prompt. To view the<br />
prompt window, select it either by pressing Alt + tab or by clicking on the prompt on<br />
the Windows task bar. The prompt reads “Microsoft <strong>Flight</strong> Simulator security warning :<br />
will happen once after install”. Click Run and when asked “would you like to designate<br />
this module?”, click yes and FS X will continue to load.<br />
The <strong>Pro</strong> <strong>Flight</strong> <strong>Multi</strong> <strong>Panel</strong> will not register automatically if you have installed the <strong>Pro</strong><br />
<strong>Flight</strong> multi <strong>Panel</strong> before installing FS X. To register the <strong>Pro</strong> <strong>Flight</strong> multi <strong>Panel</strong> with FS<br />
X, click on the “Launch the <strong>Flight</strong>sim X plugin manually” icon to re-run the program.<br />
4 5
<strong>Pro</strong>_<strong>Flight</strong>_multi_panel_PP.qxd 30/04/2009 14:30 Page 6<br />
Technical Support<br />
Nearly all the products that are returned to us as faulty are not faulty at all - they have<br />
just not been installed properly.<br />
If you experience any difficulty with this product, please first visit our website<br />
www.saitek.com. The technical support area will provide you with all the information<br />
you need to get the most out of your product and should solve any problems you<br />
might have.<br />
If you do not have access to the internet, or if the website cannot answer your<br />
question, please contact your local <strong>Saitek</strong> Technical Support Team. We aim to offer<br />
quick, comprehensive and thorough technical support to all our users so, before you<br />
call, please make sure you have all the relevant information at hand.<br />
To find your local <strong>Saitek</strong> Technical Support Center, please see the separate Technical<br />
Support Center sheet that came packaged with this product.<br />
Conditions of Warranty<br />
1. Warranty period is 2 years from date of purchase with proof of purchase submitted.<br />
2. Operating instructions must be followed.<br />
3. Specifically excludes any damages associated with leakage of batteries.<br />
Note: Batteries can leak when left unused in a product for a period of time, so it is<br />
advisable to inspect batteries regularly.<br />
4. <strong>Pro</strong>duct must not have been damaged as a result of defacement, misuse, abuse,<br />
neglect, accident, destruction or alteration of the serial number, improper electrical<br />
voltages or currents, repair, alteration or maintenance by any person or party other<br />
than our own service facility or an authorized service center, use or installation of<br />
non-<strong>Saitek</strong> replacement parts in the product or the modification of this product in<br />
any way, or the incorporation of this product into any other products, or damage to<br />
the product caused by accident, fire, floods, lightning, or acts of God, or any use<br />
violative of instructions furnished by <strong>Saitek</strong> plc.<br />
5. Obligations of <strong>Saitek</strong> shall be limited to repair or replacement with the same or<br />
similar unit, at our option. To obtain repairs under this warranty, present the product<br />
and proof of purchase (eg, bill or invoice) to the authorized <strong>Saitek</strong> Technical<br />
Support Center (listed on the separate sheet packaged with this product)<br />
transportation charges prepaid. Any requirements that conflict with any state or<br />
6<br />
Federal laws, rules and/or obligations shall not be enforceable in that particular<br />
territory and <strong>Saitek</strong> will adhere to those laws, rules, and/or obligations.<br />
6. When returning the product for repair, please pack it very carefully, preferably using<br />
the original packaging materials. Please also include an explanatory note.<br />
IMPORTANT: To save yourself unnecessary cost and inconvenience, please check<br />
carefully that you have read and followed the instructions in this manual.<br />
This warranty is in Lieu of all other expressed warranties, obligations or liabilities.<br />
ANY IMPLIED WARRANTIES, OBLIGATIONS, OR LIABILITIES, INCLUDING BUT<br />
NOT LIMITED TO THE IMPLIED WARRANTIES OF MERCHANTABILITY AND<br />
FITNESS FOR A PARTICULAR PURPOSE, SHALL BE LIMITED IN DURATION TO<br />
THE DURATION OF THIS WRITTEN LIMITED WARRANTY. Some states do not<br />
allow limitations on how long an implied warranty lasts, so the above limitations<br />
may not apply to you. IN NO EVENT SHALL WE BE LIABLE FOR ANY SPECIAL<br />
OR CONSEQUENTIAL DAMAGES FOR BREACH OF THIS OR ANY OTHER<br />
WARRANTY, EXPRESS OR IMPLIED, WHATSOEVER Some states do not allow<br />
the exclusion or limitation of special, incidental or consequential damages, so the<br />
above limitation may not apply to you. This warranty gives you specific legal rights,<br />
and you may also have other rights which vary from state to state.<br />
This symbol on the product or in the instructions means that your<br />
electrical and electronic equipment should be disposed at the end of<br />
its life separately from your household waste. There are separate<br />
collection systems for recycling in the EU.<br />
For more information, please contact the local authority or your retailer where<br />
you purchased the product.<br />
FCC Compliance and Advisory Statement<br />
Warning: Changes or modifications to this unit not expressly approved by the party<br />
responsible for compliance could void the user's authority to operate the equipment.<br />
This device complies with Part 15 of the FCC Rules. Operation is subject to the<br />
following two conditions:<br />
1. This device may not cause harmful interference, and;<br />
2. This device must accept any interference received, including interference that may<br />
cause undesired operation.<br />
7
<strong>Pro</strong>_<strong>Flight</strong>_multi_panel_PP.qxd 30/04/2009 14:30 Page 8<br />
NOTE: This equipment has been tested and found to comply with the limits for a Class<br />
B digital device, pursuant to Part 15 of the FCC Rules. These limits are designed to<br />
provide reasonable protection against harmful interference in a residential installation.<br />
This equipment generates, uses and can radiate radio frequency energy and, if not<br />
installed and used in accordance with the instructions, may cause harmful interference<br />
to radio communications. However, there is no guarantee that interference will not<br />
occur in a particular installation. If this equipment does cause harmful interference to<br />
radio or television reception, which can be determined by turning the equipment off<br />
and on, the user is encouraged to try to correct the interference by one or more of the<br />
following measures:<br />
- Reorient or relocate the receiving antenna;<br />
- Increase the separation between the equipment and receiver;<br />
- Connect the equipment into an outlet on a circuit different from that to which the<br />
receiver is connected;<br />
- Consult the dealer or an experienced radio/TV technician for help.<br />
Mad Catz Inc., 7480 Mission Valley Rd, Suite 101, San Diego, CA 92108-4406<br />
Canada ICES-003<br />
Operation is subject to the following two conditions:<br />
1. This device may not cause interference, and;<br />
2. This device must accept any interference, including interference that may cause<br />
undesired operation of the device.<br />
This Class B digital apparatus complies with Canadian ICES-003.<br />
Cet appareil numérique de la classe B est conforme à la norme NMB-003 du Canada.<br />
8<br />
SAITEK PRO FLIGHT MULTI-PANEL<br />
Herzlichen Glückwunsch zu Ihrem <strong>Saitek</strong> <strong>Pro</strong> <strong>Flight</strong> <strong>Multi</strong>-<strong>Panel</strong>. Das <strong>Multi</strong>-<strong>Panel</strong><br />
interagiert mit dem Microsoft Flugsimulator X und steuert so eine Reihe von<br />
Funktionen wie Autopilot-Einstellungen, Bremsklappen und Trimmungsregler.<br />
Installation des <strong>Pro</strong> <strong>Flight</strong> <strong>Multi</strong>-<strong>Panel</strong><br />
Befestigen Sie das <strong>Multi</strong>-<strong>Panel</strong> an der mitgelieferten Halterung. Stecken Sie die<br />
Schrauben durch die Öffnungen in den <strong>Panel</strong>ecken und durch die Halterung dahinter<br />
und ziehen Sie die Schrauben an. Falls Sie bereits ein <strong>Saitek</strong> <strong>Pro</strong> <strong>Flight</strong> Yoke System<br />
besitzen, können Sie <strong>Panel</strong> und Halterung mit den Schrauben oben auf dem Yoke<br />
montieren.<br />
1 2 3<br />
Installation für Benutzer von Windows® XP, XP64 und Vista<br />
1. Schließen Sie bei eingeschaltetem Computer alle laufenden <strong>Pro</strong>gramme und<br />
schließen Sie das USB-Kabel Ihres <strong>Panel</strong> an einen freien USB-Anschluss auf<br />
Ihrem PC an. Ein Dialogfenster erscheint auf Ihrer Windows-Taskleiste und teilt<br />
Ihnen mit, dass Ihr PC Treiber installiert. Bitte beachten Sie, dass der LED-<br />
Bildschirm nicht aufleuchtet, bis die <strong>Panel</strong>-Software installiert wurde.<br />
2. Legen Sie die Installations-CD in das CD- oder DVD-Laufwerk ein. Falls die CD<br />
nicht automatisch startet, wählen Sie zunächst auf der Windows® Taskleiste Start<br />
und danach Ausführen aus, geben Sie D:\Setup.exe ein und klicken Sie auf OK. D:\<br />
ist die Bezeichnung für Ihr CD-ROM-Laufwerk. Wenn Sie Vista benutzen und zur<br />
"Benutzerkonten-Steuerung" gelangen, klicken Sie auf "Continue" (Fortfahren).<br />
9
<strong>Pro</strong>_<strong>Flight</strong>_multi_panel_PP.qxd 30/04/2009 14:30 Page 10<br />
3. Für XP-Benutzer: Wenn der Installationsassistent erscheint, klicken Sie auf "Next"<br />
(Weiter), um fortzufahren. Für Vista Benutzer: Wenn die Aufforderung "Do you want<br />
to run this program from <strong>Saitek</strong>?" (Wollen Sie dieses <strong>Pro</strong>gramm von <strong>Saitek</strong><br />
ausführen?) erscheint, klicken Sie auf "Yes" (Ja). Nachdem Sie den<br />
Haftungsausschluss gelesen haben, wählen Sie die Option "I accept the terms of<br />
the Disclaimer" (Ich akzeptiere die Bedingungen des Haftungsausschlusses) aus<br />
und klicken Sie auf Next (Weiter), um fortzufahren.<br />
4. Auf der folgenden Ansicht erscheint "Driver setup ist installing Direct Output"<br />
(Treibersetup installiert Direct Output)<br />
5. Sobald die Treiberinstallation abgeschlossen ist, klicken Sie "Finish" (Beenden), um<br />
den Installationsvorgang zu beenden.<br />
Auswahlschalter für Autopilot-<br />
Einstellungen<br />
VS<br />
IAS<br />
HDG<br />
CRS<br />
ALT<br />
AP<br />
HDG NAV IAS ALT VS<br />
APR<br />
REV<br />
Autopilot-Funktionstasten<br />
Rad zur<br />
Einstellungsregulierung<br />
10<br />
Arm für<br />
automatischen<br />
Schub<br />
AUTO THROTTLE<br />
OFF<br />
ARM<br />
FLAPS<br />
UP<br />
DN<br />
PITCH TRIM<br />
DN<br />
UP<br />
Pitch-Trim-<br />
Drehsteuerung<br />
<strong>Saitek</strong><br />
Bremsklappen einfahren (nach oben)<br />
oder ausfahren (nach unten)<br />
6. Sie können nun eine Testanwendung ausführen, indem Sie auf Windows<br />
Start/<strong>Pro</strong>gramme/<strong>Saitek</strong>/<strong>Pro</strong> <strong>Flight</strong> <strong>Multi</strong> <strong>Panel</strong> gehen oder Microsoft FS X öffnen.<br />
Wenn Sie die Testanwendung oder FS X öffnen, leuchtet Ihr <strong>Panel</strong> auf.<br />
Hinweis: Wenn Sie einen <strong>Saitek</strong> X52 <strong>Pro</strong> nach der Installation des <strong>Pro</strong> <strong>Flight</strong> <strong>Multi</strong><br />
<strong>Panel</strong> installieren, wird die Direct Output-Datei des Instrument <strong>Panel</strong> überschrieben. In<br />
diesem Fall installieren Sie die <strong>Panel</strong>-Software neu.<br />
Einsatz des <strong>Saitek</strong> <strong>Pro</strong> <strong>Flight</strong> <strong>Multi</strong>-<strong>Panel</strong><br />
Taste Autopilot-Funktion<br />
AP<br />
Hauptschalter zum Aktivieren bzw. Deaktivieren des Autopilot<br />
HDG Flugzeug fliegt auf dem ausgewählten Kurs<br />
NAV Flugzeug fliegt gemäß ausgewählter NAV1-Frequenz oder GPS<br />
IAS<br />
Flugzeug fliegt mit gewählter angegebener Fluggeschwindigkeit<br />
ALT<br />
Flugzeug fliegt in ausgewählter Höhe und hält diese<br />
VS<br />
Flugzeug steigt oder sinkt in ausgewählter Sink-/Steiggeschwindigkeit<br />
APR Anflug erfolgt zum Startbahn-Landekurssender<br />
REV Flugzeug fliegt auf Back Course vom Landekurssender<br />
Regulierung der Autopilot-Einstellungen<br />
Um die Autopilot-Werte zu ändern, drehen Sie zunächst den Auswahlschalter links am<br />
<strong>Panel</strong> auf die Funktion, die Sie ändern möchten. Drehen Sie den Regler rechts am<br />
LED-Display, um den Wert für die gewählte Funktion zu erhöhen oder zu reduzieren.<br />
Wenn Sie beispielsweise die Flughöhe regulieren möchten, drehen Sie zunächst den<br />
Auswahlschalter links auf ALT und erhöhen oder senken dann die gewünschte<br />
Flughöhe mit Hilfe der Drehregler rechts.<br />
Um Autopilot-Funktionen zu aktivieren, wählen Sie zunächst die Funktion (z. B. HDG,<br />
NAV usw.) und drücken Sie dann den Autopilot-Hauptschalter.<br />
Sie können jede der Autopilot-Funktionen einzeln verwenden, meist wird aber eine<br />
Kombination von Funktionen benutzt. Wenn Sie beispielsweise in einer Höhe von<br />
20.000 Fuß (6100 m) mit einer Geschwindigkeit von 150 Knoten und einem Kurs von<br />
210° fliegen, wählen Sie erst die ALT-Funktion mit dem Auswahlknopf und regulieren<br />
11
<strong>Pro</strong>_<strong>Flight</strong>_multi_panel_PP.qxd 30/04/2009 14:30 Page 12<br />
dann mit den Reglern rechts die Höhe auf 20.000 Fuß. Drehen Sie den Funktions-<br />
Auswahlknopf auf IAS und stellen Sie die Geschwindigkeit auf 150 ein. Und schließlich<br />
drehen Sie den Funktions-Auswahlknopf auf HDG und den Kurs auf 210. Um die<br />
Höhen-, Geschwindigkeits- und Kursfunktionen zu aktivieren, stellen Sie zunächst den<br />
Autothrottle auf "Arm" (so dass der Autopilot die Motoren auf eine konstante<br />
Geschwindigkeit einstellen kann), drücken Sie dann die HDG , IAS- und ALT-Tasten<br />
unter dem LED-Display und die AP-Taste, um den Autopilot einzuschalten. Jetzt<br />
müsste Ihr Flugzeug auf 20.000 Fuß steigen bzw. sinken, auf Kurs 210° gehen und<br />
eine Geschwindigkeit von 150 Knoten halten.<br />
Hinweis: Nicht alle im Microsoft FS X verfügbaren Flugzeuge besitzen sämtliche<br />
Autopilot-Funktionen. So haben beispielsweise die Cessna C172SP Skyhawk und<br />
viele kleinere Flugzeuge keine Autothrottle-Armsteuerung - selbst wenn diese Funktion<br />
auf dem <strong>Multi</strong>-<strong>Panel</strong> aktiviert wird, wirkt sich dies nicht auf den Autopiloten des<br />
Flugzeugs aus.<br />
Fehlerbehebung<br />
Die Bedienteile des <strong>Multi</strong> <strong>Panel</strong> sind automatisch dafür konfiguriert, mit der FS X<br />
Software zu interagieren. Beim Öffnen von Microsoft FSX erscheint die Frage "Do you<br />
trust this driver from <strong>Saitek</strong>?" (Ist dieser Treiber von <strong>Saitek</strong> vertrauenswürdig?).<br />
Klicken Sie auf "Yes" (Ja). Danach erscheint die Frage "Do you always want to load<br />
this plugin when launching <strong>Flight</strong> Sim X?" (Wollen Sie immer dieses Plugin beim Start<br />
von <strong>Flight</strong> Sim X laden?). Klicken Sie erneut auf "Yes" (Ja). Falls Ihre FS X Software<br />
das <strong>Multi</strong> <strong>Panel</strong> nicht erkennt, hängen Sie das USB-Kabel ab und schließen Sie es<br />
erneut an.<br />
Sollte FS X nicht laden, liegt das daran, dass die Software auf eine Eingabe wartet.<br />
Wählen Sie das Eingabe-Fenster aus, indem Sie entweder Alt + Tab drücken oder die<br />
Eingabeaufforderung auf der Windows-Taskleiste anklicken. Die Eingabeaufforderung<br />
lautet: "Microsoft <strong>Flight</strong> Simulator security warning : will happen once after install"<br />
(Microsoft <strong>Flight</strong> Simulator Sicherheitshinweis: Erfolgt einmal nach der Installation).<br />
Klicken Sie auf Ausführen. Wenn die Frage "Would you like to designate this module?"<br />
(Wollen Sie dieses Modul zuweisen?) erscheint, klicken Sie auf Yes (Ja), und der<br />
Ladevorgang von FS X wird fortgesetzt.<br />
12<br />
Das <strong>Pro</strong> <strong>Flight</strong> <strong>Multi</strong> <strong>Panel</strong> wird nicht automatisch registriert, wenn Sie das <strong>Pro</strong> <strong>Flight</strong><br />
Switch <strong>Panel</strong> vor der Installation von FS X installiert haben. Um das <strong>Pro</strong> <strong>Flight</strong> <strong>Multi</strong><br />
<strong>Panel</strong> bei FS X zu registrieren, klicken Sie auf das Symbol " Launch the <strong>Flight</strong>sim X<br />
plugin manually" (<strong>Flight</strong>sim X Plugin manuell starten), um das <strong>Pro</strong>gramm erneut<br />
auszuführen.<br />
Technischer Support<br />
<strong>Pro</strong>bleme - keine Angst, wir lassen Sie nicht im Stich!<br />
Wussten Sie, dass fast alle <strong>Pro</strong>dukte, die als fehlerhaft an uns zurückgeschickt<br />
werden, überhaupt nicht defekt sind? Sie wurden einfach nicht richtig installiert!<br />
Sollten Sie <strong>Pro</strong>bleme mit diesem <strong>Pro</strong>dukt haben, besuchen Sie bitte zuerst unsere<br />
Website www.saitek.de. Unsere Website, speziell der Bereich Technischer Support,<br />
wurde erstellt, damit Sie von Ihrem <strong>Saitek</strong>-<strong>Pro</strong>dukt die bestmögliche Leistung erhalten.<br />
Sollten Sie trotzdem noch <strong>Pro</strong>bleme haben oder kein Internetanschluss haben, dann<br />
stehen Ihnen unsere <strong>Pro</strong>duktspezialisten im <strong>Saitek</strong> Technical Support Team zur<br />
Verfügung, die Sie telefonisch um Rat und Hilfe bitten können.<br />
Wir möchten, dass Sie viel Freude an Ihrem Gerät haben. Bitte rufen Sie uns an, falls<br />
Sie <strong>Pro</strong>bleme oder Fragen haben. Bitte stellen Sie auch sicher, dass Sie alle<br />
relevanten Informationen zu Hand haben, bevor Sie anrufen.<br />
Rufnummern und Adressen finden Sie auf der mit dem <strong>Pro</strong>dukt gelieferten Liste der<br />
Zentren für Technischen Support.<br />
Garantiebedingungen<br />
1. Die Garantiezeit beträgt 2 Jahre ab dem nachgewiesenen Kaufdatum.<br />
2. Die Bedienungsanleitung ist zu beachten.<br />
3. Die Garantie ist ausgeschlossen beu<br />
Verunstaltung des Geräts, unsachgemäßer oder missbräuchlicher Benutzung,<br />
mangelnder Sorgfalt, Unfall, Beseitigung oder Änderung der Seriennummer;<br />
Anschluss an eine falsche Spannung oder Stromart; Reparatur, Umbau oder<br />
Wartung des Geräts durch fremde Personen außerhalb unserer Serviceeinrichtung<br />
oder eines autorisierten Servicecenters; Verwendung oder Einbau von nicht von<br />
13
<strong>Pro</strong>_<strong>Flight</strong>_multi_panel_PP.qxd 30/04/2009 14:30 Page 14<br />
<strong>Saitek</strong> stammenden Ersatzteilen in das Gerät oder sonstigen Veränderungen:<br />
Einbau in andere Geräte; Beschädigung des Geräts durch höhere Gewalt (z.B.<br />
Unfall, Brand, Hochwasser oder Blitzschlag) oder eine den Anweisungen von<br />
<strong>Saitek</strong> zuwider laufende Benutzung des Geräts.<br />
4. Die Garantiepflicht beschränkt sich darauf, dass <strong>Saitek</strong> das Gerät nach eigener<br />
Wahl entweder repariert oder durch ein gleiches oder ähnliches Gerät ersetzt. Zur<br />
Inanspruchnahme der Garantie sind dem autorisierten <strong>Saitek</strong> Technical Support<br />
Center (Anschrift liegt dem Gerät in der Verpackung bei) Gerät und Kaufbeleg (z.B.<br />
Kassenzettel oder Rechnung) frachtfrei zu übersenden.<br />
5. Bei Einsendung des Geräts zur Reparatur ist eine angemessene Verpackung<br />
(vorzugsweise die Originalverpackung) zu wählen und eine Schilderung des<br />
<strong>Pro</strong>blems beizufügen.<br />
6. WICHTIGER HINWEIS: Achten Sie zur Vermeidung unnötiger Kosten und<br />
Unannehmlichkeiten darauf, die Anweisungen in dieser Bedienungsanleitung<br />
sorgfältig durchzulesen und zu beachten.<br />
Dieses <strong>Pro</strong>dukt darf am Ende seiner Lebensdauer nicht über den<br />
normalen Haushaltsabfall entsorgt werden, sondern muss an einem<br />
Sammelpunkt für das Recycling von elektrischen und elektronischen<br />
Geräten abgegeben werden. Das Symbol auf dem <strong>Pro</strong>dukt, der<br />
Gebrauchsanleitung oder der Verpackung weist darauf hin.<br />
14<br />
SAITEK PRO FLIGHT MULTI PANEL<br />
Félicitations pour l'achat du <strong>Saitek</strong> <strong>Pro</strong> <strong>Flight</strong> <strong>Multi</strong> <strong>Panel</strong>. Le <strong>Multi</strong> <strong>Panel</strong> interagit avec<br />
Microsoft <strong>Flight</strong> Simulator X pour contrôler un large éventail de fonctions, y compris les<br />
paramètres du pilote automatique, le contrôle des volets et de l'assiette.<br />
1 2 3<br />
Installer le <strong>Pro</strong> <strong>Flight</strong> <strong>Multi</strong> <strong>Panel</strong><br />
Fixez le <strong>Multi</strong> <strong>Panel</strong> à l'aide du support de fixation. Insérez les visses à travers les<br />
trous des coins du <strong>Panel</strong> dans le support arrière et serrez. Si vous possédez déjà un<br />
<strong>Saitek</strong> <strong>Pro</strong> <strong>Flight</strong> Yoke System, vous pouvez monter le <strong>Panel</strong> et son support sur le<br />
dessus du châssis de l'appareil à l'aide des visses fournies.<br />
Installation pour les utilisateurs de Windows® XP, XP64 et Vista<br />
1. Votre ordinateur allumé, fermez tous les programmes qui sont actuellement en<br />
cours d'exécution et branchez le câble USB de votre panneau dans l'un de vos<br />
ports USB libre de votre PC. Une fenêtre de dialogue s'ouvrira dans votre barre<br />
des tâches Windows disant que votre PC installe les pilotes. Merci de noter que<br />
l'écran à LED ne s'allumera pas jusqu'à ce que le panneau soit installé.<br />
2. Insérez le CD d'installation dans votre lecteur de CD ou de DVD. Si le CD ne<br />
s'exécute pas automatiquement, sélectionnez Démarrer dans la barre des tâches<br />
Windows ®, puis cliquez sur Exécuter et tapez D: \ Setup.exe et cliquez sur OK -<br />
D: \ est la lettre de votre disque dur. Pour les utilisateurs de Vista, si la vérification<br />
de "Contrôle de compte d'utilisateur" s'affiche, cliquez sur continuer.<br />
15
<strong>Pro</strong>_<strong>Flight</strong>_multi_panel_PP.qxd 30/04/2009 14:30 Page 16<br />
Sélecteur des réglages du Pilote<br />
Automatique<br />
VS<br />
IAS<br />
HDG<br />
CRS<br />
ALT<br />
AP<br />
HDG NAV IAS ALT VS<br />
APR<br />
REV<br />
Boutons de la fonction Pilote Automatique<br />
Réglages de<br />
l'ajustement de la roue<br />
3. Pour les utilisateurs de XP, lorsque l'écran de l'assistant d'installation apparaît,<br />
cliquez sur "Suivant" pour continuer. Pour les utilisateurs de Vista, à l'invite "Voulezvous<br />
exécuter ce programme de chez <strong>Saitek</strong> ?" Et "Voulez-vous toujours exécuter<br />
ce programme de <strong>Saitek</strong> ?", Cliquez sur "Oui". Après avoir lu l'avertissement,<br />
cochez la case "J'accepte les conditions d'utilisation" et cliquez sur "Suivant" pour<br />
continuer.<br />
4. L'écran suivant affichera "l'installation du pilote est en train d'installer Direct<br />
Output".<br />
5. Une fois l'installation du pilote terminée, cliquez sur "Terminer" pour quitter le<br />
processus d'installation.<br />
16<br />
Manette des Gaz<br />
Automatiques<br />
AUTO THROTTLE<br />
OFF<br />
ARM<br />
FLAPS<br />
UP<br />
DN<br />
PITCH TRIM<br />
DN<br />
UP<br />
Contrôle rotatif<br />
de réglage du<br />
tangage<br />
<strong>Saitek</strong><br />
Volets rétractés (haut) ou déployés (bas)<br />
6. Vous pouvez maintenant lancer une application de test en allant sur Windows<br />
Démarrer / <strong>Pro</strong>grammes / <strong>Saitek</strong> / <strong>Pro</strong> <strong>Flight</strong> <strong>Multi</strong> <strong>Panel</strong> / ou ouvrez Microsoft FS<br />
X. Lorsque vous ouvrez l'application de test ou FS X, l'affichage de votre panneau<br />
s'allumera.<br />
Note: Si vous installez un <strong>Saitek</strong> X52 <strong>Pro</strong> après avoir installé un <strong>Pro</strong> flight panel, le<br />
fichier Direct Output du Radio <strong>Panel</strong> sera écrasé. Si cela se produit, merci de<br />
réinstaller le logiciel du Radio <strong>Panel</strong>.<br />
Utiliser le <strong>Saitek</strong> <strong>Pro</strong> <strong>Flight</strong> <strong>Multi</strong> <strong>Panel</strong><br />
Bouton Fonction Pilote Automatique<br />
AP<br />
Interrupteur principale pour engager ou désengager le pilote<br />
automatique<br />
HDG L'appareil volera en direction du cap sélectionné<br />
NAV L'appareil volera en direction de la fréquence NAV1 sélectionnée ou du<br />
GPS<br />
IAS<br />
L'appareil volera à la vitesse sélectionnée<br />
ALT<br />
L'appareil volera et se maintiendra à l'altitude sélectionnée<br />
VS<br />
L'appareil montera ou descendra à la vitesse verticale sélectionnée<br />
APR L'appareil volera en approche d'alignement de la piste<br />
REV L'appareil volera en arrière de la piste<br />
Pour modifier les valeurs des paramètres du pilote automatique, tournez d'abord le<br />
sélecteur sur le côté gauche du panneau sur la fonction que vous voulez ajuster.<br />
Tournez la commande rotative à droite de l'afficheur LED pour augmenter ou diminuer<br />
les valeurs de la fonction sélectionnée.<br />
Par exemple, si vous voulez ajuster le réglage d'altitude, tournez d'abord le sélecteur<br />
vers la gauche sur ALT et ensuite augmentez ou diminuez le réglage de l'altitude<br />
désirée à l'aide de la molette de contrôle sur la droite.<br />
Pour lancer l'une des fonctions de pilote automatique, sélectionnez d'abord la fonction,<br />
par exemple, HDG, NAV, etc. et appuyez ensuite sur l'interrupteur du pilote<br />
automatique.<br />
17
<strong>Pro</strong>_<strong>Flight</strong>_multi_panel_PP.qxd 30/04/2009 14:30 Page 18<br />
Il est possible d'utiliser les fonctions de pilote automatique individuellement, mais le<br />
plus courant est d'utiliser une combinaison de fonctions. Par exemple, si vous voulez<br />
voler à 20.000 pieds à une vitesse de 150 nœuds sur un cap de 210 degrés,<br />
sélectionnez d'abord la touche ALT avec le sélecteur de fonction sur le bouton de<br />
gauche et réglez l'altitude de 20000 avec la commande rotative droite. Placez<br />
maintenant le sélecteur de fonction sur IAS et ajustez la vitesse à 150. Placez<br />
maintenant le sélecteur de fonction sur HDG et ajustez la position à 210. Pour lancer<br />
les fonctions d'altitude, de vitesse et de direction, placez d'abord la manette des gaz<br />
automatiques sur "Armé" (ce qui permet au pilote automatique de contrôler les<br />
moteurs pour maintenir la vitesse), puis appuyez sur les boutons HDG, IAS et ALT<br />
sous l'écran LED et appuyez sur le bouton AP pour engager le pilote automatique.<br />
Votre avion devrait maintenant monter ou descendre à 20.000 pieds, s'orienter sur la<br />
position à 210 degrés et de maintenir une vitesse de 150 nœuds.<br />
Merci de noter : tous les avions disponibles dans Microsoft FS X ne possèdent pas<br />
une gamme complète de fonctions de pilote automatique. Par exemple, le Cessna<br />
Skyhawk C172SP et un grand nombre de petits appareils ne sont pas équipés d'un<br />
bras de contrôle des gaz automatiques - utiliser cette fonction sur le <strong>Multi</strong> <strong>Panel</strong> n'aura<br />
pas d'effet sur le pilote automatique de l'appareil.<br />
Dépannage<br />
Les contrôles du <strong>Multi</strong> <strong>Panel</strong> sont automatiquement configurés pour interagir avec le<br />
logiciel FS X. Lorsque vous ouvrez Microsoft FSX il vous sera demandé "Avez-vous<br />
confiance en ce pilote de chez <strong>Saitek</strong> ?". Cliquez sur "Oui". Il vous sera alors<br />
demandé: "Voulez-vous toujours charger ce plugin lors du lancement de <strong>Flight</strong> Sim<br />
X?". Encore une fois, cliquez sur "Oui". Si votre logiciel FS X ne reconnaît pas le <strong>Multi</strong><br />
<strong>Panel</strong>, débranchez le câble USB et rebarnchez-le.<br />
Si FS X semble ne pas se charger, c'est parce que le logiciel attend une réponse.<br />
Pour voir la fenêtre de dialogue, sélectionnez-la en pressant Alt+Tab ou en cliquant<br />
sur la boite dans la barre des tâches Windows. La boite affiche " Alerte de sécurité<br />
Microsoft <strong>Flight</strong> Simulator : cela arrivera après l'installation ". Cliquez sur Exécuter et<br />
lorsque cela est demandé " Voulez-vous sélectionner ce module ? ", cliquez sur Oui et<br />
FS X continuera son chargement.<br />
18<br />
Le <strong>Pro</strong> <strong>Flight</strong> <strong>Multi</strong> <strong>Panel</strong> ne s'enregistrera pas automatiquement si vous l'avez installé<br />
avant le logiciel FS X. Pour enregistrer le <strong>Pro</strong> <strong>Flight</strong> <strong>Multi</strong> <strong>Panel</strong> avec FS X, cliquez<br />
sur l'icône "Lancer manuellement le plugin <strong>Flight</strong>sim X" pour ré-exécuter le<br />
programme.<br />
Support Technique<br />
Je ne peux pas démarrer. Ne vous inquiétez pas, nous sommes là pour vous aider!<br />
La plupart des produits qui nous sont retournés comme étant défectueux ne le sont<br />
pas du tout en réalité : ils n'ont tout simplement pas été installés correctement.<br />
Si vous rencontrez la moindre difficulté avec ce produit, merci de vous rendre tout<br />
d'abord sur notre site web www.saitek.com. La section Support Technique vous<br />
fournira toute l'information dont vous avez besoin pour tirer le meilleur parti de votre<br />
produit, et devrait vous aider à résoudre tous les problèmes que vous pourriez<br />
éventuellement rencontrer.<br />
Si vous n'avez pas accès à Internet, ou si vous ne trouvez pas de réponse à votre<br />
question sur notre site web, merci de bien vouloir contacter l'équipe locale du Support<br />
Technique <strong>Saitek</strong>. Notre objectif consiste à offrir un support technique complet et<br />
approfondi à tous nos utilisateurs, donc, avant de nous appeler, merci de bien vouloir<br />
vérifier que vous avez toute l'information requise à portée de main.<br />
Pour trouver votre équipe locale du Support Technique <strong>Saitek</strong>, merci de vous référer à<br />
la feuille " Centre de Support Technique " qui vous a été fournie dans l'emballage de<br />
ce produit.<br />
Conditions de garantie<br />
1. La période de garantie est de deux ans à compter de la date d'achat, avec<br />
soumission d'une preuve d'achat.<br />
2. Les instructions de fonctionnement doivent être correctement suivies.<br />
3. Le produit ne doit pas avoir été endommagé par une dégradation, une utilisation<br />
non conforme, une négligence, un accident, une destruction ou une altération du<br />
numéro de série, l'utilisation de voltages ou courants électriques inadaptés, la<br />
réparation, la modification ou la maintenance par toute personne ou tiers autre que<br />
19
<strong>Pro</strong>_<strong>Flight</strong>_multi_panel_PP.qxd 30/04/2009 14:30 Page 20<br />
notre propre Service Après Vente ou un centre de réparation agréé, l'utilisation ou<br />
l'installation de pièces de remplacement qui ne soient pas des pièces <strong>Saitek</strong>, ou la<br />
modification du produit de quelque manière que ce soit, ou l'introduction de ce<br />
produit dans n'importe quel autre produit, ou des dommages causés au produit par<br />
un accident, le feu, des inondations, la foudre, les catastrophes naturelles, ou toute<br />
utilisation allant à l'encontre des instructions fournies par <strong>Saitek</strong> PLC.<br />
4. Les obligations de <strong>Saitek</strong> sont limitées à la réparation ou au remplacement par un<br />
produit identique ou similaire, à notre convenance. Afin d'obtenir la réparation d'un<br />
produit sous cette garantie, veuillez présenter le produit et sa preuve d'achat (c'est<br />
à dire le ticket de caisse ou une facture) au Centre de Support Technique <strong>Saitek</strong><br />
agréé (la liste vous est fournie sur une feuille séparée se trouvant également dans<br />
l'emballage du produit), en ayant au préalable payé les frais d'envoi. Toute<br />
condition en contradiction avec des lois, règles et/ou obligations fédérales ou<br />
étatiques ne pourra pas être appliquée dans ce territoire spécifique et <strong>Saitek</strong><br />
adhèrera à ces lois, règles et/ou obligations.<br />
5. Lors du renvoi du produit en vue d'une réparation, veillez s'il vous plaît à l'emballer<br />
soigneusement, en utilisant de préférence l'emballage d'origine. Merci également<br />
de bien vouloir inclure une note explicative.<br />
6. IMPORTANT : afin de vous permettre d'éviter des coûts et des désagréments<br />
inutiles, merci de vérifier soigneusement que vous avez lu et suivi les instructions<br />
figurant dans ce manuel.<br />
Cette garantie agit en lieu et place de toutes les autres garanties, obligations et<br />
responsabilités. TOUTES GARANTIES, OBLIGATIONS OU RESPONSABILITES<br />
IMPLICITES, INCLUANT SANS RESTRICTION LES GARANTIES ET<br />
CONDITIONS IMPLICITES DE QUALITE OU D'ADAPTABILITE A UN USAGE<br />
SPECIFIQUE, SONT LIMITEES, EN DUREE, A LA DUREE DE CETTE GARANTIE<br />
LIMITEE ECRITE. Certains Etats n'autorisent pas de restrictions de durée de la<br />
garantie, auquel cas les restrictions décrites ci-dessus ne vous sont pas<br />
applicables. EN AUCUN CAS NOUS NE POURRONS ETRE TENUS POUR<br />
RESPONSABLES POUR DES DEGATS SPECIFIQUES OU RESULTANT D'UNE<br />
INFRACTION A CETTE GARANTIE OU A TOUTE AUTRE GARANTIE,<br />
20<br />
EXPRESSE OU IMPLICITE, QUELLE QU'ELLE SOIT. Certains Etats n'autorisent<br />
pas l'exclusion ou la restriction des dégâts accidentels, indirects, spéciaux ou<br />
induits, auquel cas la restriction ci-dessus ne vous est pas applicable. Cette<br />
garantie vous accorde des droits légaux spécifiques, et vous pouvez également<br />
bénéficier d'autres droits variant d'un Etat à l'autre.<br />
Ce symbole sur le produit ou dans le manuel signifie que votre équipement<br />
électrique et électronique doit être, en fin de vie, jeté séparement de<br />
vos déchets ménagés. Il existe en France des systèmes de collecte<br />
différents pour les déchets recyclables. Pour plus d'information,<br />
veuillez contacter les autorités locales ou le revendeur chez qui vous<br />
avez acheté le produit.<br />
21
<strong>Pro</strong>_<strong>Flight</strong>_multi_panel_PP.qxd 30/04/2009 14:30 Page 22<br />
PANNELLO MULTIPLO SAITEK PRO FLIGHT<br />
Congratulazioni per avere acquistato il pannello multiplo <strong>Saitek</strong> <strong>Pro</strong> <strong>Flight</strong>. Il pannello<br />
multiplo interagisce con Microsoft <strong>Flight</strong> Simulator X per controllare varie funzioni, tra<br />
cui le impostazioni del pilota automatico e i controlli di flap e trim.<br />
Installazione del Pannello <strong>Multi</strong>plo <strong>Pro</strong> <strong>Flight</strong><br />
Fissate il pannello multiplo alla staffa di montaggio fornita. Inserite le viti, attraverso i<br />
fori negli angoli del pannello nella parte posteriore della staffa e stringetele. Se<br />
possedete già una cloche <strong>Saitek</strong> <strong>Pro</strong> <strong>Flight</strong> Yoke System, potete montare il pannello e<br />
la staffa sulla parte superiore della cloche usando le viti fornite.<br />
Selettore per l'impostazione del<br />
pilota automatico<br />
VS<br />
IAS<br />
HDG<br />
CRS<br />
ALT<br />
Rotella per impostare le<br />
regolazioni<br />
Inserimento<br />
acceleratore<br />
automatico<br />
AUTO THROTTLE<br />
OFF<br />
ARM<br />
DN<br />
Rotella controllo<br />
del trim del<br />
beccheggio<br />
(Pitch trim)<br />
PITCH TRIM<br />
1 2 3<br />
FLAPS<br />
UP<br />
HDG NAV IAS ALT VS<br />
AP<br />
APR<br />
REV<br />
DN<br />
UP<br />
<strong>Saitek</strong><br />
Pulsante della funzione pilota automatico<br />
Ritiro (su) o estensione (giù) dei Flap<br />
Installazione per gli utenti di Windows® XP, XP64 e Vista<br />
1. Con il vostro computer acceso, chiudete tutti i programmi in esecuzione e inserite il<br />
cavo USB del vostro pannello in una porta USB libera del vostro PC. Si apre una<br />
finestra di dialogo nella barra degli strumenti di Windows, che dice che il vostro PC<br />
sta installando i driver. Notate che i LED dello schermo si illuminano solo dopo<br />
l'installazione del software del pannello.<br />
2. Inserite il CD di installazione nel vostro drive CD o DVD. Se il CD non si avvia<br />
automaticamente, selezionate Start nella barra degli strumenti Windows®, poi<br />
Esegui, digitate D:\Setup.exe (dove D:\ è la lettera del vostro disco) e fate click su<br />
OK. Per gli utenti Vista, se ricevete il messaggio "Controllo dell'account utente",<br />
fate click su Continua.<br />
22<br />
3. Per gli utenti XP, quando appare la finestra dell'assistente di impostazione, fate<br />
click su "Avanti" per continuare. Per gli utenti Vista, quando appare il messaggio<br />
"Volete eseguire questo programma di <strong>Saitek</strong>?" e "Volete eseguire sempre questo<br />
programma di <strong>Saitek</strong>?", fate clic su "Sì". Dopo avere letto il Disclaimer, selezionate<br />
l'opzione "Io accetto i termini del Disclaimer" e fate click su "Avanti" per continuare.<br />
4. La schermata successiva dice "Driver setup sta installando Direct Output".<br />
5. Una volta terminata l'installazione dei driver, fate click su "Fine" per uscire dal<br />
processo di installazione.<br />
6. Ora potete eseguire un'applicazione di test andando a Windows<br />
Start/<strong>Pro</strong>grammmi/<strong>Saitek</strong>/<strong>Pro</strong> <strong>Flight</strong> <strong>Multi</strong> <strong>Panel</strong>/ o aprire Microsoft FS X. Quando<br />
aprite l'applicazione di test o FS X il display del vostro pannello si illumina.
<strong>Pro</strong>_<strong>Flight</strong>_multi_panel_PP.qxd 30/04/2009 14:30 Page 24<br />
Nota: Se installate un X52 <strong>Pro</strong> <strong>Saitek</strong> dopo avere installato il panello <strong>Pro</strong> flight, il file<br />
Direct Output del panello viene sovrascritto. Se questo succede, ri-installate il software<br />
del panello.<br />
Uso del Pannello <strong>Multi</strong>plo <strong>Pro</strong> <strong>Flight</strong> <strong>Saitek</strong><br />
Pulsante Funzione pilota automatico<br />
AP<br />
Switch principale per inserire o disinserire il pilota automatico<br />
HDG L'aereo vola fino al punto-bussola selezionato<br />
NAV L'aereo vola alla frequenza NAV1 o GPS selezionata<br />
IAS<br />
L'aereo vola alla velocità dell'aria selezionata indicata<br />
ALT<br />
L'aereo vola fino all'altezza selezionata e la mantiene<br />
VS<br />
L'aereo sale o scende alla velocità verticale selezionata<br />
APR L'aereo vola verso il localizzatore di pista (runway localizer)<br />
REV L'aereo vola verso il back course del localizzatore.<br />
Regolazione delle impostazioni del pilota automatico<br />
Per modificare i valori di impostazione del pilota automatico, per prima cosa<br />
posizionate il selettore alla sinistra del pannello sulla funzione che volete regolare.<br />
Girate la rotella di controllo alla destra del display a LED per aumentare o diminuire i<br />
valori della funzione che avete selezionato.<br />
Per esempio, se volete regolare l'impostazione della quota, per prima cosa ruotate lo<br />
switch selettore a sinistra su ALT e poi aumentate o diminuite l'impostazione<br />
dell'altezza desiderata usando i controlli rotanti a destra.<br />
Per inserire una funzione del pilota automatico, per prima cosa selezionate la<br />
funzione, per es, HDG, NAV etc e poi premete lo switch principale del pilota<br />
automatico.<br />
E' possibile usare ciascuna delle funzioni del pilota automatico individualmente ma è<br />
più comune usare una combinazione di funzioni. Per esempio, se volete volare a<br />
20.000 piedi alla velocità di 150 nodi su una rotta di 210 gradi, prima selezionate la<br />
funzione ALT con la manopola del selettore posta a sinistra e regolate l'altezza a<br />
24<br />
20.000 piedi con i controlli rotanti. Poi ruotate la manopola del selettore alla funzione<br />
IAS e impostate la velocità su 150. Ora girate selettore delle funzioni su HDG e<br />
impostate la rotta su 210. Per inserire le funzioni altezza, velocità e rotta, prima<br />
commutate il pilota automatico su "Arm" (questo permette al pilota automatico di<br />
controllare i motori per mantenere la velocità), poi premete i pulsanti HDG, IAS e ALT<br />
sotto lo schermo LED e premete il pulsante AP per inserire il pilota automatico. Il<br />
vostro aereo dovrebbe ora salire o scendere a 20.000 piedi, girare sulla rotta 210<br />
gradi e mantenere la velocità di 150 nodi.<br />
Nota: Non tutti gli aerei disponibili in Microsoft FS X hanno tutta la gamma di funzioni<br />
di pilota automatico. Per esempio, il Cessna C172SP Skyhawk e molti piccolo aerei<br />
non hanno il controllo dell'inserimento dell'acceleratore automatico - l'uso di questa<br />
funzione sul pannello multiplo non avrà effetto sul pilota automatico dell'aereo.<br />
Regolazione del codice XPDR<br />
Per regolare il codice squawk del transponder, per prima cosa selezionate XPDR sulla<br />
manopola di selezione del modo radio alla sinistra del pannello. Girate la manopola<br />
esterna per regolare la cifra 1 e la manopola interna per regolare la cifra 2. Per<br />
regolare le cifre 3 e 4, premete una volta il bottone ACT/STBY alla destra dell'unità e<br />
regolate le cifra 3 girando la manopola esterna e la cifra 4 girando la manopola<br />
interna.<br />
Risoluzione problemi<br />
I controlli del panello radio sono a configurati automaticamente per interagire con il<br />
software FS X. Quando aprite Microsoft FSX vi viene chiesto "Do you trust this driver<br />
from <strong>Saitek</strong>?" Fate Click su "Yes". Poi vi viene chiesto "Do you always want to load<br />
this plugin when launching <strong>Flight</strong> Sim X?" fate di nuovo click su "Yes". Se il vostro<br />
software FS X non riconosce il panello radio, scollegate il cavo USB e ricollegatelo.<br />
Se FS X non si carica, è perché è in attesa di un prompt. Per vedere la finestra del<br />
prompt, selezionatela premendo Alt + tab o facendo clic sul prompt sulla barra degli<br />
strumenti di Windows. Il prompt dice "Microsoft <strong>Flight</strong> Simulator security warning : will<br />
happen once after install". Fate click su Esegui e quando viene chiesto "would you like<br />
to designate this module?", fate click su "sì" e FS X continuerà il caricamento.<br />
25
<strong>Pro</strong>_<strong>Flight</strong>_multi_panel_PP.qxd 30/04/2009 14:30 Page 26<br />
Il pannello <strong>Multi</strong> <strong>Pro</strong> <strong>Flight</strong> non registra automaticamente se avete installato il pannello<br />
prima di installare FS X. Per registrare il pannello <strong>Multi</strong> <strong>Pro</strong> <strong>Flight</strong> con FS X, fate click<br />
sull'icona "Launch the <strong>Flight</strong>sim X plugin manually" per ri-eseguire il programma.<br />
Avvio impossibile? Non preoccupatevi, siamo qui per aiutarti!<br />
Quasi tutti i prodotti che ci vengono resi come difettosi non sono affatto difettosi -<br />
semplicemente non sono stati installati correttamente.<br />
Se avete delle difficoltà con questo prodotto, visitate prima di tutto il nostro sito Web<br />
www.saitek.com. L'area dell'assistenza tecnica vi fornirà tutte le informazioni che vi<br />
occorrono per ottenere il meglio dal vostro prodotto e per risolvere qualsiasi problema<br />
da voi riscontrato.<br />
Se non avete accesso a Internet o il sito Web non è in grado di rispondere alla vostra<br />
domanda, rivolgetevi al vostro Team Assistenza Tecnica <strong>Saitek</strong> locale. Offriamo<br />
l'assistenza tecnica rapida, vasta e completa a tutti i nostri utenti. Prima di chiamarci<br />
accertatevi di avere tutte le informazioni pertinenti a portata di mano.<br />
Troverete nel foglio separato fornito con questo prodotto i dati relativi al vostro Centro<br />
di Assistenza Tecnica locale.<br />
Condizioni della garanzia<br />
1. Il periodo di garanzia è di 2 anni dalla data d'acquisto con presentazione della<br />
prova d'acquisto.<br />
2. Seguire le istruzioni per il funzionamento.<br />
3. Il prodotto non deve essere stato danneggiato a causa di deturpazione, uso errato,<br />
abuso, negligenza, incidente, distruzione o alterazione del numero di serie,<br />
incorrette tensioni o correnti elettriche, riparazione, modifiche o manutenzione<br />
effettuate da qualsiasi persona o parte eccetto dal nostro servizio di manutenzione<br />
o un centro di manutenzione autorizzato, utilizzo o installazione di parti di ricambio<br />
non <strong>Saitek</strong> nel prodotto o la modifica di questo prodotto in qualsiasi modo, o<br />
l'incorporazione di questo prodotto in qualsiasi altro prodotto, o danni al prodotto<br />
provocato da incidente, incendio, inondazione, fulmini o forza maggiore, o qualsiasi<br />
uso che contravviene alle istruzioni fornite da <strong>Saitek</strong> plc.<br />
4. Gli obblighi di <strong>Saitek</strong> saranno limitati alla riparazione o sostituzione con la stessa<br />
unità o con un'unità simile, a scelta di <strong>Saitek</strong>. Per ottenere le riparazioni ai sensi<br />
26<br />
della presente garanzia, presentare il prodotto e la prova d'acquisto (ad es. la<br />
ricevuta o la fattura) al Centro Assistenza Tecnica <strong>Saitek</strong> (elencato nel foglio<br />
separato contenuto nella confezione di questo prodotto), con le spese di trasporto<br />
prepagate. Qualsiasi condizione eventualmente in conflitto con qualsiasi legge,<br />
regolamento e/o obbligo statale o federale non sarà applicabile in quel territorio<br />
particolare e <strong>Saitek</strong> aderirà a quelle leggi, regole e/o obblighi.<br />
5. Quando il prodotto viene reso per la riparazione, imballarlo molto attentamente,<br />
preferibilmente utilizzando i materiali d'imballaggio originali. Includere inoltre una<br />
nota esplicativa.<br />
6. IMPORTANTE: per risparmiare costi e inconvenienti inutili, controllare attentamente<br />
di aver letto e seguito le istruzioni in questo manuale.<br />
7. Questa garanzia sostituisce tutte le altre garanzie, gli obblighi o le responsabilità<br />
esplicite. LA DURATA DI QUALSIASI GARANZIA, OBBLIGO, O RESPONSABILITÀ<br />
IMPLICITI, COMPRESI MA NON LIMITATI ALLE GARANZIE IMPLICITE DI<br />
RESPONSABILITÀ E IDONEITÀ PER UNO SCOPO PARTICOLARE, SARÀ<br />
LIMITATA ALLA DURATA DELLA PRESENTE GARANZIA LIMITATA SCRITTA.<br />
Alcuni Stati non consentono limitazioni sulla durata di una garanzia implicita, perciò<br />
le suddette limitazioni possono non essere pertinenti nel vostro caso. NON<br />
SAREMO MAI RESPONSABILI PER QUALSIASI DANNO SPECIALE O<br />
CONSEGUENTE PER VIOLAZIONE DI QUESTA O DI QUALSIASI ALTRA<br />
GARANZIA, ESPLICITA O IMPLICITA, DI QUALSIASI TIPO. Alcuni Stati non<br />
consentono l'esclusione o la limitazione di danni speciali, incidentali o conseguenti,<br />
per cui la suddetta limitazione può non applicarsi nel vostro caso. La presente<br />
garanzia vi conferisce diritti legali speciali, e potete avere anche altri diritti che<br />
variano da uno Stato all'altro.<br />
Questo simbolo riportato sul prodotto o nelle istruzioni indica che, al<br />
termine della loro vita, le apparecchiature elettriche ed elettroniche<br />
devono essere smaltite separatamente dai rifiuti domestici.<br />
Nell'Unione Europea sono disponibili sistemi per la raccolta separata<br />
e il riciclaggio dei rifiuti.<br />
Per richiedere ulteriori informazioni contattare le autorità locali o il rivenditore dove è<br />
stato effettuato l'acquisto del prodotto.
<strong>Pro</strong>_<strong>Flight</strong>_multi_panel_PP.qxd 30/04/2009 14:30 Page 28<br />
PANEL MÚLTIPLE PRO VUELO DE SAITEK<br />
Enhorabuena por comprar el <strong>Panel</strong> Múltiple <strong>Pro</strong> Vuelo de <strong>Saitek</strong>. El panel múltiple<br />
interactúa con el Simulador de Vuelo X de Microsoft para controlar una serie de<br />
funciones, incluyendo las configuraciones del piloto automático, las alas y los<br />
controles de trimado (trim).<br />
Selector de configuraciones del<br />
piloto automático<br />
Rueda de ajuste de<br />
configuraciones<br />
Brazo de<br />
aceleración<br />
automática<br />
Control giratorio<br />
de trimado de<br />
paso de la hélice<br />
1 2 3<br />
VS<br />
IAS<br />
HDG<br />
CRS<br />
ALT<br />
AUTO THROTTLE<br />
OFF<br />
ARM<br />
PITCH TRIM<br />
DN<br />
FLAPS<br />
UP<br />
Instalación del <strong>Panel</strong> Múltiple <strong>Pro</strong> Vuelo<br />
Ajuste el panel múltiple al soporte proporcionado. Inserte los tornillos por los agujeros<br />
en las esquinas del panel en el soporte detrás y apriételos. Si ya tiene un Sistema<br />
Yoke <strong>Pro</strong> Vuelo de <strong>Saitek</strong>, puede instalar el panel y soporte encima de la unidad Yoke<br />
utilizando los tornillos proporcionados.<br />
Instalación para usuarios de Windows® XP, XP64 y Vista<br />
1. Con su ordenador encendido, cierre todos los programas que estén actualmente<br />
en uso y conecte el cable USB de su panel en uno de los puertos USB libres de su<br />
ordenador. Aparecerá una ventana de dialogo en su barra de tareas de Windows<br />
diciendo que su ordenador está instalando controladores. Por favor tome nota que<br />
la pantalla LED (Diodo Emisor de Luz) no se encenderá hasta que no instale el<br />
software del panel.<br />
2. Introduzca el CD de instalación en la unidad de CD o DVD. Si el CD no se ejecuta<br />
automáticamente, seleccione Inicio (Start) de la Barra de Tareas de Windows®, a<br />
continuación Ejecutar (Run) y escriba D:\Setup.exe y haga clic en OK - donde D:\<br />
es una letra de su disquetera. Para usuarios de Vista, si recibe la indicación<br />
28<br />
AP<br />
HDG NAV IAS ALT VS<br />
APR<br />
REV<br />
Botones de función del piloto automático<br />
"Control de la Cuenta de Usuario" ("User Account Control"), haga clic en continuar<br />
(continue).<br />
3. Para usuarios de XP, cuando aparezca en la pantalla el asistente de configuración,<br />
haga clic en "Siguiente" ("Next") para continuar. Para usuarios de Vista, cuando<br />
reciba la indicación "¿Quiere ejecutar este programa de <strong>Saitek</strong>? ("Do you want to<br />
run this program from <strong>Saitek</strong>?") y "¿Siempre quiere ejecutar este programa de<br />
<strong>Saitek</strong>?" ("Do you always want to run this program from <strong>Saitek</strong>?"), haga clic en "Sí"<br />
("Yes"). Después de leer el Descargo de Responsabilidad, seleccione la opción<br />
"Acepto los términos del Descargo de Responsabilidad" ("I accept the terms of the<br />
Disclaimer") y haga clic en "Siguiente" ("Next") para continuar.<br />
4. La siguiente pantalla dirá "El controlador de configuración está instalando Salida<br />
Directa" ("Driver setup is installing Direct Output").<br />
29<br />
DN<br />
UP<br />
<strong>Saitek</strong><br />
Las alas se retractan (arriba) o se extienden (abajo)
<strong>Pro</strong>_<strong>Flight</strong>_multi_panel_PP.qxd 30/04/2009 14:30 Page 30<br />
5. Una vez que se haya instalado el controlador, haga clic en "Terminar" ("Finish")<br />
para salir del proceso de instalación.<br />
6. Ahora puede ejecutar una aplicación de prueba si va a Windows<br />
Inicio/<strong>Pro</strong>gramas/<strong>Saitek</strong>/<strong>Panel</strong> Múltiple <strong>Pro</strong> Vuelo/ (Windows<br />
Start/<strong>Pro</strong>grams/<strong>Saitek</strong>/<strong>Pro</strong> <strong>Flight</strong> <strong>Multi</strong> <strong>Panel</strong>/) o abriendo FS X Microsoft. Cuando<br />
abra la aplicación de prueba o FS X la pantalla de su panel se encenderá.<br />
Nota: Si instala el X52 <strong>Pro</strong> de <strong>Saitek</strong> después de haber instalado un panel <strong>Pro</strong> vuelo,<br />
se sobrescribirá el archivo de Salida Directa del panel. Si ocurre esto, por favor<br />
reinstale el software del panel.<br />
Utilización del <strong>Panel</strong> Múltiple <strong>Pro</strong> Vuelo de <strong>Saitek</strong><br />
Botón Función del piloto automático<br />
AP<br />
Conmutador máster para activar o desactivar el piloto automático<br />
HDG El avión volará con el rumbo de compas seleccionado<br />
NAV El avión volará a la frecuencia NAV1 o GPS seleccionados<br />
IAS<br />
El avión volará a la velocidad respecto al aire indicada seleccionada<br />
ALT<br />
El avión volará y mantendrá la altitud seleccionada<br />
VS<br />
El avión subirá o descenderá a la velocidad vertical seleccionada<br />
APR El avión volará al acercarse al localizador de la pista de aterrizaje<br />
REV El avión volará en un rumbo posterior del localizador<br />
Ajuste de las configuraciones del piloto automático<br />
Para cambiar los valores de las configuraciones del piloto automático, gire primero el<br />
conmutador selector en la parte izquierda del panel a la función que desea ajustar.<br />
Gire el control giratorio a la derecha de la pantalla LED (Diodo Emisor de Luz) para<br />
aumentar o disminuir los valores para la función que haya elegido.<br />
Por ejemplo, si quiere ajustar la configuración de altitud, gire primero el conmutador<br />
del selector en la izquierda a ALT y a continuación aumente o disminuya la<br />
configuración de altitud deseada utilizando los controles giratorios a la derecha.<br />
Para activar cualquiera de las funciones del piloto automático, seleccione primero la<br />
30<br />
función p. ej. HDG, NAV etc. y a continuación presione el conmutador máster del piloto<br />
automático.<br />
Es posible utilizar cada una de las funciones del piloto automático por separado pero<br />
es más normal utilizar una combinación de funciones. Por ejemplo, si desea volar a<br />
una altitud de 20.000 pies a una velocidad de 150 nudos en un rumbo de 210 grados,<br />
seleccione primero la función ALT con el mando dial del selector a la izquierda y<br />
ajuste la altitud a 20.000 con los controles giratorios derechos. A continuación gire el<br />
mando dial del selector de funciones a IAS y ajuste la velocidad a 150. Ahora gire el<br />
selector de funciones a HDG y ajuste el rumbo a 210. Para activar las funciones de<br />
altitud, velocidad y rumbo, cambie primero el acelerador automático a "Arm" (esto<br />
permite al piloto automático controlar los motores para mantener la velocidad), a<br />
continuación presione los botones HDG, IAS y ALT debajo de la pantalla LED (Diodo<br />
Emisor de Luz) y presione el botón AP para activar el piloto automático. Ahora su<br />
avión debería subir o descender a 20.000 pies, girar a un rumbo de 210 grados y<br />
mantener una velocidad de 150 nudos.<br />
Por favor tome nota: No todos los aviones disponibles en FS X Microsoft tienen la<br />
gama completa de funciones del piloto automático. Por ejemplo, el Cessna C172SP<br />
Skyhawk y muchos de los aviones más pequeños no tienen un control de brazo de<br />
aceleración automática - el utilizar esta función en el panel múltiple no tendrá ningún<br />
efecto en el piloto automático del avión.<br />
Resolución de problemas<br />
Los controles del panel de radio están configurados automáticamente para interactuar<br />
con el software FS X. Cuando abra FSX Microsoft le preguntará "¿Confía en este<br />
controlador de <strong>Saitek</strong>?" ("Do you trust this driver from <strong>Saitek</strong>?"). Haga clic en "Sí"<br />
("Yes"). A continuación le preguntará "Siempre quiere cargar este accesorio durante el<br />
lanzamiento del Sin de Vuelo X?" ("Do you always want to load this plug-in when<br />
launching <strong>Flight</strong> Sims X?"). De nuevo, haga clic en "Sí" ("Yes"). Si su software FS X<br />
no reconoce el panel de radio, desconecte el cable USB y vuelva a conectarlo.<br />
Si parece que el FS X no se carga, es porque está esperando una instrucción. Para<br />
ver la ventana con la instrucción, selecciónela presionando la tecla Alt + tabulador<br />
31
<strong>Pro</strong>_<strong>Flight</strong>_multi_panel_PP.qxd 30/04/2009 14:30 Page 32<br />
(Alta + tab) o haciendo clic en la instrucción (prompt) en la barra de tareas de<br />
Windows. La instrucción dirá "Aviso de seguridad del Simulador de Vuelo Microsoft:<br />
ocurrirá una vez después de la instalación" ("Microsoft <strong>Flight</strong> Simulator security<br />
warning: will happen once after install"). Haga clic en Ejecturar (Run) y cuando le<br />
pregunte "¿le gustaría designar este modulo?" ("would you like to designate this<br />
module?"), haga clic en sí (yes) y el FS X continuará cargando.<br />
El panel de <strong>Multi</strong> <strong>Pro</strong> Vuelo no se registrará automáticamente si ha instalado el panel<br />
antes de instalar FS X. Para registrar el <strong>Panel</strong> de <strong>Multi</strong> <strong>Pro</strong> Vuelo con FS X, haga clic<br />
en el icono "Lanzar manualmente el accesorio del Sim de Vuelo X" ("Launch the<br />
<strong>Flight</strong>sim X plugin manually") para volver a ejecutar el programa.<br />
Asistencia técnica<br />
¿No puede empezar?: No se preocupe, ¡aquí estamos para ayudarle!<br />
Casi la totalidad de los productos que nos devuelven como averiados no tienen<br />
ningún fallo: es simplemente que no se han instalado correctamente.<br />
Si experimenta alguna dificultad con este producto, rogamos que visite primeramente<br />
nuestro sitio web: www.saitek.com.<br />
El área de asistencia técnica le proporcionará toda la información que necesita para<br />
obtener el mayor rendimiento de su producto y debería resolver cualesquiera<br />
problemas que pudiese tener.<br />
Si no dispone de acceso a Internet o si no encuentra en el sitio web respuesta a su<br />
pregunta, rogamos que se ponga en contacto con el equipo de asistencia técnica de<br />
<strong>Saitek</strong>. Nuestro objetivo es ofrecer asistencia técnica rápida y completa a todos<br />
nuestros usuarios, así que le rogamos que antes de llamar tenga a mano toda la<br />
información relevante.<br />
Para hallar el Centro de asistencia técnica de <strong>Saitek</strong> de su localidad, rogamos que<br />
consulte la hoja de Centros de asistencia técnica incluida en el paquete de este<br />
producto.<br />
Condiciones de la garantía<br />
1. El período de garantía es de 2 años desde la fecha de compra con presentación<br />
de comprobante.<br />
32<br />
2. Se deben seguir las instrucciones de funcionamiento.<br />
3. El producto no se deberá haber dañado como resultado de modificación, uso<br />
indebido, abuso, negligencia, accidente, destrucción o alteración del número de<br />
serie, tensiones o corrientes eléctricas inadecuadas, reparación, modificación o<br />
mantenimiento por parte de cualquier persona que no sea de nuestras<br />
instalaciones de servicio o de un centro de servicio autorizado, uso o instalación de<br />
piezas de repuesto que no sean de <strong>Saitek</strong> en el producto o modificación de este<br />
producto de cualquier manera o la incorporación de este producto en cualesquiera<br />
otros productos o daños causados por accidente, incendio, inundación, rayos o<br />
fuerza mayor o por cualquier uso que viole las instrucciones suministradas por<br />
<strong>Saitek</strong> plc.<br />
4. Las obligaciones de <strong>Saitek</strong> se limitarán a reparar o sustituir la unidad por otra igual<br />
o similar, según optemos. Para obtener reparaciones de acuerdo a esta garantía,<br />
deberá presentar el producto y comprobante de compra (p. ej., una factura o un<br />
albarán) al Centro de asistencia técnica de <strong>Saitek</strong> autorizado (listado en una hoja<br />
separada empaquetada con este producto) y pagando los gastos de transporte.<br />
Cualesquiera requisitos que entren en conflicto con cualesquiera leyes, normas y/u<br />
obligaciones estatales o federales no serán aplicables en dicho territorio en<br />
particular y <strong>Saitek</strong> se atendrá a dichas leyes, normas y/u obligaciones.<br />
5. Cuando se devuelva el producto para reparar, rogamos que se empaquete con<br />
mucho cuidado, preferentemente utilizando los materiales de envasado originales.<br />
Se ruega adjuntar una nota explicativa.<br />
6. IMPORTANTE: Para ahorrarse costes e inconvenientes innecesarios, rogamos que<br />
compruebe cuidadosamente que ha leído y seguido las instrucciones de este<br />
manual.<br />
7. Esta garantía sustituye a cualesquiera otras garantías, obligaciones o<br />
responsabilidades explícitas. CUALESQUIERA GARANTÍAS, OBLIGACIONES O<br />
RESPONSABILIDADES IMPLÍCITAS, INCLUYENDO, SIN LIMITARSE A LO<br />
MISMO, LAS GARANTÍAS IMPLÍCITAS DE COMERCIABILIDAD Y APTITUD<br />
PARA UN FIN PARTICULAR, SE LIMITARÁN EN CUANTO A DURACIÓN AL<br />
PERÍODO DE ESTA GARANTÍA LIMITADA ESCRITA. Algunos estados no<br />
33
<strong>Pro</strong>_<strong>Flight</strong>_multi_panel_PP.qxd 30/04/2009 14:30 Page 34<br />
permiten limitaciones en cuanto al tiempo de duración de una garantía implícita,<br />
así que las limitaciones anteriores podrían no ser aplicables para usted. EN<br />
NINGÚN CASO SEREMOS RESPONSABLES DE NINGÚN DAÑO ESPECIAL O<br />
INDIRECTO POR INCUMPLIENTO DE ESTA O CUALESQUEIRA OTRAS<br />
GARANTÍAS, EXPLÍCITAS O IMPLÍCITAS Y DE LA NATURALEZA QUE FUESEN.<br />
Algunos estados no permiten la exclusión o limitación de daños especiales,<br />
incidentales o indirectos, así que la limitación anterior podría no aplicarse a usted.<br />
Esta garantía le da derechos legales específicos y también podría tener otros<br />
derechos, que varían entre estados.<br />
Este símbolo en el producto o en las instrucciones significa que no debería<br />
tirar a la basura doméstica el equipo eléctrico o electrónico al final de<br />
su vida útil. En los países de la UE existen sistemas de recogida<br />
separados para reciclaje. Para más información, rogamos que se<br />
ponga en contacto con la autoridad local o con el vendedor al que<br />
compró el producto.<br />
© 2009 Mad Catz Interactive Asia. <strong>Saitek</strong> and <strong>Saitek</strong> logo are trademarks or registered trademarks of Mad Catz<br />
Interactive Asia, its subsidiaries and affiliates. <strong>Saitek</strong> is owned by Mad Catz Interactive, Inc., a publicly-listed<br />
company. Mad Catz, and the Mad Catz logo are trademarks or registered trademarks of Mad Catz, Inc., its<br />
subsidiaries and affiliates. All other trademarks or registered trademarks are the property of their respective owners.<br />
© 2009 Mad Catz Interactive Asia. <strong>Saitek</strong> et <strong>Saitek</strong> logo sont des marques de commerce ou des marques<br />
déposées de Mad Catz Interactive Asia et de ses filiales ou sociétés apparentées. <strong>Saitek</strong> est une filiale de Mad<br />
Catz Interactive, Inc., une société cotée en bourse. Mad Catz, et le logo Mad Catz sont des marques de<br />
commerce ou des marques déposées de Mad Catz, Inc., de ses filiales ou de ses sociétés affiliées.Toutes les<br />
autres marques de commerce, déposées ou non, appartiennent à leurs. propriétaires respectifs.<br />
© 2009 Mad Catz Interactive Asia. <strong>Saitek</strong> y el logotipo de <strong>Saitek</strong> son marcas comerciales o marcas comerciales<br />
registradas de Mad Catz Interactive Asia, sus subsidiarias y filiales. <strong>Saitek</strong> es propiedad de Mad Catz Interactive,<br />
Inc., una compañía que cotiza en bolsa. Mad Catz, y el logotipo de Mad Catz son marcas comerciales o marcas<br />
comerciales registradas de Mad Catz, Inc., sus subsidiarias y afiliados. Todas las otras marcas y copyrights son<br />
propiedad de sus respectivos. propietarios.<br />
UK<br />
France<br />
Mad Catz Europe Limited<br />
<strong>Saitek</strong> / Mad Catz Europe Ltd.<br />
31 Shenley Pavilions, 21, Rue d'Hauteville<br />
Chalkdell Drive,<br />
Esc.B, 4ème Etage,<br />
Shenley Woods,<br />
F-75010 Paris<br />
Milton Keynes,<br />
Buckinghamshire MK5 6LB<br />
Germany<br />
USA<br />
<strong>Saitek</strong> Eleftronik<br />
Mad Catz Inc.<br />
Vertriebs GmbH<br />
7480 Mission Valley Rd<br />
Landsberger Strase 400 Suite 101<br />
81241 München, Germany San Diego , CA 92108-4406<br />
Mad Catz is a publicly traded company on the TSX/AMEX, symbol MCZ.<br />
Les actions de Mad Catz sont cotées en bourse sur le TSX/AMEX sous le symbole MCZ.<br />
Help center call numbers:<br />
www.saitek.com / www.madcatz.com<br />
+1 800 659 2287 (USA)<br />
+1 619 683 2815<br />
+44 (0)1454 451900 (UK)<br />
Made in China/ Fabriqué en Chine<br />
34<br />
35
<strong>Pro</strong>_<strong>Flight</strong>_multi_panel_PP.qxd 30/04/2009 14:30 Page 36<br />
CZ<br />
DK<br />
HR<br />
HU<br />
Vložte USB konektor do volného USB portu Vašeho PC.<br />
Vložte CD-ROM priložený <strong>Saitek</strong> <strong>Pro</strong> <strong>Flight</strong> <strong>Multi</strong> <strong>Panel</strong> do mechaniky pro ctení<br />
CD Vašeho PC. Jakmile PC detekuje CD, postupujte dle instrukcí na obrazovce,<br />
aby byla provedena instalace ovladacu, programovacího software a zprístupnen<br />
návod.<br />
<strong>Pro</strong> overení správnosti funkce <strong>Saitek</strong> <strong>Pro</strong> <strong>Flight</strong> <strong>Multi</strong> <strong>Panel</strong> Kliknete ve<br />
Windows® Taskbar na Start a vyberte Control <strong>Panel</strong>. Kliknete na ikonu Game<br />
Controllers. V okne Game Controllers zvolte <strong>Saitek</strong> <strong>Pro</strong> <strong>Flight</strong> <strong>Multi</strong> <strong>Panel</strong> a<br />
postupujte dle instrukcí na obrazovce.<br />
USB stikket i en ledig USB port på din PC.<br />
Indsæt CD-rommen der kom med <strong>Saitek</strong> <strong>Pro</strong> <strong>Flight</strong> <strong>Multi</strong> <strong>Panel</strong> I dit CD drev på<br />
din PC. Følg instruktionerne på skærmen for at installere driver softwaren og<br />
online manualen.<br />
For at teste at <strong>Saitek</strong> <strong>Pro</strong> <strong>Flight</strong> <strong>Multi</strong> <strong>Panel</strong> fungerer korrekt, skal du klikke på<br />
START i Windows menuen, vælge. Kontrolpanel - klik på spilleenheder ikonet. I<br />
vinduet vælger du <strong>Pro</strong> <strong>Flight</strong> Rudder Pedals og følger instruktionerne på<br />
skærmen.<br />
Ukljucite USB prikljucak u dostupan USB ulaz na vašem racunalu.<br />
Umetnite CD-ROM dostavljen sa <strong>Saitek</strong> <strong>Pro</strong> <strong>Flight</strong> <strong>Multi</strong> <strong>Panel</strong> u CD citac na<br />
Vašem racunalu. Slijedite upute koje ce se pojaviti na vašem zaslonu kako biste<br />
instalirali pogonske programe i pristupili on-line prirucniku.<br />
Kako biste iskušali radi li <strong>Saitek</strong>ov <strong>Saitek</strong> <strong>Pro</strong> <strong>Flight</strong> <strong>Multi</strong> <strong>Panel</strong> ispravno,<br />
pritisnite Start na programskoj traci Windowsa® i odaberite Control <strong>Panel</strong>.<br />
Pritisnite Game Controllers ikonu na zaslonu. U Game Controllers prozorcicu<br />
odaberite <strong>Saitek</strong> <strong>Pro</strong> <strong>Flight</strong> <strong>Multi</strong> <strong>Panel</strong> i slijedite upute koje ce se pojaviti na<br />
Vašem zaslonu.<br />
Polacz koncówke USB z dostepnym portem USB w komputerze PC.<br />
Helyezze be a termékhez mellékelt CD-ROM-ot a számítógépe CD írójába.<br />
Kövesse a monitoron megjeleno utasításokat, hogy installálja a meghajtó<br />
NL<br />
NO<br />
PL<br />
programot és elérje az online használati utasítást.<br />
Ahhoz, hogy ellenorizhesse, hogy a <strong>Saitek</strong> <strong>Pro</strong> <strong>Flight</strong> <strong>Multi</strong> <strong>Panel</strong> termék jól<br />
funkcionál, kattintson a Start menübe és válassza ki a Control <strong>Panel</strong>t. Kattintson<br />
a Game Controller ikonra, ebben az ablakban válassza ki a <strong>Saitek</strong> <strong>Pro</strong> <strong>Flight</strong><br />
<strong>Multi</strong> <strong>Panel</strong> terméket és kövesse a képernyon lévo utasításokat.<br />
Sluit de USB connector in een beschikbare USB poort van uw computer.<br />
Plaats de CD-ROM welke is meegeleverd met de <strong>Saitek</strong> <strong>Pro</strong> <strong>Flight</strong> <strong>Multi</strong> <strong>Panel</strong> in<br />
de CD-Rom speler van de computer. Volg de instructies op het scherm om de<br />
driver te installeren en om de online handleiding te raadplegen.<br />
Om te testen of de <strong>Saitek</strong> <strong>Pro</strong> <strong>Flight</strong> <strong>Multi</strong> <strong>Panel</strong> goed functioneert, klik op<br />
START op de windows taakbalk en selecteer Configuratiescherm. Klik op het<br />
spelbesturings ikoontje. In het spelbesturings scherm selecteert u de <strong>Saitek</strong> <strong>Pro</strong><br />
<strong>Flight</strong> <strong>Multi</strong> <strong>Panel</strong> en volgt u de instructies op het scherm.<br />
Koble inn USB kontakten i en ledig USB-port på din PC.<br />
Sett i CD-ROM platen som følger med <strong>Saitek</strong> <strong>Pro</strong> <strong>Flight</strong> <strong>Multi</strong> <strong>Panel</strong> i CDspilleren<br />
på din PC. Følg deretter instruksjonene på skjermen for å innstallere<br />
driver-rutiner og for å komme til "online-manualen".<br />
For å teste at din <strong>Saitek</strong> <strong>Pro</strong> <strong>Flight</strong> <strong>Multi</strong> <strong>Panel</strong> fungerer korrekt, klikk på Start på<br />
Windows® aktivitetsfelt og velg deretter Kontrollpanelet - klikk på ikonet for<br />
Spillenheter. Velg <strong>Saitek</strong> <strong>Pro</strong> <strong>Flight</strong> <strong>Multi</strong> <strong>Panel</strong> under spillenhetsvinduet og følg<br />
instruksjonene på skjermen.<br />
Polacz koncówke USB z dostepnym portem USB w komputerze PC.<br />
Umiesc zalaczony dysk CD, po czym w celu zainstalowania sterowników lub<br />
instrukcji obslugi online, postepuj wedlug instrukcji pojawiajacych sie na ekranie.<br />
Aby sprawdzic, czy kontroler funkcjonuje poprawnie, kliknij START na pasku<br />
narzedzi, po czym wybierz <strong>Panel</strong> Kontrolny (Control <strong>Panel</strong> ), nastepnie kliknij w<br />
ikone Kontrolery Gier (Game Controllers ). W oknie Kontrolery Gier (Game<br />
Controllers ) wybierz <strong>Saitek</strong> <strong>Pro</strong> <strong>Flight</strong> <strong>Multi</strong> <strong>Panel</strong> i postepuj wedlug instrukcji<br />
pojawiajacych sie na ekranie.<br />
36<br />
37
<strong>Pro</strong>_<strong>Flight</strong>_multi_panel_PP.qxd 30/04/2009 14:30 Page 38<br />
PT<br />
SE<br />
TR<br />
Conecte o cabo USB em qualquer porta USB disponível em seu PC.<br />
<strong>Saitek</strong> <strong>Pro</strong> <strong>Flight</strong> <strong>Multi</strong> <strong>Panel</strong> Insira o CD que acompanha o <strong>Saitek</strong> <strong>Pro</strong> <strong>Flight</strong><br />
<strong>Multi</strong> <strong>Panel</strong> no CD-ROM no seu PC. Siga as instruções que aparecera no écran<br />
para instalar o driver software e para acessar o manual online.<br />
Para testar que o <strong>Saitek</strong> <strong>Pro</strong> <strong>Flight</strong> <strong>Multi</strong> <strong>Panel</strong> está funcionando corretamente,<br />
clique na opçâo Start (Inicio) da barra de tarefas do Windows® e seleccione<br />
entâo Control <strong>Panel</strong>.- Clica no icon Game Controllers (Controladores de Jogo).<br />
Na janela de Game Controllers (Controladores de Jogo) seleciona <strong>Saitek</strong> <strong>Pro</strong><br />
<strong>Flight</strong> <strong>Multi</strong> <strong>Panel</strong> e siga as instruções que aparecerâo no écran.<br />
Koppla in USB kontakten i en ledig USB-port på din PC.<br />
Sätt I CD-ROM skivan som medföljer <strong>Saitek</strong> <strong>Pro</strong> <strong>Flight</strong> <strong>Multi</strong> <strong>Panel</strong> i CD-spelaren<br />
på din PC. Följ därefter instruktionerna på skärmen för att installera drivrutiner<br />
och för att komma åt online maualen.<br />
För att testa att din <strong>Saitek</strong> <strong>Pro</strong> <strong>Flight</strong> <strong>Multi</strong> <strong>Panel</strong> fungerar korrekt klicka på Start<br />
på Windows® aktivitetsfält och välj därefter Kontrollpanelen - klicka på ikonen för<br />
Spelenheter. Välj <strong>Saitek</strong> <strong>Pro</strong> <strong>Flight</strong> <strong>Multi</strong> <strong>Panel</strong> under spelenhetsfönstret och följ<br />
instruktionerna på skärmen.<br />
USB ara birimini PC'nizin uygun bir USB portuna takiniz.<br />
<strong>Saitek</strong> <strong>Pro</strong> <strong>Flight</strong> <strong>Multi</strong> <strong>Panel</strong> ile birlikte verilen CD'nizi CD sürücünüze<br />
yerlestiriniz.. Yazilimi yüklemek ve on-line kilavuza ulasmak için ekranda çikan<br />
talimatlari izleyiniz.<br />
<strong>Saitek</strong> <strong>Pro</strong> <strong>Flight</strong> <strong>Multi</strong> <strong>Panel</strong> ürününün dogru çalisip çalismadigini test etmek için,<br />
Windows® araç çubugunda bulunan Start "Baslangiç"tan, Control <strong>Panel</strong> "Denetin<br />
Masasi"ni açin .- Game Controllers "Oyun Kumandalari" ikonuna tiklayin. Açilan<br />
Game Controllers "Oyun Kumandalari" penceresinde <strong>Saitek</strong> <strong>Pro</strong> <strong>Flight</strong> <strong>Multi</strong><br />
<strong>Panel</strong> ürününü seçin ve ekrandaki talimatlari izleyin.<br />
GR<br />
RU<br />
<strong>Saitek</strong> <strong>Pro</strong> <strong>Flight</strong> <strong>Multi</strong> <strong>Panel</strong>,<br />
<strong>Saitek</strong> <strong>Pro</strong> <strong>Flight</strong> <strong>Multi</strong> <strong>Panel</strong>,<br />
<strong>Saitek</strong> <strong>Pro</strong> <strong>Flight</strong> <strong>Multi</strong> <strong>Panel</strong>,<br />
<strong>Saitek</strong> <strong>Pro</strong> <strong>Flight</strong> <strong>Multi</strong> <strong>Panel</strong>,<br />
<strong>Saitek</strong> <strong>Pro</strong> <strong>Flight</strong> <strong>Multi</strong> <strong>Panel</strong>,<br />
<strong>Saitek</strong> <strong>Pro</strong> <strong>Flight</strong> <strong>Multi</strong> <strong>Panel</strong>,<br />
<strong>Saitek</strong> <strong>Pro</strong> <strong>Flight</strong> <strong>Multi</strong> <strong>Panel</strong><br />
<strong>Saitek</strong> <strong>Pro</strong> <strong>Flight</strong> <strong>Multi</strong> <strong>Panel</strong><br />
<strong>Saitek</strong> <strong>Pro</strong> <strong>Flight</strong> <strong>Multi</strong> <strong>Panel</strong><br />
38<br />
39
<strong>Pro</strong>_<strong>Flight</strong>_multi_panel_PP.qxd 30/04/2009 14:30 Page 40<br />
40<br />
41
<strong>Pro</strong>_<strong>Flight</strong>_multi_panel_PP.qxd 30/04/2009 14:30 Page 42<br />
© 2009 Mad Catz Interactive Asia, <strong>Saitek</strong> and <strong>Saitek</strong> logo are trademarks or registered trademarks of Mad Catz<br />
Interactive Asia, its subsidiaries and affiliates. <strong>Saitek</strong> is owned by Mad Catz Interactive, Inc., a publicly-listed<br />
company. Mad Catz, and the Mad Catz logo are trademarks or registered trademarks of Mad Catz, Inc., its<br />
subsidiaries and affiliates. All other trademarks or registered trademarks are the property of their respective owners.<br />
© 2009 Mad Catz Interactive Asia, <strong>Saitek</strong> et <strong>Saitek</strong> logo sont des marques de commerce ou des marques<br />
déposées de Mad Catz Interactive Asia et de ses filiales ou sociétés apparentées. <strong>Saitek</strong> est une filiale de Mad<br />
Catz Interactive, Inc., une société cotée en bourse. Mad Catz, et le logo Mad Catz sont des marques de<br />
commerce ou des marques déposées de Mad Catz, Inc., de ses filiales ou de ses sociétés affiliées.Toutes les<br />
autres marques de commerce, déposées ou non, appartiennent à leurs. propriétaires respectifs.<br />
© 2009 Mad Catz Interactive Asia, <strong>Saitek</strong> y el logotipo de <strong>Saitek</strong> son marcas comerciales o marcas comerciales<br />
registradas de Mad Catz Interactive Asia, sus subsidiarias y filiales. <strong>Saitek</strong> es propiedad de Mad Catz Interactive,<br />
Inc., una compañía que cotiza en bolsa. Mad Catz, y el logotipo de Mad Catz son marcas comerciales o marcas<br />
comerciales registradas de Mad Catz, Inc., sus subsidiarias y afiliados. Todas las otras marcas y copyrights son<br />
propiedad de sus respectivos. propietarios.<br />
UK<br />
France<br />
Mad Catz Europe Limited<br />
<strong>Saitek</strong> / Mad Catz Europe Ltd.<br />
31 Shenley Pavilions, 21, Rue d'Hauteville<br />
Chalkdell Drive,<br />
Esc.B, 4ème Etage,<br />
Shenley Woods,<br />
F-75010 Paris<br />
Milton Keynes,<br />
Bucks MK5 6LB<br />
Germany<br />
USA<br />
<strong>Saitek</strong> Eleftronik<br />
Mad Catz inc.<br />
Vertriebs GmbH<br />
7480 Mission Valley Rd<br />
Landsberger Strase 400 Suite 101<br />
81241 München San Diego , CA 92108-4406<br />
Mad Catz is a publicly traded company on the TSX/AMEX, symbol MCZ.<br />
Les actions de Mad Catz sont cotées en bourse sur le TSX/AMEX sous le symbole MCZ.<br />
Help center call numbers:<br />
+1 800 659 2287 (USA)<br />
+1 619 683 2815 (USA)<br />
+44 (0)1454 451900 (UK)<br />
Made in China/ Fabriqué en Chine<br />
www.saitek.com<br />
www.madcatz.com<br />
42<br />
43
<strong>Pro</strong>_<strong>Flight</strong>_multi_panel_PP.qxd 30/04/2009 14:30 Page 44<br />
<strong>Saitek</strong> ®<br />
<strong>Pro</strong> FIight <strong>Multi</strong> <strong>Panel</strong><br />
www.saitek.com<br />
Version 1.0 - 24/04/09<br />
PZ70<br />
44