You also want an ePaper? Increase the reach of your titles
YUMPU automatically turns print PDFs into web optimized ePapers that Google loves.
2. Dilation of Stricture<br />
Generally, predilation is not performed on malignant strictures.<br />
However, if it is determined that predilation is necessary, use<br />
standard balloon dilation techniques. Remove the balloon<br />
catheter from the patient while maintaining stricture access<br />
with the guidewire.<br />
3. Introduction of Stent Delivery System<br />
Advance the device over the guidewire and through the sheath.<br />
WArNINg: If resistance is encountered at any time during<br />
the insertion procedure, do not force passage. resistance<br />
may cause damage to stent or duct. Carefully withdraw the<br />
stent system without deploying the stent.<br />
4. Stent Deployment<br />
a. Advance the delivery system until the distal (leading) radiopaque<br />
inner shaft marker is distal to the target stricture.<br />
b. Pull back on the delivery system until there is no slack in<br />
the delivery system and the radiopaque inner shaft markers<br />
extend distal and proximal to the target stricture.<br />
c. Open the safety lock by turning the knob counterclockwise.<br />
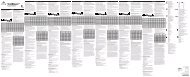
d. Initiate stent deployment by pinning down (holding) the<br />
inner shaft (proximal grip) in a fixed position and pulling the<br />
outer sheath (distal grip) toward the proximal grip as shown<br />
in Figure 2.<br />
e. Once initial deployment is visible and prior to achieving duct<br />
apposition, reposition stent as needed using radiopaque<br />
markers.<br />
Note: It is recommended to lock the safety lock in order to<br />
ensure that there is no relative movement between the grips<br />
during repositioning.<br />
CAUtIoN: the stent is not designed for either repositioning<br />
after establishing duct apposition or recapturing.<br />
f. During release of the stent, the whole length of the flexible<br />
deployment system should be kept as straight as possible. In<br />
order to ensure that no slack is introduced in to the delivery<br />
system, hold the proximal grip stationary and fixed. Deployment<br />
is complete when the outer sheath marker passes the<br />
proximal inner shaft stent marker and the stent is released.<br />
WArNINg: If resistance is felt when initially pulling back<br />
on the distal grip, do not force deployment. Carefully withdraw<br />
the stent system without deploying the stent.<br />
Distal<br />
Grip<br />
PULL PIN<br />
Figure 2: Stent Deployment<br />
Proximal<br />
Grip<br />
Figure 1: Delivery System<br />
CAUtIoN: Failure to hold the proximal grip in a fixed<br />
position could lead to partial deployment, foreshortening,<br />
lengthening or increased deployment force.<br />
CAUtIoN: the stent is not designed to be stretched past its<br />
nominal length.<br />
Note: If a second stent is needed, place the more distal stent<br />
first. If overlap of sequential stents is necessary, the amount of<br />
overlap should be kept to a minimum.<br />
CAUtIoN: the effects of overlapping stents have not been<br />
evaluated.<br />
5. Post Stent Deployment<br />
a. While using fluoroscopy, withdraw the entire delivery system<br />
as one unit, over the guidewire, into the catheter sheath<br />
and out of the body. Remove the delivery system from the<br />
guidewire.<br />
WArNINg: If resistance is met during delivery system<br />
withdrawal, advance the outer sheath until the outer<br />
sheath marker contacts the catheter tip and withdraw the<br />
system as one unit.<br />
b. Using fluoroscopy, visualize the stent to verify full deployment.<br />
c. If incomplete expansion exists within the stent at any point<br />
along the stricture, post deployment balloon dilation can be<br />
performed.<br />
CAUtIoN: Use caution when crossing a deployed stent with<br />
any adjunct device.<br />
CAUtIoN: Stent should not be expanded past its nominal<br />
diameter.<br />
Select an appropriate size balloon catheter that is labeled<br />
for biliary stent deployment and/or optimization, and dilate<br />
the stricture with conventional technique. The inflation<br />
diameter of the balloon used for post dilation should<br />
approximate the diameter of the reference biliary duct.<br />
Remove the balloon from the patient.<br />
d. Remove the guidewire and sheath from the body.<br />
e. Close entry wound as appropriate.<br />
f. Discard the delivery system, guidewire and sheath.<br />
Note: Physician experience and discretion will determine the<br />
appropriate drug regimen for each patient.<br />
MrI Compatibility<br />
The stent is MRI safe and does not interfere with, nor is affected<br />
by, the operation of an MRI device. 1<br />
1 MR Imaging Artifacts, Ferromagnetism, and Magnetic Torque of<br />
Intravascular Filters, Stents, and Coils, Radiology 1988, 166: 657-664.