Lib.ist.F100 TSE.pmd - Airforce
Lib.ist.F100 TSE.pmd - Airforce
Lib.ist.F100 TSE.pmd - Airforce

You also want an ePaper? Increase the reach of your titles
YUMPU automatically turns print PDFs into web optimized ePapers that Google loves.
GB<br />
Installation<br />
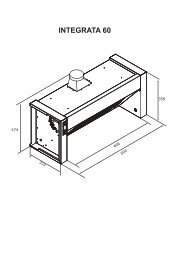
The cooker hood must be placed at a minimum d<strong>ist</strong>ance of 65<br />
cm from the cooking plane for electric cookers and 75cm for<br />
gas or mixed cookers.<br />
If the instructions for installation for the gas hob specify a greater<br />
d<strong>ist</strong>ance, this has to be taken into account.<br />
Do not tile, grout or silicone this appliance to the wall. Surface<br />
mounting only. Do not fix chimney flue to furniture or fly over<br />
shelves unless the chimney flue can be easily removed, in<br />
case maintenance is ever required.<br />
Use<br />
The cooker hood is provided with an upper air exit B for<br />
discharging fumes externally for models including chimney<br />
flue C ( Suction Version A- exhaust pipe not supplied).<br />
If cooking fumes and vapours cannot be externally discharged,<br />
the cooker hood can be used in the recirculating version<br />
F: the installation of 1 active charcoal filter F allows the<br />
recirculation of fumes and vapours through the upper grid G.<br />
Electrical connection<br />
Make sure that there is a power socket near the hood and<br />
that the system has a 30 mA differential. The mains voltage<br />
must be the same as that on the label inside the hood. The<br />
hood has a 1250 mm power cable with or without plug: if it<br />
does have a plug, connect the hood to an accessible<br />
approved socket; or if it does not (connection direct to the<br />
mains), fit an approved bipolar switch with a minimum<br />
contact opening of no less than 3 mm (accessible). This<br />
installation and electrical connection must be executed by a<br />
qualified technician.<br />
Operation<br />
INSTRUCTION ON MOUNTING AND USE<br />
Check also the drawings on the initial pages with the alphabetical<br />
and numerical references in the explanatory text.<br />
Closely follow the instructions in this manual. We cannot<br />
accept liability for any faults, detriment or fire damage to the<br />
appliance due to non-compliance with the manual’s<br />
instructions. Installation and electrical connections must be<br />
executed by a qualified technician. You should affix the hood<br />
to a wall of sufficient weight-bearing capacity, so not to one<br />
made of plasterboard. Do not install it inside a cupboard.<br />
Attach it to the wall using the anchors provided: Fig. 3 diameter<br />
12, Fig. 5 diameter 8.<br />
D: Increase extraction speed (power) key: press this touch<br />
sensor to increase the extraction speed of the hood.<br />
E: Timer key: irrespective of the extraction speed selected,<br />
touching the key will activate the timer function for 5 minutes<br />
(during this phase a dot will flash on and off on the display). To<br />
reset the timer operate the E motor key.<br />
F: Filters reset key: touching this key will reset the metal<br />
anti-grease filter (1) saturation and carbon filter replacement (2)<br />
warning.<br />
(1) After the hood has been operating for 40 hours, the<br />
“FG“or”G” symbol on the display will begin to<br />
flash, indicating the need to clean the metal antigrease<br />
filters.<br />
(2) After the hood has been operating for 120 hours,<br />
the “FC”or”C” symbol on the display will begin to<br />
flash, indicating the need to clean the active carbon<br />
filters.<br />
Sensor function: Touching keys ‚C‘ and ‚D‘ simultaneously<br />
will activate the sensor. In this mode the extraction speed will<br />
set itself automatically causing keys C and D to flash<br />
intermittently. Operate key ‘C’ or ‘D’ to resume manual operation.<br />
Maintenance<br />
Prior to any maintenance operation ensure that the cooker hood<br />
is disconnected from the electrical outlet.<br />
Cleaning:<br />
The hood must be cleaned frequently both inside (apart from<br />
the area behind the grease filter) and outside. Use a cloth<br />
mo<strong>ist</strong>ened with denatured alcohol or neutral liquid detergents.<br />
Never use products containing abrasives.<br />
Warning: Failure to carry out the basic standards of the cleaning<br />
of the cooker hood and replacement of the filters may cause fire<br />
risks. Therefore we recommend observing these instructions.<br />
Anti-grease Filter – must be cleaned once a month, with non<br />
abrasive detergents, by hand or in dishwasher on low temperature<br />
and short cycle.<br />
When washed in a dishwasher, the grease filter may discolour<br />
slightly, but this does not affect its filtering capacity.<br />
A B C D E F<br />
A: Light ON/OFF key: press this touch sensor to switch on<br />
or off the lights of the hood.<br />
C: Motor ON/OFF key (4 speed): press this touch sensor to<br />
switch on the hood extractor fan at the same speed as it was<br />
when last switched off. Use the „D“ and „B“ keys to vary the<br />
speed (power) of extraction.<br />
Charcoal Filter - (only for filter version):<br />
The active charcoal filters F are not washable nor regenerative.<br />
It should be changed every 6 months in normal use.<br />
The active charcoal filters capture unpleasant cooking odours.<br />
Replacing lightbulbs<br />
Warning! Prior to touching the light bulbs ensure they are cooled<br />
down.<br />
Extract the lamp cover by levering it off with a small screwdriver<br />
or similar tool.<br />
Replace the damaged light bulb. Only use halogen bulbs of 20W<br />
max (G4), making sure you do not touch them with your hands.<br />
Close the lamp cover (it will snap shut).<br />
B: Decrease extraction speed (power) key: press this touch<br />
sensor to reduce the extraction speed of the hood.<br />
6