Create successful ePaper yourself
Turn your PDF publications into a flip-book with our unique Google optimized e-Paper software.
7 English<br />
Additional safety rules for wall chasers<br />
Always<br />
wear safety<br />
goggles<br />
Always<br />
wear safety<br />
shoes<br />
Always<br />
wear<br />
safety<br />
gloves<br />
Always<br />
wear dust<br />
mask<br />
Instructions before use<br />
Always wear<br />
ear<br />
protection<br />
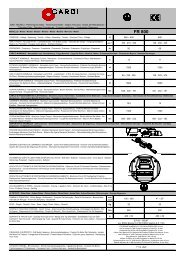
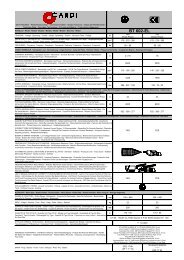
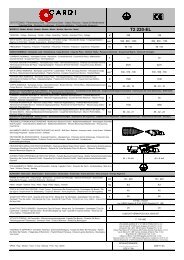
Read carefully the data written on the Technical<br />
Data sheet that you will find in the package<br />
together with your product.<br />
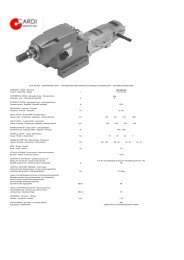
In the following text, figures are identified by numbers,<br />
details inside the figures by letters. Figures are depicted on<br />
the first pages of this user manual.<br />
Power supply<br />
Extension cords<br />
• when you have to operate with your wall chaser far<br />
from an outlet, you can use an extension cord. If<br />
you use it make sure that the section of the cord is<br />
suitable;<br />
• the extension cord (made up of cable, plug and<br />
socket) must be suitable for outdoor use. It is better<br />
if the cord is made of rubber and it is H07RN-F;<br />
• follow the chart shown in figure 14 on this manual<br />
for the choice of the right section of the conductors;<br />
• if you use more than one extension cord make sure<br />
that every cable in each extension cord has a<br />
section not lower than the value shown on the chart<br />
in figure 14, considering the total length of the<br />
extension cords;<br />
• remember the longer an extension cord the higher<br />
the drop in voltage. This causes loss of rpm and<br />
therefore cooling as well as loss of power<br />
operating your wall chaser. Don’t use extension<br />
cords if you have to operate too far from the<br />
electrical outlet.<br />
Preliminary operations<br />
In order to prepare your wall chaser to operate, proceed as<br />
follows, make sure before you start that your machine is<br />
unplugged.<br />
• set the B handle (figure 1) in one of the two<br />
possible positions. To change the position of the<br />
handle, loosen the wing-nut, when the handle is not<br />
engaged turn it (see figure 6). Before tightening the<br />
wing nut, make sure the handle is engaged (pins go<br />
into the holes). Before operating, make sure the<br />
handle is securely fastened;<br />
Warning: not using auxiliary and main handles<br />
can result in loss of control of your wall chaser<br />
and serious personal injury.<br />
• connect an industrial vacuum cleaner to the wall<br />
chaser according to the direction given in the Dust<br />
extraction paragraph;<br />
• insert the blade/s according to the instruction given<br />
in the Blade mounting or replacement paragraph;<br />
• if available, set the cutting depth according to the<br />
paragraph Setting the cutting depth.<br />
ON/OFF switch<br />
See figure 5 in order to understand how to use the switch<br />
(figure 2 E).<br />
Your switch is equipped with a safety lock device. With this<br />
device you can switch on the motor only if you follow first<br />
step I and than step II, as shown in figure 5. This prevents<br />
the wall chaser from starting accidentally.<br />
Warning: after switching off, the machine will<br />
not be idle immediately.<br />
Checks and precautions to avoid<br />
structural damages and damages to<br />
objects<br />
Before starting any cutting activity, talk with the construction<br />
manager or the planner in order to make sure that the cut<br />
doesn’t:<br />
• make any damage to the structure of the building<br />
and doesn’t change the structural characteristics of<br />
the construction;<br />
• damage any water or gas pipeline or any electrical<br />
circuits.<br />
Blade choice<br />
Your <strong>Cardi</strong> wall chaser has been designed to make grooves<br />
into building materials such as concrete, reinforced<br />
concrete, bricks, masonry, natural stone, tiles etc, using<br />
laser welded diamond blades (figure 8 and 9).<br />
Warning: Do NOT use circular saw blades or<br />
other kind of blades not laser-welded. Failure to<br />
follow this warning may result in serious personal<br />
injury. See figure 8 and 9.<br />
Ask your dealer about the best blade for your application.<br />
You can mount to your machine, depending on your model,<br />
2 or 3 blades. See the Technical data sheet that you will find<br />
in the package for dimensional limits of blades. The blade<br />
must have maximum rotating speed (provided by the blade<br />
manufacturer), higher than the maximum rotating speed of<br />
the arbor of your wall chaser, shown on the data plate (see<br />
figure 7).<br />
Use blades with diameter, arbor hole and rotating speed<br />
compatible with your specific wall chaser model. Use of<br />
blades with inappropriate dimensions can result in<br />
misalignment, vibrations, irregular rotation and loss of<br />
control causing serious injury.<br />
Check the blade before use. Do not use damaged blades.<br />
Mounting the blade and setting the cutting<br />
width<br />
Before mounting or replacing the blades, make sure the wall<br />
chaser is unplugged. For blades mounting or replacement,<br />
proceed as follows, referring to figure 10:<br />
• remove the protective cover by loosen the screws<br />
with a screwdriver (10/A);<br />
• loosen and remove the blade-tightening screw<br />
using the Allen key provided. Than remove the<br />
flange. See figure 10/B;<br />
• remove the spacing washers (10/C);<br />
• insert the blades, placing the spacing washers<br />
between them (see figures 10/D and 10/E). You<br />
can set the cutting width positioning a different<br />
number of spacing washers between the blades.<br />
Depending on your model, you can mount 2 or 3<br />
blades;<br />
• when the blades and ALL spacing washers have<br />
been positioned, assemble the flange (10/F);<br />
• tighten the blade tightening screw, making sure the<br />
blades are firmly fastened (10/G);<br />
Warning: before operating always ensure the<br />
blades are firmly fastened.