
Create successful ePaper yourself
Turn your PDF publications into a flip-book with our unique Google optimized e-Paper software.
MDV 6110 BT<br />
BLUETOOTH<br />
DVD/Mpeg4 PLAYER<br />
USB IN<br />
SD CARD IN<br />
RADIO RIPRODUTTORE DVD/Mpeg4/<br />
CD/MP3 RDS CON INGRESSO USB/<br />
SD CARD E SISTEMA BLUETOOTH<br />
Manuale d'uso e collegamento<br />
RDS SYSTEM CAR-STEREO DVD/<br />
Mpeg4/CD/MP3 PLAYER BLUETOOTH<br />
Instruction manual
<strong>ITA</strong>LIANO<br />
<strong>ITA</strong>LIANO<br />
PRIMA DELL'INSTALLAZIONE<br />
ATTENZIONE: Rimuovere le viti di bloccaggio della meccanica prima di installare l'apparecchio.<br />
Se non venissero rimosse non sarà possibile inserire alcun tipo di CD/DVD.<br />
INFORMAZIONI SULLA SICUREZZA<br />
2<br />
MDV 6110 BT<br />
1. Il prodotto è stato progettato per funzionare in modalità DVD e tutte le funzioni video a veicolo fermo (con<br />
freno a mano inserito).<br />
2. Rispettare i collegamenti elettrici come da schema di collegamento.<br />
3. Per la sicurezza di chi guida il prodotto deve funzionare in modalità DVD e tutte le funzioni video solo a<br />
veicolo fermo (con freno a mano inserito) e quindi non manomettere o modificare il collegamento d' installazione.<br />
4. Utilizzare solamente parti contenute nella confezione. L'uso di parti non incluse può causare danneggiamenti o<br />
malfunzionamenti.<br />
5. Il laser potrebbe danneggiarsi alle alte temperature. Evitare l'installazione dell'unità in ambienti molto caldi.<br />
6. Se l'angolo di installazione dell'unità è maggiore di 30°, l'apparecchio potrebbe non fornire le sue ottime performance.<br />
Bluetooth<br />
r r<br />
Bluetooth è una tecnologia di connettività radio (wireless) a breve distanza sviluppata per l'utilizzo di cellulari, PC palmari<br />
e altri dispositivi. Bluetooth funziona ad un intervallo di frequenza di 2,4 GHz e trasmette voce e dati alla velocità di<br />
1megabit al secondo.
<strong>ITA</strong>LIANO<br />
<strong>ITA</strong>LIANO<br />
DESCRIZIONE COLLEGAMENTI.<br />
INGRESSO MICROFONO<br />
FILO GRIGIO SCURO/SPINOTTO BIANCO/ROSSO USCITE AUDIO FRONTALI SINISTRA/DESTRA<br />
FILO GRIGIO/SPINOTTO GIALLO USCITE VIDEO 1-2<br />
FILO GRIGIO CHIARO SPINOTTO BIANCO/ROSSO USCITE AUDIO POSTERIORI SINISTRA/DESTRA<br />
FILO MARRONE/SPINOTTO MARRONE USC<strong>ITA</strong> SUBWOOFER<br />
FILO MARRONE SPINOTTO GIALLO INGRESSO VIDEO CAMERA POSTERIORE<br />
INGRESSO CONNETTORE ISO<br />
INNESTO FILI CONNETTORE ISO<br />
Freno di parcheggio<br />
Interrutore del freno di parcheggio<br />
nell'automobile<br />
3<br />
MICROFONO ESTERNO<br />
MDV 6110 BT<br />
1.GIALLO BATT+ 12V<br />
2.GRIGIO POSITIVO ALTOPARLANTE FRONTALE DESTRO<br />
3. GRIGIO/NERO NEGATIVO ALTOPARLANTE FRONTALE DESTRO<br />
4.PORPORA POSITIVO ALTOPARLANTE POSTERIORE DESTRO<br />
5.VIOLA/NERO NEGATIVO ALTOPARLANTE POSTERIORE DESTRO<br />
6.ROSSO +12V DEL POWER<br />
7.BLU ANTENNA ELETTRICA/AMPLIFICATORE +12V<br />
8.NON PRESENTE SUL MODELLO<br />
9.NERO MASSA<br />
10.BIANCO POSITIVO ALTOPARLANTE PRONTALE SINISTRO<br />
11.BIANCO/NERO NEGATIVO ALTOPARLANTE PRONTALE SINISTRO<br />
12.VERDE POSITIVO ALTOPARLANTE POSTERIORE SINISTRO<br />
13.VERDE/NERO NEGATIVO ALTOPARLANTE POSTERIORE SINISTRO<br />
14.NON PRESENTE NEL MODELLO<br />
15. MARRONE PARKING BRAKE<br />
16. ARANCIONE +12V REVERSE LIGHT<br />
(Connessione della linea del parking brake dell'apparecchio con il sistema parking brake dell'automobile)<br />
Filo marrone del freno di parcheggio<br />
Alla parte metallica o telaio dell'auto
<strong>ITA</strong>LIANO<br />
<strong>ITA</strong>LIANO<br />
COMANDI FRONTALI<br />
COMANDI INTERNO FRONTALE<br />
DESCRIZIONE COMANDI FRONTALE<br />
1. Tasto PWR/BACK, accensione e spegnimento unità.<br />
2. Tasto MODE, seleziona una delle quattro modalità:<br />
radio, cd-dvd, BT(Bluetooth) e AV.<br />
3. Tasti >>I o I
<strong>ITA</strong>LIANO<br />
<strong>ITA</strong>LIANO<br />
1.<br />
4.<br />
3.<br />
5.<br />
7.<br />
2.<br />
21.<br />
20.<br />
23.<br />
24.<br />
DESCRIZIONE TASTI TELECOMANDO<br />
22.<br />
8.<br />
6.<br />
10.<br />
25.<br />
27.<br />
11.<br />
13.<br />
12.<br />
15.<br />
14.<br />
26.<br />
28.<br />
29.<br />
30.<br />
9.<br />
16.<br />
17.<br />
31.<br />
32.<br />
18. 19.<br />
1. Tasto POWER, accensione, spegnimento.<br />
2. Tasto MODE, selezione una delle quattro modalità:<br />
Radio, CD-DVD, BT(Bluetooth) e AV.<br />
3. Tasto DISP, premere in sequenza per visualizzare le<br />
informazioni sui Titoli e Capitoli. Chiude una chiamata<br />
in BT (Bluetooth).<br />
4. Tasto P/N, seleziona un un tipo di sistema video, tra<br />
PAL, MULTI, NTSC.<br />
5. Tasto SETUP, regolazione impostazioni generali<br />
6. Tasti di navigazione ����, su e giù<br />
7. ENTER, tasto di conferma, accesso voci dei sottomenu<br />
8. Tasto >>I NEXT, avanti frequenze Radio/CD-DVD<br />
spostamento nei menu<br />
9. Tasto I
<strong>ITA</strong>LIANO<br />
<strong>ITA</strong>LIANO<br />
ACCENSIONE<br />
6<br />
MDV 6110 BT<br />
ACCENSIONE E SPEGNIMENTO<br />
Premete il tasto PWR/BACK(1) sul frontale dell'autoradio per accendere l’apparecchio, se non si accende tenerlo premuto<br />
per qualche secondo; per spegnere l’apparecchio, usare lo stesso tasto.<br />
Nota<br />
Se all'interno dell'apparecchio vi è un disco inserito, l'autoradio si accendera in modalità CD/<br />
DVD, diversamente appare la stazione radio preselezionata.<br />
APERTURA E CHIUSURA FRONTALINO<br />
Premete il tasto REL (12) per abbassare il forntale e quindi inserire un disco oppure estrarre il frontalino dell'unità.<br />
Richiudere il frontale verso l'interno per utilizzare l'autoradio.<br />
SELEZIONE SORGENTE<br />
Premete in sequenza il tasto MODE (2) del telecomando per selezionare la sorgente da riprodurre. Le sorgenti disponibili<br />
sono: RADIO, AV e BT (Bluetooth). Le sorgenti CD/DVD, MP3 e SD CARD sono disponibili solo se sono presenti i<br />
relativi supporti.<br />
MENU PRINCIPALE<br />
Premete sul controllo volume VOL (5) sul frontale dell'apparecchio, oppure premere il tasto MENU (24) dal telecomando.<br />
Sullo schermo compare il menu di regolazione AUDIO/PICTURE/SETUP, premere i tasti freccia (3) a sinistra del frontale<br />
e posizionarsi sulla voce AUDIO, confermare premendo sul controllo volume (5) oppure utilizzare il tasto ENTER(7)<br />
sul telecomando.<br />
AUDIO<br />
Nella schermata regolazione AUDIO compariranno le seguenti funzioni:<br />
VOLUME<br />
ruotate il controllo volume VOL (5) sul frontale dell'apparecchio, in senso orario/antioraio per aumentare/diminuire il<br />
volume o premere i tasti VOL+ e VOL- (13) del telecomando;<br />
BASS E TREBLE<br />
queste funzioni regolano rispettivamente i toni BASSI e i toni ALTI;<br />
REGOLAZIONE BALANCE<br />
questa funzione bilancia l'ascolto del suono verso gli altoparlanti destri o sinistri.<br />
REGOLAZIONE FADER<br />
questa funzione bilancia l'ascolto del suono verso gli altoparlanti frontali o posteriori.<br />
EQ<br />
questa funzione permette di selezionare delle equalizzazioni preimpostate tra: POP - ROCK - FLAT - CLASS.<br />
LOUD<br />
questa funzione esalta i toni bassi a basso volume, garantendovi un ascolto migliore.<br />
SUB.W<br />
questa funzione vi permette di attivare-disattivare un eventuale subwoofer (opzionale - se collegato).<br />
PICTURE<br />
Seguire la stessa procedura vista nel menù principale, per posizionarsi alla voce PICTURE compariranno le seguenti<br />
funzioni:<br />
BRIGHT (luminoso)<br />
questa funzione permette di regolare la luminosità dell'immagine.<br />
CONTRAST (contrasto)<br />
questa funzione permette di regolare il contrasto dell'immagine.<br />
COLOR (colore)<br />
questa funzione permette di regolare il colore dell'immagine.<br />
TINT (tono)<br />
questa funzione è attiva solamente con il sistema colore NTSC e permette di regolare il tono dell'immagine.
<strong>ITA</strong>LIANO<br />
<strong>ITA</strong>LIANO<br />
DEFAULT (impostazioni iniziali)<br />
questa funzione permette di ritornare alle impostazioni di fabbrica.<br />
7<br />
MDV 6110 BT<br />
SETUP<br />
Nella schermata regolazione SETUP compariranno i sottomenu: SYSTEM, CLOCK. Utilizzare sempre i tasti freccia(3)<br />
sul frontale per selezionare i sottomenu, oppure utilizzare i tasti di navigazione ����(6) sul telecomando e confermare<br />
col tasto ENTER (7).<br />
SYSTEM<br />
Nella schermata SYSTEM compariranno le seguenti funzioni : TIME, TIME.M:<br />
TIME<br />
questa funzione attiva o disattiva la visualizzazione dell'orario sul display.<br />
TIME.M<br />
questa funzione permette di visualizzare l'orario nel formato 12 o 24.<br />
CLOCK<br />
Nella schermata CLOCK sarà possibilie impostare l'orario.<br />
- Ruotare il controllo volume VOL (5) in senso orario per regolare l'ora, oppure utilizzare i tasti di navigazione<br />
��(6) sul telecomando.<br />
- Posizionarsi sui minuti utilizzando i tasti freccia(3) e ruotare il controllo volume VOL (5) in senso orario<br />
per regolare i minuti oppure utilizzare i tasti di navigazione ��(6) sul telecomando e successivamente agire<br />
sui tasti ��(6) per effettuare le regolazioni.<br />
- Per confermare tenere premuto per qualche secondo il controllo volume VOL (5) sull'unità, oppure premere<br />
il tasto ENTER (7) sul telecomando.<br />
NOTA<br />
Attenzione l'autoradio aggancia il segnale orario RDS, pertanto l'orario impostato manualmente potrà essere sostituito da quello<br />
trasmesso dalle emittenti radiofoniche.<br />
Se le emittenti radiofoniche trasmettono un segnale orario errato, questo verrà visualizzato sul display ma non sarà modificabile.<br />
MODAL<strong>ITA</strong>' RADIO<br />
Se il dispositivo si trova in altre modalità, premere il tasto MODE fino alla comparsa della modalità<br />
radio.<br />
SINTONIA<br />
Selezionate la banda di frequenza (FM1, FM2, FM3, MW1, MW2) che desiderate ascoltare con il tasto BAND(30) del<br />
telecomando.<br />
Premete il tasto >>| (3) sul frontale o SEEK+/RDM (16) del telecomando una volta per sintonizzarvi sulla stazione<br />
successiva; tenete il tasto >> (6) premuto per aumentare di 0,05 MHz la frequenza visualizzata.<br />
Premete il tasto |>| o |
<strong>ITA</strong>LIANO<br />
<strong>ITA</strong>LIANO<br />
8<br />
MDV 6110 BT<br />
LOCAL<br />
Questa funzione aumenta la sensibilità della radio durante la ricerca, selezionando le stazioni con il segnale più forte.<br />
Premete il tasto SUB-T/LOC (29) del telecomando per attivare la funzione; sul display apparirà l’indicazione "LOC".<br />
Premete nuovamente il tasto per disattivare la funzione; sul display scomparirà l’indicazione "LOC".<br />
STEREO<br />
Questa funzione attiva la modalità Stereo durante l'ascolto.<br />
Premete il tasto AUDIO/ST (31) del telecomando per attivare la funzione; sul display apparirà l'indicazione "STEREO".<br />
Premete nuovamente il tasto per disattivare la funzione; sul display comparirà l'indicazione "MONO".<br />
RADIO DATA SYSTEM<br />
Il sistema RDS prevede la trasmissione, dalle emittenti europee che lo hanno adottato, di una serie di informazioni<br />
comprendenti il nome dell'emittente, le eventuali frequenze alternative su cui può essere ricevuta, l'inizio di un notiziario<br />
sul traffico, il tipo di programma trasmesso (musica classica, jazz, rock, cultura), ecc.<br />
Questo apparecchio offre le seguenti caratteristiche:<br />
AF FREQUENZE ALTERNATIVE<br />
Questa funzione riceve la lista delle frequenze alternative dell'emittente e si sintonizza automaticamente su quella con<br />
il segnale migliore.<br />
Premete il tasto AF (8) sul frontale o il tasto AF (17) del telecomando per attivare la funzione; sul display apparirà<br />
l'indicazione "AF".<br />
Premete nuovamente il tasto per disattivare la funzione; sul display scomparirà l'indicazione "AF".<br />
Quando il segnale della stazione che state ascoltando peggiora, l'indicatore "AF" comincia a lampeggiare, l'apparecchio<br />
controlla la lista delle frequenze alternative trasmesse dalla stazione e si risintonizza su quella con segnale migliore.<br />
REG RICEZIONE STAZIONI REGIONALI<br />
Alcune stazioni nazionali possono trasmettere dei programmmi regionali, ad esempio dei notiziari, diversi da zona a zona.<br />
Con questa funzione attivata è possibile continuare a ricevere lo stesso programma regionale anche se il segnale di una<br />
zona vicina è più forte.<br />
1. Per attivare questa funzione tenere premuto per 2 sec il tasto AF (8) sul frontale o il tasto AF (17) del telecomando<br />
compare la scritta REG ON.<br />
2. Per disattivare questa funzione premere per 2 sec il tasto AF (8) sul frontale o il tasto AF (17) del telecomando<br />
compare la scritta REG OFF.<br />
TA INFORMAZIONI SUL TRAFFICO<br />
Questa funzione attiva la ricezione automatica dei notiziari sul traffico.<br />
Premete il tasto TA (9) sul frontale o il tasto TA (17) del telecomando per attivare la funzione; sul display apparirà<br />
l'indicazione "TA".<br />
Premete nuovamente il tasto per disattivare la funzione; sul display scomparirà l'indicazione "TA".<br />
Se la stazione che state ricevendo non trasmette notiziari sul traffico l'apparecchio cercherà automaticamente una<br />
stazione che li trasmette.<br />
Quando un bollettino sul traffico inizia il volume viene automaticamente aumentato.<br />
Al termine del bollettino il volume torna alle condizioni iniziali.<br />
Se state ascoltando un CD/DVD con la funzione TP inserita all'inizio del bollettino l'apparecchio passa automaticamente<br />
all'ascolto della radio e alza il volume. Al termine del bollettino la riproduzione del CD/DVD riprende.<br />
ATTIVAZIONE DELLA FUNZIONE PTY<br />
Questa funzione permette di selezionare il tipo di programma desiderato.<br />
La radio si sintonizzerà solo sulle stazioni che trasmettono il tipo di programma selezionato.<br />
Premete il tasto 9/PTY (17) del telecomando;sul display comparirà l'indicazione del tipo di programma selezionato.<br />
Premere i tasti di navigazione ��(6) sul telecomando per selezionare la tipologia di ricerca.<br />
Premete il tasto 9/PTY (17) del telecomando per attivare la ricerca di una stazione che trasmetta il tipo di programma<br />
scelto.<br />
Se il tipo di programma selezionato non è presente il display mostra la scritta NO FOUND.<br />
RIPRODUZIONE DI UN DISCO DVD, CD, MP3<br />
INIZIO DELLA RIPRODUZIONE<br />
1. Premere il tasto REL (12) del frontale per accedere al vano CD/DVD.<br />
2. Inserire il disco nell'apposito vano.<br />
- Posizionare il disco con i titoli rivolti verso l’alto.
<strong>ITA</strong>LIANO<br />
<strong>ITA</strong>LIANO<br />
- Automaticamente inizia la riproduzione del disco.<br />
Per recuperare il disco, premere il tasto(20) all'interno del frontale.<br />
DURANTE LA RIPRODUZIONE DI UN DISCO DVD<br />
9<br />
MDV 6110 BT<br />
SALTO AL CAPITOLO SEGUENTE/PRECEDENTE<br />
Premere il tasto � (9) dal telecomando, per passare al capitolo precedente e il tasto � (8), per passare al capitolo<br />
seguente.<br />
RICERCA VELOCE<br />
1. Premere in sequenza il tasto � o �(6) dal telecomando per far avanzare/indietreggiare velocemente le immagini.<br />
2. Ad ogni pressione del tasto la velocità aumenta.<br />
3. Gli indicatori numerici presenti sullo schermo a fianco del simbolo �� segnalano la velocità (2x - 4x - 8x - 16x - 32x).<br />
4. Per tornare alla riproduzione normale premere il tasto PLAY (27).<br />
CAMBIO LINGUA D'ASCOLTO<br />
1. Se il disco è predisposto per il cambio della lingua d'ascolto, durante la riproduzione premere il tasto ST/AUDIO<br />
(31) sul telecomando.<br />
2. Sullo schermo compare l’indicazione delle lingue (<strong>ITA</strong>, <strong>ENG</strong> ecc....) e dei canali disponibili (Ch 6 per indicare i 6 canali<br />
del Dolby Digital, Ch 2 per indicare 2 canali stereo, ecc...)<br />
3. Selezionare la lingua che vi interessa premendo in sequenza il tasto ST/AUDIO (31).<br />
4. Le indicazioni sul display scompaiono automaticamente dopo qualche secondo.<br />
ATTIVAZIONE/CAMBIO DEI SOTTOTITOLI<br />
1. Se il disco è predisposto per attivare i sottotitoli, durante la riproduzione del disco premere il tastoLOC/ SUB-T<br />
(29) sul telecomando.<br />
2. Sullo schermo compare l’indicazione delle lingue disponibili (<strong>ITA</strong>, <strong>ENG</strong> ecc.....)<br />
3. Selezionate la lingua che vi interessa premendo in sequenza il tasto LOC/SUB-T (29)<br />
4. Per disattivare la funzione ripetere la stessa procedura selezionando OFF dalla lista dei sottotitoli.<br />
5. Le indicazioni sul display scompaiono automaticamente dopo qualche secondo.<br />
CAMBIO ANGOLO DI VISUALE<br />
1. Se il disco è predisposto per la visione multiangolo (consultare la confezione del disco per accertarvene) premere<br />
il tasto ANGLE(11) sul telecomando per passare ad un angolo diverso di visione.<br />
2. Sullo schermo compare l’indicazione dei vari punti di vista disponibili (1/1 - 1/2 - 1/3 ecc.).<br />
3. Selezionare il punto di vista che vi interessa premendo in sequenza il tasto ANGLE(11).<br />
FUNZIONE PAUSA<br />
1. Premere il tasto PLAY (27) sul telecomando per fermare momentaneamente la riproduzione e ottenere un fermo<br />
immagine.<br />
2. Premerlo di nuovo per ripristinare la riproduzione.<br />
ARRESTO DELLA RIPRODUZIONE<br />
1. Premere il tasto STOP (26) sul telecomando per fermare la riproduzione del disco, sullo schermo compare la scritta<br />
“STOP” e la schermata iniziale.<br />
2. Premere il tasto PLAY (27) per riprendere la riproduzione da dove era stata interrotta.<br />
3. Premere due volte il tasto STOP (26) per fermare definitivamente la riproduzione, se ora premete il tasto PLAY(27)<br />
la riproduzione del disco ricomincia dall’inizio.<br />
FUNZIONE ZOOM<br />
1. Premere il tasto #/ZOOM (19) sul telecomando per aumentare/diminuire l'immagine; sul display comparirà in<br />
sequenza la scritta “ZOOM x2, x3, x4, x1/2, x1/3, x1/4, OFF, l’immagine sullo schermo si modificherà ad ogni pressione<br />
del tasto.<br />
2. Selezionare la scritta “OFF” per tornare alla visione normale.<br />
Con il tasto #/ZOOM selezionato, sul visore/display compare un doppio riquadro, quello grande indica tutta l'immagine,<br />
quello piccolo scuro all'interno, indica la zona dell'immagine che può essere variata con i relativi tasti freccia.<br />
FUNZIONE MENU<br />
1. Premere il tasto PBC (25) sul telecomando per passare in qualsiasi momento alla visione del menu principale del film.<br />
SISTEMA VIDEO<br />
Questa funzione permette di impostare il tipo di sistema di riproduzione video.<br />
Durante l ariproduzione di un disco DVD/VCD, premere in sequenza il tasto P/N (4) sul telecomando, per selezionare<br />
tra: PAL, MULTI o NTSC.
<strong>ITA</strong>LIANO<br />
<strong>ITA</strong>LIANO<br />
10<br />
MDV 6110 BT<br />
FUNZIONE SLOW +/- (riproduzione lenta)<br />
1. Durante la riproduzione di un DVD/VCD premere in sequenza il tasto SLOW+<br />
riproduzione di "1/2, 1/4, 1/8, 1/16".<br />
(23) per rallentare la<br />
2. Premere in sequenza il tasto SLOW- (22) per rallentare la riproduzione al contrario di "1/16, 1/8, 1/4, 1/2".<br />
FUNZIONE DISPLAY<br />
Questa funzione vi permette di vedere direttamente sullo schermo tutte le informazioni inerenti alla durata del capitolo<br />
che state guardando al tempo residuo del film, del titolo ecc....<br />
1. Premere il tasto DISP (3) sul telecomando, per visionare tutte le informazioni.<br />
2. Per uscire dalla funzione display, premere nuovamente il tasto DISP (3).<br />
FUNZIONE DISPLAY PER LA RIPRODUZIONE DI FILE MP3/MPEG4<br />
Questa funzione vi permette di visualizzare la lista delle cartelle/dei file contenuti in un CD/USB/SD Card MP3/MPEG4.<br />
1. Durante la riproduzione, tenere premuto il tasto DISP (3) sul telecomando per commutare alla schermata di<br />
visualizzazione delle cartelle/dei file.<br />
2. Utilizzare i tasti navigazione ���� (6) del telecomando per scegliere la cartella o il file desiderato dalla lista che<br />
compare sulla sinistra dello schermo, e confermare la selezione con il tasto ENTER (7).<br />
FUNZIONE SEARCH<br />
Questa funzione vi permette di cercare un particolare del film che state guardando.<br />
1. Premere il tasto GOTO (18) sul telecomando una volta, sullo schermo compare un menu dove potete inserire il<br />
tempo (per es. 00:26:45) che volete ricercare il titolo, capitolo, formato audio, sottotitoli, angolazione, tt time, ch<br />
time, repeat e time dist.<br />
2. Per muovere il cursore all’interno del menu utilizzate i tasti navigazione ����(6) del telecomando.<br />
3. Per inserire i dati premere il tasto ENTER (7) digitare i numeri tramite i tasti numerici 1...9(17).<br />
4. Per attivare la funzione di ricerca premere il tasto PLAY (27).<br />
FUNZIONE RIPETIZIONE CAPITOLO/TITOLO<br />
1. Premere il tasto RPT/SEEK- (15) sul telecomando fino a quando sullo schermo compare la scritta “REPEAT CHAPTER”,<br />
il lettore ripeterà continuamente lo stesso capitolo.<br />
2. Premere il tasto RPT/SEEK- (15) sul telecomando fino a quando sullo schermo compare la scritta “REPEAT TITLE”,<br />
il lettore ripeterà continuamente lo stesso titolo.<br />
3. Premere il tasto RPT/SEEK- (15) sul telecomando fino a quando sullo schermo compare la scritta “REPEAT ALL”,<br />
il lettore ripeterà tutto il disco.<br />
4. Per disattivare la funzione di ripetizione premere il tasto RPT/SEEK- (15), fino a quando sullo schermo compare<br />
la scritta “OFF”<br />
RIPETIZIONE FRA PUNTO A E PUNTO B<br />
1. Tenere premuto per qualche secondo il tasto BAND/A-B (30) per selezionare un punto di partenza, sullo schermo<br />
viene visualizzata la scritta “A”<br />
2. Tenere premuto per qualche secondo il tasto BAND/A-B (30) una seconda volta per selezionare un punto di arrivo,<br />
sullo schermo viene visualizzata la scritta “A B”<br />
3. Il lettore ripete in continuazione il brano compreso fra i punti A e B.<br />
4. Premere una terza volta il tasto BAND/A-B (30) per tornare alla normale riproduzione.<br />
FUNZIONI RANDOM<br />
Premete il tasto RDM/SEEK+ (16) del telecomando per attivare l'ascolto in sequenza casuale dei capitoli/tracce presenti<br />
sul DVD/CD; sul display comparirà la scritta “RANDOM ON”.<br />
Premete nuovamente il tasto per disattivare la funzione; sul display comparirà la scritta “RANDOM OFF”.<br />
FUNZIONE PROGRAMMAZIONE TITOLI E CAPITOLI<br />
Questa funzione permette di programmare la riproduzione del DVD, immettendo tramite il tastierino numerico l'ordine<br />
dei titoli e dei capitoli.<br />
1. Premere il tasto AMS/PROG (28) sul telecomando o AMS sul frontale, comparirà il menu di programmazione.<br />
2. Utilizzare i tasti di navigazione ����(6) del telecomando per spostarsi fra le celle.<br />
3. Premere il primo numero per il titolo(indicato con Tt e dopo che s'illumina il CH(capitolo) premere il numero del<br />
capitolo. Per numeri maggiori di 9, usare il tasto 10+ del telecomando(per le decine) seguito da uno dei tasti delle unità(da<br />
uno a nove).<br />
4. Selezionare START e premere il tasto ENTER per riprodurre la programmazione.
<strong>ITA</strong>LIANO<br />
<strong>ITA</strong>LIANO<br />
CONFIGURAZIONE DEL LETTORE DVD<br />
11<br />
MDV 6110 BT<br />
1. Per accedere al menù di configurazione premere il tasto SETUP (5) sul telecomando, sullo schermo compare il menu<br />
di configurazione del lettore. (per accedere al menù, l'apparecchio deve essere in modalità DVD, con disco all'interno<br />
in modalità STOP).<br />
GENERAL SETUP PAGE ......<br />
AUDIO SETUP PAGE ...........<br />
VIDEO SETUP PAGE ............<br />
PREFERENCE SETUP PAGE<br />
PASSWORD SETUP PAGE .<br />
EXIT SETUP MENU ..............<br />
Selezionare il menu tramite i tasti navigazione ��(6), entrare nel menu premendo il tasto ENTER (7) del telecomando.<br />
Per muoversi all’interno dei menu di configurazione premere i tasti navigazione ��(6) e selezionare il menu da configurare<br />
tramite il tasto ENTER (7) del telecomando.<br />
Anche se il SETUP prevede nelle sue varie voci il loro cambiamento, questo sarà operativo, solo, se<br />
l'apparecchio e il disco sono predisposti.<br />
GENERAL SETUP PAGE<br />
TV DISPLAY<br />
Questa funzione permette di impostare l'aspetto dell'immagine sul televisore.<br />
È possibile settare la riproduzione su NORMAL PS, NORMAL LB, WIDE e WIDE SEQUOOZE.<br />
Il formato NORMAL PS (Pan & Scan) permette di ingrandire l’immagine in modo da eliminare le bande nere sopra e sotto<br />
ma taglia parte dell’immagine a destra e sinistra.<br />
Il formato NORMAL LB (Letter Box) visualizza le immagini con le bande nere sopra e sotto ma rispetta il formato originale<br />
del programma e non provoca perdita di parte dell’immagine.<br />
Il Wide è il formato da selezionare per la riproduzione sui televisori in formato 16:9 widescreen o sui televisori in formato<br />
4:3 con l’opzione 16:9 (controllate sul manuale del vostro televisore).<br />
Il formato Wide Sequooze permette di adattare l'immagine alle dimensioni dello schermo.<br />
OSD LANGUAGE<br />
Questa funzione permette di impostare la lingua del menu di configurazione.<br />
AUDIO SETUP PAGE<br />
SPEAKER SETUP<br />
Questa funzione permette di impostare l’uscita audio stereo del lettore.<br />
Potete scegliere tra: LT\RT, STEREO, V SURR.<br />
LT\RT: altoparlanti con un effetto teatrale (da selezionare se si utilizzano dischi con Dolby PRO LOGIC).<br />
STEREO: altoparlanti in stereo.<br />
V SURR: altoparlanti con un effetto virtual surround.<br />
PREFERENCE SETUP PAGE<br />
Premere il tasto freccia a sinistra fino a quando compare nella striscia nera questa pagina, le sue voci sono:<br />
TV TYPE<br />
Questa funzione permette di impostare il tipo di sistema di riproduzione video.<br />
Accedere alla funzione e scegliere tra le modalità PAL, MULTI, NTSC.<br />
NOTA:<br />
In Italia viene utilizzato il sistema PAL.<br />
AUDIO<br />
Permette di impostare la lingua d’ascolto del film.<br />
Attenzione voi potete impostare la lingua che preferite, ma se il disco DVD non è predisposto l’operazione non funziona.<br />
Quindi accertarsi che il disco sia predisposto.<br />
SUBTITLE<br />
Permette di impostare la lingua dei sottotitoli del film.<br />
Attenzione voi potete impostare la lingua che preferite, ma se il disco DVD non è predisposto l’operazione non funziona.<br />
Quindi accertarsi che il disco sia predisposto.
<strong>ITA</strong>LIANO<br />
<strong>ITA</strong>LIANO<br />
12<br />
MDV 6110 BT<br />
DVD MENU<br />
Permette di impostare la lingua del menu del film.<br />
Attenzione voi potete regolare la lingua del menu del film che preferite, ma se il disco DVD non è predisposto l’operazione<br />
non funziona. Quindi accertarsi che il disco sia predisposto.<br />
PARENTAL<br />
I dischi DVD possono essere codificati in base al contenuto con un livello da 1 (film per tutti) a 7 (film per adulti, contenente<br />
scene di violenza e/o sesso).<br />
La codifica può riguardare tutto il disco o solo alcune scene in esse contenute, a volte sono disponibili scene alternative<br />
a quelle con contenuto non adatto ai minori.<br />
È il produttore del disco che decide se e a quale livello implementare il livello di codifica.<br />
Il lettore DVD può essere impostato su un livello da 1 a 8 (il livello 8 corrisponde a nessuna restrizione attivata).<br />
Quando un livello è impostato nel lettore vengono riprodotti solo i dischi e le scene con livello di codifica uguale o inferiore<br />
a quello impostato. Per esempio se il lettore è impostato sul livello 5 vengono riprodotti solo i dischi e le scene con livello<br />
1, 2, 3, 4, 5.<br />
Selezionate un livello di protezione da “1” a “8” utilizzando i tasti di navigazione ��(6) .<br />
Se intendete disattivare tutte le protezioni selezionate la scritta “8 ADULT”.<br />
DEFAULT<br />
Permette di settare le impostazioni di fabbrica del lettore.<br />
PASSWORD SETUP PAGE<br />
Per entrare in questa pagina, è necessario che il disco sia fermo, diversamente il setup viene sempre visualizzato, ma il tasto<br />
freccia relativo non si ferma in questa pagina ma la salta. Se il disco è in riproduzione, fermarlo premendo due volte il tasto<br />
STOP, se è fermo sul visore è indicato un quadrato con interno nero.<br />
Entrando in questa pagina, compaiono sul visore le seguenti voci:<br />
PASSWORD MODE<br />
Attivazione o disattivazione della funzione password, se attivata ogni volta che viene modificato il livello della funzione<br />
parentale viene richiesta la password.<br />
PASSWORD<br />
Questa funzione permette di bloccare la possibile modifica del livello di protezione da parte di un estraneo. Se attivate<br />
il blocco, non sarà possibile modificare il livello di protezione.<br />
La password di fabbrica è “136900”.<br />
INSTALLAZIONE VIDEOCAMERA POSTERIORE<br />
Se la vostra autovettura è dotata di videocamera per la visione di retromarcia, collegate il filo arancione REVERSE-LIGHT,<br />
alla retromarcia oppure alle luci della retromarcia, quando questa verrà inserita, automaticamente il display commuterà<br />
su di essa e disattiverà l'audio.<br />
CONNESSIONE TRAMITE BLUETOOTH (modalità HANDS-FREE)<br />
E' possibile effettuare chiamate dal proprio cellulare in modalità HANDS-FREE (in modalità libera) grazie alla compattibiltà<br />
con il sistema internazionale wireless Bluetooth.<br />
- Quando effettuate una chiamata, parlare con voce forte e chiara, tenedo il microfono a distanza.<br />
- Per avere una condizione ottimale prima di effettuare o ricevere una chiamata, chiudere i finestrini dell'automobile.<br />
- La voce può essere riprodotta in maniera distorta nel caso in cui ci siano problemi di campo telefonico, oppure tenendo<br />
il microfono vicino alla bocca.<br />
- L'utilizzo della funzione HANDS-FREE dipende dalla compattibilità parziale/totale del vostro telefono cellulare.<br />
- Assicurarsi che nel proprio telefono cellulare sia disponibile la connessione tramite Bluetooth, altrimenti consultare<br />
il manuale del proprio telefono.
<strong>ITA</strong>LIANO<br />
<strong>ITA</strong>LIANO<br />
13<br />
MDV 6110 BT<br />
CONNESSIONE<br />
1. Accedere alla schermata Bluetooth premendo più volte il tasto MODE (2) sul telecomando, fino alla comparsa della<br />
scritta BT.<br />
2. Attivare la funzione Bluetooth dal vostro telefonino ed effettuare la ricerca.<br />
3. Selezionare dal cellulare il dispositivo LJ3889 che corrisponde all'autoradio.<br />
4. Vi verrà richesto di inserire il codice a 4 cifre "8888".<br />
5. Ora la connessione è stabilita, sul display dell'autoradio comparirà la scritta CONNECTED, con indicazione BT<br />
lampeggiante.<br />
EFFETTUARE UNA CHIAMATA<br />
Per eseguire questa operazione, parcheggiare il veicolo e inserire il freno a mano.<br />
1. Effettuare una chiamata telefonica dall'autoradio immettendo tramite il tastierino numerico 1..9(17) il numero<br />
da chiamare.<br />
2. Premere il tasto SLOW- (22) per attivare la chiamata, sul display lampeggerà la scritta "OUT CALL" assieme al<br />
3.<br />
numero di telefono composto.<br />
Terminare la chiamata premendo il tasto BAND (16) sul forntale dell'autoradio o SLOW+ (23) sul telecomando.<br />
EFFETTUARE UNA CHIAMATA DAI NUMERI MEMORIZZATI<br />
E' possibile selezionare il numero ed effettuare una chiamata di una persona dalla lista delle chiamate fatte, ricevute,<br />
composte e perse.<br />
1. Ricercare il numero telefonico presente nella lista delle chiamate fatte, ricevute, composte e perse spostando<br />
la selezione con i tasti di navigazione ����(6) del telecomando.<br />
2. Effettuare la chiamata premendo il tasto SLOW- (22).<br />
CHIAMATA RAPIDA ALL'ULTIMO NUMERO RICEVUTO<br />
1. Premere due volte il tasto SLOW- (22) e verrà avviata una chiamata al numero dell'ultima chiamta ricevuta.<br />
2. Premere il tasto SLOW+ (23) per terminare la chiamata, sul display verrà visualizzato il tempo totale della chiamata.<br />
RICEZIONE DI UNA CHIAMATA<br />
1. Quando ricevete una chiamata, la suoneria del vostro telefono cellulare verrà segnalata sul display dell'autoradio.<br />
2. Premere il tasto SLOW- (22), per attivare la chiamata.<br />
- Se la modalità AUTO è settata su ON, l'autoradio attiverà la risposta automatica.<br />
- L'audio della vostra chiamata sarà udibile dalle casse del vostro impianto.<br />
- Le funzioni dell'autoradio verranno interrotte al ricevimento di una chiamata, appena questa verrà terminata l'unità<br />
si riposizionerà automaticamente sulla funzione interrotta.<br />
DEVIAZIONE DELLA CHIAMATA<br />
Durante la chiamata premere il tasto SLOW- (22) per utilizzare il telefono e disattivare la funzione HAND-FREE.<br />
Premere nuovamente il tasto SLOW- (22) per ritornare in modalità HAND-FREE (vivavoce).<br />
TRASMISSIONE FILE AUDIO TRAMITE BLUETOOTH<br />
Tramite la connessione Bluetooth potete ascoltare i vostri files musicali presenti nel vostro telefono cellulare (se<br />
compattibile) direttamente nel vostro impianto utilizzando questa autoradio.<br />
1. Connettere il dispositivo facendo riferimento al paragrafo CONNESSIONE.<br />
2. Dal vostro telefono cellulare avviare la riproduzione di un files MP3.<br />
3. Premere il tasto PLAY (27) sul telecomando per avviare l'ascolto del file dalle casse del vostro impianto.
<strong>ITA</strong>LIANO<br />
<strong>ITA</strong>LIANO<br />
INGRESSO USB<br />
PROBLEMI, POSSIBILI CAUSE E SOLUZIONI<br />
SINTOMO CAUSA RIMEDIO<br />
Il tasto POWER è inserito I connettori non sono Conterollare l'inserimento<br />
ma l'unità non funziona inseriti correttamente dei connettori<br />
Il fusibile è interrotto Sostituire il fusibile con uno<br />
con la stessa potenza<br />
Il microprocessore non Resettare l'unità<br />
funziona correttamente<br />
14<br />
MDV 6110 BT<br />
RIPRODUZIONE<br />
Inserite un lettore MP3 nell'ingresso USB (13) munito di batteria; la riproduzione parte automaticamente.<br />
Per tutte le funzioni di riproduzione fate riferimento al paragrafo "RIPRODUZIONE DI UN DISCO DVD/CD/MP3".<br />
NOTA:<br />
L'autoradio MDV 6110 BT, potrebbe non supportare alcuni apparecchi esterni con presa USB, questo è<br />
dovuto all'incompatibilità dei processori.<br />
INGRESSO SD CARD<br />
RIPRODUZIONE<br />
Premete il tasto REL (12) del frontale.<br />
Inserire una SD Card nell'ingresso SD Card (18) posta dietro al frontale, la riproduzione parte automaticamente.<br />
Per tutte le funzioni di riproduzione fate riferimento al paragrafo "RIPRODUZIONE DI UN DISCO DVD/CD/MP3".<br />
MODAL<strong>ITA</strong>' AV<br />
Premere consecutivamente il tasto MODE (2) sul telecomando e selezionare la modalità AV.<br />
Collegare l'apparecchio esterno (DVD Players, DVD Players portatili) alla presa AUX (17) posizionata sul forntale.<br />
Avviare la riproduzione dall'apparecchio esterno.<br />
L'unità non risponde al Il telecomando è usato non Dirigere il sensore del telecomando<br />
telecomando correttamente verso il sensore dell'unità controllando<br />
che non siano presenti ostacoli tra i due sensori<br />
La batteria è scarica Inserire una nuova batteria<br />
Alcune operazioni non sono Controllare con altri dischi<br />
abilitate con dischi sicuri<br />
La riproduzione non è Il disco è sporco Pulire il disco<br />
possibile<br />
Il disco caricato non può Controllare il tipo di disco<br />
essere letto dall'unità<br />
Il disco caricato non è Mettere un disco compatibile con<br />
compatibile con il sistema il proprio sistema<br />
video<br />
Non si sente il sonoro Le connessioni audio non Controllare le connesioni audio<br />
sono a posto
<strong>ITA</strong>LIANO<br />
<strong>ITA</strong>LIANO<br />
L'immagine è alterata La inizializzazione del display Selezionare nel setup video la<br />
non è corretta corretta inizializzazione<br />
La lingua del dialogo non Il DVD in ascolto non prevede Le altre lingue non sono registrate<br />
può essere cambiata il multi lingua sul disco<br />
CARATTERISTICHE TECNICHE<br />
15<br />
MDV 6110 BT<br />
I sottotitoli non sono Il DVD non prevede I sottotitoli non possono essere<br />
visualizzati sottotitoli visualizzati se non sono registrati sul disco<br />
Nel menù del disco la Cambiare la selezione del menù del disco<br />
selezione impostata non è<br />
corretta<br />
GENERALI<br />
Supporta: .............................................................................................................DVD, MPEG4, VCD, MP3, CD,CD-R, CD-RW<br />
Potenza di uscita massima ..............................................................................40 Wx 4<br />
Impedenza degli altoparlanti ..........................................................................4 ohm per canale<br />
Canali memorizzabili .........................................................................................18 in FM e 12 in MW<br />
Sistema video ......................................................................................................PAL/NTSC/MULTI<br />
Alimentazione .....................................................................................................12 V<br />
Assorbimento massimo ....................................................................................15 A<br />
Dimensioni ...........................................................................................................187x180x50 mm<br />
Peso .......................................................................................................................1,55 Kg<br />
RADIO FM-MW<br />
Banda di frequenza FM ...................................................................................87,5 - 108 MHz<br />
Banda di frequenza MW .................................................................................522 - 1620 KHz<br />
Distorsione in FM .............................................................................................. 0,5% mono<br />
CD - DVD<br />
Rapporto S/R .....................................................................................................>70 dB 1 KHz<br />
Distorsione ..........................................................................................................< 0,2%<br />
NOTA.<br />
La TREVI persegue una politica di continuo miglioramento dei prodotti. Per tale motivo le<br />
caratteristiche tecniche sono soggette a modifiche senza preavviso.
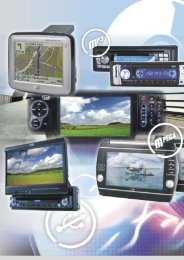
CABLE CONNECTION<br />
ACCESSORIES<br />
1.<br />
2.<br />
3.<br />
4.<br />
5.<br />
6.<br />
7.<br />
8.<br />
9.<br />
10.<br />
11.<br />
12.<br />
1 2 3 4 5 6 7 8<br />
9 10 11 12 13 14 15 16<br />
A1.NC<br />
A2.NC<br />
A3.NC<br />
A4.BACKUP MEMORY<br />
A5.AUTO ANTENNA<br />
A6.NC<br />
Mounting Bracket (Half Sleeve) X 1<br />
A7.ACC IGNITION<br />
A8.GROUND<br />
Removable Trim Ring equipped on the unit X 1<br />
Mounting Screw M5 X 1<br />
Rubber X 1<br />
Remote Control X 1<br />
Release key X 2<br />
ISO Wire connector X 1<br />
removable control panel X 1<br />
User manual X 1<br />
carrying case X 1<br />
Antenna receiver X 1<br />
Screws X 4<br />
SUB WOOFER OUT<br />
REAR VIEW VIDEO IN<br />
ANTENNA<br />
B1.REAR RIGHT SPEAKER+<br />
B2.REAR RIGHT SPEAKER-<br />
B3.FRONT RIGHT SPEAKER+<br />
B4.FRONT RIGHT SPEAKER-<br />
B5.FRONT LEFT SPEAKER+<br />
B6.FRONT LEFT SPEAKER-<br />
B7.REAR LEFT SPEAKER+<br />
B8.REAR LEFT SPEAKER-<br />
MIC IN<br />
REAR MONITOR VIDEO OUT<br />
LINE OUT REAR LEFT<br />
LINE OUT REAR RIGHT<br />
LINE OUT FRONT LEFT<br />
LINE OUT FRONT RIGHT
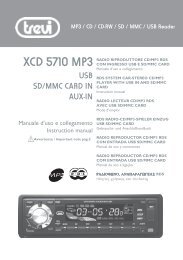
FRONT PANEL<br />
2<br />
3<br />
1<br />
PWR<br />
MODE<br />
4<br />
STOP<br />
BACK<br />
18<br />
5<br />
20<br />
6 7 8<br />
MENU<br />
VOL<br />
IR<br />
PTY<br />
TA<br />
9<br />
AF<br />
21<br />
19<br />
10 11 12<br />
AUX<br />
ME/<br />
SET/RPT<br />
AMS<br />
BAND<br />
17<br />
REL<br />
OPEN<br />
13<br />
14<br />
15<br />
16
1 PWR/BACK<br />
Press the button to turn on the unit, press and hold<br />
the button to turn off the unit.<br />
In menu mode, when you want to come back the<br />
previous menu, you can press the button.<br />
2 MODE<br />
Press the MODE button to select one source<br />
of TUNER/DVD/AV/BT.<br />
3 / :Press the button to automatic seek a<br />
station. Long press the button to manually turn in a<br />
station.<br />
In the playback mode press the button to select the<br />
last and next track , press and hold the button to fast<br />
for ward or fast back ward.<br />
4 STOP<br />
Press to stop playing in playback mode.<br />
5 VOL<br />
Adjust the volume by turning the knob clockwise<br />
or counterclockwise.<br />
Press the button will display the menu:<br />
AUDIO/PICTURE/SETUP. Press or to<br />
select a sub-menu and then press it to access the<br />
selected submenu.<br />
Rotate the button to select a item and then press<br />
it to access. Rotate the button to adjust to desired<br />
setting. When you want to return to the previous<br />
menu, you can press the PWR/BACK button.<br />
Press the MENU button will cancel the menu function.<br />
In AUDIO item, rotate VOL button to select<br />
BASS/TREBLE/BALANCEFADER/EQ/LOUD/SUB.W.<br />
In PICTURE item, rotate VOL button to select<br />
BRIGHT/CONTRAST/COLOR/TINT/DEFAULT.<br />
In SETUP, you can select SYSTEM/CLOCK.<br />
6 IR window<br />
7 PTY<br />
In radio mode, press the button to turn on/off the<br />
PTY function. Long press to function LOC and LOC<br />
will display on TFT.<br />
8 AF<br />
In radio mode,press the AF button to turn on/off<br />
the AF function.Long press to funtion REG and REG<br />
will display on TFT.<br />
9 TA<br />
In radio mode, press the button to turn on/off the TA<br />
function. Long press to switch MONO/STEREO on.<br />
10 TFT display<br />
11 ME/<br />
Press the ME button to change sequence number of<br />
stored station.<br />
In play mode press button to pause or resume<br />
playback.<br />
12 REL<br />
Press the button to release the front panel.<br />
13 USB Slot<br />
14 SET/RPT<br />
Press SET button to select the stored station in radio<br />
mode. In playback mode, press the RPT button<br />
repeatedly to select a repeat playback mode.<br />
15 AMS<br />
In radio mode, long press the AMS button to automatically<br />
store the stations with a good reception. Press<br />
this button to scan the preset stations.<br />
16 BAND<br />
In radio mode, press the button to select<br />
the band in the following sequence:<br />
FM1/FM2/FM3/MW1/MW2.<br />
In DVD mode, press the button to function<br />
as the OSD button on remote control.<br />
17 AV IN :<br />
Insert the AV cord, then press MODE button to<br />
switch to AV mode.<br />
18 SD Slot<br />
Insert the SD card and the unit will play the items<br />
automatically .<br />
Note: Once the SD card could not eject automatically<br />
after pressing, just take it out manually.<br />
19 DISC Loading Slot<br />
20<br />
Press the button to eject a disc when it is loaded into<br />
the unit.<br />
21 RESET<br />
Press the button to reset the unit using a sharp<br />
object such as a pencil to reset the unit.
BASIC OPERATION<br />
Initial System Start-Up<br />
Immediately after installing or applying power to the unit, it should be initialized. To do this, first, remove the<br />
detachable front panel. Behind the front panel, to the left of the connector, there is a small hole. Using a ball-point<br />
pen or other pointed object, press the RESET switch mounted behind this hole to complete the initialization<br />
procedure.<br />
POWER<br />
PWR<br />
MODE<br />
STOP<br />
BACK<br />
MENU<br />
VOL<br />
RESET switch<br />
IR<br />
PTY<br />
TA<br />
AF<br />
VOLUME VOLUME<br />
Turning on/off the power<br />
Note:<br />
Be careful of using this unit for a long time without running the engine. If you drain the car's battery too far, you<br />
may not be able to start the engine and this can reduce the service life of the battery.<br />
1.Press the [PWR/BACK] button.<br />
2.The illumination and display on the unit light up. The unit automatically remembers its last operation<br />
mode and will automatically switch to display that mode.<br />
3. Press the [PWR/BACK] button for a long time to turn off the power for the unit.<br />
In power off,the unint will be turn on automatically after insert a disc.<br />
Adjusting the volume<br />
1.Turning the [VOL] knob clockwise increases the volume;<br />
2.Turning it counterclockwise decreases the volume.<br />
Setting the sound characteristics<br />
Press VOL button to enter the AUDIO sub-menu,press or to select the desired mode in the following order:.<br />
VOL-BAS-TRE-BAC-FAD-EQ-LOUD-SUB.W<br />
CLOCK SETTING<br />
Displaying the time: Press VOL button get into SYSTEM.There are 2 items in the TFT. In TIME item, rotate VOL<br />
button ,select ON to display the time. In TIME.M item,rotate VOL button to select the format of time displayed<br />
(12/24) Adjusting the time: Press VOL button get into SETUP. In CLOCK item, press VOL button to select the<br />
minutes or hours adjusted ,rotate VOL button to adjust the number of minutes and hours<br />
AUX<br />
ME/<br />
SET/RPT<br />
AMS<br />
BAND<br />
REL<br />
OPEN
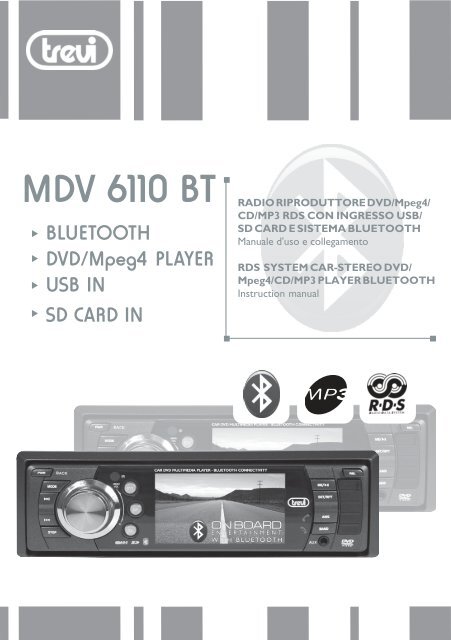
REMOTE CONTROL<br />
1<br />
2<br />
3<br />
4<br />
5<br />
6<br />
7<br />
8<br />
9<br />
10<br />
11<br />
12<br />
13<br />
14<br />
POWER MODE MUTE<br />
DISP<br />
CLEAR<br />
TITLE<br />
P/N<br />
GOTO<br />
SEEK+<br />
RDM<br />
TA AF PTY<br />
ZOOM<br />
#<br />
Installing the battery<br />
Slide the tray out on the back of the remote control<br />
and insert the battery with the plus (+)and minus(-)<br />
poles pointing in the proper direction.<br />
PBC<br />
ANGLE PLAY STOP<br />
+<br />
SETUP<br />
VOL<br />
SEEK<br />
RPT<br />
SLOW<br />
VOL+<br />
MENU<br />
BACK<br />
SLOW+<br />
PROG<br />
AMS<br />
SUB-T<br />
LOC<br />
A B<br />
BAND<br />
AUDIO<br />
ST<br />
15<br />
16<br />
17<br />
18<br />
19<br />
20<br />
21<br />
22<br />
23<br />
24<br />
25<br />
26<br />
1 POWER<br />
Press to turn on or off the unit.<br />
2 MODE<br />
Refer to the head unit about MODE.<br />
3 DISP<br />
In DVD mode,press the DISP buttonto display the play<br />
informations.<br />
In CD/MP3/WMA mode,long press the button to<br />
switch the display layout (the image display or OSD<br />
display) when the vehicle is parked.<br />
4 P/N<br />
In DVD VCD mode,press to selectPAL MULTI<br />
or NTSC system.<br />
5 SETUP<br />
In playback mode, press to display system setting<br />
picture, the user can select some relative constant<br />
parameters.<br />
27<br />
Use and care of the remote control<br />
Point the remote control in the direction of the front<br />
panel to operate to use it.<br />
Notes:<br />
Using batteries improperly can cause them to explode.<br />
Take note of the following points:<br />
* Keep the battery out of the reach of children. Should<br />
the battery be swallowed, immediately consult a doctor.<br />
* Use one CR2025(3V)lithium battery.<br />
* Remove the battery if the remote control is not to<br />
be used for a month or longer.<br />
* Do not short-circuit, disassemble or heat batteries.<br />
* Do not dispose of batteries into fire or flames.<br />
* Dispose of spent batteries properly.<br />
* Do not let the remote control fall onto the floor,<br />
where it may become jammed under the brake or<br />
accelerator pedals.<br />
6 [ / ][ / ][ / / / ]/ENTER<br />
[fast reverse/fast forward][previous track/next track]<br />
[upwards/downwards/leftwards/rightwards] and then<br />
press ENTER to access the selected item or confirm<br />
the selection in the system setting menu.<br />
7 TITLE<br />
In DVD playback mode, press the button to return the<br />
title menu (only in normal play).<br />
8 ANGLE<br />
Press to change the viewing angle inDVD mode.<br />
9 CLEAR<br />
Press the button to clear the erroneous number.<br />
10 VOL-/VOL+<br />
Press to adjust the volume.<br />
11 10+<br />
Press the button and number button to select<br />
track or chapter which sequence number is over 10.
12 RPT/SEEK-<br />
In playback mode, press RPT repeatedly to select<br />
repeat playback mode.<br />
In radio mode, press to scan stations downwards.<br />
13 (0-9)NUMBER BUTTON<br />
Press to select track chapter or preset stations.<br />
In radio mode, press the 7 TA/8 AF/9 PTY button to<br />
turn ON/OFF the TA/AF/PTY functions respectively .<br />
In radio mode, press the number button to select a<br />
corresponding preset station press and hold any one<br />
of the number buttons(from 1 to 6)to store you<br />
favourites station on.<br />
14 GOTO/<br />
In DVD mode, press GOTO buttonand cursor button<br />
to select TITLE CHAPTER AUDIO SUBTITLE<br />
ANGLE TT TIME CH TIME REPEAT TIME DISP.<br />
Then press ENTER button to setthe item.<br />
In VCD mode,press GOTO button and cursor button<br />
to select TRACK DISC TIME TRACK TIME<br />
REPEAT TIME DISP. Then press ENTER button to set<br />
the item.<br />
In CD mode,press GOTO button to select DISC TIME<br />
TRACK TIME TRACK.<br />
In MP4 mode, press GOTO button to display as follows<br />
"SELECT:_ _ _" "GOTO _:_ _:_ _".<br />
Then press 0-9 number buttons to set the track or<br />
time what you want.<br />
In bluetooth mode, press this button to function as<br />
what the button on your cell phone does.<br />
15 BACK<br />
Press to return to the previous menu in menu mode.<br />
16 MUTE<br />
Press to shut off the sound output.<br />
Press it again to resume previous sound level.<br />
17 SLOW- /SLOW+<br />
Press to playback slow motion forward or backward.<br />
In bluetooth mode, press these buttons to function<br />
as what the button on your cell phone does.<br />
18 MENU<br />
Press to display the menu: AUDIO/PICTURE/SETUP<br />
In DVD mode, press and hold to display ROOT MENU.<br />
19 PBC<br />
During VCD playback , press to turn on PBC .<br />
The disc menu(if available) will be displayed then use<br />
the up or down cursor to select the track to play.<br />
20 STOP<br />
Press to stop playing in playbcak mode .<br />
21 PLAY<br />
Press to resume the current playback.<br />
22 AMS/PROG<br />
In radio mode, long press to scan and store stations<br />
automatically. Press the button to scan the preset<br />
stations. In VCD/CD mode, press to set the program<br />
order to play.<br />
23 LOC/SUB-T<br />
In FM of radio mode, press to select local or distance<br />
reception. In DVD playback mode, press to change<br />
the subtitle language.<br />
24 RDM/SEEK+<br />
In playing mode, press to play tracksat random order.<br />
In radio mode, press to scan stations upwards.<br />
25 BAND/A-B<br />
In radio mode, press to select bands.<br />
In DVD/VCD mode, press the button to play the<br />
section of selected chapter/track repeatedly.<br />
26 ST/AUDIO<br />
In FM mode, press to select stereo or mono reception.<br />
In DVD mode, press to change the audio language.<br />
In VCD mode, press to select audio output mode.<br />
27 ZOOM/#<br />
Press to increase or decrease the picture in size.<br />
In bluetooth mode, press this button to function<br />
as what the button on your cell phone does.
RADIO OPERATION<br />
Listening to the radio<br />
1.Press the [MOD] button and select the radio mode.<br />
The frequency appears in the display.<br />
2.Press the [BAND] button and select the radio band.<br />
Each time the button is pressed, the radio reception<br />
band changes in the following order:<br />
FM1--FM2--FM3--MW1--MW2<br />
Manual tuning<br />
1.Press the [BAND] button and select the desired<br />
band(FM or MW).<br />
2.Long press the [ ] or [ ] button on the unit<br />
to switch to manual tuning and "MANUAL" displays<br />
on the screen.<br />
Press [ ] or [ ] to search the station in the<br />
direction of higher frequency or lower frequency.<br />
When it is not pressed for few seconds, "MANUAL"<br />
will disappear and manual tuning function is cancelled.<br />
Seek tuning<br />
1.Press the [BAND] button and select the desired<br />
band(FM or MW).<br />
2.Press the [ ] or [ ]button on the unit to tune<br />
in a station automatically.<br />
*Press SEEK-/SEEK+ button on the remote control<br />
also perform the same operation.<br />
Preset tuning - Recalling a preset station<br />
A total of 30 preset stations(18-FM,12-MW) are<br />
available in memory. Press [ ] or [ ] on the remote<br />
control to recall a preset station.<br />
*Press SET button on the unit also perform the same<br />
operation.<br />
Auto store<br />
Auto store is a function for storing up to 6 stations.<br />
If 6 stations with good reception cannot be received,<br />
the previous stored stations (if they exist) remain as<br />
they are.<br />
1.Press the [BAND] button and select the desired<br />
band(FM or MW).<br />
2.Hold down the [AMS] button for 2 seconds or<br />
longer.The stations with good reception are stored<br />
automatically.<br />
Manual store<br />
In radio mode, press the SEEK-/SEEK+ button on the<br />
remote control to scan station frequency downward<br />
or upward.When your desired station is searched,<br />
long press the digit[1-6] to store.<br />
Change sequence number of stored station<br />
press ME button repeatly to select sequence number<br />
you wan to set for stored station, and press the<br />
button for long time to confirm.<br />
Local / distant<br />
Press LOC button on the remote control, LOC<br />
appears on display and only local station can be<br />
received,press the button again,both<br />
RDS (RADIO DATA SYSTEM) OPERATION<br />
the RDS data are the PI,PS,TP,PTY,TA and AF DATA.<br />
PI: Program identification Code<br />
Code for identifying program.<br />
PS: Program Service<br />
Name Broadcast station name data expressed in<br />
alphanumerically character.<br />
TP: Traffic Program ldentification<br />
ldentification data for traffic information broadcasting<br />
station.<br />
TA: Traffic Announcement ldentification<br />
ldentification data showing traffic information is being<br />
transmitted or not.<br />
AF: Alternative Frequencies<br />
Frequency list of broadcasting station transmitting<br />
the same program.<br />
Setting AF MODE<br />
*Press AF button briefly to switch on/off AF mode.<br />
*Whenever AF is switched on, symbol AF appears<br />
on the display.<br />
*The tuner will return to Alternative Frequencies<br />
whenever the reception signals getting worse.<br />
*ALARM will be displayed when an emergency<br />
broadcasting is received; meanwhile sound output<br />
level will be adjusted to the preset output level<br />
automatically when the volume control is set at<br />
minimum.
Regional Program Operation<br />
*Press AF button for 1 second to switch on or off<br />
regional mode.<br />
*When region is on, the current listening program remains<br />
unchanged. When region is off, it allows the reception<br />
moves to the regional station.<br />
Using PTY to Select Program<br />
The PTY function allows you to search for stations<br />
with a particular Program Type. To select your program<br />
type, press the PTY button:<br />
PTY -PTY -PTY<br />
music group speech group off<br />
Now you can select the music type or speech type by<br />
rotating VOL knob onthe head unit or pressing and<br />
on remove control for your selection as listed in<br />
below table:<br />
PTY MUSIC group<br />
POP M, ROCK M<br />
EAST M, LIGHT M<br />
CLASSICS, OTHER M<br />
JAZZ M, COUNTRY M<br />
NATION M, OLDIES M<br />
FOLK M<br />
PTY SPEECH group<br />
NEWS,AFFAIRS,INFO<br />
SPORT,EDUCATE,DRAMA<br />
CULTURE,SCIENCE,VARIED<br />
WEATHER,FINANCE,CHILDREN<br />
SOCIAL,RELIGION,PHONE IN<br />
TRAVEL,LEISURE,DOCUMENT<br />
While selecting PTY engagement, its selection is<br />
implemented by preset button as described in notes.<br />
When PTY is selected, the radio starts to search<br />
corresponding PTY information, and stops of the<br />
corresponding PTY information is detected.<br />
If corresponding PTY information is not found,<br />
normal radio reception is resumed.<br />
Listening to Traffic Announcement<br />
Traffic announcement can interrupt CD play or radio<br />
listening when broadcast. Briefly press the TA button<br />
to select the TA mode on or off.<br />
When TA mode is on, you will hear the Traffic<br />
Announcement when broadcast.<br />
During traffic announcement, you can interrupt it by<br />
short press of TA button, without switching off the<br />
TA mode. By doing so, the set will return to the<br />
previous operating mode.<br />
MP3 OPERATION<br />
1.Playing a disc, an SD/MMC card or a USB<br />
device containing MP3 files<br />
Connect a USB device or press the REL button to<br />
open the front panel, insert a disc into the disc slot or<br />
SD/MMC card into the card slot. The unit will automatically<br />
switch on when a disc, card or USB device<br />
is inserted.<br />
*You can eject a disc by pressing button on the unit.<br />
**Once the SD card could not eject automatically after<br />
pressing ,just pull it out manually.<br />
2.Quick track selection<br />
When playing MP3 files, press the or button on<br />
the remote control to go to the next or previous track.<br />
3. Repeat playing<br />
When playing MP3 files, press the RPT button repeatedly<br />
on the remote control to select repeat mode:<br />
SINGLE, REPEAT ONE, REPEAT ALL. While in SINGLE<br />
mode, it will stop after the single track is played. While<br />
in REPEAT ONE mode, it will play one track repeatedly.<br />
While in REPEAT ALL mode, it will play all tracks<br />
repeatedly.<br />
Note: The RPT button on the main unit perform the<br />
same function.<br />
4.The number buttons<br />
Selecting any track directly by using Number button<br />
(0-9).For example, if you want to play the 23th track,<br />
you press 10+ button twice and then press button 3<br />
the corresponding track will be played.<br />
Note:<br />
* This function can only be operated using the remote<br />
control.<br />
* If you make a mistake, press CLEAR button to clear.<br />
5. Stop playing<br />
When playing Mp3 files, press the STOP button to<br />
stop playback.<br />
6. Pause playback<br />
When playing MP3 files, press the button on the<br />
main unit or the PLAY button on the remote control<br />
to switch between play and pause.<br />
Skip backward/forward/F.F/F.REW<br />
playback<br />
Press the or button on the remote<br />
control to perform fast rewind or fast forward.<br />
2 --4 --8 --16 --32 --<br />
Press the or button on the planet for long<br />
time as perform same function.
DVD/VCD OPERATIONS<br />
1. Loading a disc<br />
1.Press the [REL] button to access the disc slot behind<br />
the PANEL.<br />
2.Insert a disc into the Disc slot. The disc will be pulled<br />
into the unit automatically, and the unit switch to the DVD<br />
mode.<br />
*You can eject a disc by pressing button on the unit.<br />
*If the disc does not eject, press MODE button to<br />
switch to the radio mode, and press and hold<br />
button for 3 seconds<br />
2. Quick track selection<br />
During DVD/VCD/CDplayback, first press button to<br />
return to the beginning of the current track. Press this<br />
button again to play the previous track. Press the<br />
button to play the next track.<br />
* Press or button on the unit also perform the<br />
same operation.<br />
3.Repeat play<br />
During DVD/ VCD/CD playback, press the RPT button<br />
on the remote control repeatedly to select a repeat<br />
mode.<br />
In DVD mode,the option changes in following order:<br />
Chapter Title All<br />
off<br />
In VCD/CD mode,the option changes in following order:<br />
Track<br />
All<br />
Off<br />
Note:<br />
* The RPT button on the unit preforms the same function.<br />
* By default, repeat play is switched off.<br />
Fast forward/fast rewind playback<br />
Press the or button on the remote control to<br />
perform fast rewind or fast forward. Repeatedly press<br />
the button ,the options switch as follows order:<br />
2X 4X 8 X 16X 32X<br />
Press the or button on the unit for long time as<br />
perform same function.<br />
4.Number buttons<br />
Use the number button to select a track to play.<br />
Press 10+ button and the number button to select<br />
the track which sequence number above 10.<br />
Note: This function can only be operated by using the<br />
remote control.<br />
24<br />
5. Stop the playback<br />
Press STOP button to stop playing, then press PLAY<br />
button to play the current chapter, press stop button<br />
twice to stop playing completely, press PLAY button<br />
to play the beginning of disc.<br />
6. Pause the Playback<br />
Press PLAY button to suspend the playback,<br />
Press it again to return to normal playback.<br />
Pressing button on the head unit also perform<br />
the same operation.<br />
7.System switch<br />
In DVD/VCD playback, press the P/N button on the<br />
remote control to set the TV system to PAL, MULTI<br />
or NTSC.<br />
Note: This function can only be operated by using the<br />
remote control.<br />
8.Increase or decrease the size of the picture<br />
During DVD/VCDplayback, Press the ZOOM button<br />
to increase or decrease the picture size. Press the<br />
button repeatedly to change the zoom size. There<br />
are 6 option to select:<br />
2X 3X 4X 1/ 2 1/ 3 1/ 4<br />
Note:<br />
* This function can only be operated by using the<br />
remote control.<br />
9. Slow motion playback<br />
InDVD mode, press the SLOW+/SLOW- button to<br />
play slow forward or backward.<br />
The following speeds are available:<br />
1/ 2 1/ 4 1/8 1/16<br />
In VCD mode,press SLOW+ to play slow forward.<br />
1/ 2 1/ 4 1/8 1/16<br />
NORMAL<br />
Note: This function can only be operated by using<br />
the remote control.<br />
the display shows in following order:<br />
Title elapsed Title remain Chapter elapsed<br />
Display off<br />
NORMAL<br />
NORMAL<br />
10. On screen display<br />
In DVD mode, press DISP button on the remote control,<br />
Chapter remain
In VCD/CD mode, press DISP button on the remote<br />
control, the display shows in following order:<br />
Single elapsed<br />
Single remain<br />
Display off<br />
Total remain Total elapsed<br />
Note: This function can only be operated by using the<br />
remote control.<br />
11.Selecting an audio mode<br />
In VCD mode, press the AUDIO button on the<br />
remote control repeatedly to select an audio mode<br />
in the following order:<br />
LEFT MONO<br />
RIGHT MONO<br />
STEREO MIX-MONO<br />
12. PBC selector<br />
In VCD mode, press the PBC button. PBC playback<br />
starts and the menu of the entire disc appears on the<br />
TFT. Then you can select the desired track by using<br />
the up /down cursor buttons. To cancel the PBC<br />
function, press the PBC button again.<br />
Note: PBC playback is only compatible with discs<br />
which are version 2.0 or above.<br />
13. Programmed playback<br />
In VCD/CD mode, press the PROG button and the<br />
program menu will be displayed. Press the number<br />
buttons to select the track number. Use the direction<br />
buttons to move the cursor to START and press<br />
ENTER to start programmed playback.<br />
Move the cursor to EXIT and press ENTER to exit<br />
the programmed playback.<br />
Move the cursor to and press ENTER to go to<br />
the last page; move the cursor to and press<br />
ENTER to go to the next page. During this process,<br />
press STOP to cancel the programmed playback.<br />
Note: This function can only be operated by using<br />
the remote control.<br />
14. Changing the viewing angle(Multi-angle)<br />
With DVDs featuring multi-angle (scenes shot from<br />
multiple angles) recordings, press the ANGLE button<br />
to switch between viewing angles during playback.<br />
The viewing angle changes in the following order:<br />
ANGLE1-ANGLE2-ANGLE3<br />
25<br />
Note:<br />
* This function is operated by using the remote control.<br />
* This function is only available with DVDs featuring<br />
multi-angle recordings.<br />
* The symbol on a DVD packaging indicates that<br />
it features multi-angle scenes. The number in the<br />
symbol indicates the number of angles from which<br />
scenes were shot.<br />
* The ANGLE button does not function during fast<br />
forward/fast rewind or pause.<br />
15. Changing audio language(multi-audio)<br />
DVDs can provide audio playback with different<br />
languages. With DVDs featuring multi-audio recordings,<br />
you can press the AUDIO button to switch between<br />
language and audio systems during playback.<br />
Note:<br />
* This function can only be operated by using the<br />
remote control (for some DVDs, you need to<br />
change the language in the menu).<br />
* This function is only available with DVDs featuring<br />
multi-audio recordings.<br />
* The number in the symbol on a DVD packaging<br />
indicates the number of recorded languages/audio<br />
systems.<br />
16.Changing the subtitle language(multi-subtitle)<br />
With DVDs featuring multi-subtitle re-cording, press<br />
the SUB-T button to switch between subtitle languages<br />
during playback.<br />
Note:<br />
* This function can only be operated by using the<br />
remote control (for some DVDs, you need to change<br />
the language in the menu)<br />
.<br />
* This function is only available with DVDs featuring<br />
multi-audio recordings.<br />
* The number in the symbol on a DVD<br />
packaging indicates the number of recorded subtitle<br />
languages.<br />
17. Selecting different title (DVD mode)<br />
For DVD disc, you can press TITLE on the remote<br />
control to return to the title menu of the disc, and<br />
you can select different title upward or downward<br />
by using or .This function is operated by using<br />
the remote control.
18.Selecting root menu(DVD mode)<br />
For DVD disc, you can press MENU to select different<br />
root menus, and then press [ENTER]<br />
buttons to enter the sub-menus. With pressing<br />
buttons, and number buttons, and then<br />
ENTER button to select and enter what you desired.<br />
19.SETUP MENU<br />
In DVD/VCD/CDmode, press SETUP, the screen will<br />
display system setting picture, the user can select<br />
some relative constant parameters. The user also can<br />
set it as needed by moving the cursor and using<br />
buttons, and then press ENTER to execute the<br />
selecting or entering item. This function is operated<br />
by using the remote control.<br />
Notes:<br />
* The selections are the preferred options that will be<br />
chosen if they are available on a disc. If the disc that is<br />
inserted does not have the preferred option then the<br />
discs own preferencewill be used.<br />
* Regarding SETUP MENU, please refer to the following<br />
pages for more details.<br />
* Some functions varies depending on the types of<br />
models or formats of the disc.<br />
21. Auto switch to video<br />
When playing a DVD whilst driving, there is<br />
ATTENTION DRIVING display on the screen.<br />
This message warns you that you must stop the car<br />
and activate the hand break in order to access the<br />
video mode.<br />
22. Auto switch to reverse video<br />
When reversing the car, the screen of the unit will<br />
show reversing view automatically if a reversing<br />
camera is connected, and the sound will be shut off.<br />
26<br />
SYSTEM SETUP<br />
When you press SETUP button on the remote control,<br />
the setup menu will be displayed. It include General Setting,<br />
Audio Setup, Video Setup, Preference Setup, Password Setup<br />
and Exit Setup menu.<br />
1.Within the setup menu, you can use [ ][ ][ ][ ]<br />
buttons on the remote control to move the cursor, and then<br />
press the ENTER/PLAY button to make your selection.<br />
Press [ ] can return to the previous menu.<br />
2.To exit setup menu, you can select the exit setup menu or<br />
press SETUP button.<br />
1. GENERAL SETUP PAGE<br />
Setup TV screen format,video type and all DVD functions.<br />
1.1 TV DIS PLAY<br />
GENERAL SETUP PAGE<br />
TV DISPLAY<br />
OSD LANG<br />
SET TV DISPLAY MODE<br />
The TV Display which select the different ratio of display<br />
format and the screen of TV. There are various types of display<br />
on screen for different matches between Disc and TV.<br />
Note:<br />
1.No matter which display format is selected, a picture<br />
recorded in standard 4:3 format always displays in the 4:3<br />
aspect ratio.<br />
2. The display format of DVD titles may vary; please refer to the<br />
information that accompanies your specific DVD title.<br />
3. If the DVD title is recorded in 16:9 wide display format<br />
while the TV is a standard 4:3 screen, horizontal compression<br />
of the image will result.<br />
4.Some DVD titles may be recorded in special formats. In such<br />
cases, the DVD titles will always appear on the screen in their<br />
original format, regardless of which TV display format you select.<br />
1.2 OSD LANGUAGE<br />
On Screen Display(OSD)Language:Users can select the<br />
whole setup menu and on-screen display language.<br />
GENERAL SETUP PAGE<br />
TV DISPLAY<br />
OSD LANG<br />
SET OSD LANGUAGE<br />
PS NORMAL/PS<br />
<strong>ENG</strong><br />
NORMAL/LB<br />
WIDE<br />
WIDE SEQUOOZE<br />
PS<br />
<strong>ENG</strong> <strong>ENG</strong>LISH<br />
<strong>ITA</strong>LIAN
2. AUDIO SETUP PAGE<br />
2.1 SPEAKER SETUP PAGE<br />
AUDIO SETUP PAGE<br />
SPEAKER SETUP<br />
GO TO SPEAKER SETUP PAGE<br />
VIDEO SETUP PAGE<br />
COMPONENT<br />
COMPONENT<br />
PREFERENCE PAGE<br />
TV TYPE<br />
PAL<br />
AUDIO<br />
<strong>ENG</strong><br />
SUBTITLE<br />
OFF<br />
DISC MENU <strong>ENG</strong><br />
PARENTAL<br />
DEFAULT<br />
SET TV S TANDARD<br />
OFF OFF<br />
PAL<br />
MULTI<br />
NTSC<br />
SPEAKER SETUP PAGE<br />
DOWNMIX<br />
SET DOWNMIX MODE<br />
DOWNMIX MODE: sets front speakers to LT/RT STEREO,<br />
V SURR or 5.1CH.<br />
1.The first 3 settings (LT/RT, STEREO, V SURR) downmix the<br />
sound Signal for 2-Speakers.This setting allows you to enjoy<br />
a surround sound effect with onIy two speakers. For this reason<br />
a setup for additional speakers (described in the following sections)<br />
is disabled when DOWNMlX MODE is set to these settings. In<br />
this setting, the DIALOG is active.<br />
You have to set the DOWNMlX MODE to 5.1CH if you have<br />
selected the Dolby Digital connection and you would like to<br />
enjoy true Dolby Digital surround sound. In this setting, the<br />
CENTER, REAR speakers is active.<br />
3. VIDEO SETUP PAGE<br />
3.1 VIDEO QUALITY SETUP PAGE<br />
STR LT/RT<br />
STEREO<br />
V SURR<br />
4. PREFERENCE SETUP PAGE<br />
The preference setting is active only when no disc or<br />
stop completely, and the setting is effective on next time<br />
power on till exchanging the saved setting.<br />
4.1 TV TYPE<br />
TV TYPE: This player supports different screen output,<br />
including MULTI(Auto), NTSC, and PAL systems.<br />
lf your TV support only NTSC or PAL and had you inadvertently<br />
selected the wrong TV type, the screen will<br />
become flickering and black-and-white. In this case, you<br />
should press the SETUP button to set as following Note.<br />
27<br />
Note: How to Set the TV Type?<br />
You may switch the NTSC/PAL setting of the DVD<br />
player to match the video signal of your TV.<br />
The table below shows what kinds of disc are<br />
compatible with each setting (MULTI, PAL and NTSC)<br />
4.2 AUDIO<br />
AUDIO: Sets the preferred audio language as the default when<br />
playing DVD. (IF DVD support these languages)<br />
PREFERENCE PAGE<br />
TV TYPE<br />
AUDIO<br />
SUBTITLE<br />
DISC MENU<br />
PARENTAL<br />
DEFAULT<br />
PREFERENCE PAGE<br />
TV TYPE<br />
AUDIO<br />
SUBTITLE<br />
DISC MENU<br />
PARENTAL<br />
DEFAULT<br />
NTSC<br />
<strong>ENG</strong><br />
OFF<br />
<strong>ENG</strong><br />
PREFERRED AUDIO LANGUAGE<br />
NTSC<br />
<strong>ENG</strong><br />
OFF<br />
<strong>ENG</strong><br />
<strong>ENG</strong>LISH<br />
FRENCH<br />
SPANISH<br />
CHINESE<br />
JAPANESE<br />
KOREAN<br />
RUSSIAN<br />
THAI<br />
4.3 SUBTITLE<br />
SUBTITLE: Sets the preferred subtitle language asthe default when<br />
playing DVD.(if DVD support these languages)<br />
PREFERENCE PAGE<br />
TV TYPE<br />
AUDIO<br />
SUBTITLE<br />
DISC MENU<br />
PARENTAL<br />
DEFAULT<br />
NTSC<br />
<strong>ENG</strong><br />
OFF<br />
<strong>ENG</strong><br />
FRENCH<br />
SPANISH<br />
CHINESE<br />
JAPANESE<br />
KOREAN<br />
RUSSIAN<br />
THAI<br />
OFF<br />
PREFERRED SUBTITLE LANGUAGE<br />
4.4 DISC MENU<br />
DISC MENU: Sets the preferred menu language asthe default when<br />
playing DVD.(if DVD support these languages)<br />
PREFERRED MENU LANGUAGE<br />
<strong>ENG</strong>LISH<br />
FRENCH<br />
SPANISH<br />
CHINESE<br />
JAPANESE<br />
KOREAN<br />
RUSSIAN<br />
THAI<br />
4.5 PARENTAL<br />
PARENTAL: The parental control function works in conjunction with<br />
the different censorship classes assigned to DVDs. These classes help to<br />
control the types of DVDs that the family watches, There are up to 8<br />
censorship classes for DVDs.<br />
Note:<br />
The PARENTAL is changeable when 5.1 PASSWORD MODE set to OFF.<br />
After setting the level of parental control. please set the password as<br />
ON to perform the lock of changing.<br />
PREFERENCE PAGE<br />
TV TYPE<br />
AUDIO<br />
SUBTITLE<br />
DISC MENU<br />
PARENTAL<br />
DEFAULT<br />
NTSC<br />
Fre<br />
OFF<br />
Fre<br />
SET PARENTAL CONTROL<br />
1.KID SAF<br />
2.G<br />
3.PG<br />
4.PG 13<br />
5.PG R<br />
6.R<br />
7.NC 17<br />
8.ADULT
4.6 DEFAULT<br />
DEFAULT: Resets to all the manufacturer's original settings for this DVD<br />
player Press ENTER to perform the reset.<br />
PREFERENCE PAGE<br />
TV TYPE<br />
AUDIO<br />
SUBTITLE<br />
DISC MENU<br />
PARENTAL<br />
DEFAULT<br />
LOAD FACTORY SETTING<br />
5. PASSWORD SETUP PAGE<br />
5.1 PASSWORD MODE<br />
PASSWORD MODE: Sets the function operation to be ON for<br />
locking the parental function, and OFF for changing the parental level.<br />
There will be old password confirmation when ON/OFF interchange.<br />
The initial password is 136900.<br />
PASSWORD SETUP PAGE<br />
PASSWORD MODE ON<br />
PASSWORD<br />
CHANGE<br />
CHANGE PASSWORD<br />
NTSC<br />
Fre<br />
OFF<br />
Fre<br />
PASSWORD SETUP PAGE<br />
PASSWORD MODE<br />
PASSWORD<br />
PASSWORD MODE<br />
RESET<br />
ON ON<br />
OFF<br />
5.2 PASSWORD CHANGE<br />
PASSWORD CHANGE: you can change the password,<br />
please type 6 numerals as new password.<br />
6. EXIT SETUP MENU<br />
EXIT SETUP MENU<br />
OLD PASSWORD<br />
NEW PASSWORD<br />
CONFIRM PWD<br />
Use cursor to select this page and press ENTER<br />
button on the remote control to exit SETUP.<br />
OK<br />
28<br />
SETTING THE TV SCREEN SIZE<br />
Multi-aspect ratio suit to different TV screen size.<br />
Picture format<br />
on Disc<br />
4:3<br />
16:9<br />
Pan Scan<br />
4:3<br />
TV Screen Size<br />
16:9<br />
Letter-box Wide Screen<br />
Function supported by DVD discs<br />
There are many functions available on DVD discs<br />
and the functions vary per player and per manufacturer.<br />
2<br />
Regional code and signal system<br />
Dolby digital surround sound<br />
DTS surround<br />
Number of languages<br />
Subtitle languages<br />
Picture proportion modes<br />
Parent lock<br />
Angles for viewing<br />
Closed Caption
BLUETOOTH OPERATION<br />
The unit is compatible with Bluetooth internatianal<br />
standard wireless cummunication technology.You<br />
can place a hands-free call using a Bluetooth compatible<br />
mobile phone.<br />
*When you place a call,speak loudly and clearly<br />
*Shut the windows before calling<br />
*Certain voice or may sound unnatural ,depending<br />
on the person using the telephone or on telephone<br />
line conditons.<br />
*Depending on the mobile phone, you may not be<br />
able to use a hands-free phone.<br />
1. Connecting<br />
Bluetooth setting<br />
selecting B Tmode<br />
The connection is made<br />
The TFT display CONNECT<br />
Searching<br />
Inputting a pass code<br />
The pair code is8888<br />
*The Bluetooth setting is required for a mobile phone.<br />
,<br />
See the Owner s Manual of the mobile phone.<br />
*After paired ,the unit can connect with the mobile<br />
phone automatically. in valid range<br />
*After connected the mark BT is winking on<br />
underside of the display in any operation.<br />
*shut the Bluetooth function of mobile phone to<br />
disconnect.<br />
*In valid range touch PTY to reconnect again if<br />
the uint disconnect with mobile phone.<br />
.Placing a Call<br />
1.Placing a call by inputting a telephone number<br />
1.1 Inputting a telephone number and press to<br />
dial the telephone. OUT CALL and the telephone<br />
number you dialling is appear on the display.<br />
1.2. using mobile phone also Place a call, but the TFT<br />
,<br />
dont display the dialling telephone number.<br />
2.Placing a call by history<br />
2.1 Select BT mode, press SETUP button to enter<br />
the system menu.<br />
2.2you can use cursor to select a person from a list<br />
of received calls, dialled calls or missed calls and place<br />
a call by pressing.<br />
3.Pressing can place a call quickly to a telephone<br />
number you last dialled or received.<br />
*Pressing to hang up the call, and the call duration<br />
be displayed. The unit will be back to previous mode<br />
automatically.<br />
29<br />
Receiving a Call<br />
when a call is received, a received call sound rings ,<br />
and the received call is announced in the display.<br />
Press to starts the call.<br />
If ON is set in AUTO an incoming call is<br />
answered automatically after it is received.<br />
*The Bluetooth audio sounds is output from the<br />
auto sound box.<br />
*The unit audio playing will interrupted by hands-free<br />
phone. After calling, the unit will be back to previous<br />
modeautomatically.<br />
Diverting incoming call<br />
ln calling ,press to switch the mode to receive a<br />
call by using mobile phone, and press it again to<br />
return to hand-fress mode.<br />
Bluetooth Audio Function<br />
Audio information of a Bluetooth compatible mobile<br />
phone, portable player etc., is by wireless playback<br />
form the unit.<br />
1.Refer to connect to connect Bluetooth audio<br />
devices.<br />
2.Press PLAY button on the remote control to play,<br />
press or button to select track backward or<br />
forward<br />
3.Press PLAY button to pause the playing .<br />
Setting setup<br />
1.Press SETUP button to enter BT setup. Use the<br />
direction buttons to move the cursor to select item,<br />
and press ENTER button to confirm, press BACK<br />
button to resume the previous menu, press MENU<br />
button to exit BT MENU. The item display as follows:<br />
PRESET/MISSED/RECEIVE /AUTO/DIALED/DEFAULT<br />
2.Selectting PRESET item, you can reserve 6 telephone<br />
numbers byuse number button<br />
3.in PRESET/RECEIVE/DIALED/MISSED item, press<br />
or button to select telep-hone number stored,<br />
and press button to dial telephone number you<br />
selected.<br />
RECEIVE: A received calls list<br />
DIALED:A dialed calls list<br />
MISSED:A missed telephone number list<br />
3.In AUTO item, press VOL- or VOL+button on the<br />
remote control(rotate the VOL knob on the panel)<br />
to select auto or manual answer.<br />
4.In DEFAULT, press SEEK+/SEEK- button on the remote<br />
control or VOL+/VOL- button on the unit to resume the<br />
unit to the initial status. The preset telephone number<br />
and call logo will be cleared.
INSTALLATION<br />
Notes<br />
1.Before finally installing the unit, connect the wiring<br />
temporarily, making sure it is all connected up properly,<br />
and the unit and the system work properly.<br />
2.Use only the parts included with unit to ensure proper<br />
installation. The use of unauthorized parts can cause<br />
malfunctions.<br />
3.Consult with your nearest dealer if installation<br />
requires the drilling of holes or other modifications<br />
of the vehicle.<br />
4.Install the unit where it does not get in the driver's<br />
way and cannot injure the passenger if there is a<br />
sudden stop.<br />
5.The semiconductor laser will be damaged if it over-<br />
heats, so don't install the unit anywhere hot--for<br />
instance, near a heater outlet.<br />
6.If installation angle exceeds 30 from horizontal, the<br />
unit might not give its optimum performance.<br />
The cords must not cover up the area shown in the<br />
figure below. This is necessary to allow the amplifires<br />
to radiate freely.<br />
30<br />
INSTALLATION<br />
Install the unit<br />
After inserting the holder into the dash-board,<br />
select the appropriate tabs according to the<br />
thickness of the dash-board material and bend them.<br />
(Install as firmly as possible using the top and bottom<br />
tabs. To secure, bend the tabs 90 degrees.)<br />
Dash board<br />
Rubber bush<br />
Screw<br />
Insert the supplied extraction keys into the unit, as<br />
shown in the figure, until they click into place.<br />
Keeping the keys.<br />
Pressed against the sides of the unit, pull the unit out.
TROUBLE SHOOTING<br />
Common problems<br />
Symptom Cause Remedy<br />
Power doesn't switch ON .The unit doesn't operate. Leads and connectors are incorr ectly connected Confirm once more that all connections<br />
are correct<br />
A fuse has blown<br />
Noise and other factors are causing the built-in<br />
microprocessor to operate incorrectly<br />
Fix the problem causing the blown fuse and replace<br />
the old fuse with a new one of the same capacity<br />
Reset the unit<br />
Operation with the remote control isn't possible The remote control operation mode is incorrect Switch to the correct remote control mode<br />
Battery power is low Load new batteries<br />
Some operations are prohibited with certain discs Check using another disc<br />
Playback is not possible. The disc is dirty Clean the disc<br />
The loaded disc is a type this unit cannot play Check w hat type the disc is<br />
Non compatible video system disc is loaded Change to a disc compatible to your video system<br />
There's no sound Connections are incorrect. Check connections<br />
The prohibited mark is displayed and<br />
operation is not possible<br />
The picture stops (pauses)and the unit cannot be<br />
operated<br />
With some discs,96kHz output is prohibited. Switch the output setting to 48 Khz<br />
The unit is performing still F.FWD or F.REV playbackThere is no sound during still F.FWD ,F.REV playback<br />
The operation is prohibited for the disc This operation is not possible<br />
The operation is not compatible with the disc's<br />
organization<br />
Reading of data has become impossible during<br />
playback<br />
This operation is not possible<br />
There's no sound Volume level is low The volume level is low Raise the volume level<br />
There's audio and video skipping This unit is not firmly secured Secure this unit firmly<br />
After pressing once start playback once more<br />
The picture is stretched the aspect is incorrect The aspect setting is incorrectfor the display Select the appropriate setting for your display<br />
When the ignition switch is turned ON (or turned This unit confirms whether a disc is loaded or not This is a normal operation<br />
to ACC), the motor sounds<br />
31
Problem during DVD playback<br />
Symptom Cause Remedy<br />
Playback is not possible The loaded disc has a different region number<br />
from this unit<br />
Dialog language (and subtitle language) can not<br />
be switched.<br />
Problem during Video CD playback<br />
The DVD playing does not feature multiple language<br />
recordings.<br />
You can only switch between options indicated in<br />
the disc menu<br />
Replace the disc with one featuring the<br />
same region number as this unit<br />
You cannot switch among multiple languages if<br />
they aren't recorded on the dis.<br />
Switch using the disc menu<br />
No subtitles are displayed The DVD playing does not feature subtitles Subtitles are not displayed if they are not<br />
recorded on the disc<br />
Playback is not with the audio language and subtitle<br />
language settings selected in SET UP MENU<br />
The picture is extremely unclear/distorted and dark<br />
during playback<br />
The PBC(playback control) menu display cannot be<br />
called up.<br />
You can only switch between options indicated<br />
in the disc menu<br />
Switch using the disc menu<br />
The DVD playing does not feature dialog or subtitles Switching to a selected language is not possible if<br />
in the language selected in the SET UP MENU the language selected in the SET UP MENU is<br />
not recorded on the disc<br />
The disc features a signal to prohibit copying (some Since this unit is compatible with the copy guard<br />
discs may have this)<br />
analog copy protect system. when playing a disc<br />
that has a signal prohibiting copying the picture<br />
may suffer from horizontal stripes or other<br />
imperfections when viewed on some displays.<br />
This does not mean this unit is malfunctioning.<br />
Symptom Cause Remedy<br />
The video CD playing does not feature PBC<br />
PBC is switched OFF Switch PBC ON<br />
Repeat play and track/time search are not possible PBC is itched ON Switch PBC OFF.<br />
32<br />
This operation is not possible with video Cds<br />
not featuring PBC
SPECIFICATION<br />
GENERAL<br />
power requirement ------------------------------------------------------------------------------- 12VDC(10.8~16V)<br />
grounding system -------------------------------------------------------------------------------------------negative type<br />
max: current consumption ----------------------------------------------------------------------------------------- 15 A<br />
max: power output ---------------------------------------------------------------------------------------------- 40Wx4<br />
load impedance -------------------------------------------------------------------------------------------- 4 4-8<br />
dimensions----------------------------------------------------------------------------------------------178X166X50MM<br />
weight----------------------------------------------------------------------------------------------------------------1.55KG<br />
DVD PLAYER<br />
SN ratio ----------------------------------------------------------------------------------------more than 70dB(1KHz)<br />
dynamic range ---------------------------------------------------------------------------------more than 80dB(1KHz)<br />
distortion --------------------------------------------------------------------------------------------------less than 0.2%<br />
video output --------------------------------------------------------------------------------------- 1.0Vp--p+0.2V/75<br />
audio output (RCA) ---------------------------------------------------------------------------- 2.0Vrms+0.3V 10K<br />
FM TUNER<br />
frequency range ------------------------------------------------------------------------------------------ 87.5~108MHz<br />
usable sensitivity -----------------------------------------------------------------------------------------------------10dB<br />
SN ratio ----------------------------------------------------------------------------------------------------- 55dB(mono)<br />
distortion -----------------------------------------------------------------------------------------------------0.5%(mono)<br />
stereo separation ---------------------------------------------------------------------------------- 30dB(65dBu,1kHz)<br />
MW TUNER<br />
frequency range ----------------------------------------------------------------------------------------- 522~1620 kHz<br />
usable sensitivity ---------------------------------------------------------------------------------------------------- 30dB<br />
signal-to-noise ratio ------------------------------------------------------------------------------------------------ 50dB<br />
33
E4 10R<br />
021298<br />
DICHIARAZIONE DI CONFORMITÀ<br />
SI DICHIARA CHE:<br />
L'apparecchio: Autoradio Bluetooth con<br />
Monitor 3" e riproduttore CD/DVD marca<br />
TREVI<br />
modello MDV 6110 BT<br />
risponde alle prescrizioni dell'art. 2 comma 1<br />
del D.M. 28 agosto 1995, n° 548<br />
Coriano, 30 Ottobre 2008<br />
TREVI S.p.A.<br />
Via Ausa 173, 47852 Coriano (Rn) Italia<br />
MADE IN P.R.C.<br />
TREVI S.p.A. - Via Ausa 173, 47852 Coriano (Rn) Italy - Tel. 0541-756420 - Fax 0541-756430 - E-mail: info@trevi.it - www.trevi.it